Connected Product Foundation User Guide
The Connected Product Foundation (CPF) is a prebuilt and production-ready template that significantly reduces the development time and complexity for your Losant applications. The CPF provides a wide variety of out-of-the-box functionality required by most IoT products and services. This includes multitenancy, user management, device management, data visualization, event management, and white labeling.
This guide provides an in-depth overview of the CPF features and administration tools.
Getting Started With the CPF
The CPF is an Application Template and is intended to be the starting point for new Losant applications. To get started with the CPF, create a new application and choose the Connected Product Foundation template.
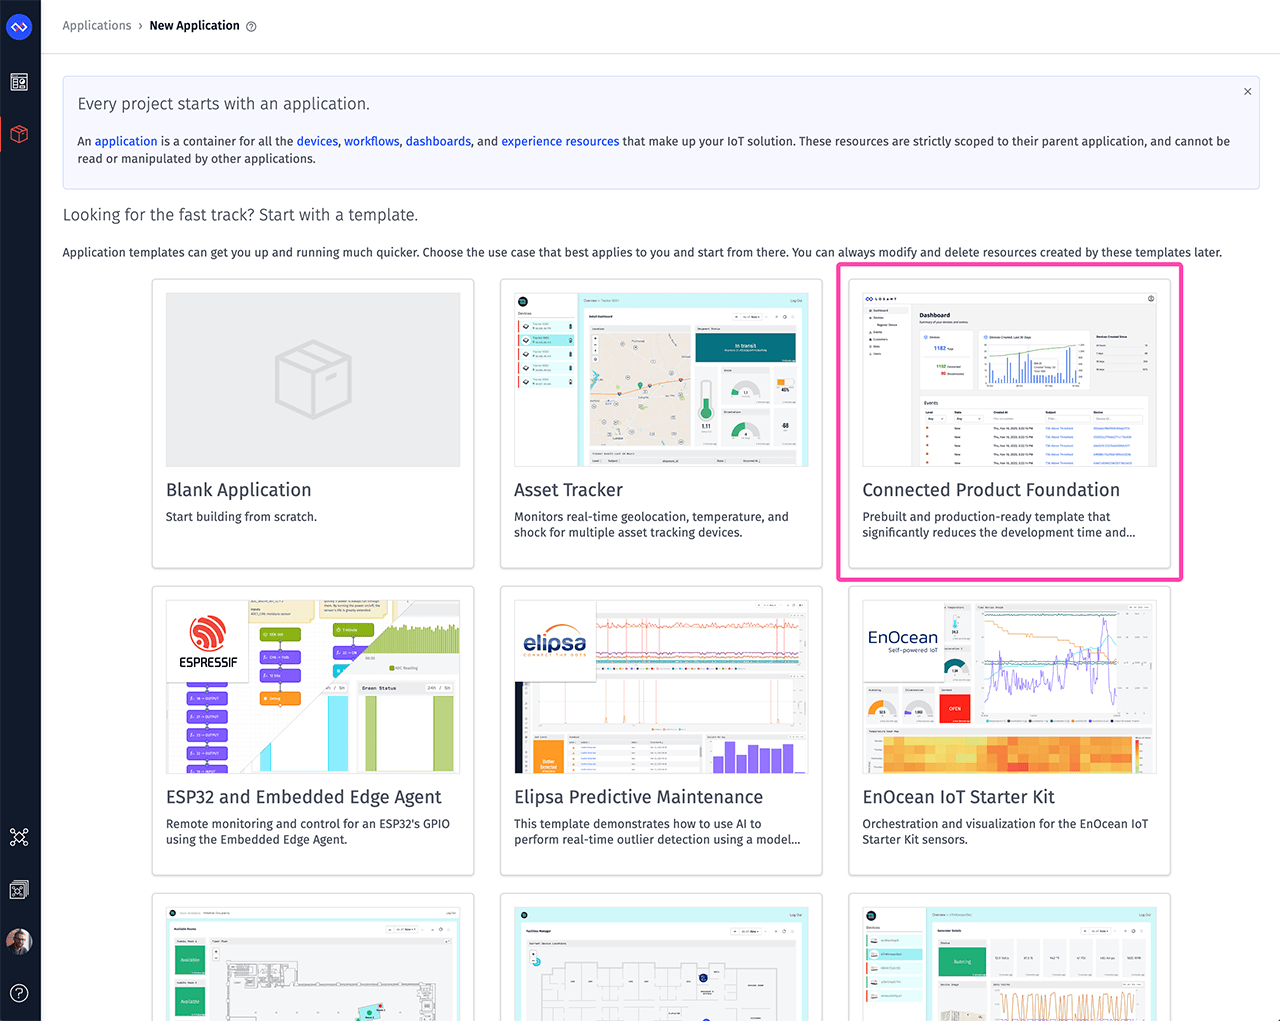
The CPF template provides example devices, dashboards, users, groups, and a simulation workflow to generate device data. This allows you to immediately begin exploring the CPF features. Once your application has been created, review the application’s README for the intial setup instructions.
System Administrators
One of the first tasks you must do is create one or more system admins. You can think of system admins as your “super users”. They are the only users that can configure the CPF using the built-in admin pages.
The CPF template creates an example system admin for you (system-admin@example.com). This user can be used for evaluation purposes, however we recommend removing this user and creating a new system admin for production deployments.
Set a Password for the Example System Admin
To log in as the example system admin, you must first provide the user a password using the Losant platform:
- Navigate to your application’s list of Experience Users.
- Select the
system-admin@example.comuser. - Click the Change Password checkbox.
- Provide a secure password.
- Click the Save User button.
Create a New System Admin
For production deployments, we recommend removing the example system admin and creating one with your own email address:
- Navigate to your application’s list of Experience Users.
- Click Add User.
- Provide an email and password.
- Assign the user to the
Systemgroup. - Add a User Tag with the key set to “cpf_role” and the value set to “admin”.
System administrators are the only users managed through the Losant platform directly. All other users (e.g. your customers) are created and managed using the CPF’s interface.
Log In to the CPF
The CPF can be accessed using your application’s default Experience Slug (e.g. <YOUR_APPLICATION_ID>.onlosant.com). Once you navigate to that URL with your browser, you’ll automatically be redirected to the CPF’s log in page (/login). The CPF uses email and password for authentication.
The CPF supports custom domains. The CPF works the same regardless of what domain is being used. If you have a custom domain configured, simply navigate to that domain instead of your default application slug.
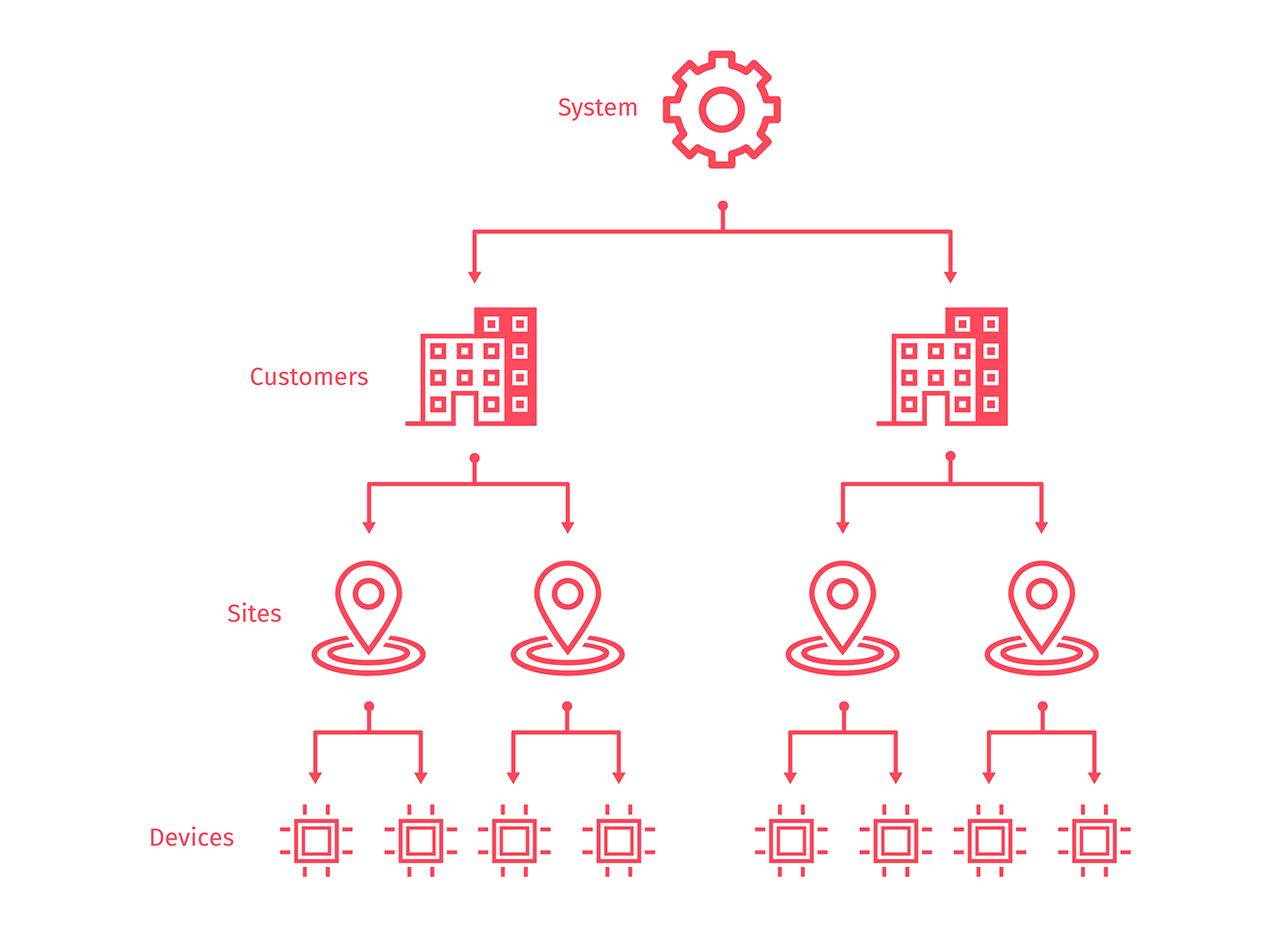
Customers and Sites
The CPF is a multi-tenant application where each tenant is referred to as a “customer”. Customers have one or more sites and sites have one or more devices. Therefore, before any devices can be registered, you must have at least one customer with at least one site.
The CPF template creates example customers and sites for you that you can use for evaluation purposes. For production deployments, you’ll create new customers and sites as you onboard your own tenants.
Only system administrators can create customers. To create a customer:
- Log in to the CPF as a system administrator.
- Select Customers from the left navigation.
- Click the Add Customer button.
- Provide a name (and any other optional fields).
- Click the Submit button.
Sites can be created by system admins and customer admins. This allows your customers to manage their own sites and devices. More details about user types and roles can be found in the Users section.
- Select Sites from the left navigation.
- Click the Add Site button.
- Provide a name (and any other optional fields).
- Select the customer to which this site will belong from the Customer dropdown. Only system admins will see the customer dropdown. If a customer admin is creating their own site, this value will default to their own customer ID.
- Click the Submit button.
Customers and sites cannot be deleted if they have any child resources. To delete a customer or a site, you must first delete or reassign any child devices, users, and sites.
Users
Except for system administrators, all users are created and managed directly through the CPF interface. Users can belong to either a customer or a site. A user can only belong to a single group (i.e. you cannot assign a single user to two different customers). The CPF’s built-in multitenancy ensures users will never see customers, sites, or devices outside of their location in the tenancy hierarchy.
Customer Users
A user assigned to a customer will have access to all sites and devices that are children of that customer. Customer users can be created by system admins or customer admins. When you onboard a new customer, you will typically create at least one customer admin so they begin managing their own sites and devices.
To create a customer user:
- Select Users from the left navigation.
- Click the Add User button.
- Provide an email address (and any other optional fields).
- Assign the user to a customer using the Customer dropdown. Only system admins will see the customer dropdown. If a customer admin is adding their own user, this value will default to their own customer ID.
- Select —All Sites— from the Site dropdown. This option assigns the user to the customer instead of a specific site.
- Select the desired Role. See User Roles for more details.
- Click the Submit button.
Site Users
A user assigned to a site will have access to all devices that are children of that site. Site users can be created by system admins, customer admins, or site admins.
To create a site user:
- Select Users from the left navigation.
- Click the Add User button.
- Provide an email address (and any other optional fields).
- Assign the user to a customer using the Customer dropdown. Only system admins will see the customer dropdown. If a customer admin is adding a user, this value will default to their own customer ID. If a site admin is adding a user, this value will default to the site’s parent customer ID.
- Assign the user to a site using the Site dropdown. Only system admins and customer admins will see this dropdown. If a site admin is adding a user, this value will default to their own site ID.
- Select the desired Role. See User Roles for more details.
- Click the Submit button.
New User Passwords
Newly created users do not have passwords for their accounts. You must instruct new users to navigate to the CPF’s password reset page (/forgot-password) to set their password. The CPF will display instructions directly in the interface with the link to the forgot password page after the user is created.
It’s very common for password reset email to be treated as junk/spam/quarantine, so ensure the user checks those locations for the reset email.
By default, the password reset email is sent from the platform’s built-in Email Node, which is intended for evaluation purposes only. Emails sent from this node are often marked as spam. For production use cases, it’s highly recommended you switch to the SendGrid Node using your own SendGrid account.
User Roles
The CPF supports three user roles: viewer, editor, and admin. From a high level, viewers have readonly access, editors can view and modify existing resources, and admins can create new resources. Higher roles expand on lower roles (i.e. an editor can do everything a viewer can do).
Viewer
Viewers have the following permissions:
- Readonly access to device properties, data explorer, dashboards, and events.
- Readonly access to child sites.
- Cannot create any resource (customer, site, user, or device).
- Cannot change the properties for any resource.
- Cannot edit events (add comments or change status).
- Cannot see the details for any other user, even if those users are assigned to the same site or customer.
Editor
In addition to viewer permissions, editors have the following permissions:
- Can modify all device properties. Customer users with the editor role can change which site a device is assigned to.
- Can modify child site properties.
- Can edit events (add comment and change status).
- Cannot see the details for any other user, even if those users are assigned to the same site or customer.
Admins
In addition to viewer and editor permissions, admins have the following permissions:
- Can view, add, and remove users. Admins are the only role that have access to users.
- Can move users to different sites (for customer users with the admin role). Only system admins can move users between customers. Site admins cannot move users out of their own site.
- Can add and remove devices.
- Can add and remove child sites.
Registering Devices
The CPF has built-in support for device registration and provisioning. Only site, customer, and system admins can add and delete devices. See User Roles for details.
There are two required steps before devices can be registered in the CPF:
- Create one or more Device Recipes.
- Configure which Device Tags are available for your users to view and modify.
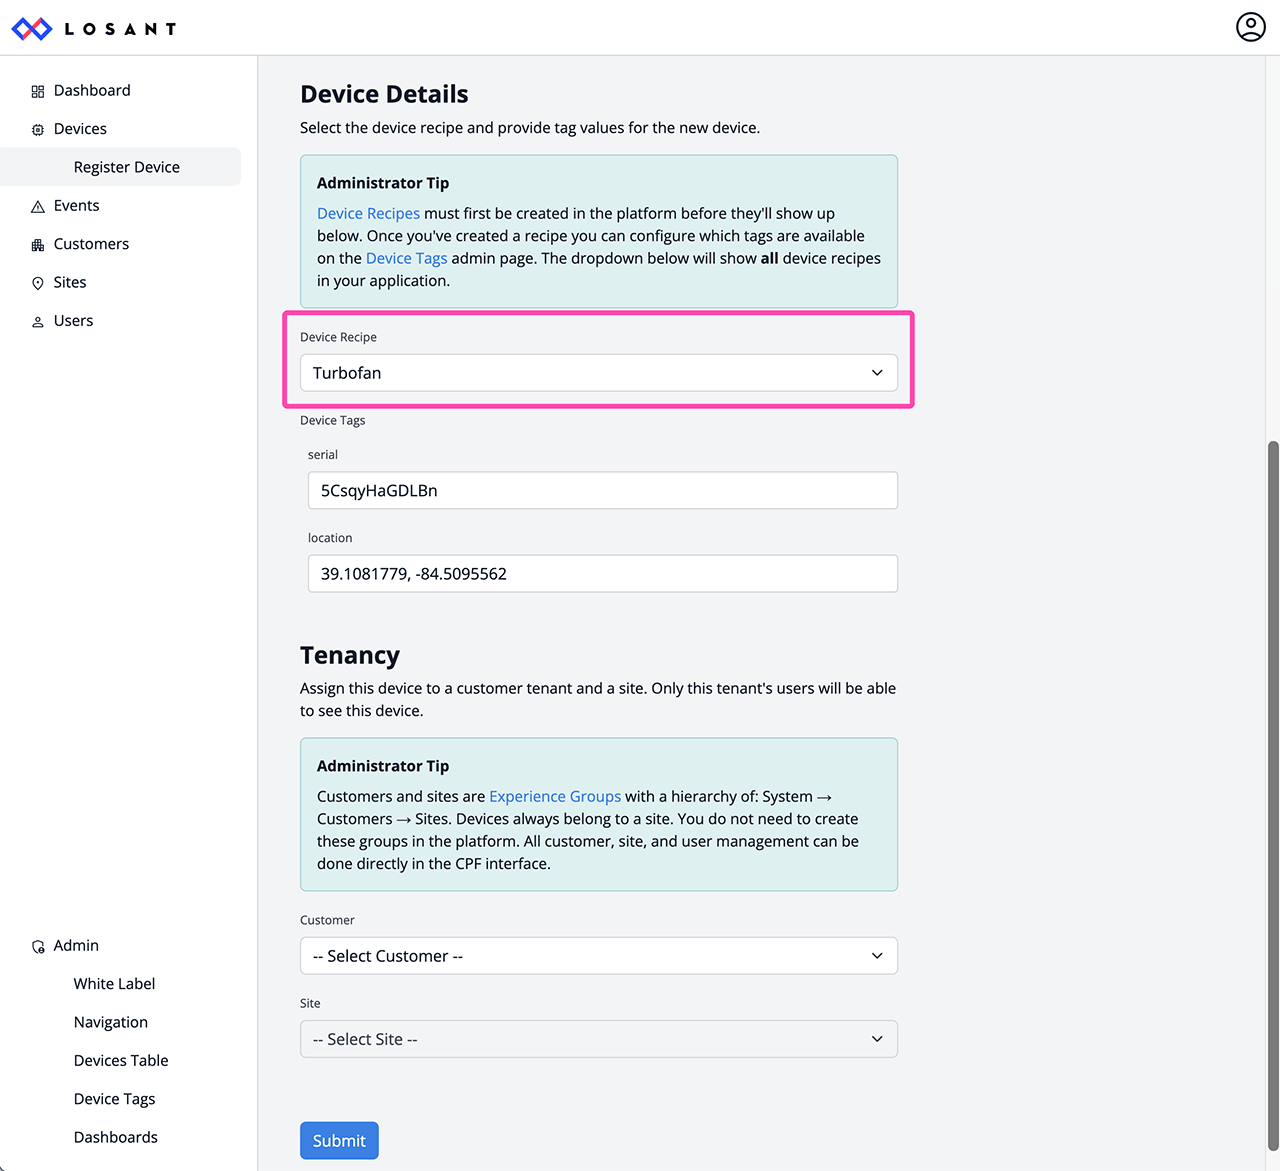
Device Recipes
Device recipes are required when creating devices using the CPF. The recipe controls which Device Attributes are created and which Device Tags should appear on the interface for the user to set.
Device recipes are created directly in the Losant platform. Once a recipe is created, it will appear in the Device Recipe dropdown on the device registration page within the CPF.
Configure Device Tags
All device tags are opt-in. This means that, by default, no user will be able to view or edit any device tag that has not been configured using the Device Tags admin page. When creating new devices, users will be able to set values for any tags that exist on the recipe and you’ve configured to allow. If your devices do not have any tags that you wish to expose to users, this step can be skipped.
Device Registration Page
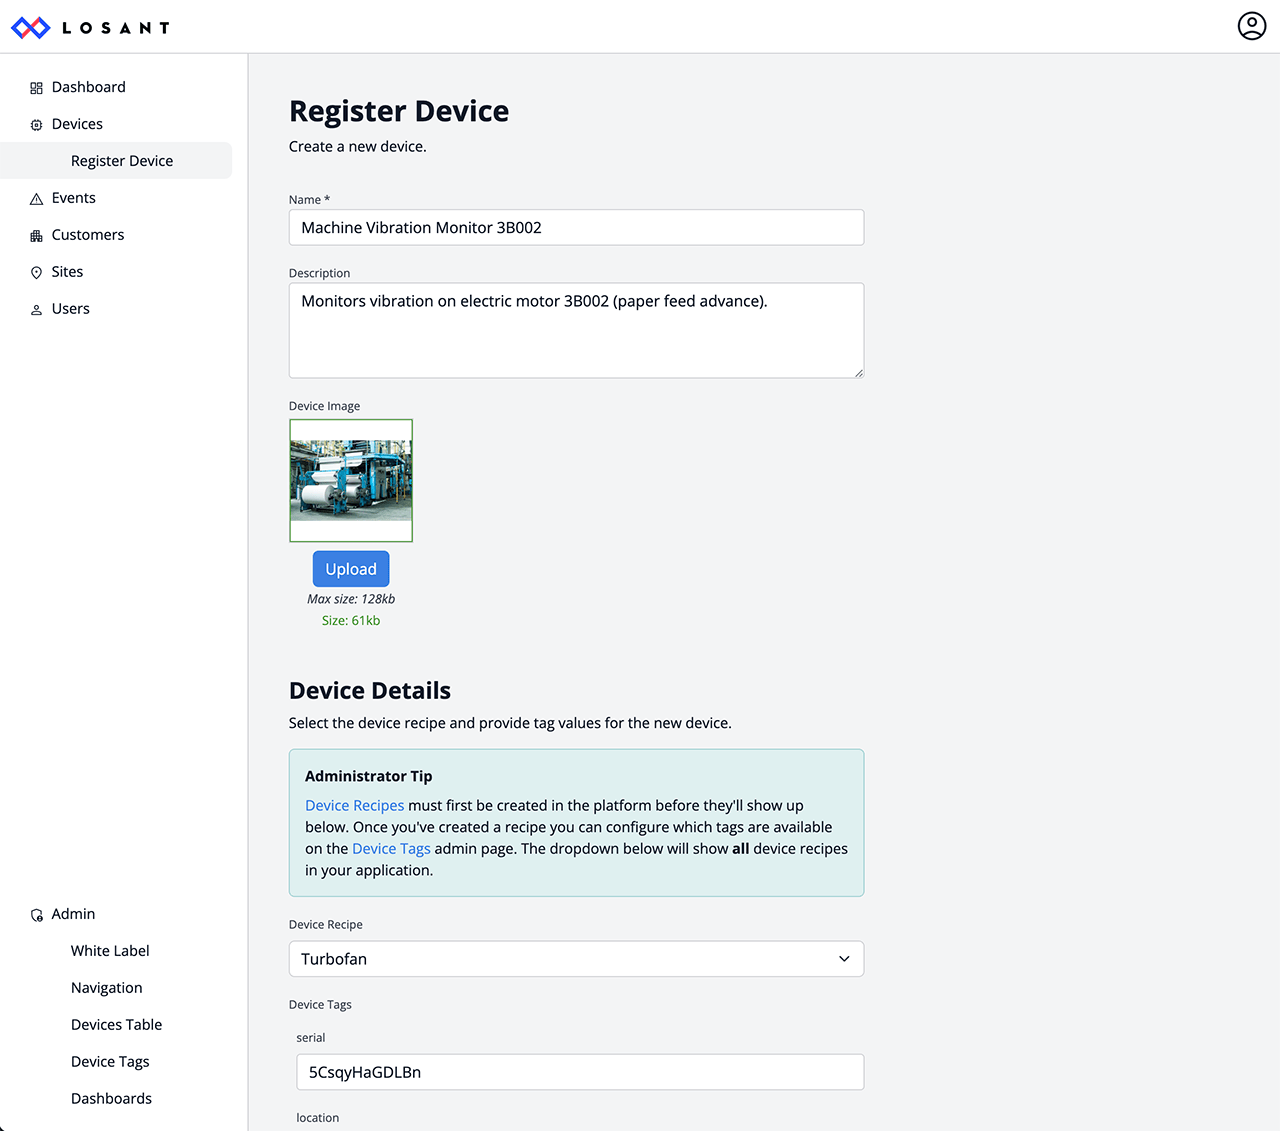
Now that you have device recipes and device tags configured, you can begin adding devices to your application. Select Register Device from the left navigation. If you do not want users to register their own devices, you can hide this link using the Navigation Admin Page.
Devices require a name, recipe, and must be assigned to a site.
The customer dropdown only appears for system admins. If a customer admin registers a device, the customer value will default to their own customer ID. Customer admins can choose to assign a device to any site that is a child of their customer. If a site admin registers a device, that device will automatically be assigned to their own site.
The CPF does not offer features to help receive device data once the device is created. This is because every application is unique when it comes to device connections and how data is received by the platform.
It is intended that the workflows powering the CPF be modified to perform additional actions specific to your application. For example, the workflow handling device creation can be modified to invoke a third-party device management API to complete any required onboarding steps.
Devices Table
The devices table is available to all users. The columns that appear can be customized using the Devices Table Admin Page. The most common customization will be to add columns for your specific device tags and attributes.
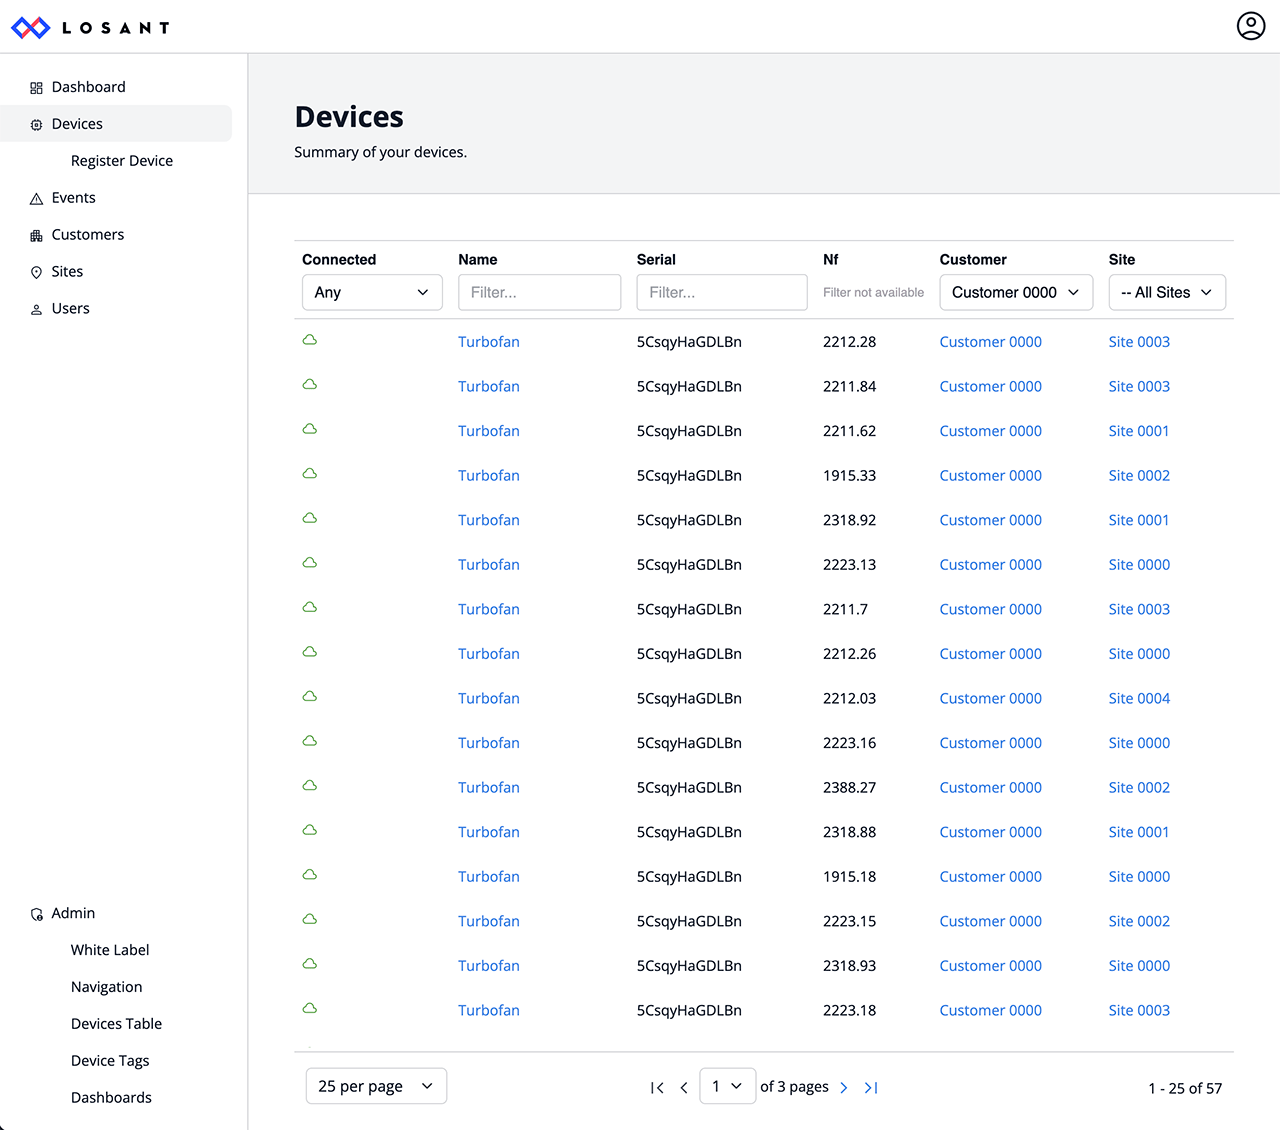
Devices can be filtered using the input controls in the table’s header. Devices can be filtered by every property except attribute data. Tag columns and the device ID column are filtered by exact matches. The device name column filters by a case-insentive “contains” match. For example, a device named “Hello” will be found by filtering by “h”, “llo”, “eLLo”, etc.
The customer and site dropdowns will automatically be hidden based on the user. If the user is assigned to a customer, they will not see the customer dropdown, and the site dropdown will only include sites that are children of that customer. If the user is assigned to a site, they will see no dropdowns. Only system admins will see both the customer and site dropdowns.
Dashboards
When a device is selected from the devices table the CPF displays a dashboard based on the device recipe that was used to create that device. Dashboards must first be created in the platform. The CPF does not provide the ability for your users to create or modify dashboards.
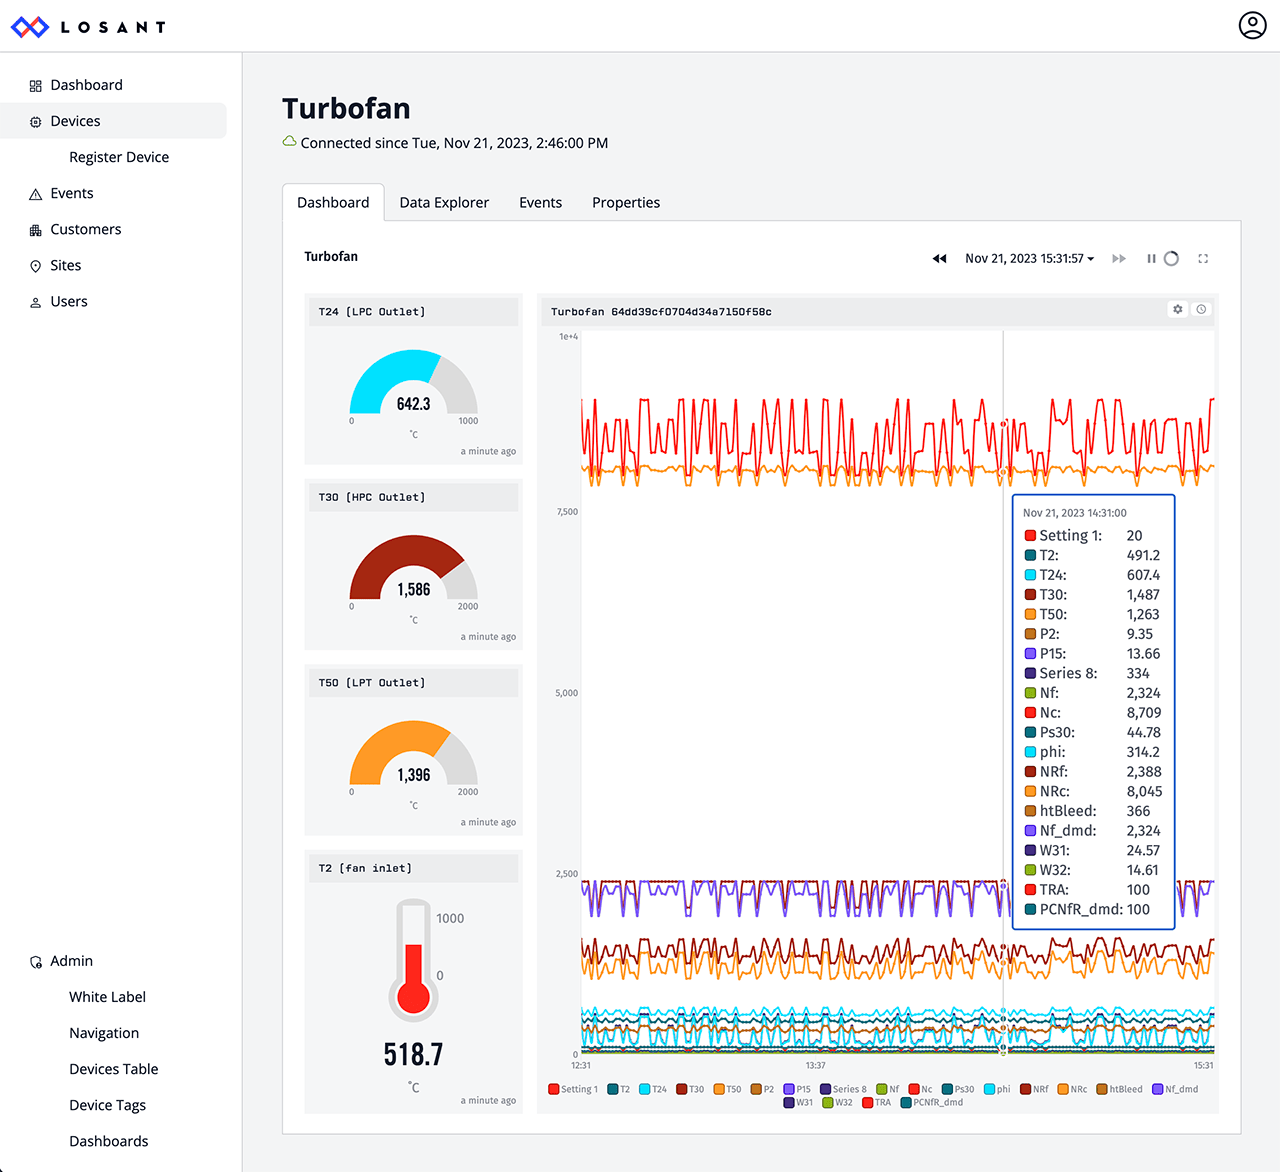
Associating device recipes to dashboards is done using the Dashboards Admin Page.
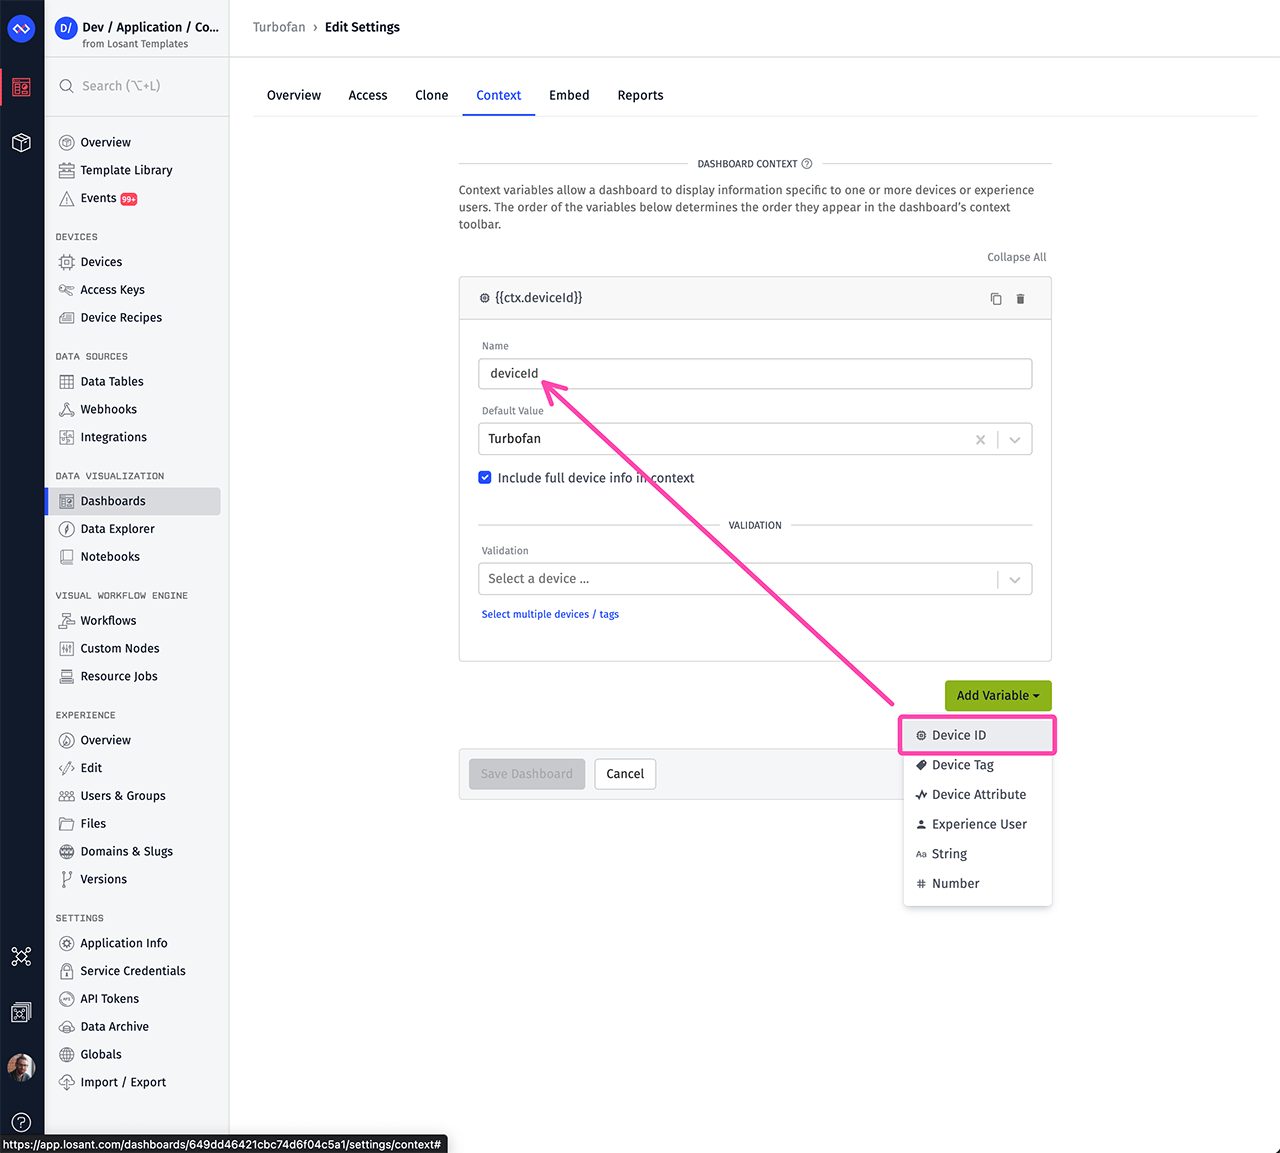
Required Dashboard Context
The CPF is designed around the concept of large collections of similar devices all sharing the same dashboard. To facilite this, dashboards for the CPF must have a Device ID Context Variable named deviceId. When a device is selected, the CPF will find the matching dashboard based on the device’s recipe and automatically set the deviceId context variable.
Data Explorer
The data explorer is available to all users. When a device is selected from the devices table, the data explorer can be accessed by selecting the Data Explorer tab.
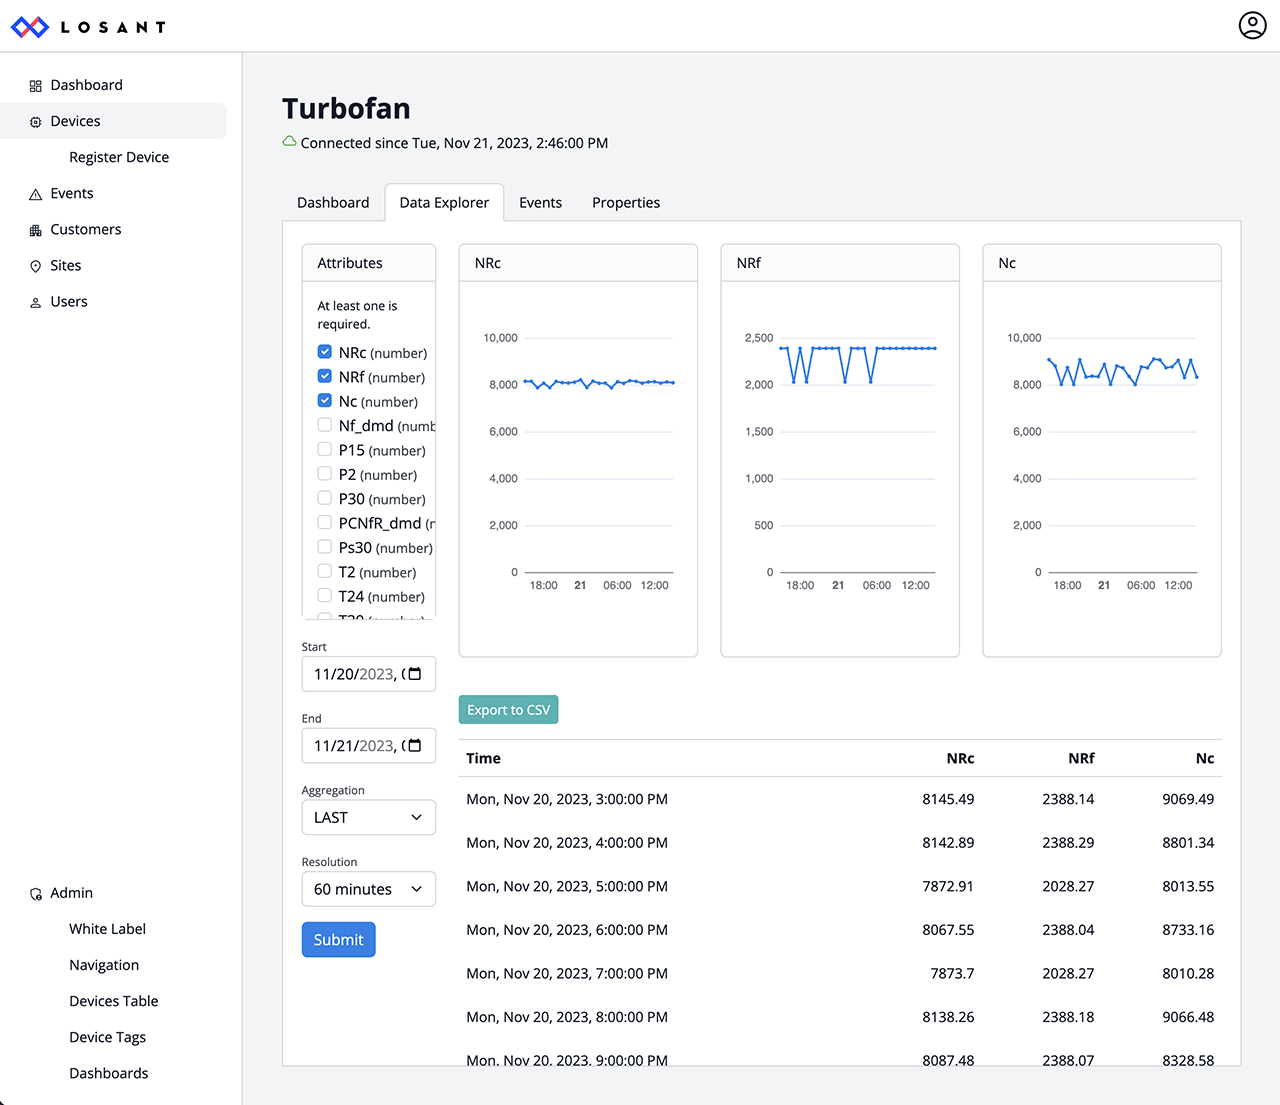
The data explorer gives your users a flexible way to explore device data. To use the data explorer:
- Select one or more attributes to display. Every attribute on the device will be listed.
- Select a Start and End time.
- Select an Aggregration. The aggregation controls how multiple data points in the same Resolution bucket are combined. For example, if the resolution is “60 Minutes” and your device reports data every 15 minutes, this will result in 4 data points per bucket. If you select “MEAN” as the aggregation, those 4 data points will be averaged together.
- Select a Resolution. This controls how far apart you data points will be on the resulting graph. If your underlying data has multiple points in the same resolution bucket, they will be combined based on your selected Aggregation.
The data explorer has a maximum amount of data it can display. If you receive an error that indicates there is too much data, you must select fewer attributes, reduce the time range, or increase the resolution.
Data displayed in the data explorer can be saved as a CSV file using the Export to CSV button. The resulting CSV file will have a $time column in Date time string format (UTC time zone) and a column for each selected attribute. The date column displayed directly in the data explorer is localized based on your browser’s time zone setting.
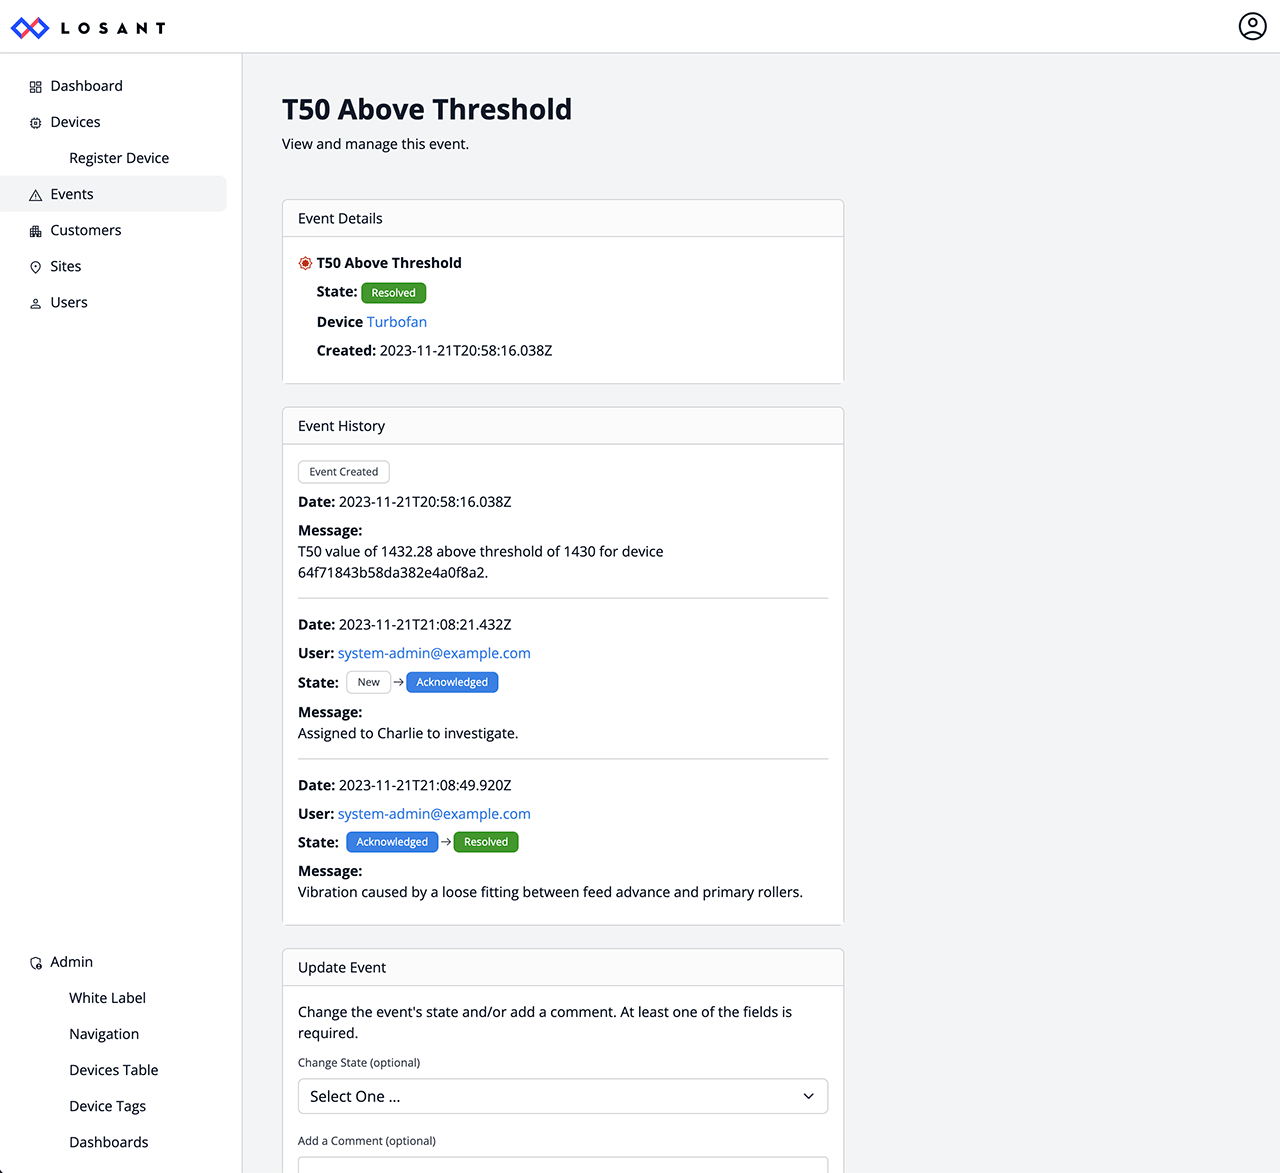
Events
The CPF directly integrates Losant Events. Events are a way to track and monitor exceptional occurrences. Events are typically created by workflows monitoring device data for anomalous conditions. For example, if an engine temperature exceeds a critical threshold, an event can be created to track this failure.
The CPF template contains a workflow that generates sample events based on simulated device data. To generate your own events, you must create workflows that check your specific error conditions. For events to show up in the CPF interface, they must be associated with a device.
Events follow the same security rules as the device they are associated with. This means that if a user can see a device, they can also see events associated with that device. No users can see events for devices outside of their location in the tenancy hierarchy.
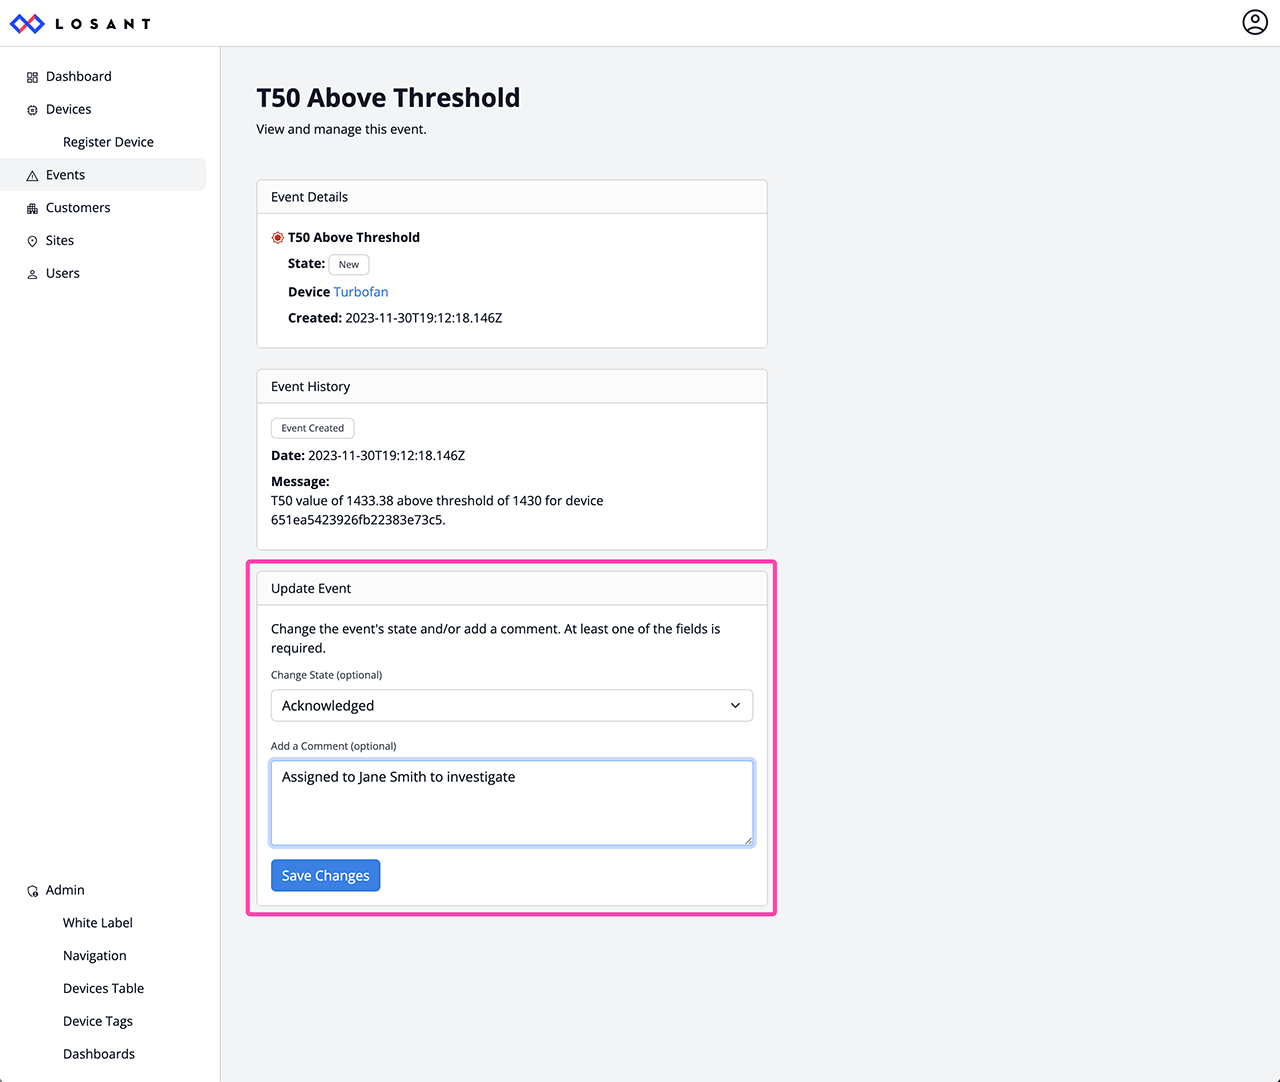
The event details page displays the entire event history as it progresses through its lifecycle. If the user is an editor or an admin, they can modify the event’s state and/or add comments. Whenever an event is modified, a new entry in the history will be added and associated with the user who made it.
Admin Pages
The CPF offers built-in customizability through its admin pages. These pages can be used to change the look, feel, and behavior the CPF without writing code.
White Label
The white label admin page controls the look and feel of your application.
Some white label changes may not immediately be reflected due to your browser’s cache. If changes do not immediately appear, a simple browser refresh may be required to see the changes.
Logos
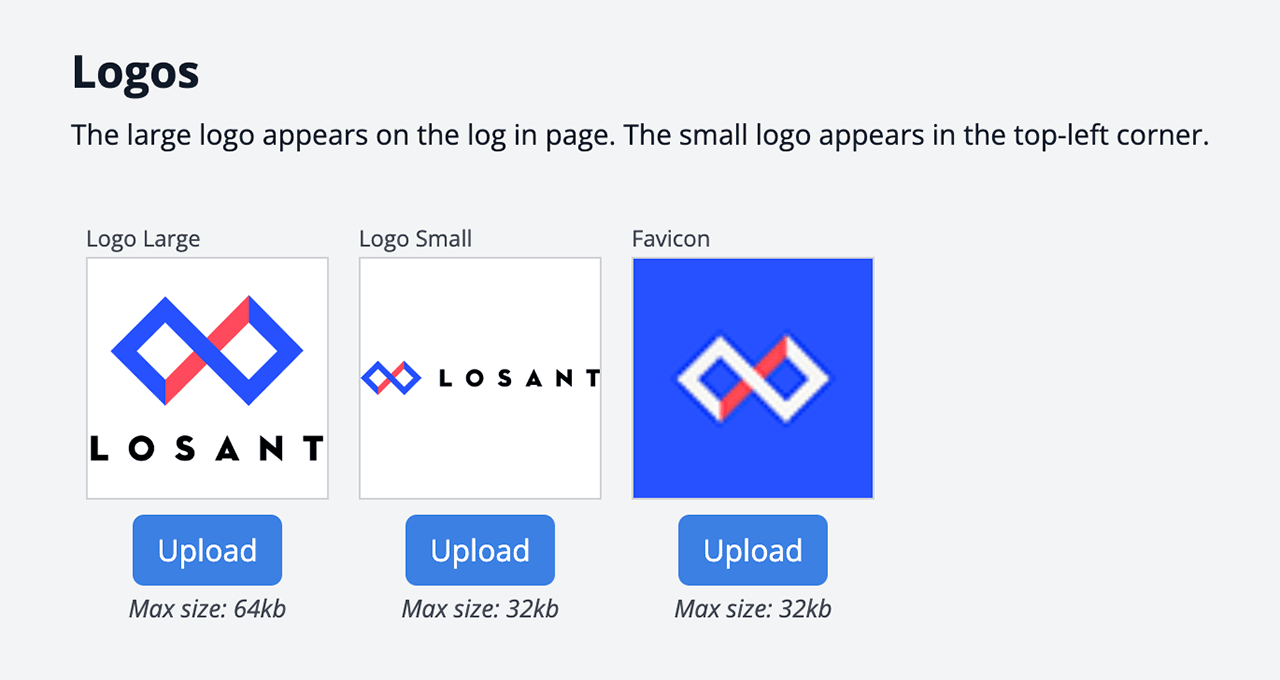
The CPF uses three different logo files. The supported image types are PNG, JPEG, and ICO (favicon).
- Logo Large: this logo is displayed on the login page, 404 (not found) page, 500 (error) page, and the forgot password page. The recommended image height is 240px. The image can be any width, but will look the best if the width and height are approximately the same. The recommended format is PNG with a transparent background. There should no padding or whitespace in the image itself (the logo should touch the edges of the image).
- Logo Small: this logo appears in the top-left corner above the left navigation. The recommended image height is 48px. If you want your company or product name in the top-left corner, it must be included in this image. The recommended format is PNG with a transparent background.
- Favicon: this logo appears in the browser tab. The recommended dimensions are 48x48px. Favicons are commonly ICO files, however all image types are supported by modern browsers.
Company Name
The company name section controls how the name of your company or product appears throughout the CPF.
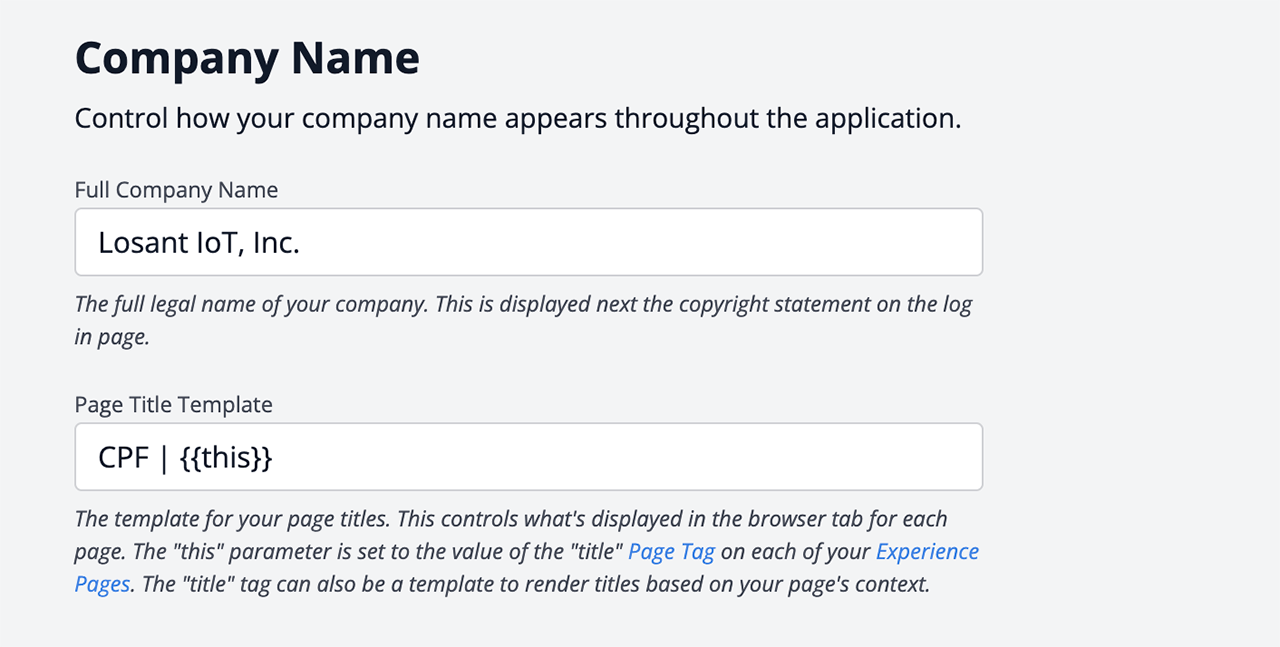
- Full Company Name: this is displayed next to the copyright statement in the footer of the login page, 404 (not found) page, 500 (error) page, and the forgot password page.
- Page Title Template: this controls the title of the page that’s displayed in the browser tab. The
{{this}}parameter will be replaced by the value of thetitlepage tag on the page being viewed. Thetitlepage tag itself can be a template using any available context. For example, thetitlepage tag for the device details page is set to{{pageData.device.name}}. This results in the final page title being “CPF | My Device Name”. The minimum recommended change is to replace “CPF” with your company or product name.
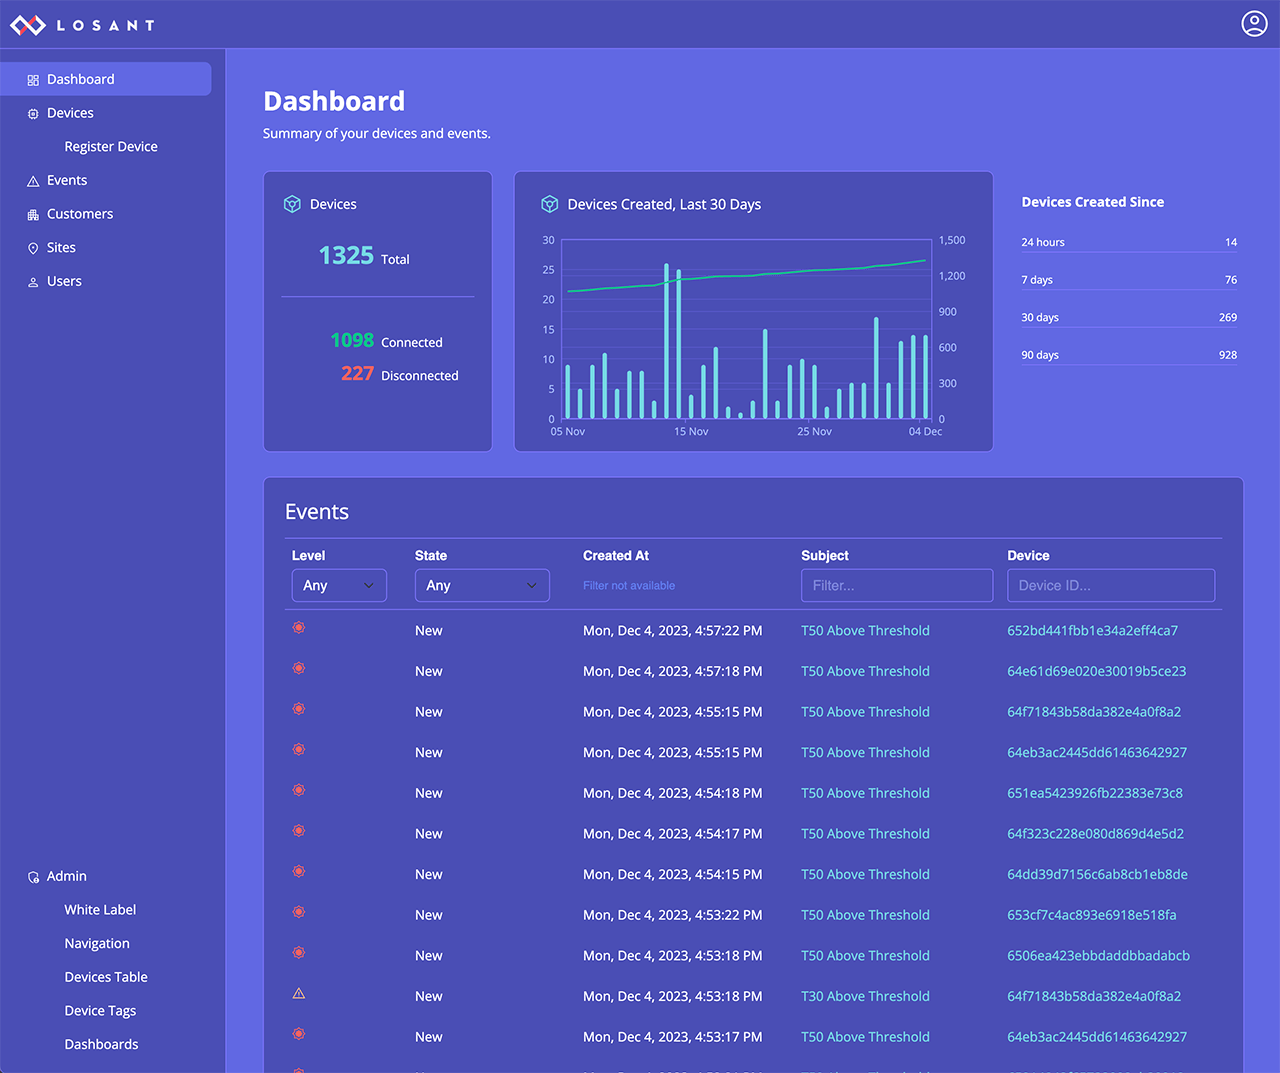
Colors
Every CPF color can be customized using the colors section.
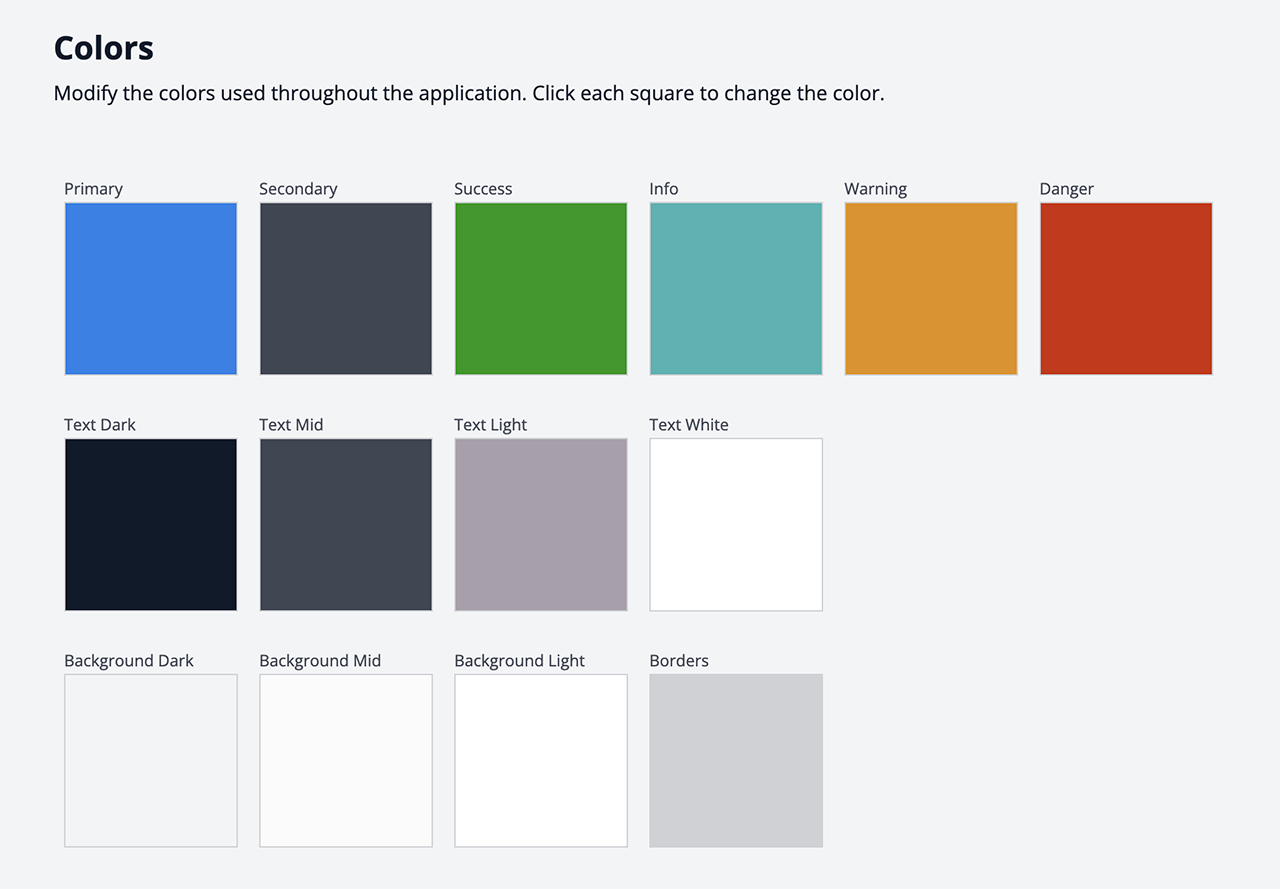
The diagram below shows where many of the colors are used. Several colors are used for multiple purposes. For example, “danger” is used for error icons, delete resource buttons, and error alerts.
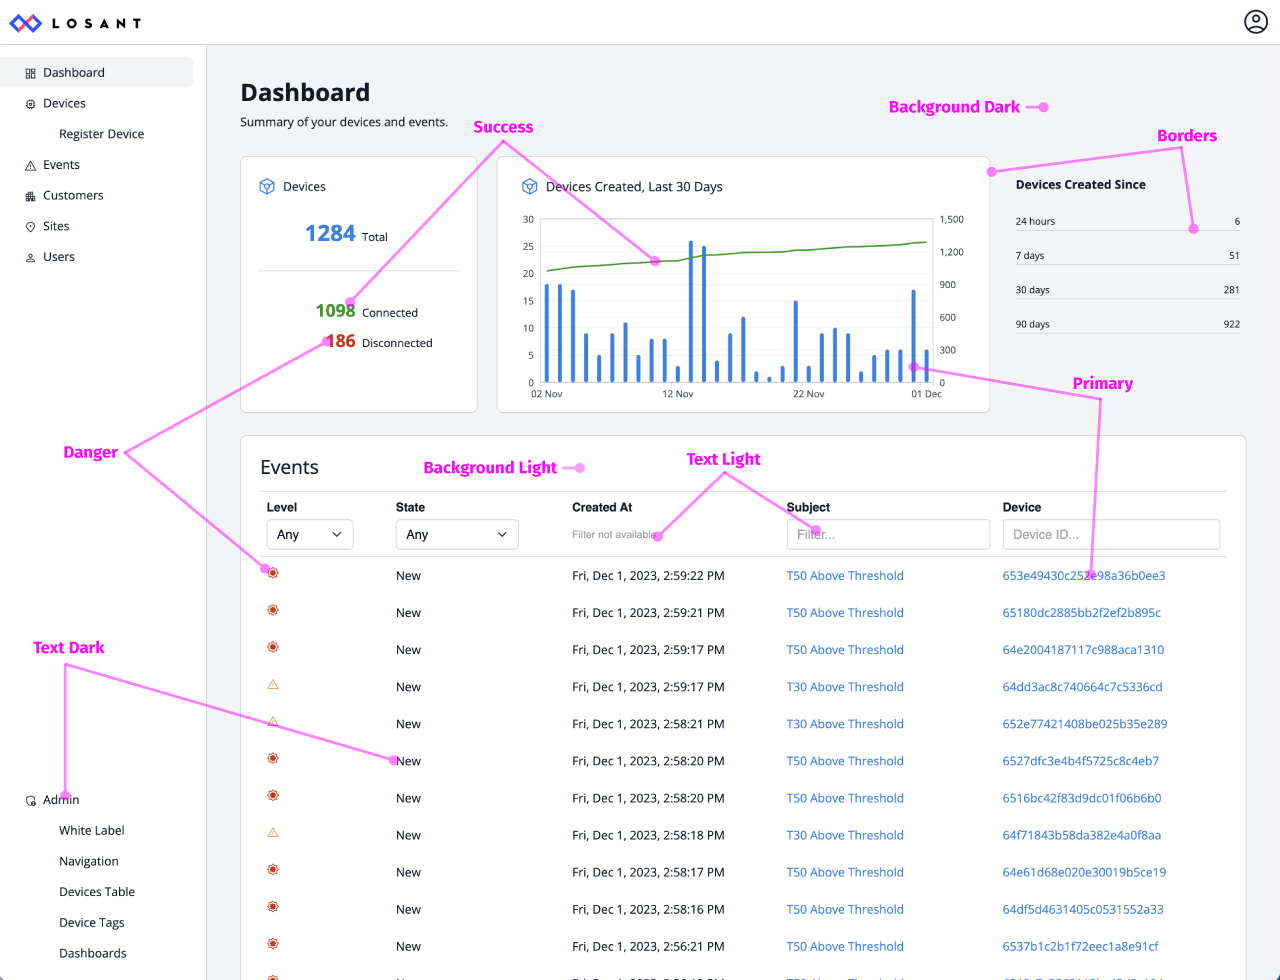
- Primary: link text, general icons, submit/save buttons
- Secondary: unused by the CPF, but this is a core color in the underlying CSS framework, which may be used if modifying the CPF implementation
- Success: add resource buttons, connected icon, success messages
- Info: no results messages, general info messages, administrator tip messages
- Warning: warning event icon
- Danger: disconnected icon, error event icon, delete buttons, error messages
- Text Dark: body text
- Text Mid: input field labels, help text under input fields
- Text Light: form placeholder text
- Text White: button text
- Background Dark: body background, disabled input fields
- Background Mid: section header backgrounds
- Background Light: nav background, input fields background, table backgrounds
- Borders: all borders including input fields
These colors provide a high degree of customizability over the look of your application, including the ability to make dark themes.
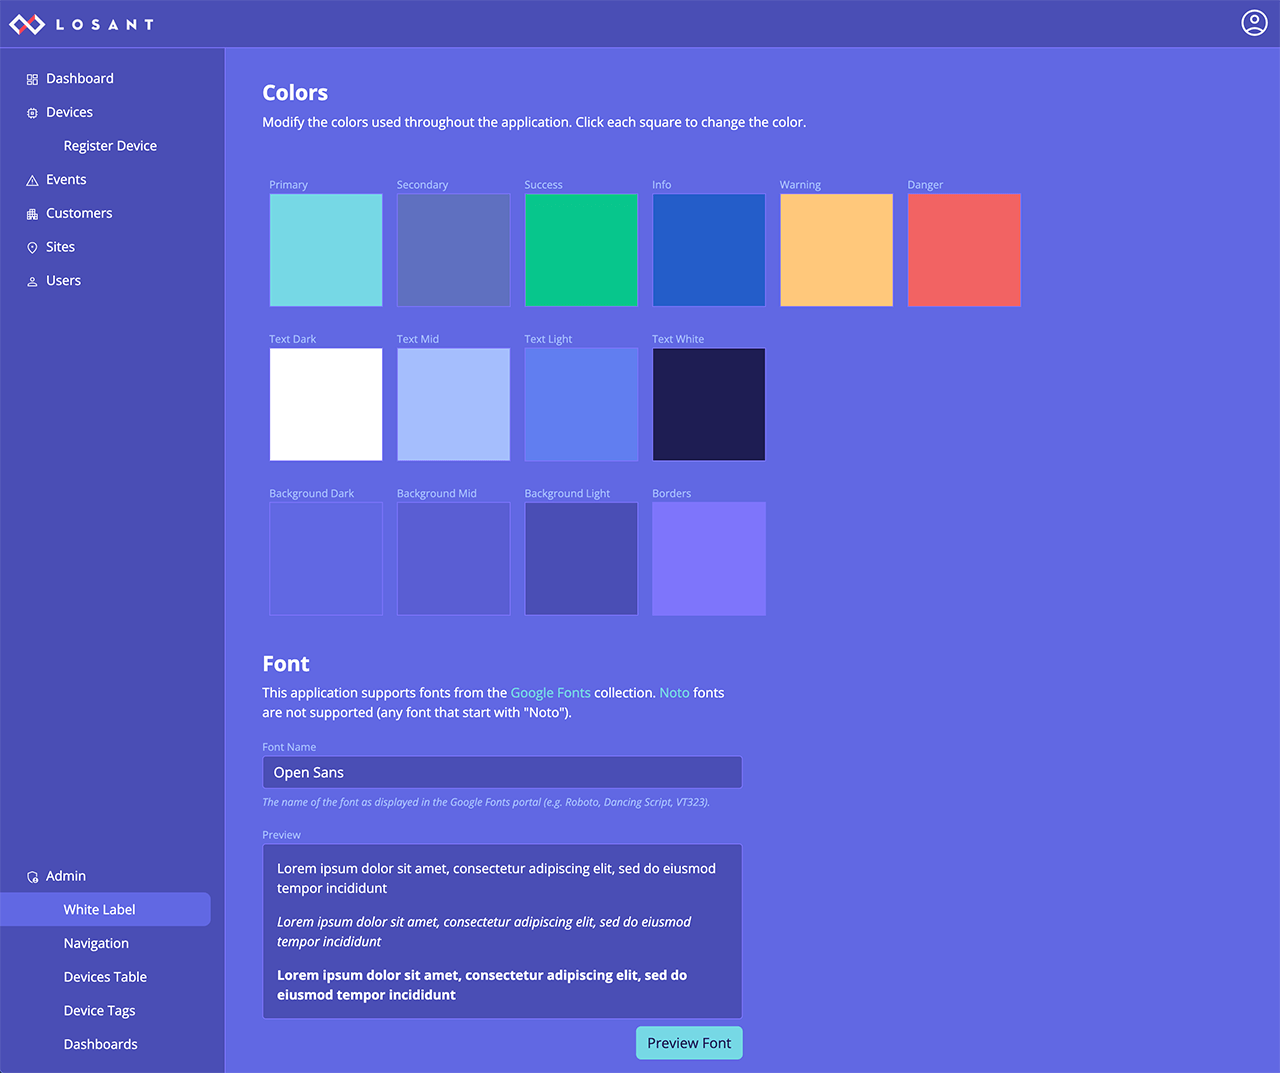
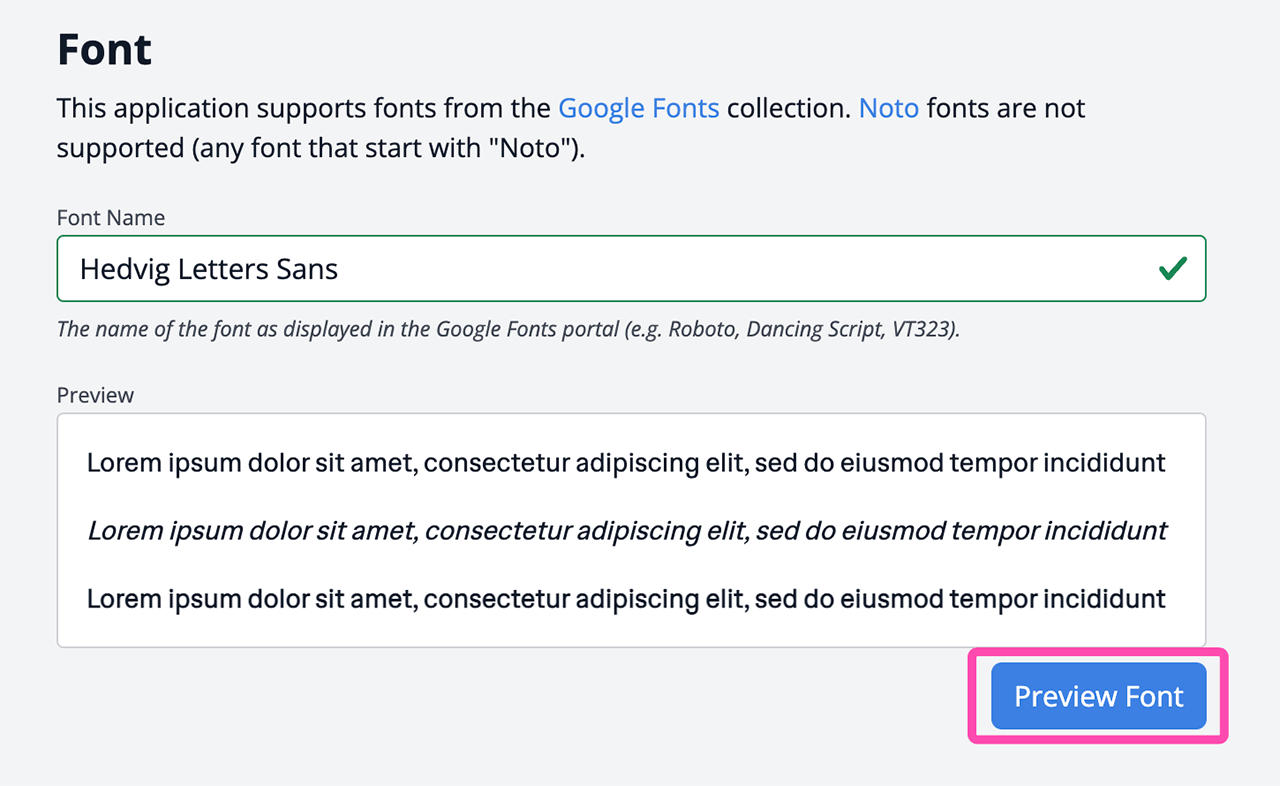
Font
The CPF integrates Google Fonts and this section allows you to set the font for your application. Google Fonts are royalty free and can be used for any commercial purposes.
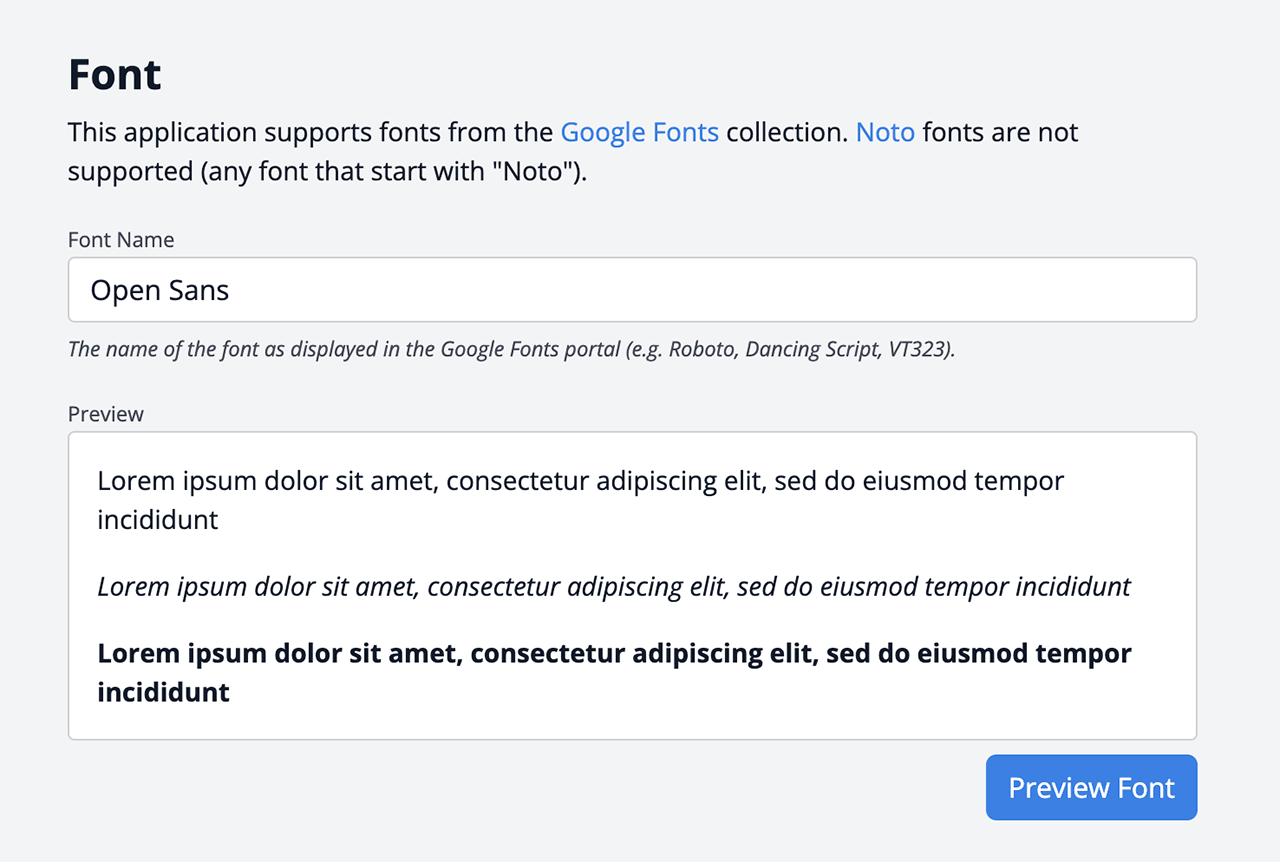
To change the font, first enter the name of the desired font in the Font Name field. The name must exactly match what appears in Google Fonts. For example, if you wanted to use Hedvig Letters Sans, the name you would enter is “Hedvig Letters Sans”. After entering a name, you must then click the Preview Font button to ensure the font has been correctly provided and it successfully loads.
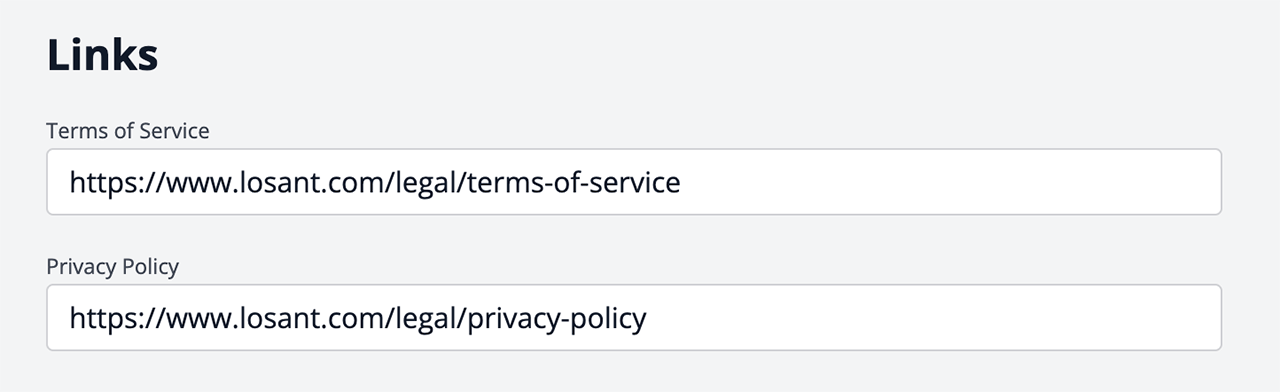
Links
This section allows you to provide links to your company’s privacy policy and terms of service. These links are displayed in the footer on the login page, forgot password page, 404 (not found) page, and the 500 (error) page.
Navigation
The navigation admin page gives you full control over the left navigation for your application.
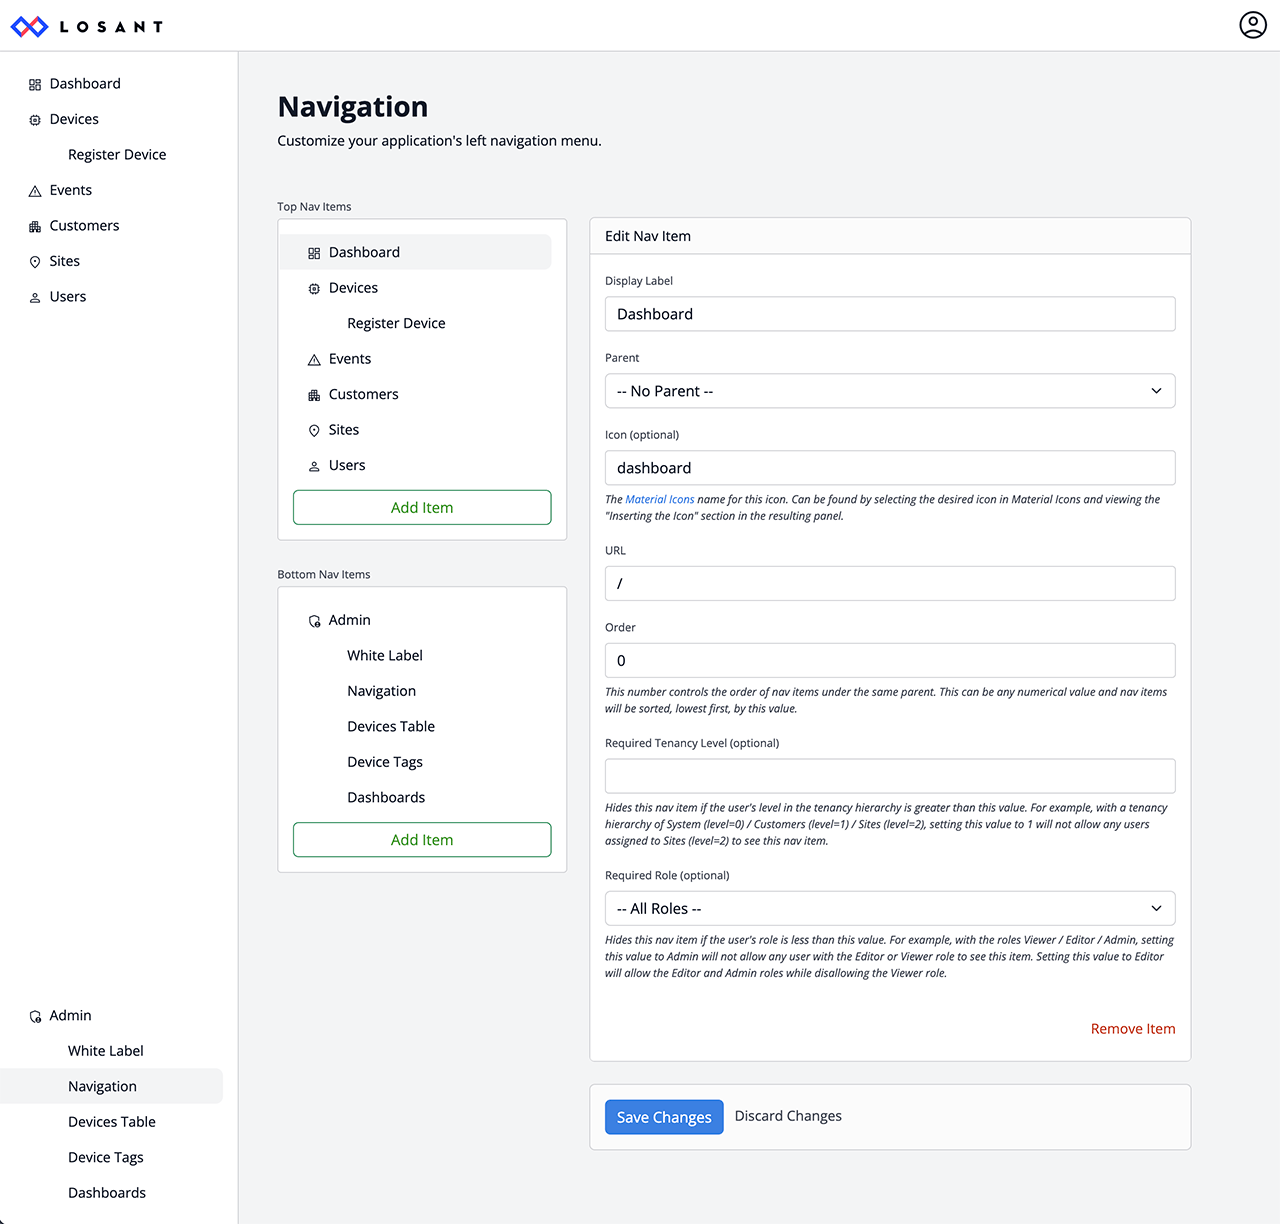
The navigation is divided into two sections: top and bottom. By default, the top section contains nav items available to your users and the bottom section contains the admin pages.
The most common modification is to add new nav items for new pages that you develop. For example, the screenshot below shows a new nav item called “Shipments”, which might be a page you’d add if you were developing an asset tracking solution using the CPF.
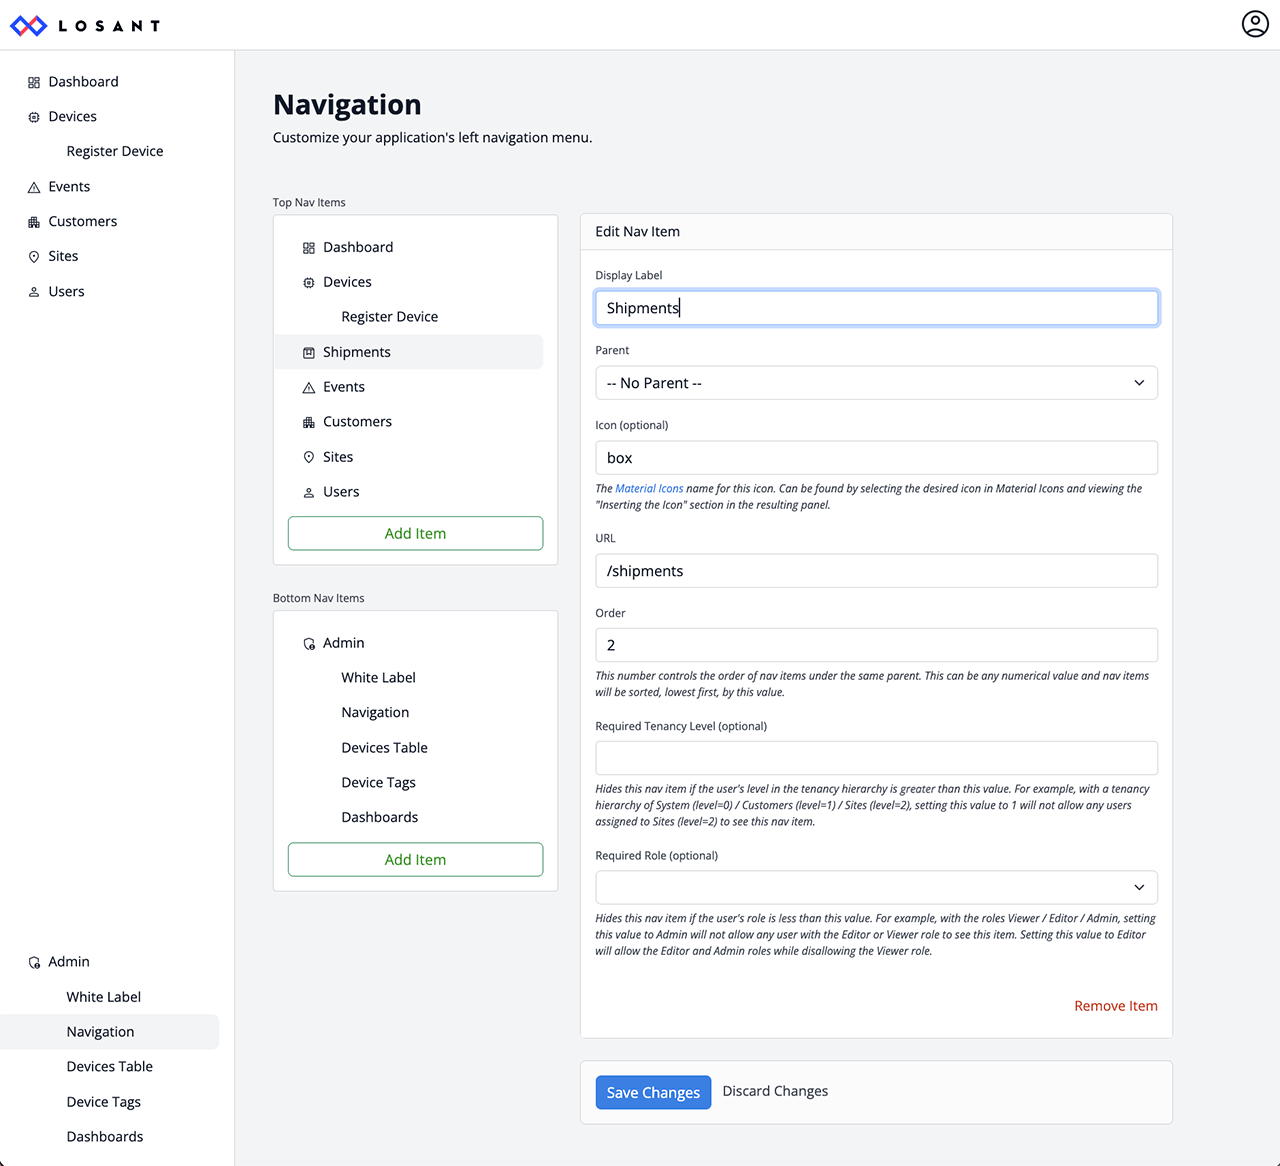
- Display Label: the label that appears to your users.
- Parent: allows you to nest nav items under other nav items.
- Icon: the CPF integrates Material Icons. You can use any icon in that collection by providing its identifier in this field. The identifier does not always match the name of the icon. For example, the “Open In New” icon’s identifier is
open_in_new. You can find the identifier by clicking on the desired icon and looking at the Inserting the Icon section in the panel that appears on the right. - URL: this is where the user is taken when they click the nav item. If the page is within the CPF, we recommend using relative URLs (e.g.
/shipments). You can also provide absolute URLs if you’re sending them to an external site. For example, you may want to add a nav item that links to your documentation (e.g.https://docs.losant.com). - Order: this controls the display order for the nav items. Nav items are arranged, top-to-bottom, by sorting by this value, ascending (lower values towards the top).
- Required Tenancy Level: this controls the visibility of nav items based on a user’s location in the tenancy hierarchy (system=0, customer=1, site=2). Users at or below this value in the tenancy hierarchy will see this nav item. For example, setting this value to
0will only allow system adminstrators to view the item. Setting this value to1allows customer users and system administrators to see the item. - Required Role this controls the visibility of nav items based on the user’s role (viewer, editor, admin). Users must have a role equal to or greater than this value to see the nav item. For example, setting this to
Editorwill only allow editors and admins to see the nav item (admins are greater than editors). Setting this toViewerwill allow all users to see the nav item.
The Required Tenancy Level and Required Role fields only control the visibility of the nav item. They do not provide any authorization for the endpoint itself. Users can still navigate directly to the nav item’s URL. If authorization is required, you must provide authorization logic in your endpoint workflows. If you have nested nav items and the parent item is hidden based on one of these fields, all children are also hidden, regardless of their configuration.
Devices Table Admin Page
Every application’s devices are different and the CPF provides first-class customizability over the columns you wish to display in the devices table. The most common changes are to add columns for the tags and attributes that are specific to your device.
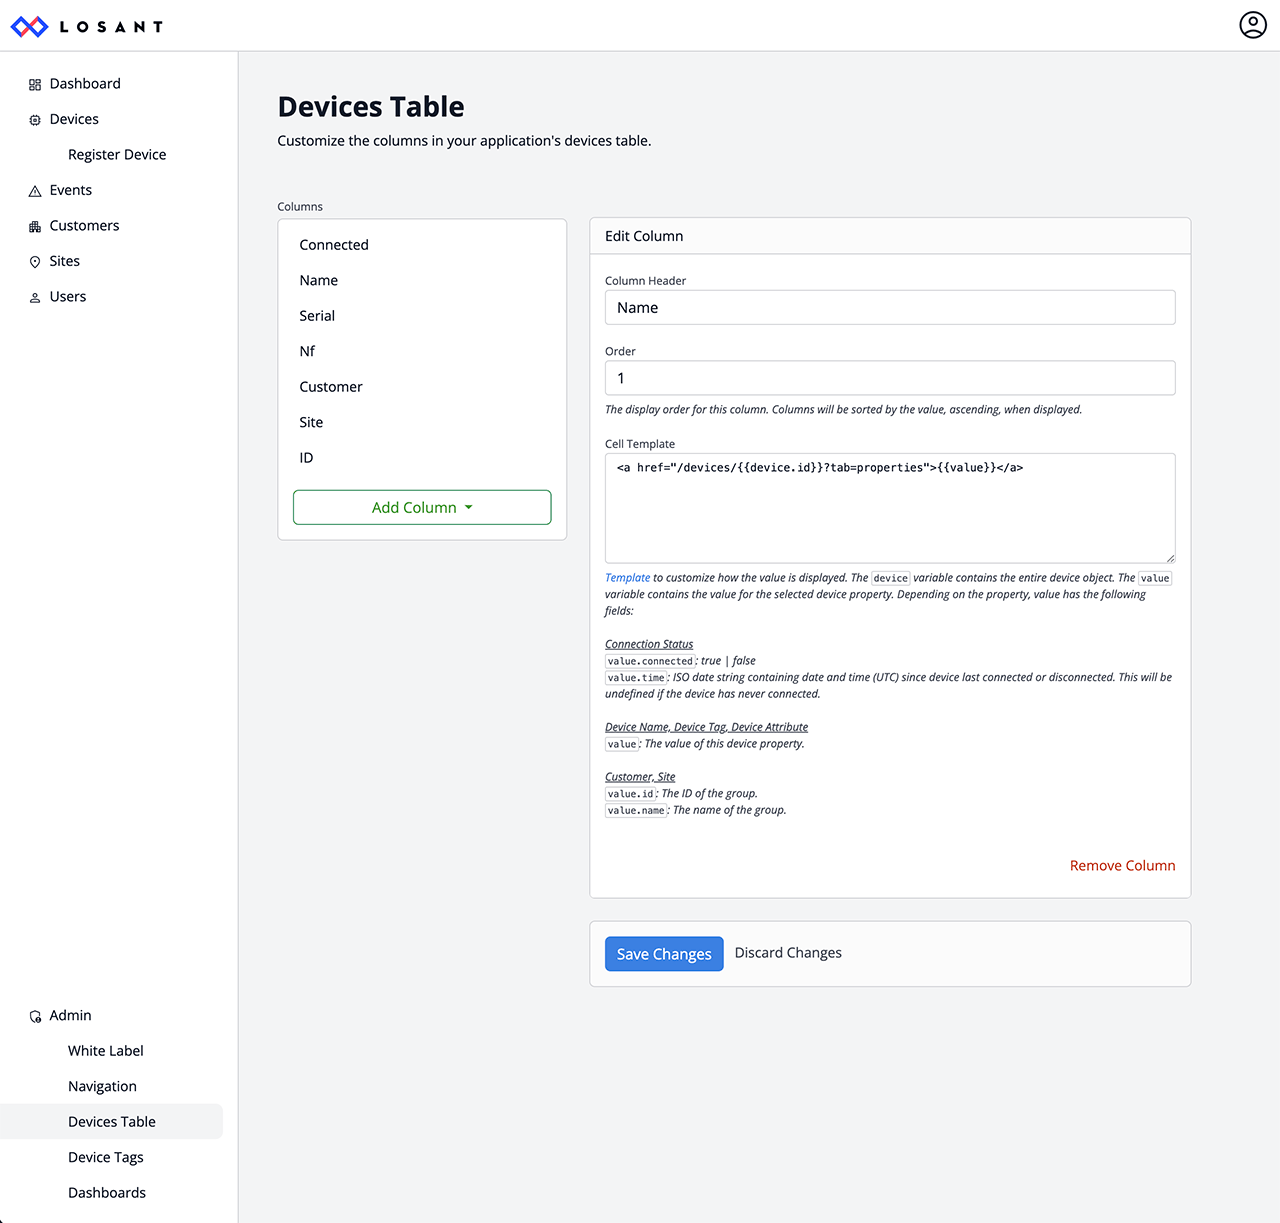
The CPF supports seven column types:
- Connection Status: the current connection status of the device.
- Device ID: the ID of the device.
- Device Name: the name of the device.
- Device Tag: the value of a device tag.
- Device Attribute: the most recently reported value for a device attribute.
- Customer: the customer to which this device belongs.
- Site: the site to which this device belongs.
When you add a Device Tag or a Device Attribute column, you must provide the name of the tag or attribute to display. You can add multiple of any column type. For example, if you want to display two attribute values, you can add two attribute columns with different attribute names.
If you add a Customer or Site column, they will automatically be hidden based on the user’s level in the tenancy hierarchy. For example, a user assigned to a customer will not see the customer column. A user assigned to a site won’t see either column. This is because the devices table is automatically scoped to the user’s customer or site and they do not have the ability to access devices from other tenants.
The Order field controls the arrangement, from left to right, of the columns. Columns will be sorted by this value, ascending (lower values to the left).
Every column supports a Cell Template, which customizes how that column’s data is displayed. Every template is provided a device and a value variable. The device variable contains the entire device object. The value variable contains the data for the specific column. Based on the column type, value has the following fields:
Connection Status
value.connected: the current connection status of the device:trueorfalse.value.time: ISO date string containing the date and time (UTC) since the device last connected or disconnected. This will beundefinedif the device has never connected.
Device Name, Device Tag, Device Attribute
value: the direct value of the selected device property. For example, if this is a device attribute column and the most recently reported value for this attribute is25, thenvaluewill be25.
Customer, Site
value.id: the ID of the customer or site.value.name: the name of the customer or site.
Templates can include any amount of HTML and CSS that’s required to display the underlying data. For example, the default template for the device name column is the following:
<a href="/devices/{{device.id}}?tab=properties">{{value}}</a>This template uses {{value}} to display the name of the device and {{device.id}} to construct a link, that when clicked, takes the user to the details for this device.
The devices table automatically adds filter input fields to every column header (except for attribute columns). These filters apply to the underlying value and are not based on what your template renders. Therefore, if you use a template to dramatically alter what’s displayed to the user, it could lead to confusion since the filter no longer corresponds to the displayed value.
Device Tags
Device tags can contain sensitive information that you may not wish to expose to users. For the CPF, all tags are opt-in, which means your users will not be able to view or edit any device tags until they are configured.
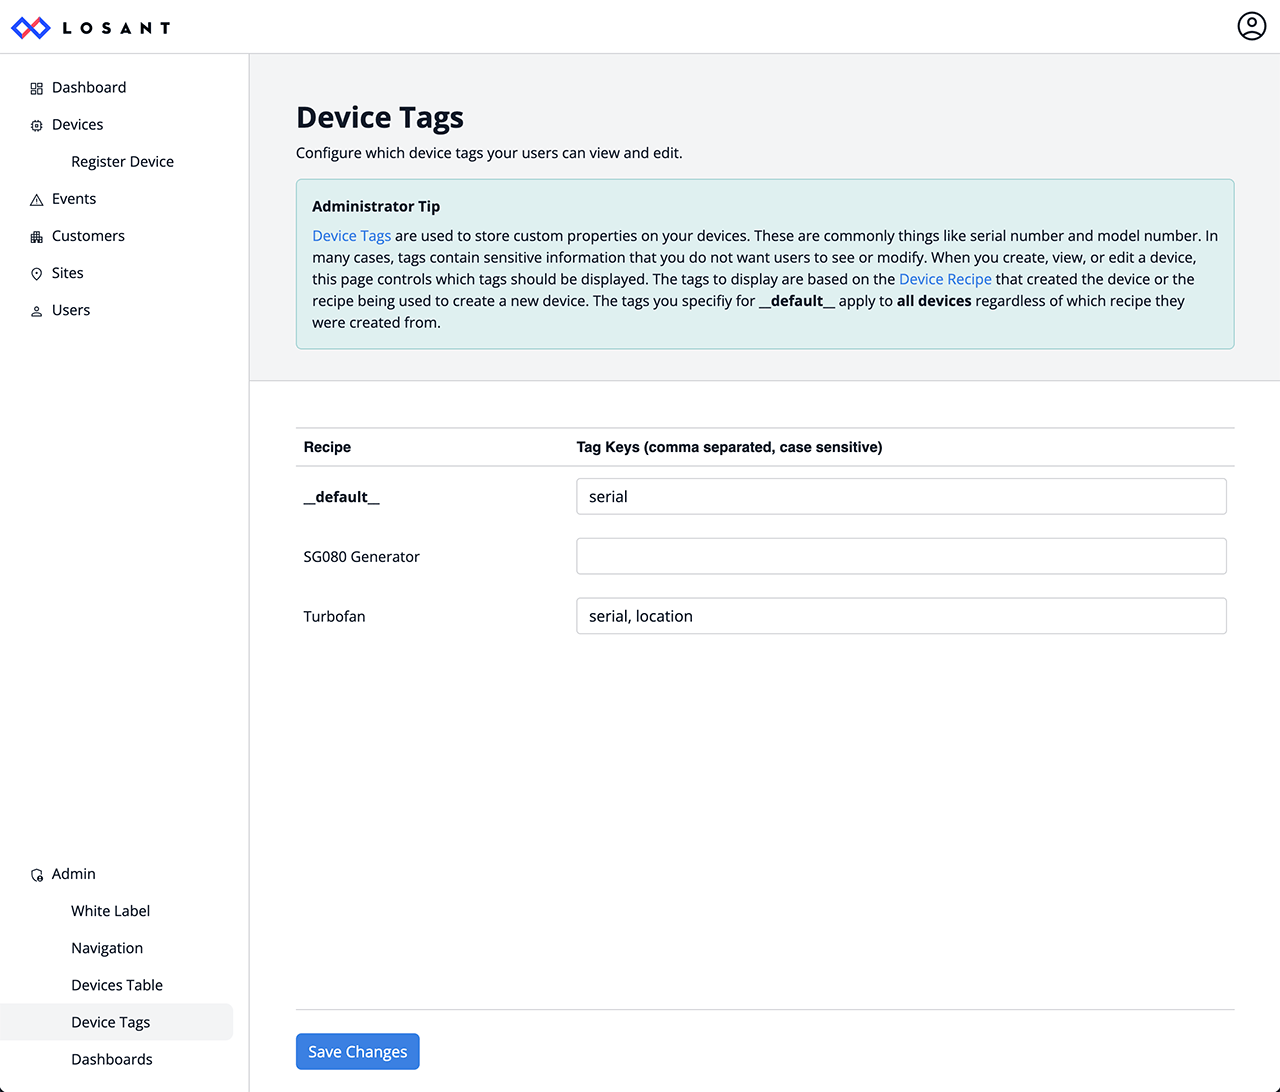
Each set of configured device tags are associated with a device recipe. This controls which tags will appear when creating a new device or viewing/editing an existing device. To opt-in to tags, provide a comma-separated list of tag keys next to each device recipe. Spaces between entries will be ignored.
Any tags added to the special __default__ entry will be made available to all devices, regardless of the recipe they were created from. This is useful if your application has many recipes that all share identical device tags. You can put the tag under the __default__ entry instead of duplicating the same tag for every recipe.
When viewing an existing device, the CPF uses the value of the DeviceRecipe tag on the device to find the matching tags in this table. The DeviceRecipe tag is set automatically whenever a device is created from a recipe. Therefore, any device created by the CPF will already have this tag. If you have devices created outside of the CPF, they must be updated to include this tag. If a device does not have the DeviceRecipe tag, the CPF will use what’s configured in the __default__ entry.
The DeviceRecipe tag is set to the name of the recipe. The tag’s value will not update if you rename the recipe after creating the device. If you rename a device recipe, you may have to bulk update all previously created devices with the new name and reconfigure the tags using this admin page.
Dashboards Admin Page
This page controls what dashboard is displayed when a device is selected in the CPF. Dashboards are associated with devices based on the recipe that was used to create that device. This page lists all device recipes with a dropdown next to each containing your application’s dashboards. If you have a dashboard defined for the __default__ entry, this dashboard will be used when a device is selected and no matching recipe can be found in this table.
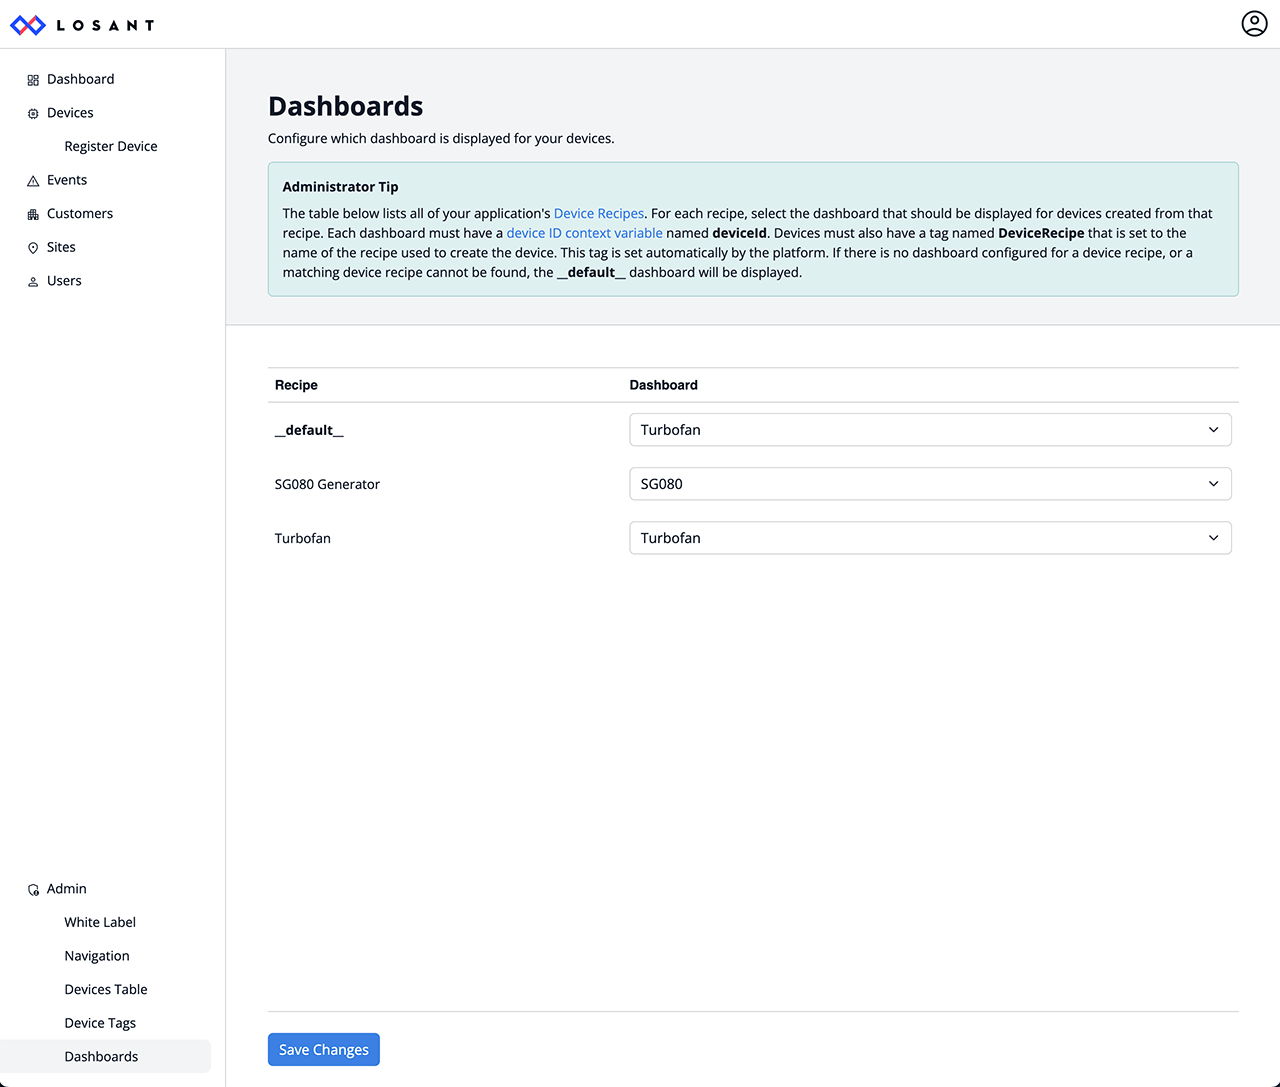
The CPF uses the DeviceRecipe tag on devices to find the matching dashboard. This tag is set automatically whenever a device is created from a recipe. Therefore, any device created by the CPF will already have this tag. If you have devices created outside of the CPF, they must be updated to include this tag.
The DeviceRecipe tag is set to the name of the recipe. The tag’s value will not update if you rename the recipe after creating the device. If you rename a device recipe, you may have to bulk update all previously created devices with the new name and reconfigure the dashboards using this admin page.
CPF Updates
Losant continually updates the CPF with new functionality and bug fixes. Whenever you create an application from the CPF template, you are importing a copy of the CPF at that point in time. Any changes made to the CPF by Losant after you’ve imported the template will not apply to your copy.
Modifying the CPF
You have full access to the source code that makes up the CPF. When you create an application from the CPF template, every resource that makes up the CPF is imported into your application. The CPF provides a very capable out-of-the-box experience, but it is intended to be modified to meet your specific requirements.
The CPF is built on an architecture that is designed to be extended with new functionality. The user interface is built on the following web frameworks:
It is recommended that you familiarize yourself with the above frameworks before modifying the CPF’s implementation.
Was this page helpful?
Still looking for help? You can also search the Losant Forums or submit your question there.