How To Configure Single Sign-On Within Experiences Using Active Directory
We now have a template for this! While this guide remains valid, you might find it easier to use our Azure Active Directory SSO Template.
End-User Experiences allow you to develop and publish custom APIs and user interfaces with built-in user management and authentication. Each Experience has its own set of Users, Groups, and Domains. Using Experiences, you can enable your Experience Users to authenticate to an Experience using Single Sign-On (SSO) with Azure Active Directory.
In this guide, you will use the SAML: Login Node and SAML: Verify Node to enable SSO within an Experience. Though this guide uses Azure Active Directory, these instructions apply to most SAML Identity Providers.
Prerequisites
Before you begin, you need:
- Access to an Azure Active Directory
- Familiarity with SSO and SAML
How It Works
When complete, you will have implemented the following logic:
- An Experience User navigates to an Experience Endpoint:
GET /saml/login. - The
/saml/loginExperience Endpoint triggers an Experience Workflow. This workflow generates an Active Directory SSO URL and redirects the user. - The Experience User can then authenticate to Active Directory. After a successful login, the user is redirected back to a Losant Experience Endpoint:
POST /saml/assert. - The
/saml/assertExperience Endpoint verifies the request and authorizes the user by setting the authorization cookie.
If you’re unfamiliar with SAML-based SSO, here are some resources to help:
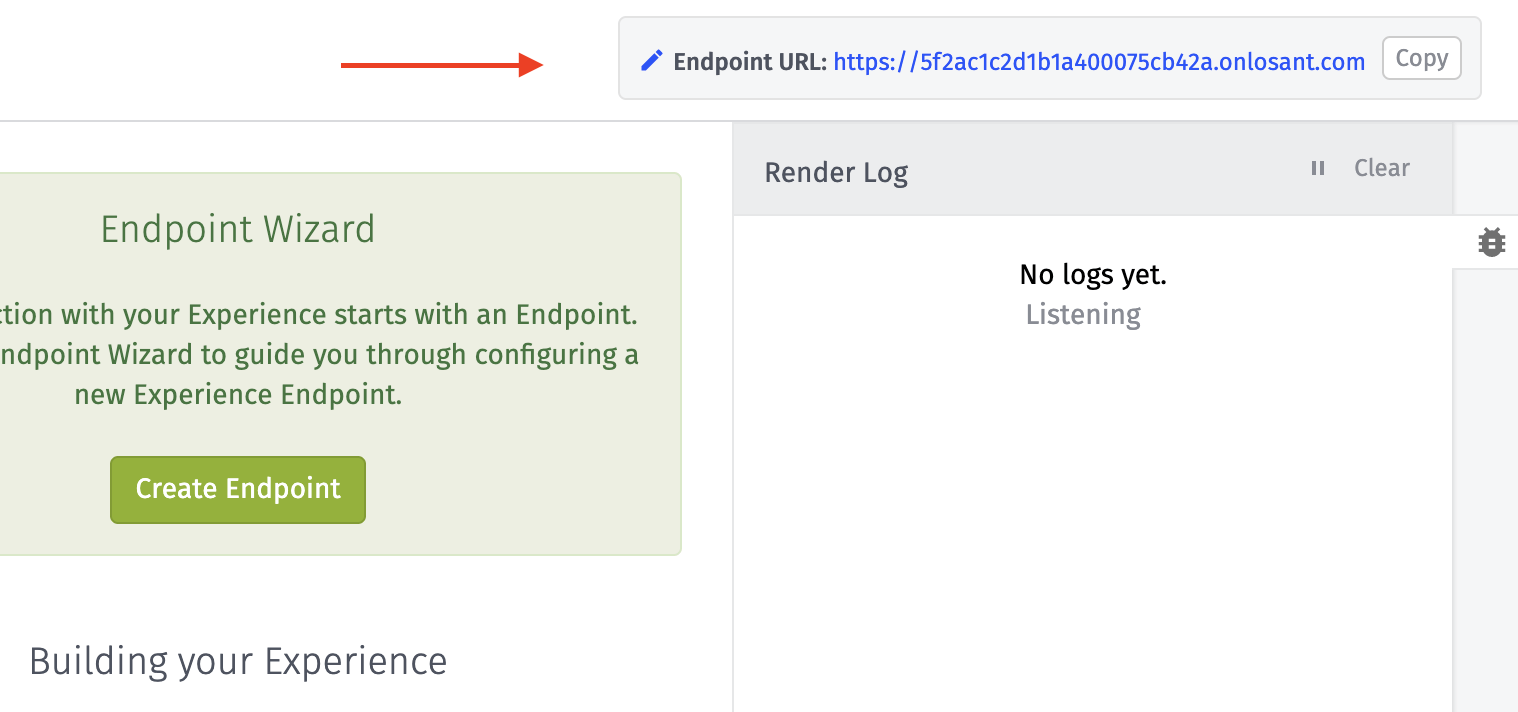
Getting an Endpoint URL
To follow along, you’ll need a Losant Experience with an Endpoint URL. You can acquire this in three ways:
- Create a new Experience.
- Start from an Application Template.
- Acquire from an existing Experience.
Once you have an experience, you can find the URL on the “Edit” page within the Experiences Menu:
SAML Configuration
Before you can configure SSO, you first must prepare the proper configuration for the SAML: Login Node and SAML: Verify Nodes.
The two nodes share a common configuration. They both require a:
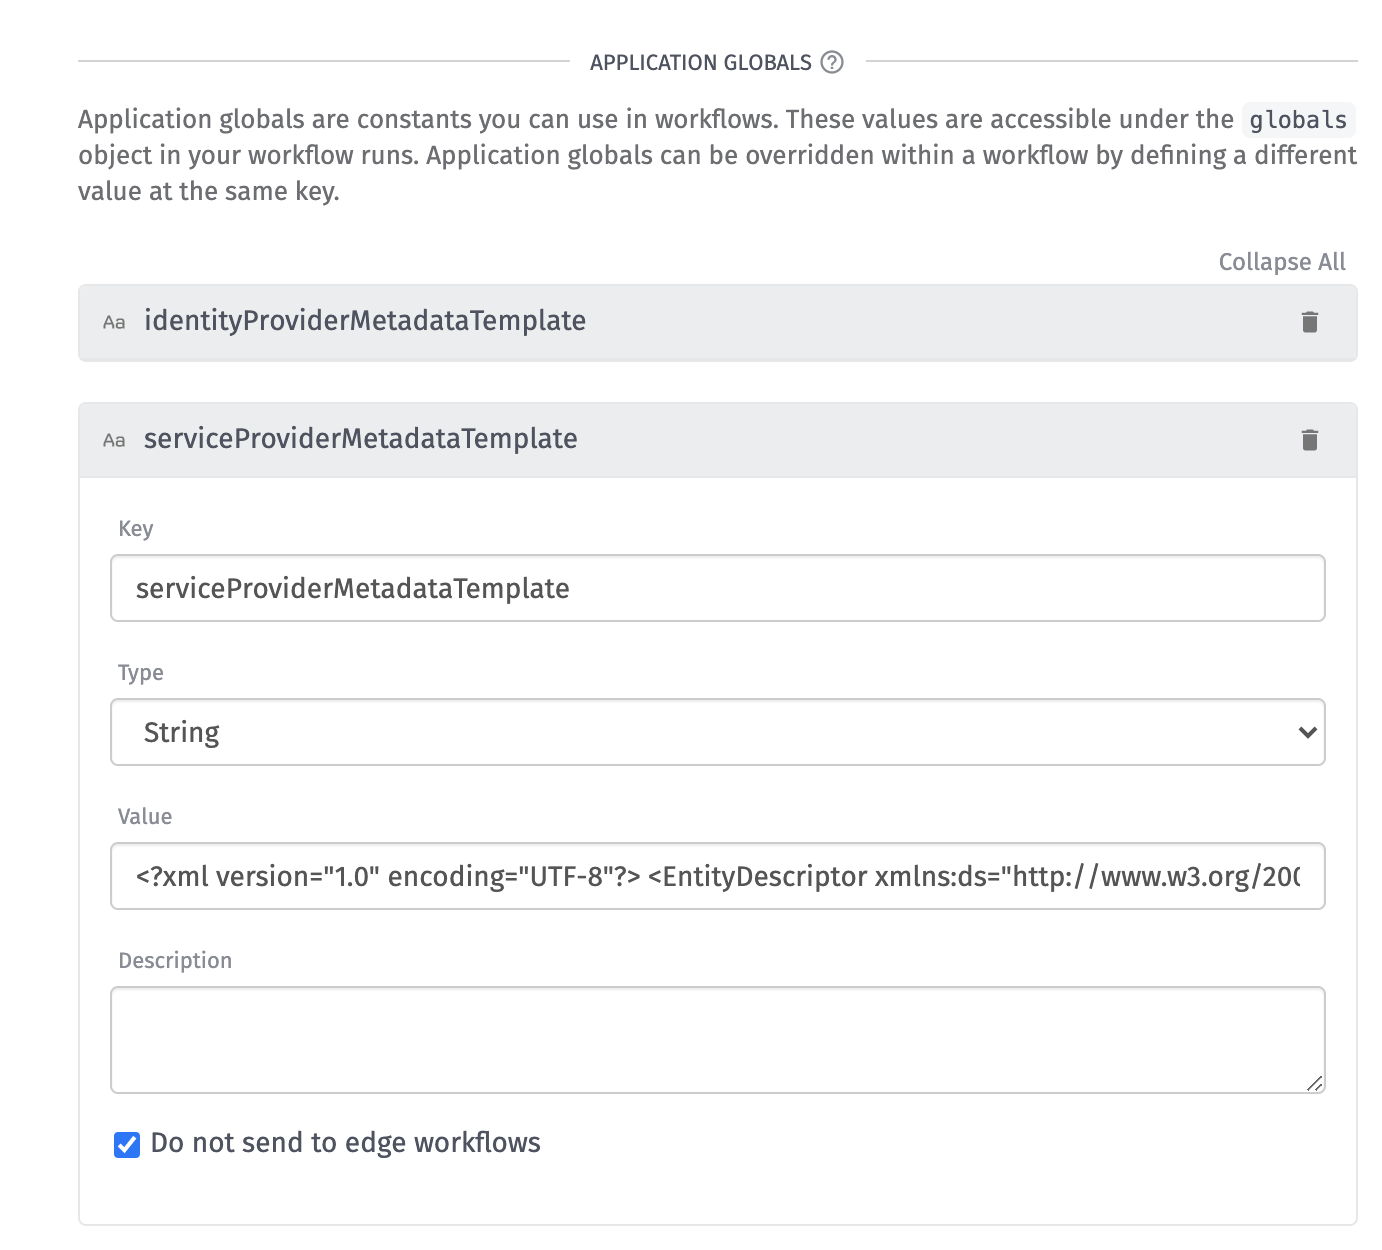
Service Provider Metadata Template
The Service Provider Metadata Template describes the service provider, which in this case is your Losant Experience. Here is an example configuration:
<EntityDescriptor
  xmlns:md="urn:oasis:names:tc:SAML:2.0:metadata"
  xmlns:saml="urn:oasis:names:tc:SAML:2.0:assertion"
  xmlns:ds="http://www.w3.org/2000/09/xmldsig#"
  entityID="ENTITYID"
>
  <SPSSODescriptor
    protocolSupportEnumeration="urn:oasis:names:tc:SAML:2.0:protocol"
  >
    <!-- insert ds:Signature element (omitted) -->
    <NameIDFormat
    >urn:oasis:names:tc:SAML:1.1:nameid-format:emailAddress</NameIDFormat>
    <AssertionConsumerService
      isDefault="true"
      index="0"
      Binding="urn:oasis:names:tc:SAML:2.0:bindings:HTTP-POST"
      Location="REDIRECT_URL"
    />
  </SPSSODescriptor>
</EntityDescriptor>
You may use this example or update it to support any application-specific requirements.
Following from the example, you must update the following values:
ENTITYID: A globally unique name for an Identity Provider or a Service Provider. Depending on your environment, there may be a specificentityIdrequired. However, in this example, you may set this value to your Experience URL.REDIRECT_URL: Set to the value of[Your experience url]/saml/assert. For example, if your Experience URL washttps://5f3ac1c2d1b1a400075cb42a.onlosant.comthe value you would configure would behttps://5f3ac1c2d1b1a400075cb42a.onlosant.com/saml/assert.
Identity Provider Metadata Template
Next, you need to acquire an Identity Provider Metadata Template from the identity provider, which in this case is Active Directory:
- Add an application to your Azure Active Directory.
- Set up single sign-on (SSO) for an application in your Azure Active Directory.
- Download the “Federation Metadata XML.” You can find this within your Azure Active Directory single sign-on application settings:
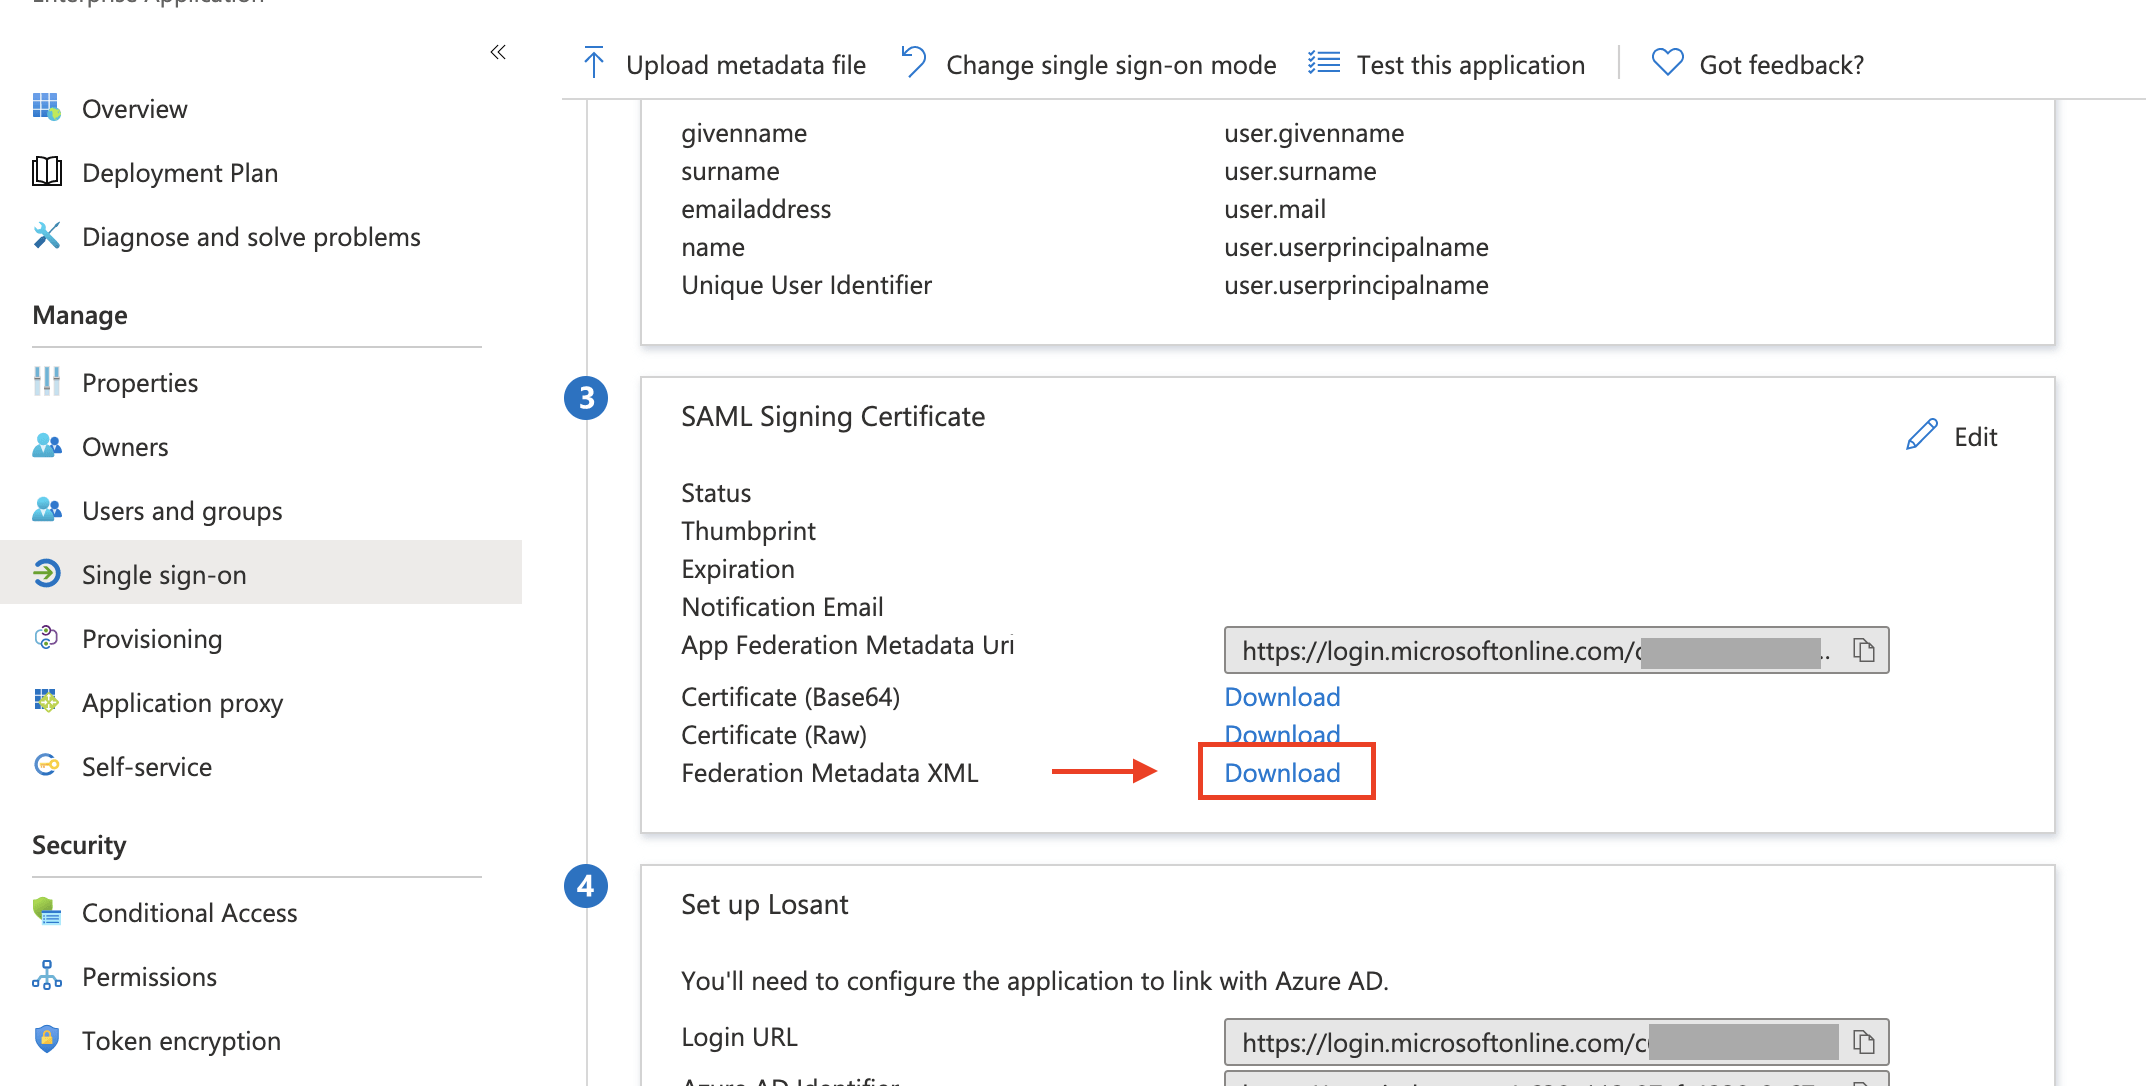
- Create or give a user access to the application within Active Directory.
Setting Global Configuration
It’s best practice to use application globals to store application-wide configuration that may be used across multiple workflows, like phone numbers or API keys. Application globals are a set of key/value pairs that are accessible inside of a workflow.
In this case, you can use them to store the SSO configuration to be used later within the SAML Nodes.
Building SAML Workflows
For this use case, you are going to create two Experience Workflows:
- GET /saml/login: This route redirects the user to Active Directory to log in.
- POST /saml/assert: After attempting to login to Active Directory, the user will be redirected to this route.
SAML Login Workflow
This route redirects the user to Active Directory. To create the Experience Endpoint and Workflow:
- Create an Experience Endpoint using the Experience Endpoint Wizard.
- Select “Return data for an API.”
- Set the “Method” to
GET. - Set the “Route” to
/saml/login. - Select "Create a new Workflow.”
- Select "All public users/custom authentication.”
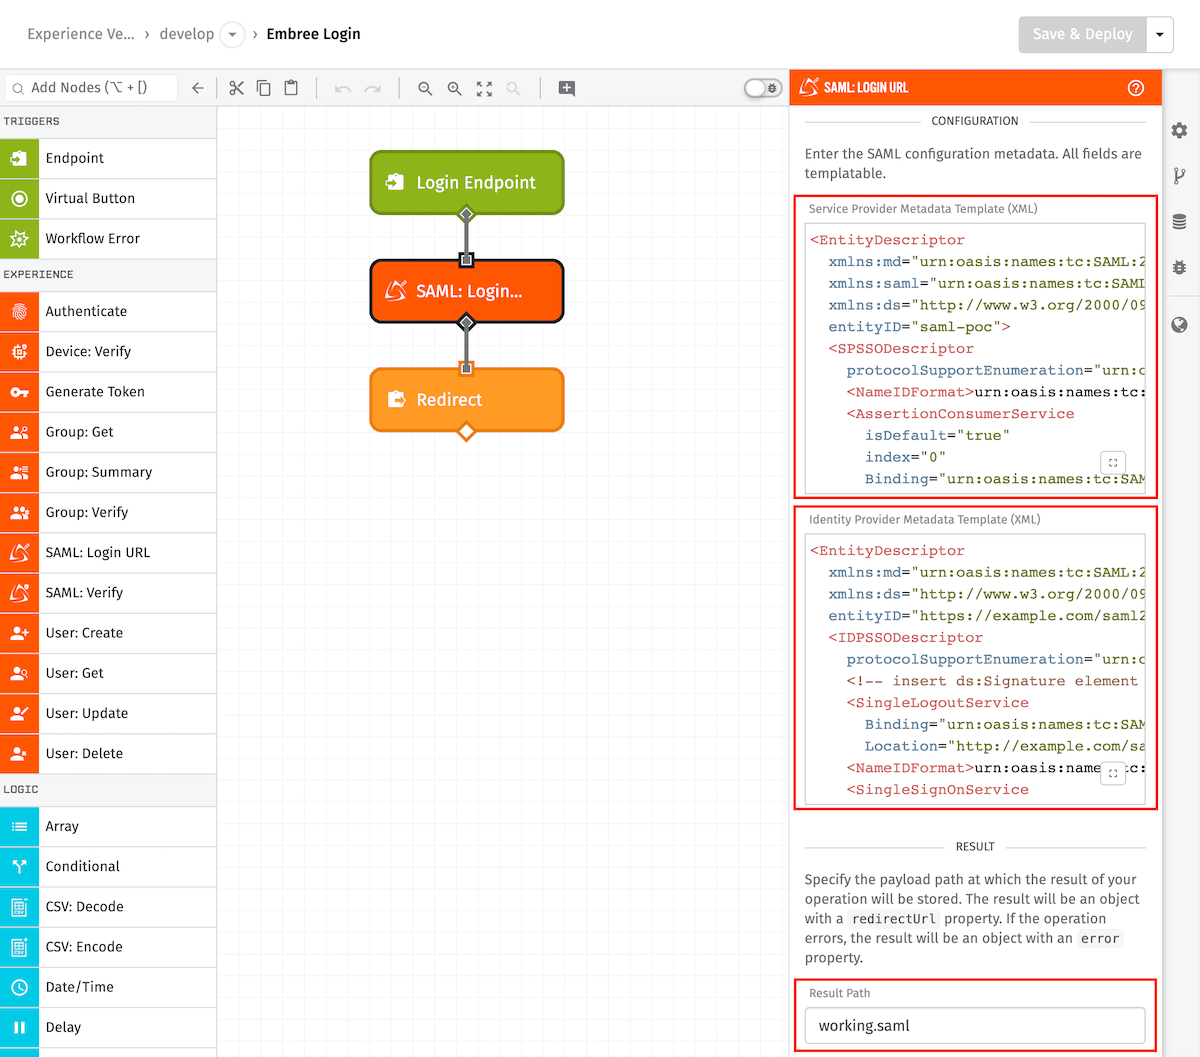
Once done, your workflow will look similar to:
To update this Experience Workflow:
- Navigate to the
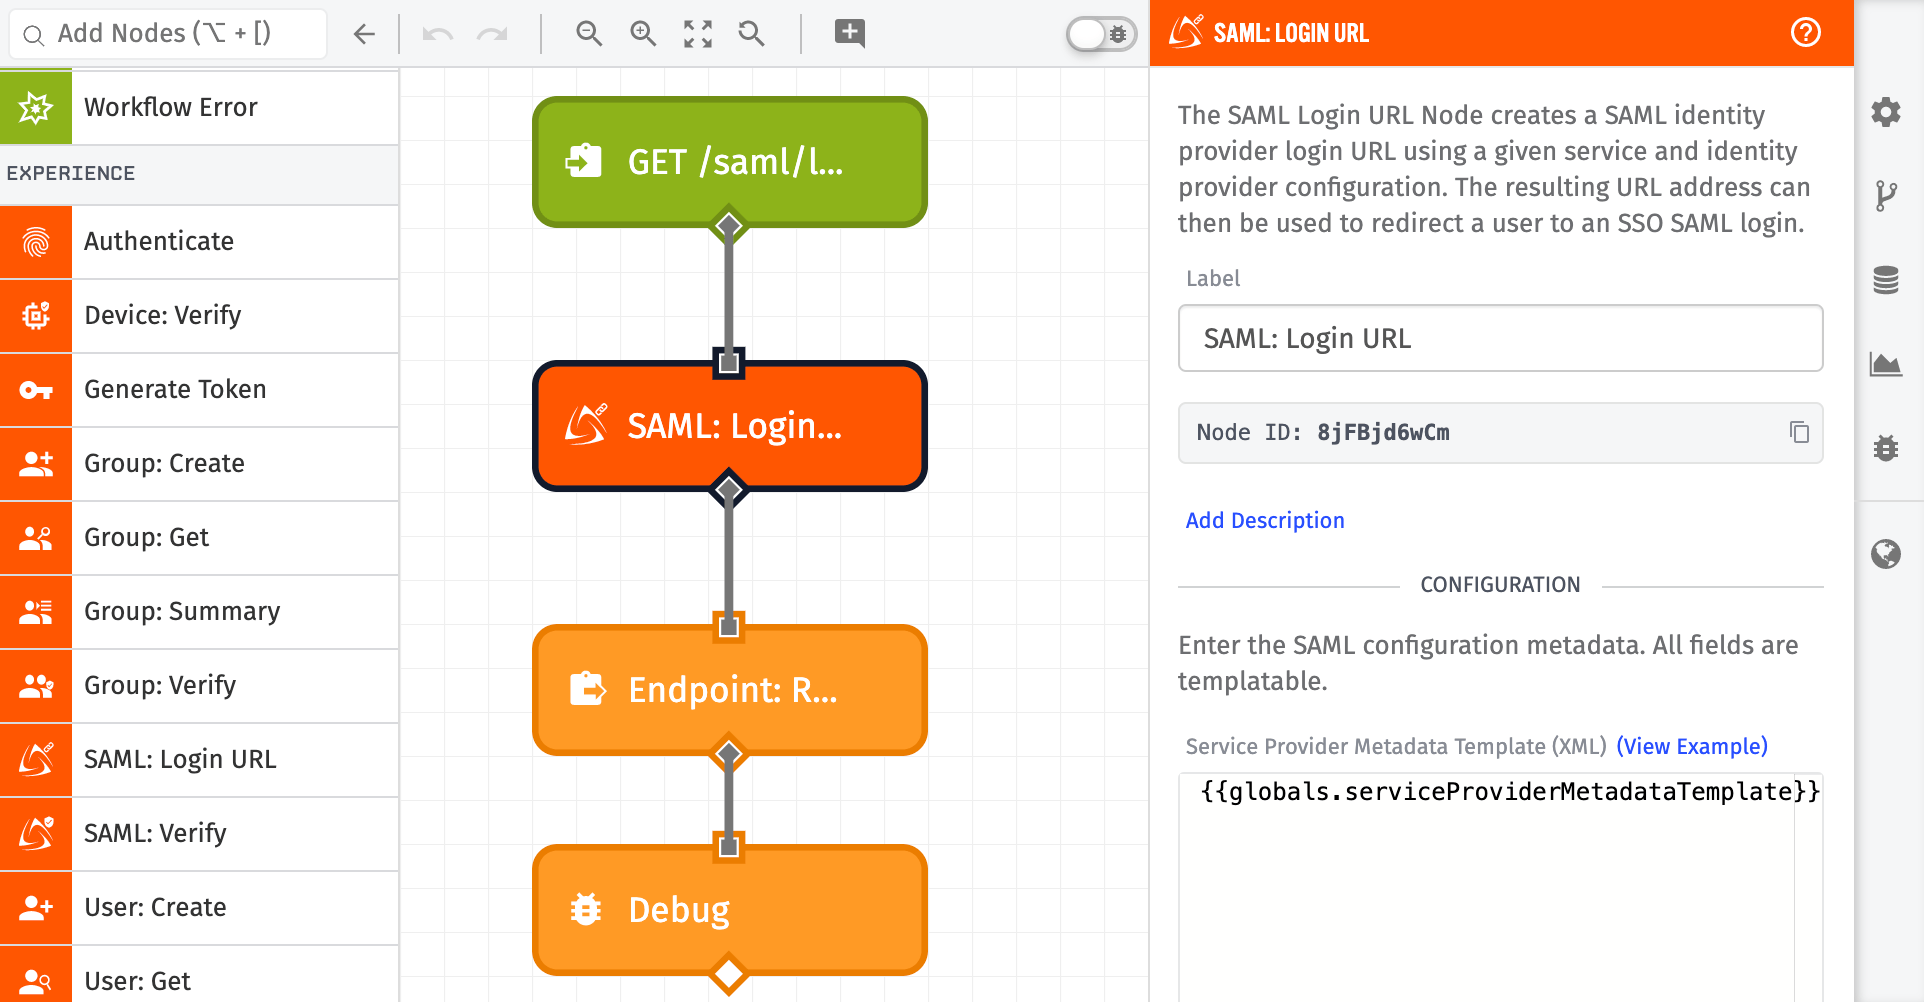
GET /saml/loginExperience Workflow. - Connect a SAML: Login URL Node between the Endpoint Trigger and the Endpoint Reply Node.
To configure the SAML: Login Node:
- Set the “Service Provider Metadata Template (XML)” to
{{globals.serviceProviderMetadataTemplate}}. - Set the “Identity Provider Metadata Template (XML)” to
{{globals.identityProviderMetadataTemplate}}. - Set the “Result Path” to
working.samlUrl.
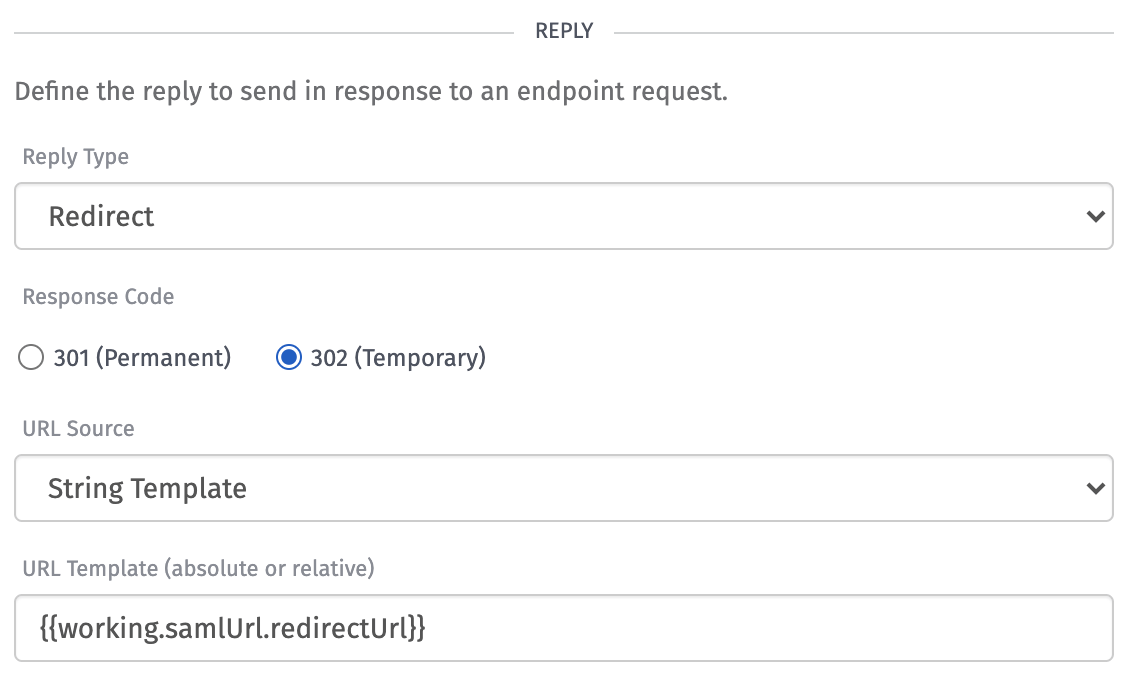
To configure the Endpoint Reply Node:
- Set the “Reply Type” to
Redirect. - Set the “Response Code” to
302 (Temporary). - Set the “URL Source” to
String Template. - Set the “URL Template” to
{{working.samlUrl.redirectUrl}}.
Now, the SAML Login workflow is complete.
SAML Assert Workflow
After attempting to log in to Active Directory, the user will be redirected to this route. This route needs to perform the following actions:
- Check whether the authentication was successful.
- Associate the authenticated user to an Experience User.
- Authenticate the Experience User for Losant Experiences.
To create the Experience Endpoint and Workflow:
- Create an Experience Endpoint using the Experience Endpoint Wizard.
- Select “Return data for an API.”
- Set the “Method” to
POST. - Set the “Route” to
/saml/assert. - Select "Create a new Workflow.”
- Select "All public users/custom authentication.”
When complete, the workflow will look similar to:
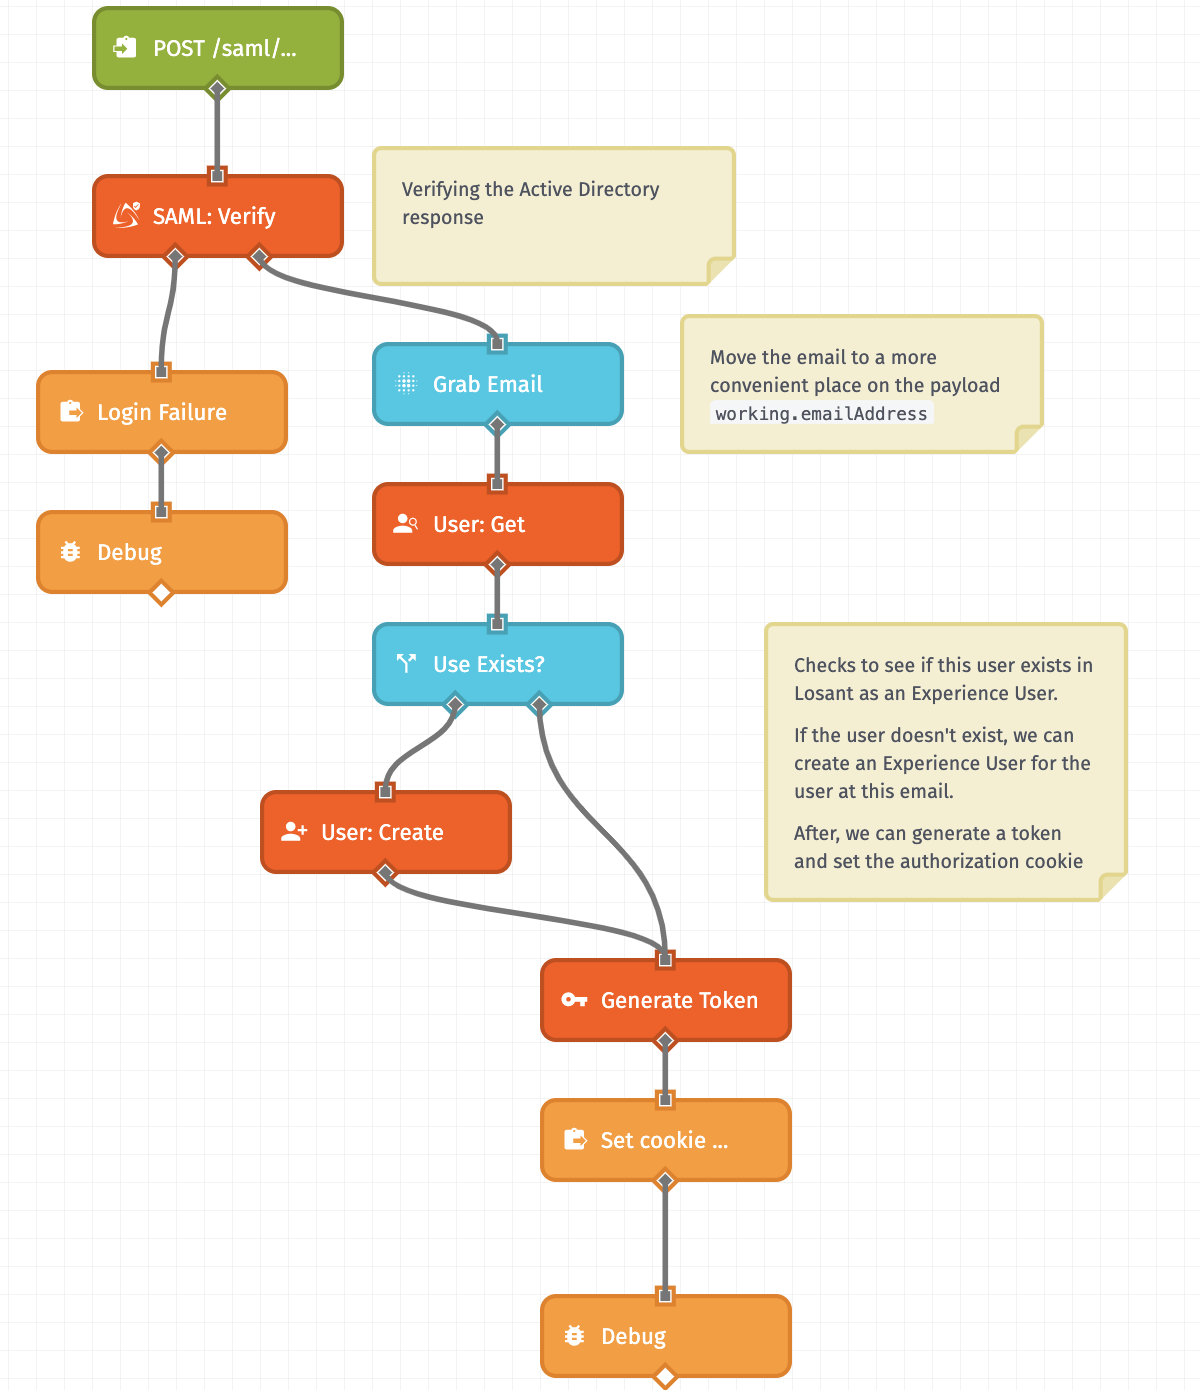
To update this Experience Workflow:
- Navigate to the
POST /saml/assertExperience Workflow. - Connect a SAML: Verify Node to the Experience Endpoint Trigger.
- On the left path of the SAML: Verify Node, connect an Endpoint Reply and Debug Node.
- On the right path of the SAML: Verify Node, connect a Mutate Node.
- Connect a User: Get Node to the Mutate Node.
- Connect a Conditional Node to the User: Get Node.
- On the left path of the Conditional Node, connect a User: Create Node.
- On the right path of the Conditional Node, connect a Generate Token Node.
- Connect an Endpoint Reply Node and a Debug Node to the Generate Token Node.
To configure the SAML: Verify Node:
- Set the “Service Provider Metadata Template (XML)” to
{{globals.serviceProviderMetadataTemplate}}. - Set the “Identity Provider Metadata Template (XML)” to
{{globals.identityProviderMetadataTemplate}}. - Set the “SAML Response Template” to
{{data.body.SAMLResponse}}. - Set the “Result Path” to
working.samlUser.
If the SSO fails, this node allows you to redirect the user to the most appropriate page. If the SSO succeeds, the workflow can continue to log in the user.
To configure the Mutate Node:
- Select “Set a new value.”
- Set the “Value Template” to:
- Set the “Destination Path” to
working.emailAddress.
The Mutate Node allows you to move a value on the payload from one place to another. It’s useful to avoid long payload paths. In this example, the Mutate Node is moving the email address of the user to working.emailAddress. The email address is returned from the Identity Provider.
To configure the User: Get Node:
- Set “Find By” to “Email or User ID.”
- Set the "Experience User ID or Email Template” to
working.emailAddress. - Set the “Result Path” to
working.experienceUser.
This allows you to check if an Experience Users exists with the same email provided by Active Directory.
To configure the Conditional Node:
- Set “Expression” to
{{working.experienceUser}}.
This node allows you to branch the workflow in separation actions based on whether an Experience User was found.
To configure the User: Create Node:
- Set “Email Address Template” to
working.emailAddress. - Set “Password Template” to
{{working.samlUser.nameID}}.
If the user does not exist, you can automatically create a new Experience User with the details provided by Active Directory.
To configure the Generate Token Node:
- Set “User ID or Email Template” to
working.emailAddress. - Set “Result Path” to
data.responseToken.
If the Experience User does exist, or after we create one, you can generate a valid authentication.
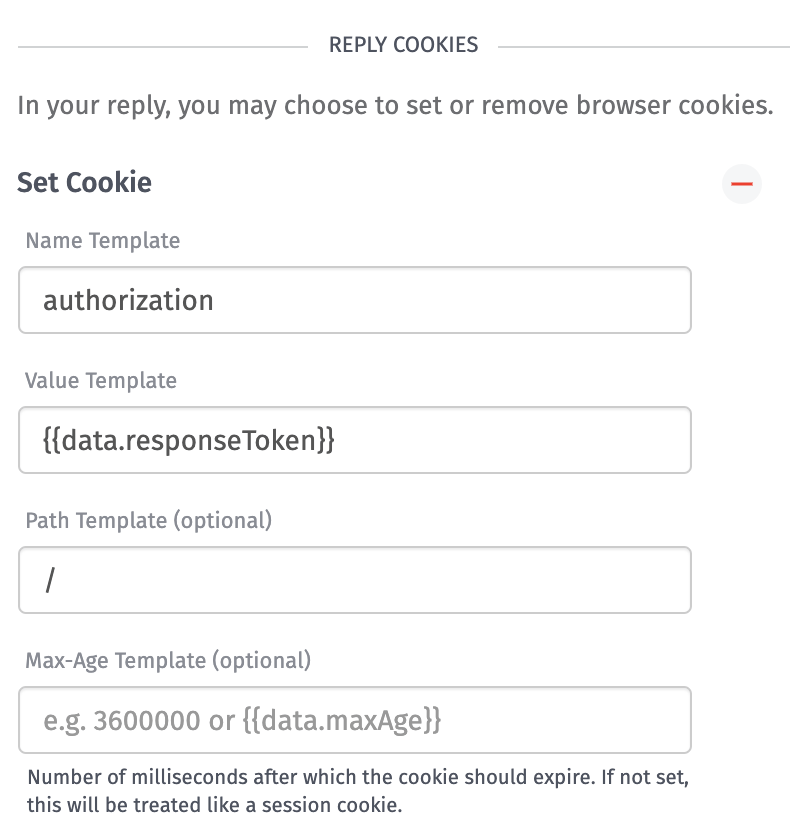
To configure the Endpoint Reply Node:
- Set the “Reply Type” to
Redirect. - Set the “Response Code” to
302 (Temporary). - Set the “URL Source” to
String Template. - Set the “URL Template” to
/. - In the “Reply Cookies” section, select “Set Cookie.”
- Set the “Name Template” to
authorization. - Set the “Value Template” to
data.responseToken. - Set the “Path Template” to
/.
Now, the SAML Verify workflow is complete.
Verifying and Next Steps
If everything was configured properly, you will be able to perform the following:
- Navigate to
/saml/login. - Log in to Active Directory.
- Redirect to the
/(home) page of your Experience.
Here are some helpful tips to help you debug any issues:
Verify Workflow
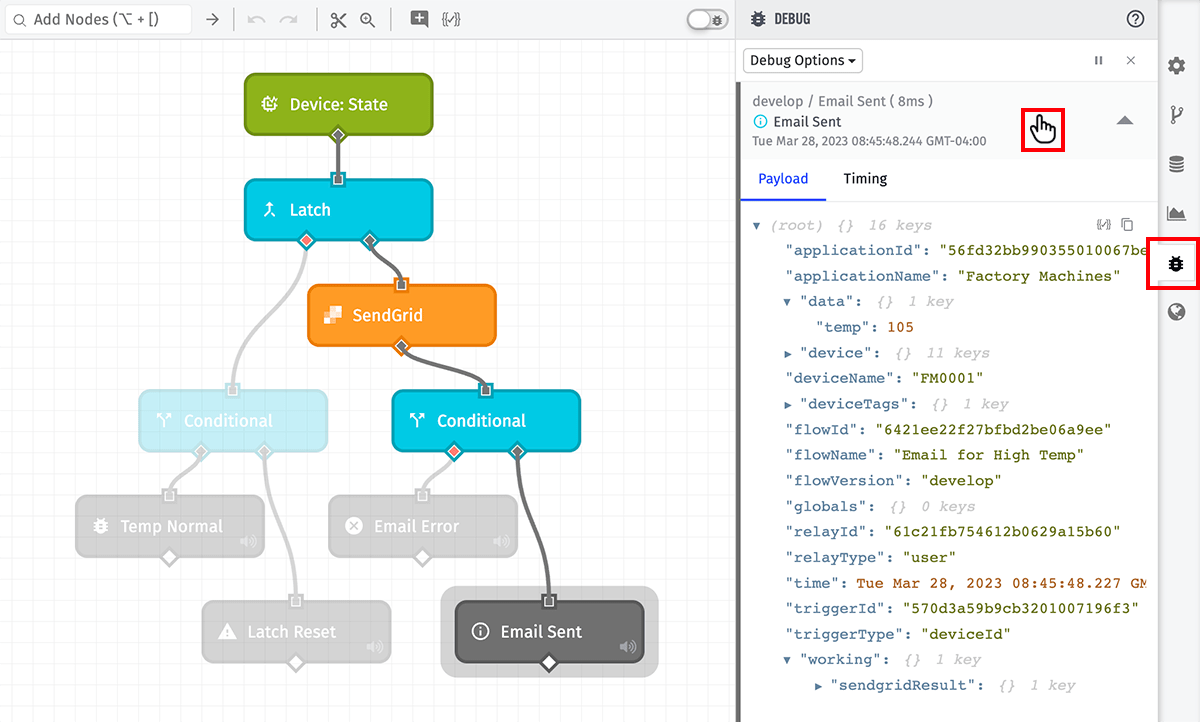
Adding Debug Nodes allows inspection of the current payload at any point during a workflow. It is extremely useful when initially constructing a workflow to make sure that all the various components are acting on the payload as expected.
Testing Experience
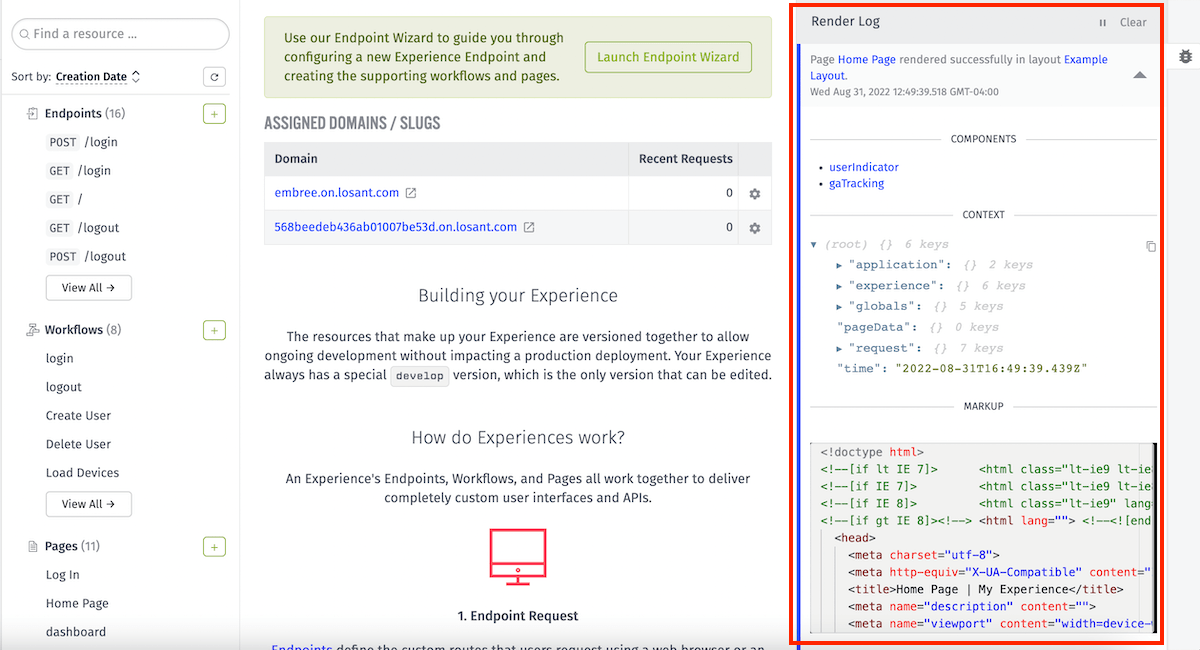
For debugging purposes, Losant provides an Experience Render Log of render attempts for your experience views. This log creates an entry for every attempted page render (including failures).
Was this page helpful?
Still looking for help? You can also search the Losant Forums or submit your question there.