How To Use Cloudflare With Losant Experiences
Using Cloudflare as a proxy in front of your Losant Experiences provides a cost-effective solution for a number of networking requirements that most businesses have when deploying production applications. Besides the automatic DDOS protection and caching that Cloudflare delivers, this guide also provides instructions for a number of common use cases requested by our users. These include:
- IP Address whitelisting and blacklisting
- Blocking requests to specific endpoints
- Restricting access to staging domains
This guide will describe how to configure Cloudflare to work best with Losant experiences. Everything shown in this guide can be done using Cloudflare’s free plan.
Step 1: Add your Domain to Losant
The first step is to add a custom domain to your Losant application. The screenshot below shows a simple configuration that will work for anyone just starting with custom domains.
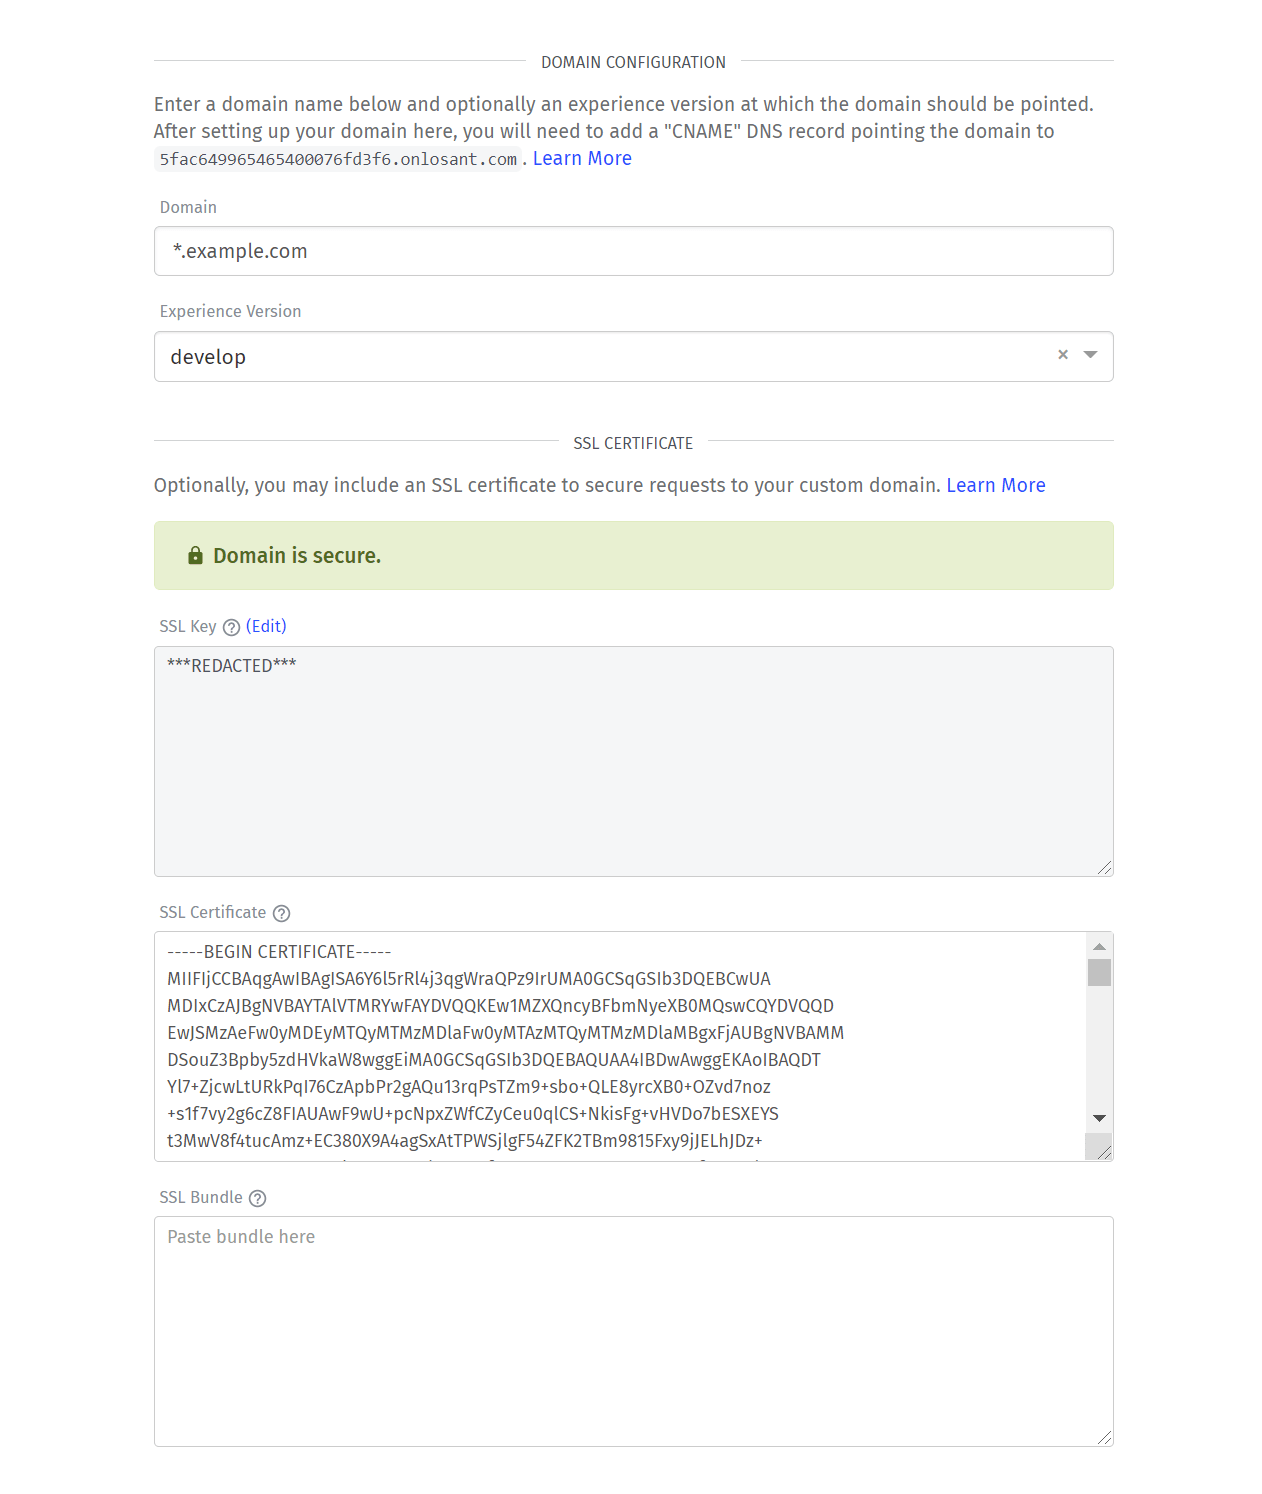
- The Domain is set to
*.example.com. - The Experience Version is set to develop.
- The SSL Key and SSL Certificate are set to a wildcard SSL certificate obtained for this domain.
For details about production vs. staging domains, please see the Use Case: Production vs Staging Domains section below.
Step 2: Add your Domain to Cloudflare
This step does not involve any configuration specific to Losant. Cloudflare works by changing your DNS configuration to direct traffic to Cloudflare’s servers instead of directly to Losant’s servers.
Cloudflare has an excellent set of video tutorials that explain the configuration process. Once your domain has been successfully added to your Cloudflare account, you can continue this guide.
Step 3: Add a Page Rule for HTTPS and WWW Redirects
Cloudflare Page Rules provide a way to intercept requests and perform any number of actions. In this case, we want to automatically redirect users if they requests the non-https site or request the root domain (not starting with www). For example, if our domain is example.com, we want all of these requests to automatically redirect to https://www.example.com.
These redirects are not required, but are very common and recommended for production sites.
Note: enter your own domain for the configuration below. Here example.com is being used as a placeholder for this guide.
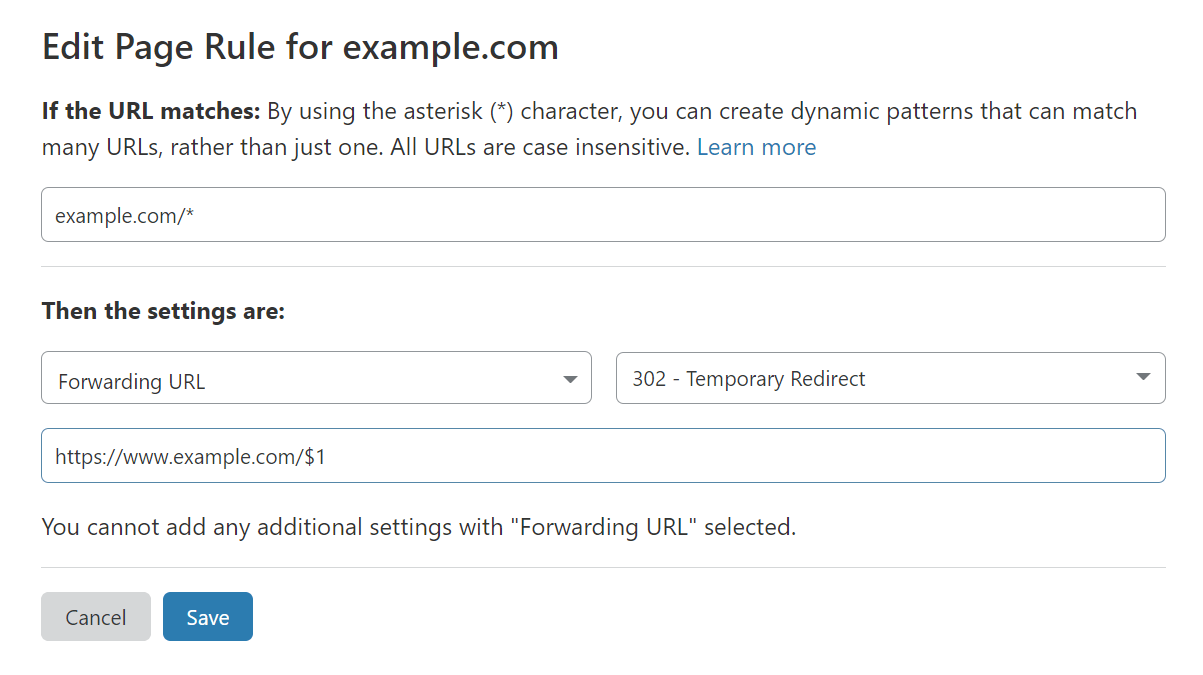
- Set the URL to
example.com/*. - Select Forwarding URL as the action.
- Select 302 - Temporary Redirect as the status code.
- Set the destination URL to
https://www.example.com/$1. The$1at the end is a special variable that will keep the path from the original request.
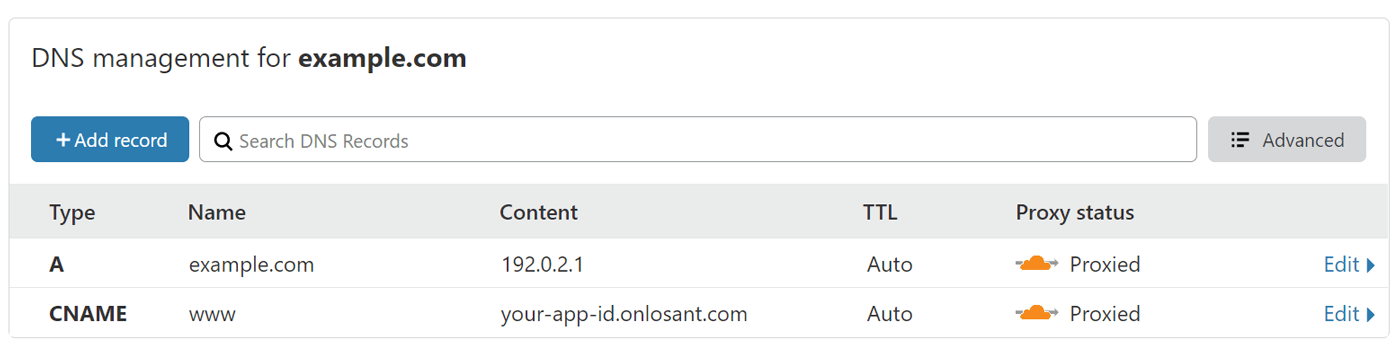
Step 4: Add CNAME and A Records in Cloudflare
The first record you’ll need to add is a CNAME that points www to your unique your-app-id.onlosant.com domain. Cloudflare supports both “Proxied” and “DNS Only” records. You’ll want to ensure “Proxied” is selected, otherwise traffic will not go through Cloudflare.
Cloudflare will automatically import existing DNS configuration from your previous provider. In some cases, the CNAME entry will already exist but may not be configured as “Proxied”. In that case, you’ll have to remove and recreate the entry.
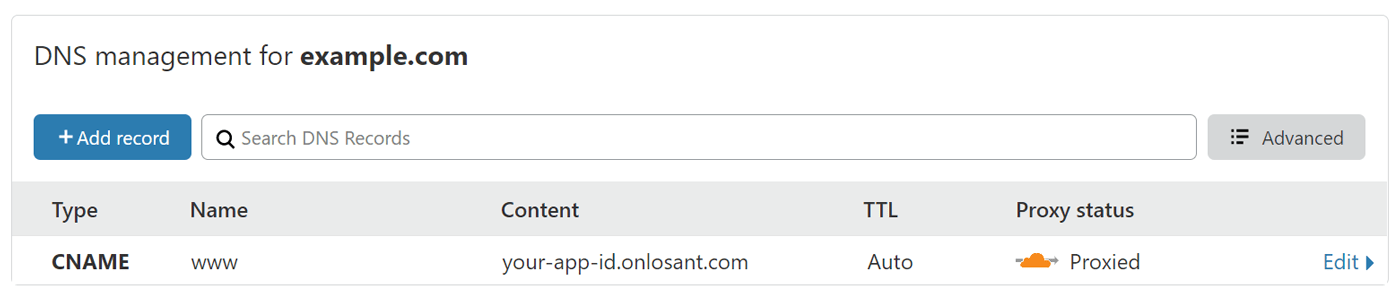
The next record you’ll need is an A record that directs your domain’s root (@ )to any arbitrary IP address. The reason the IP address doesn’t matter is that the page rule you configured above will execute first and redirect the user to www.
Your DNS configuration should now look something like this:
At this point, Cloudflare is successfully configured and automatically providing DDOS protection and request caching. The remainder of this guide describes specific use cases that are optional based on your business requirements.
Use Case: IP Address Whitelisting
Cloudflare supports IP address whitelisting and blacklisting using their Firewall. The following screenshot shows the basic configuration for an IP whitelist:

- Set the Field to IP Address.
- Set the Operator to is not in list.
- Set the Value to your list of IP addresses. If you don’t have a list yet, you can click the Manage lists link to create it.
- Set the Action to Block.
Once this is saved, any request originating from an IP address outside of your whitelist will be blocked.
Use Case: Block Requests to Specific Endpoints
Requests to specific endpoints (i.e. URI Paths) can be blocked using Cloudflare’s Firewall. The following screenshot shows how to block all requests to the endpoint /block-me:
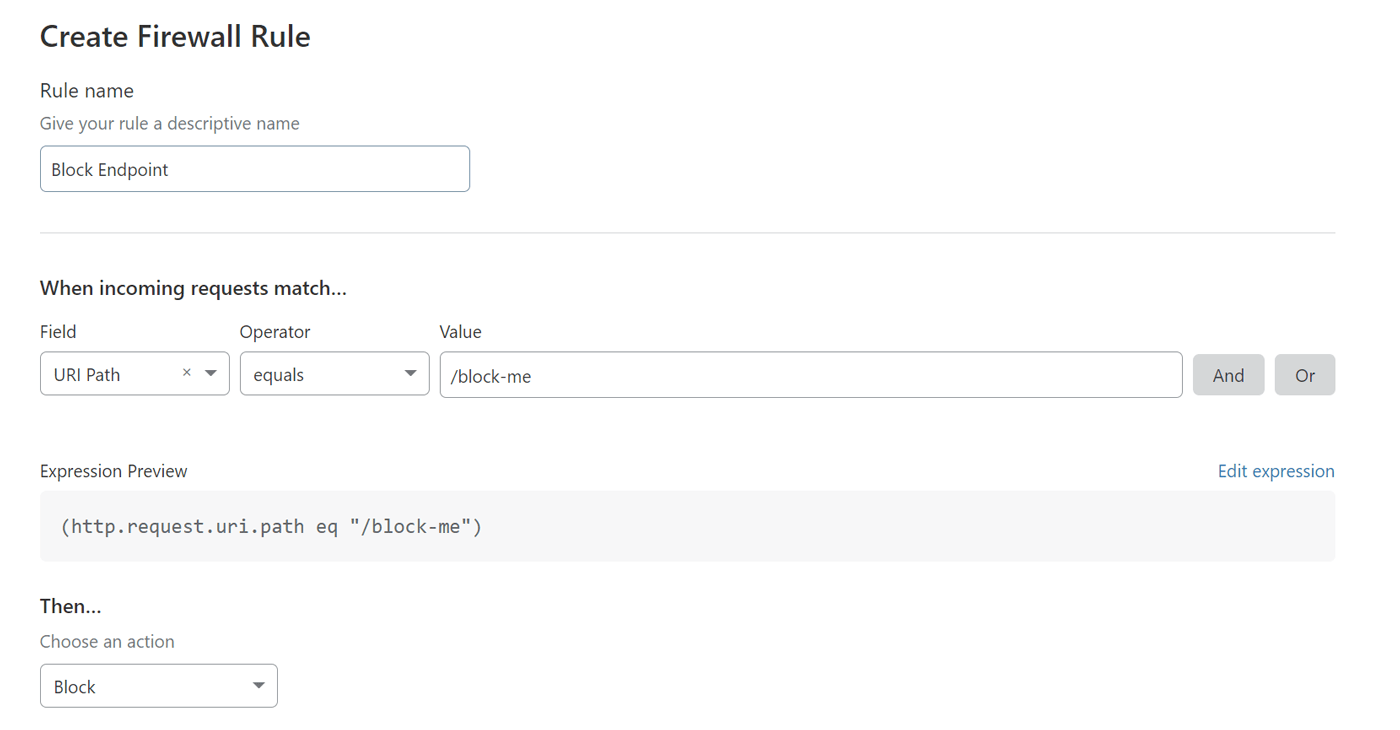
- Set the Field to URI Path.
- Set the Operator to Equals. If you have multiple endpoints to block, the operator can also be set to is in, which allows you to choose a list containing multiple endpoints.
- Set the Action to Block.
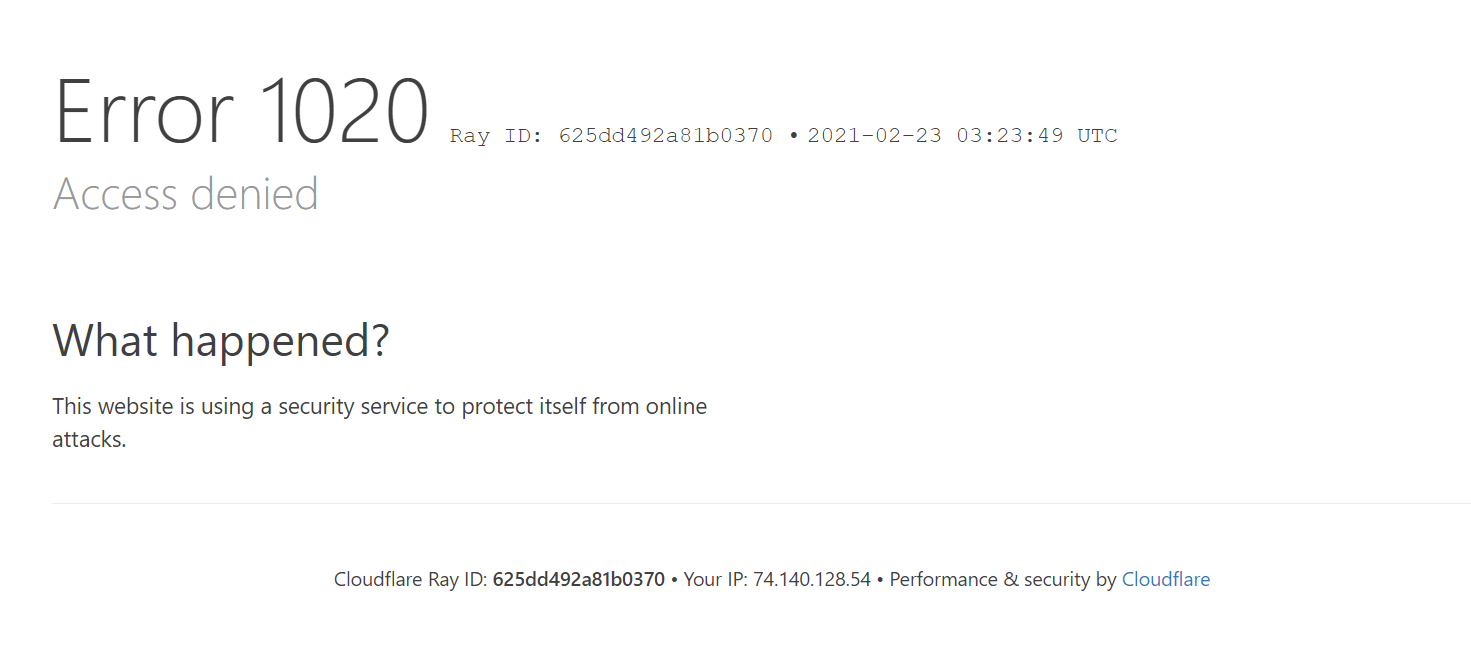
Once this is saved, any request made to example.com/block-me will be blocked. The user will see an error message generated by Cloudflare and the request will never make it to your Losant experience.
Use Case: Production vs Staging Domains
In a production application, you’ll want to perform ongoing development without impacting your live experience. The most common way to do this is by using two domains: one for production and one for staging.
The example below has two domains configured in Losant. The production domain, www.example.com, points to the production version (v1.0.0) of the experience. The staging domain, staging.example.com, points to the develop version.

If you followed Step 4 in this guide, Cloudflare is already configured for the www domain. To support the staging subdomain, you’ll need to add another CNAME with the name set to staging.

The content of the www and staging CNAME entries are identical.
If you want to restrict access to your staging domain, you can do so with another Cloudflare firewall rule.
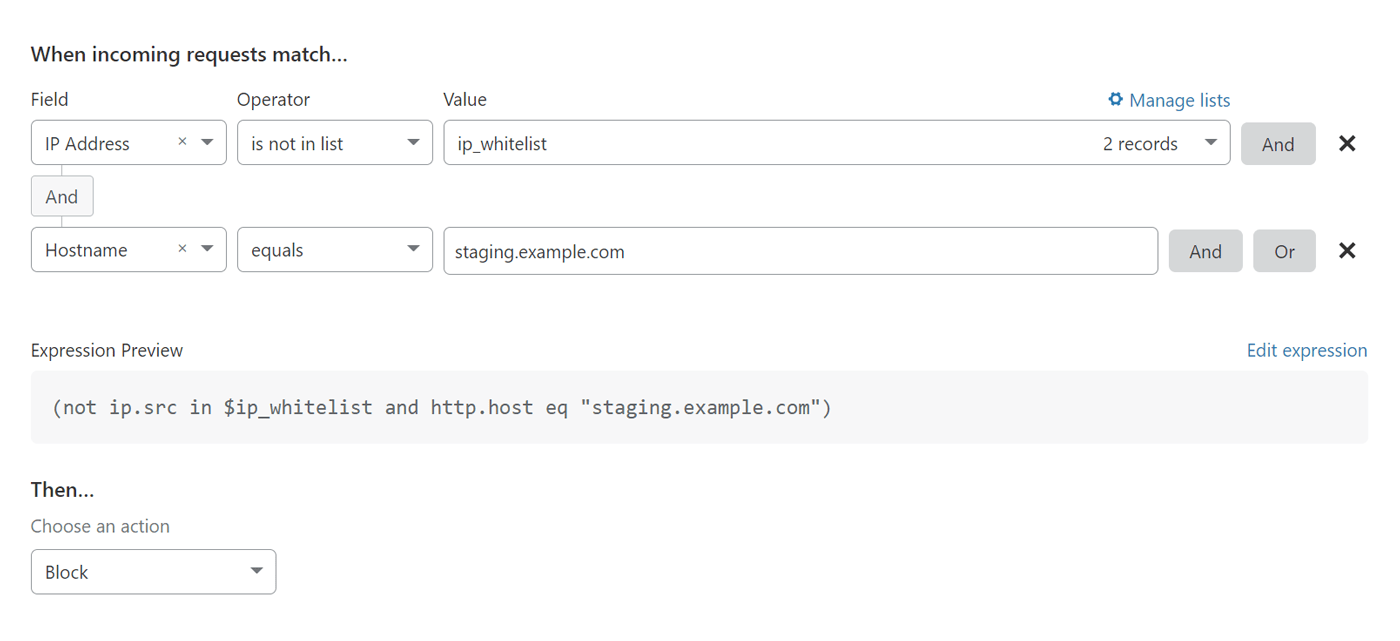
The example in the screenshot above will restrict access to staging.example.com based on a predefined list of IP addresses.
Was this page helpful?
Still looking for help? You can also search the Losant Forums or submit your question there.