Resource Jobs
Resource Jobs allow for managing batch processes and asynchronous tasks running against an application's resources. Each resource matching the Resource Job's query triggers one or more Application Workflows. The success or failure of each iteration is then logged through the workflow engine, and a detailed report is provided once the execution completes.
For a demonstration of how Resource Jobs can be used to improve efficiency, please see our How-to Guide: How To Use Resource Jobs to Poll Device State From an API.
Viewing Resource Jobs
A list of your application's Resource Jobs can be found by clicking the Resource Jobs item in the application subnavigation. The list also indicates the targeted resource type and its last execution date.
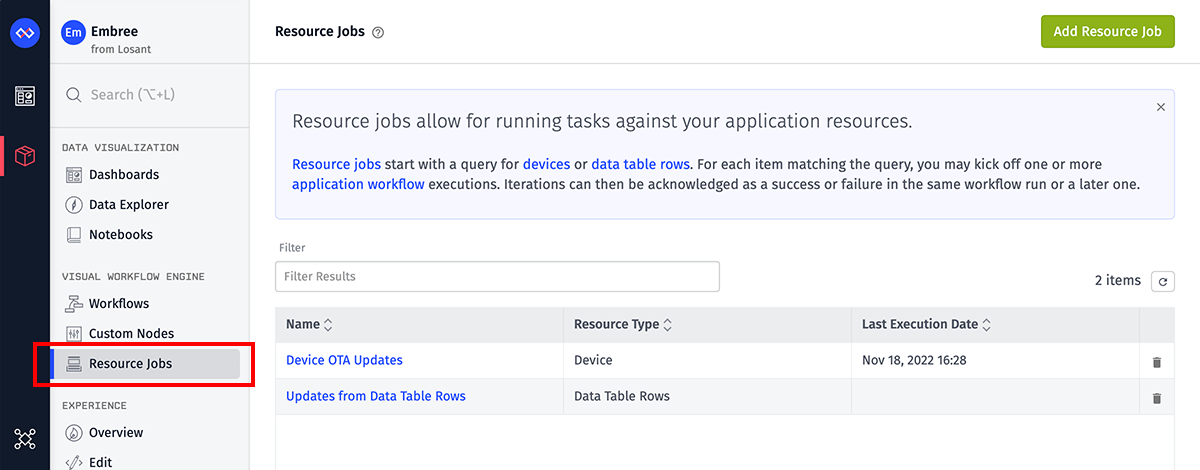
Click a Resource Job's name in the list to edit its configuration, view detailed execution logs, or view workflows triggered by the Resource Job.
Creating a Resource Job
From the Resource Jobs list page, click "Add Resource Job" in the top right corner. This will take you to a page where you may enter the properties of the Resource Job.
Resource Job Properties
There are several configuration properties that affect the behavior and targeted resources of a Resource Job.
Descriptive Properties
First, like many other application resources, there are a couple of properties that are strictly for presentational purposes and have no bearing on the behavior of the Resource Job:
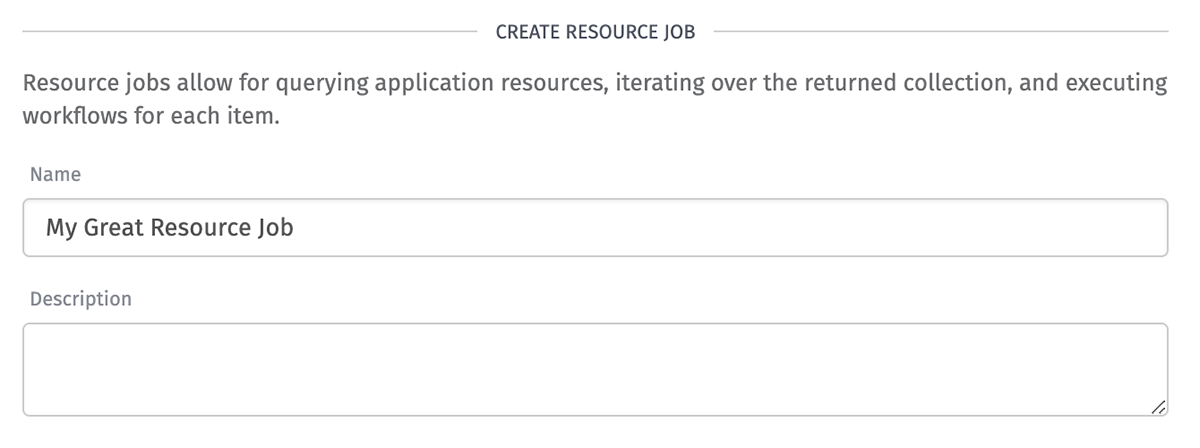
- Name: (Required) The human-readable name for this Resource Job.
- Description: An optional longer description of the Resource Job and its behavior.
Resource Query
Next, define the resources to target for this Resource Job ...
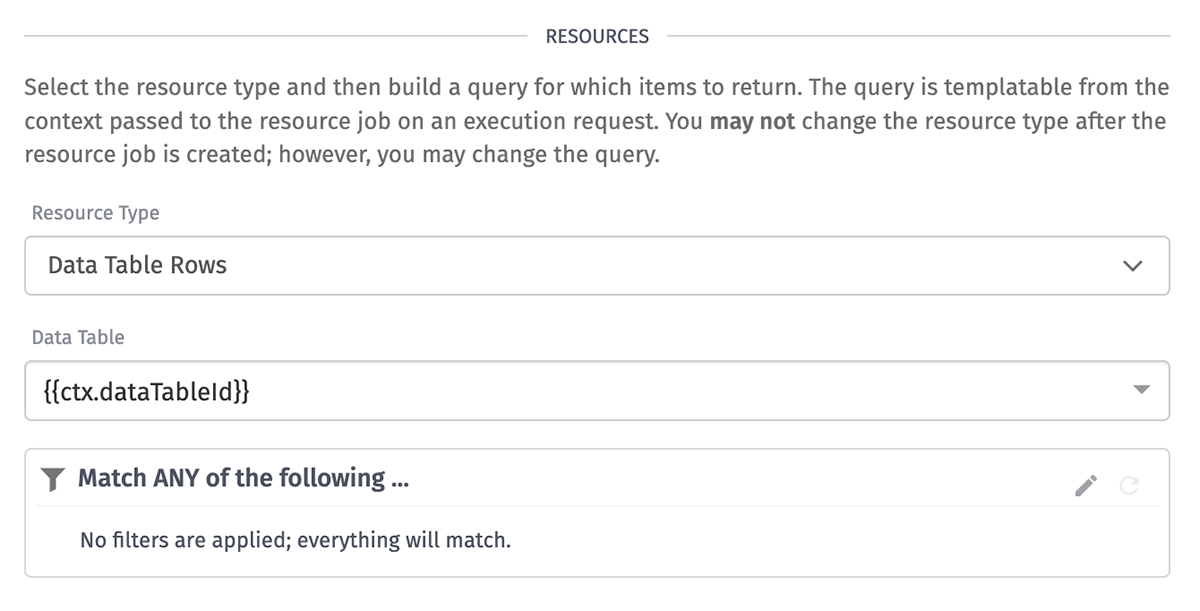
- Resource Type: Resource Jobs may target Devices, Data Table Rows, Experience Groups, or Experience Users. This value cannot be changed after creation of the Resource Job.
- Data Table: If "Data Table Rows" is the selected resource type, you must also select which of your application's Data Tables to query. This field is templatable against the execution context, allowing for dynamic selection of the Data Table at the time of execution.
- Query: Enter an advanced query to limit which items are targeted by the Resource Job iterations. This value is a JSON template that may reference values from the execution context to dynamically modify the returned resources. By default, the query returns all of your application's resources of the selected resource type.
When using values from the execution context to build your query, those values are found under the ctx object. For example, given a context of ...
{
   "dataTableId": "aaaabbbbccccddddeeeeffff",
   "apiUrlBase": "https://mythirdpartyapi.com/v2/2022-02-02",
   "fields": ["lastUpdated", "longName", "sequenceId"]
}
... you can reference those values through templates referencing the ctx object; for example, {{ctx.dataTableId}}.
Iteration Behavior
Once you have defined which application resources to iterate over, you must then define the general behavior of those iterations ...
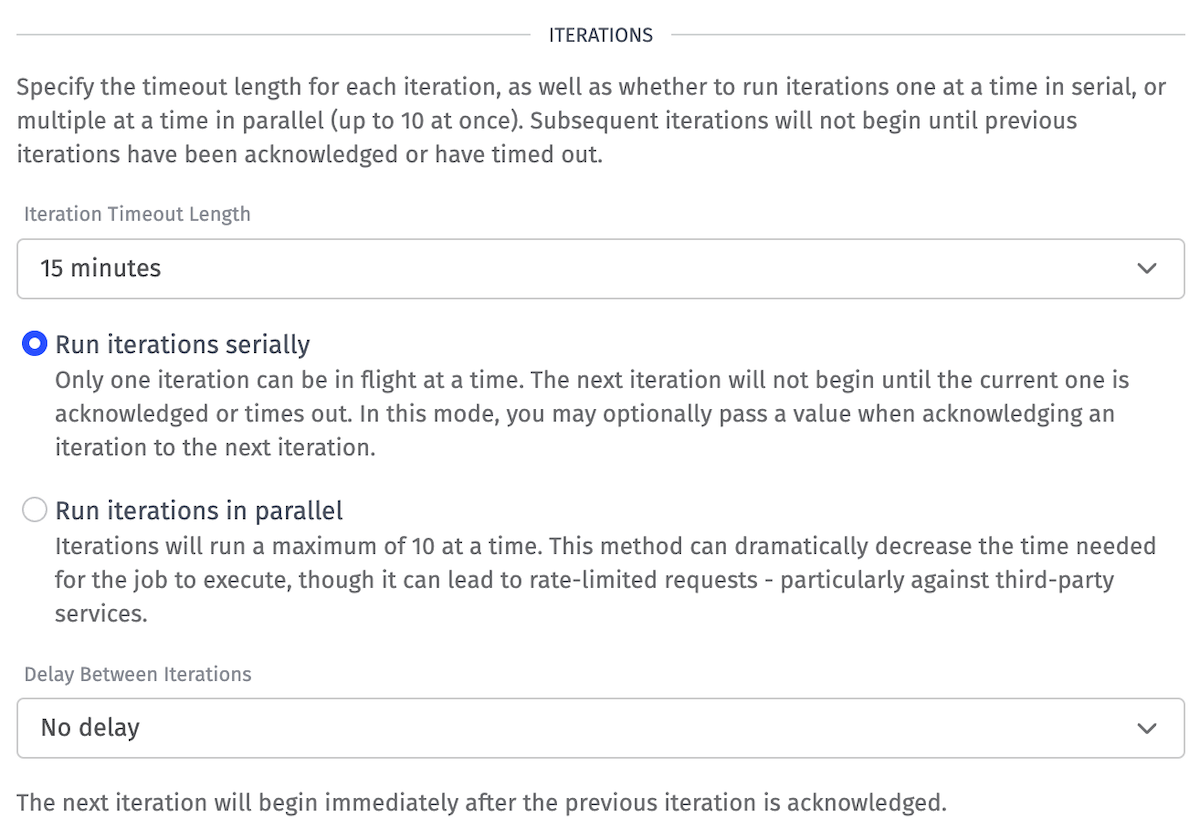
- Iteration Timeout Length: Select a length of time that each Resource Job iteration should be held open awaiting acknowledgment before the iteration times out. For processes that resolve in a single workflow execution, this value should be set to 60 seconds; for asynchronous processes, this should be set to a higher value to allow time for an acknowledgment request to return to the platform.
- Serial vs. Parallel Execution: Choose whether to run the iterations serially (one at a time) or in parallel (up to 10 at a time). Each mode has its advantages ...
- Serial iterations are useful if changes within your application during one iteration need to be referenced in a future iteration. Serial mode can also slow down the Resource Job execution if doing so is necessary to avoid third-party API rate limits. Additionally, choosing to run the iterations serially gives you the option of defining a value known as an Accumulator to pass to the next iteration of your Resource Job when acknowledging an iteration.
- Parallel iterations allow your Resource Job execution to complete much quicker than in serial mode. Any Accumulator defined on acknowledgment of a parallel iteration will be ignored and not passed to the following iterations. (Note: Parallel mode is not available in Sandbox-owned applications.)
- Delay Between Iterations: Optionally, you may add a short delay between when a previous iteration is acknowledged or times out and when the next iteration begins. This is especially useful when dealing with third-party APIs and services that may rate limit requests initiated.
Retries
In addition to defining the general behavior of iterations, you can also configure a Resource Job to retry iterations that fail or time out.
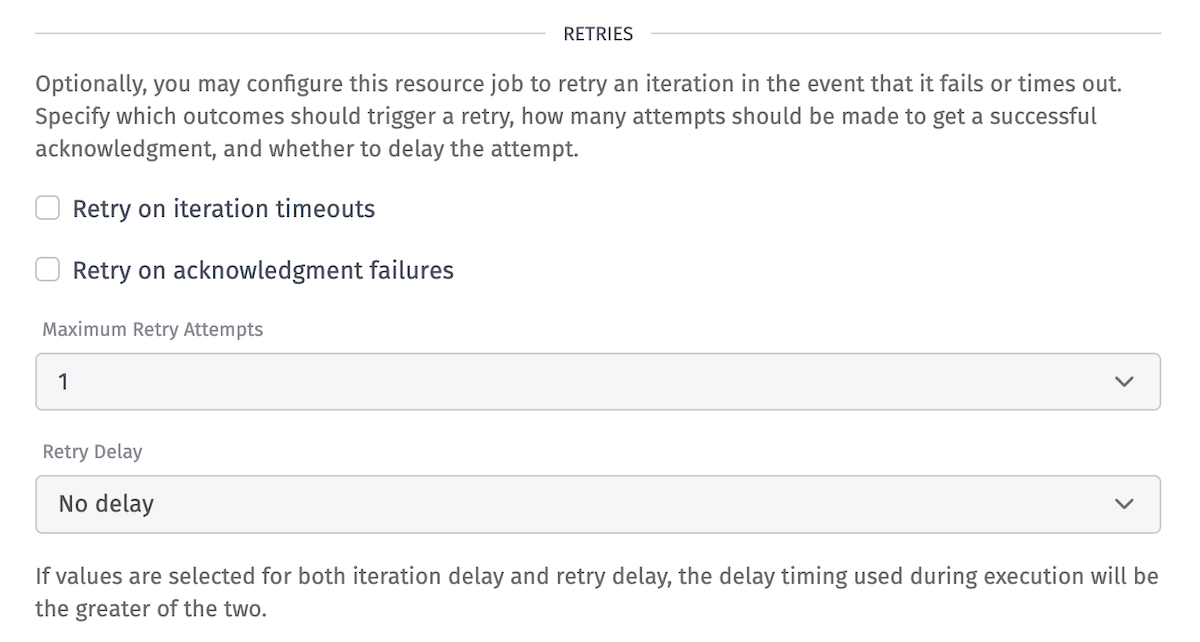
To enable iteration retries for your Resource Job, first select one or both options for situations in which you would want to retry an iteration.
- Retry on iteration timeouts: Retries an iteration if it hits a timeout, assuming there are retries left for the iteration.
- Retry on acknowledgment failures: Retries an iteration if it is marked as a failure, assuming there are retries left for the iteration.
If either of the above options are selected, you will be able to define the following:
- Maximum Retry Attempts: The maximum number of times to retry a given iteration.
- Retry Delay: The length of time to wait after the previous failure before kicking off the retry. (Note: If there are values selected for both Delay Between Iterations and Retry Delay, the greater of the two will be used.)
Default Context
Finally define the Default Context for this Resource Job. This value is a JSON object that is provided on the initial payload to all Iteration, Timeout, and Completion Triggers, and this context can also be referenced in the query targeting your application resources.
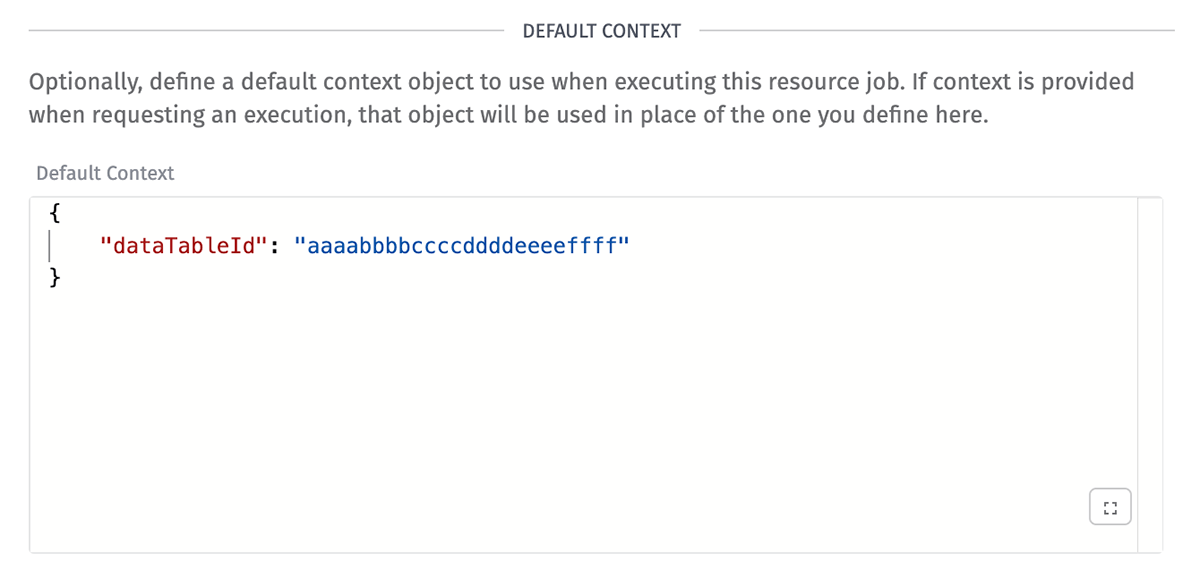
The Default Context is only used if a custom context object is not provided when requesting the execution.
Using Resource Jobs
The configuration of the Resource Job itself is only a small portion of the setup; the majority of the work takes place in Losant's visual workflow engine, where the behavior of each iteration, acknowledgment, error handling, and final reporting is all defined.
Requesting an Execution
First, there are three ways to request a Resource Job execution:
- Resource Job "Execute" Modal: From the Resource Job's overview page, click the "Execute" button in the top right corner. Before scheduling the execution, you can change the query from what is defined on the Resource Job (which is useful when developing and testing the Resource Job). You also have the option of using the Resource Job's default context, or providing a custom JSON object for the execution.
- Job: Execute Node: An execution may be requested within a workflow run by invoking a Job: Execute Node targeting your Resource Job.
- Losant's REST API: Executions may be requested through a request to the Resource Job: Execute API endpoint. The request may optionally include a
templateContextJSON Template to override the Resource Job's default context.
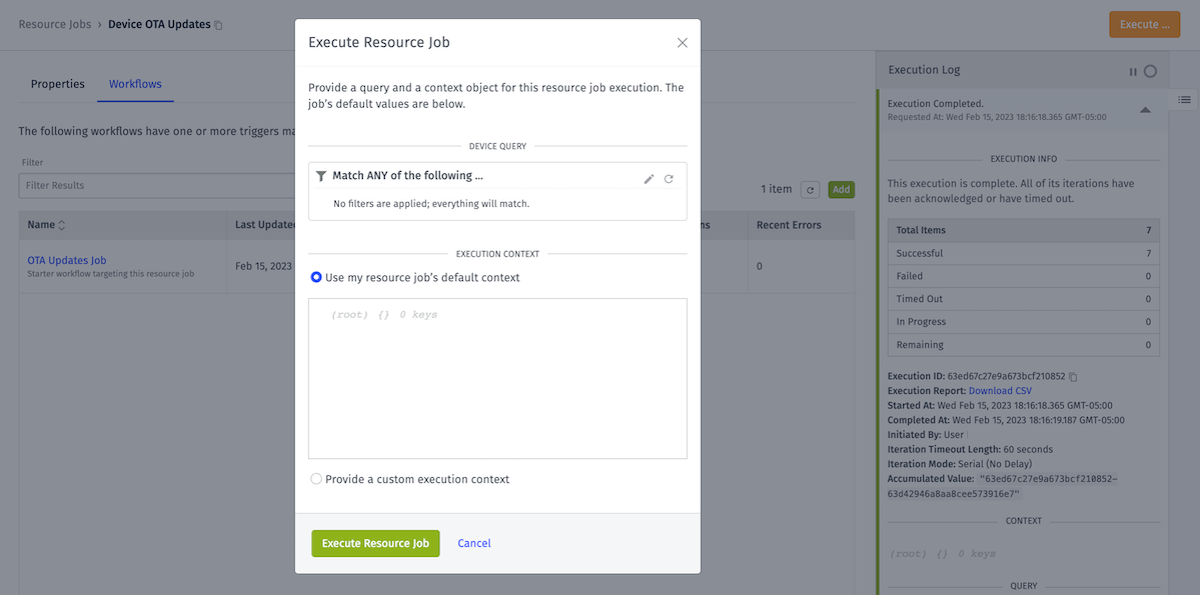
Once the execution request is sent, iterations will begin immediately and will continue until all resources matching the query have completed, or the execution is canceled.
Note: A Resource Job may only have one in-flight execution at a time; in other words, requesting an execution, and then requesting another execution before all iterations of the first execution have completed, will result in an error.
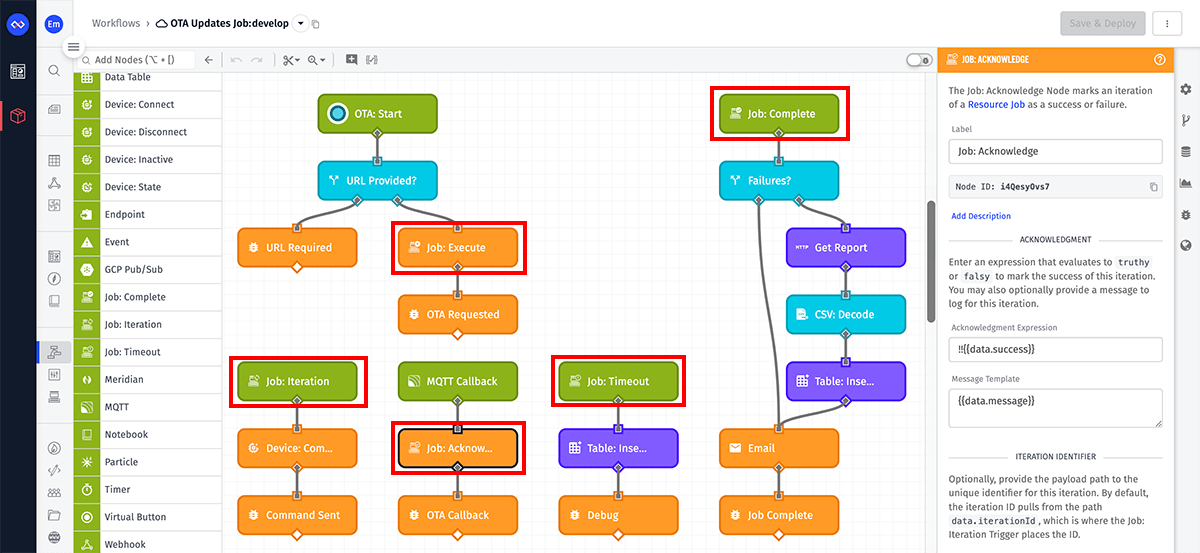
Handling Iterations
Each item returned by the Resource Job's query kicks off its own separate workflow run, and that run may then fire additional workflow runs until the iteration is acknowledged or times out.
Those runs always start with a Job: Iteration Trigger, which includes an object for the current resource being iterated, as well as general information about the execution itself.
Out of that initial trigger, you may use the full power of Losant's Application Workflows to, for example ...
- Send commands to devices – prompting them to take some sort of action – and then handle replies on custom MQTT topics.
- Make HTTP requests to third-party services, or use other nodes in the palette to query databases or kick off processes in major cloud providers.
- Update devices or other application resources, or record state.
Acknowledging Iterations
Every iteration should end with a Job: Acknowledge Node, marking the iteration as a success or failure depending on the actions taken and responses received within that iteration's workflow run(s).
Acknowledging iterations is important for two main reasons:
- Tracking the Resource Job's success: Knowing whether each iteration performed its expected tasks is crucial for managing your IoT application's hardware and data. Iterations marked as a failure can be retried at a later date - for example, at a time when a failing device has re-established its connection to the Losant MQTT broker.
- Decreasing overall execution time: Acknowledging an iteration frees up a slot for the next iteration of the Resource Job to begin. Whether running in serial or parallel mode, future iterations cannot begin until a previous iteration has completed.
If an iteration is never acknowledged - either due to an uncaught exception in a workflow run or a Job: Acknowledge Node never being invoked - the iteration will eventually time out, and that resource will be logged as a timeout when viewing the execution's final report.
Handling Timeouts
In the event that an iteration goes unacknowledged and it reaches its timeout limit, you may optionally trigger an additional workflow execution through a Job: Timeout Trigger.
Assuming the resource has not been deleted since its initial execution, the Job: Timeout Trigger includes the full resource object as well as the execution context. Out of that trigger, you may log an event, send an SMS message, delete the resource, or whatever action is appropriate for your use case.
Viewing Results
Finally, once all iterations have completed or timed out, you may optionally fire a Job: Complete Trigger. This trigger's payload includes information about the full Resource Job execution (number of successful iterations, failures, and timeouts), as well as a link to a detailed CSV report that includes per-resource results.
That report can be emailed, saved to Application Files, or written to a Data Table for use in a future Resource Job execution.
Canceling an Execution
If you have a Resource Job in progress that you wish to cancel, there are a couple of ways to do so. One way to cancel is through a Losant API request. The other option for canceling your research job execution is an inline "Cancel Execution" button that can be found in the execution log accessible from the Resource Job's "Properties" tab.
It is worth noting that when you choose to cancel an execution, any in-progress workflow runs will complete, but all other iterations will be immediately canceled.
Execution Logs
A log of a Resource Job's recent executions is available on its "Properties" tab. For each execution, the log contains general information about the execution, such as:
- Number of successful, failed, and timed-out iterations.
- Resolved queries, context objects, and Resource Job settings for the execution.
- A URL from which the detailed report can be downloaded. (Note: This URL is only valid for 7 days after its creation.)
- For Resource Jobs that run iterations serially, the final accumulated value, if defined.
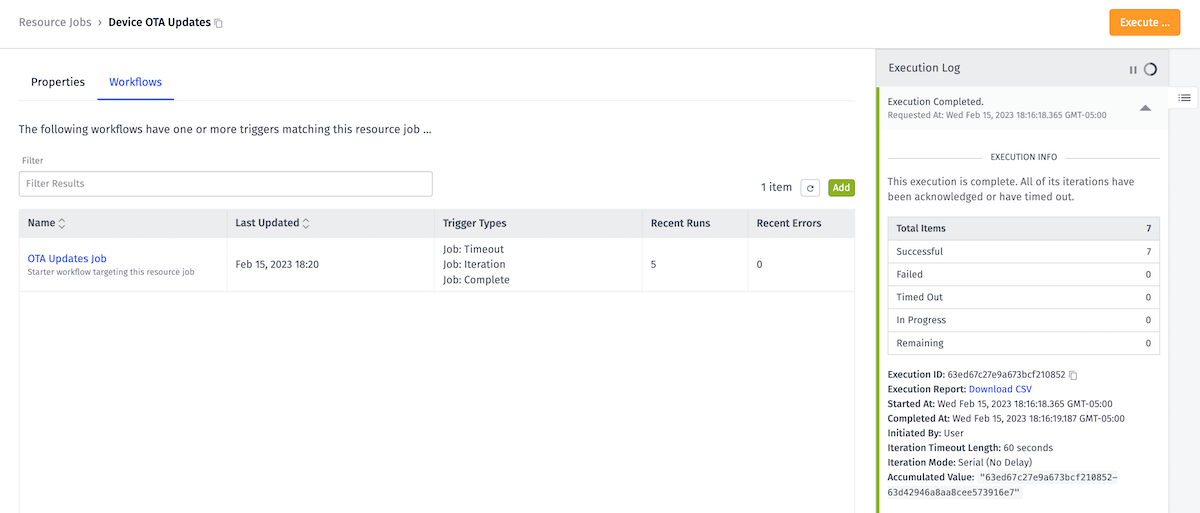
Associated Workflows
From a Resource Job's "Workflows" tab, you will see a list of all workflows and custom nodes with at least one of the following components targeting this Resource Job ...
The following are not included in a Resource Job's "Workflows" list ...
- Job: Acknowledge Nodes targeting an iteration of this Resource Job.
- Job: Execute Nodes that use a string template to reference the Resource Job by ID, as opposed to selecting the Resource Job directly.
- Losant API Nodes invoking any API action for this Resource Job, including a job execution.
From this table, you may also generate a starter workflow for this Resource Job, which includes debug output for all triggers, and the ability to execute the job and acknowledge iterations.
Deleting a Resource Job
To delete a Resource Job, click the "Delete Resource Job" link at the bottom of its "Properties" tab.
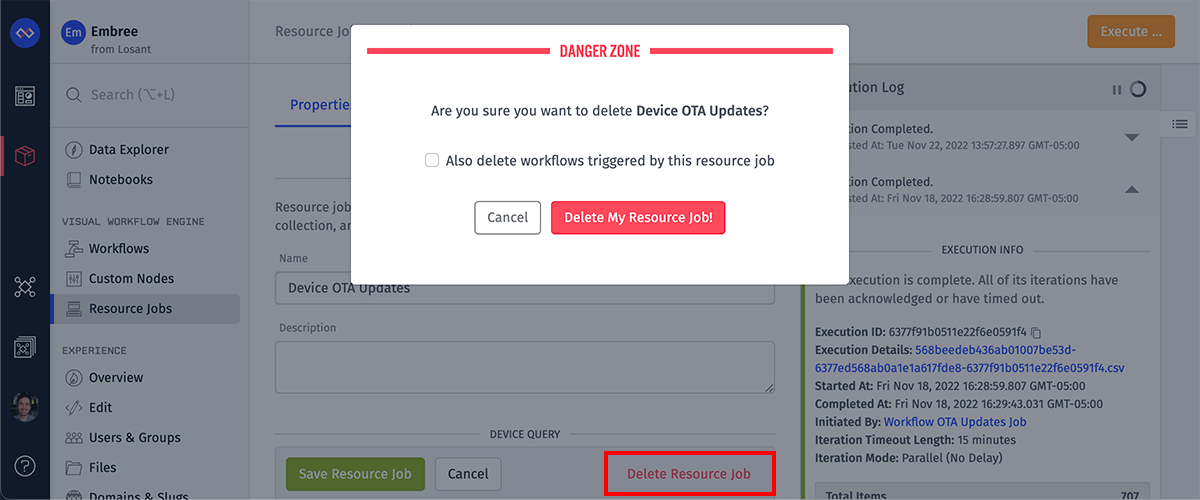
Deleting a Resource Job will cause any in-progress executions to complete, but no new iterations will begin. Execution logs for the Resource Job will no longer be accessible.
When deleting a Resource Job, you also have the option of deleting any workflows with triggers targeting that Resource Job (but not any workflows with associated Job: Execute or Job: Acknowledge Nodes). Take care when exercising this option, as if the targeted workflows have other, unrelated triggers, the workflows will still be deleted.
Related Links
Was this page helpful?
Still looking for help? You can also search the Losant Forums or submit your question there.