Instance Custom Nodes
Instance Custom Nodes allow for extending the functionality of Losant's Visual Workflow Engine by exposing new first-class workflow nodes to all applications under the instance. Instance Custom Nodes can be cloud-based (in which case they are available in Application Workflows, Experience Workflows, and Application Custom Nodes), or edge-based (in which case they are available in Edge Workflows and Edge Custom Nodes).
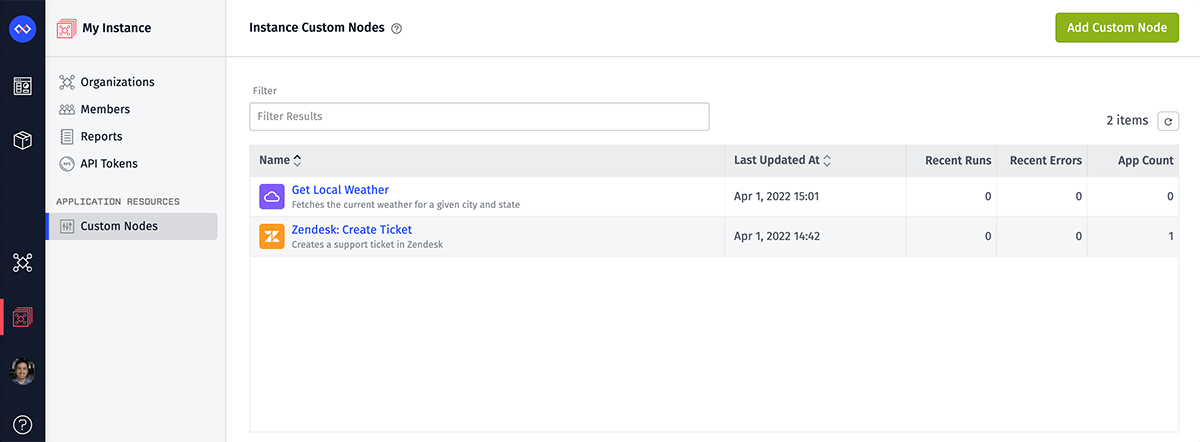
Instance Custom Nodes can be created and viewed within the Instance Manager.
Differences from Application-Owned Custom Nodes
While there are similarities around how they are initially constructed, there are significant differences between Instance Custom Nodes and application-owned Custom Nodes, which are scoped to a single application:
Appearance in Workflow Editors
First, application-owned Custom Nodes include an icon in the palette and on the stage indicating their status as a custom node. Their editors also speak to this by asking the user to choose a version and also allowing the user to view the node's source.
Instance Custom Nodes appear just like any other node in the workflow palette, on the stage, and in debug and error logs. To the application builder, they are no different than any first-class node. They also do not appear in the application's list of Custom Nodes.
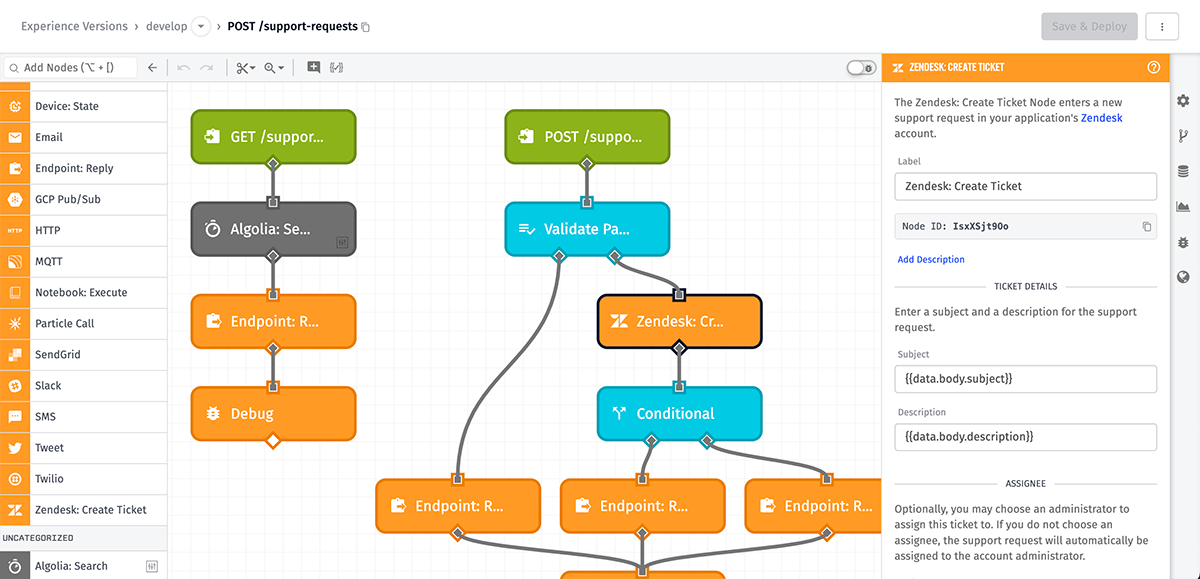
In the example above, the "Zendesk: Create Ticket" Node is an Instance Custom Node, whereas the "Algolia: Search" Node is an application-owned Custom Node.
Hidden Configuration
Since application-owned Custom Nodes exist within the scope of an application—whether they were developed in the application, imported from a file, or imported from the Template Library—they are treated as application resources. As such, users may view the node's configuration and make changes at any time.
Instance Custom Nodes, on the other hand, never appear as resources within an application; other than what you expose to your application builders through display properties (such as the name, icon, category, and descriptions), inputs, and result behavior, users cannot access the underlying functionality of an Instance Custom Node. This allows authors of Instance Custom Nodes to connect to third-party services—and include credentials for access to those services—without ever exposing those services directly to the Losant developers utilizing them.
Note: The contents of edge-based Instance Custom Nodes—when included in Edge Workflows deployed to Gateway Edge Agents—are sent down to those edge devices, so that the nodes can be executed. This means that the contents of edge-based Instance Custom Nodes are potentially exposed to application builders or others who have access to the edge agent devices.
Cross-Application Exposure
To utilize an application-owned Custom Node in multiple applications, the node must be imported independently into each application that is utilizing it. This is true not only for Custom Nodes the user has developed, but also for those that come from Losant's Template Library.
Instance Custom Nodes, however, are automatically made available to all applications under your instance. No action is required by the application builder to start using the node, other than simply dragging it from the workflow palette onto the stage. It is immediately available once the Instance Custom Node has been created within the instance.
Versioning
Application-owned Custom Nodes may be versioned just like workflows, and when utilizing them in a workflow, users may choose a specific version to execute.
Since they are meant to appear as native nodes, Instance Custom Nodes are not versioned. Instance Custom Node authors may not upload multiple versions of the node, and users may not choose a version to execute.
However, a version of a Custom Node may be exported and utilized as an Instance Custom Node. It is not required to use the "develop" version of an application-owned Custom Node; instead, simply export the version you wish to use as the Instance Custom Node and import that file.
Developing Instance Custom Nodes
Instance Custom Nodes are developed first as application-owned Custom Nodes. They take the same forms of user input and are constructed using the native nodes in the workflow palette. They are then exported from the application and imported as a new Instance Custom Node.
Development Guidelines
Given that Instance Custom Nodes are exposed to all applications under your instance, it is important to take extra care when developing them:
- Instance Custom Nodes should never reference specific application resources (devices, data tables, etc.) in the nodes that make up their functionality, as those resources are not available to the applications that will be utilizing the Instance Custom Node.
- Extra care should be taken to test various inputs and conditions, as you will have little control over the values provided as inputs to the Instance Custom Node once it is in your users' hands.
- If your Instance Custom Node utilizes third-party services, verify that the service can handle the load that will be placed on it (throttles, concurrency, monthly limits) when your node is being utilized across multiple applications in your instance.
Creating Nodes
Once you have completed developing and testing your application-owned Custom Node, you may export the node as a file. Then, within the Instance Manager, navigate to your list of Instance Custom Nodes and click the "Add Custom Node" button.
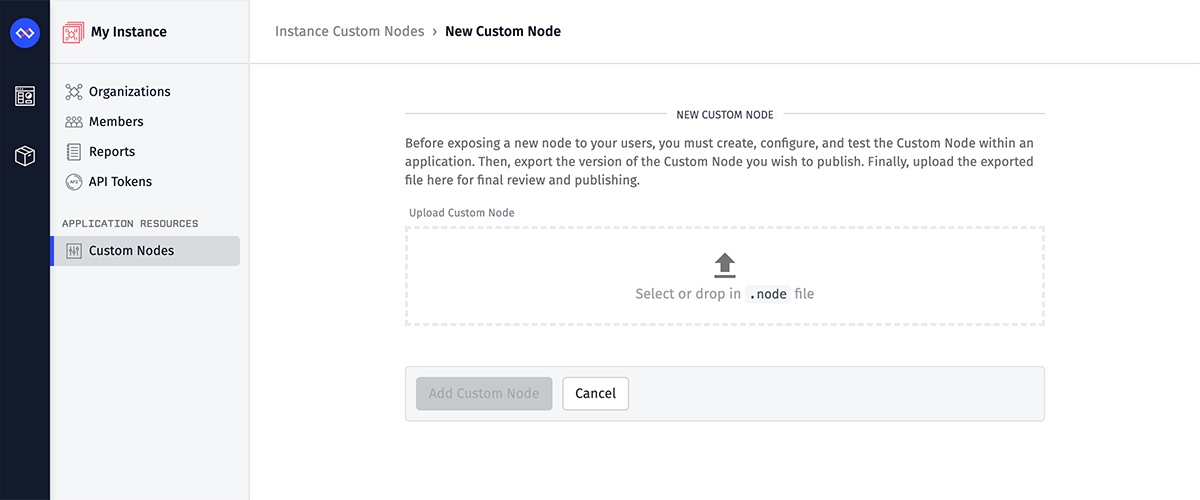
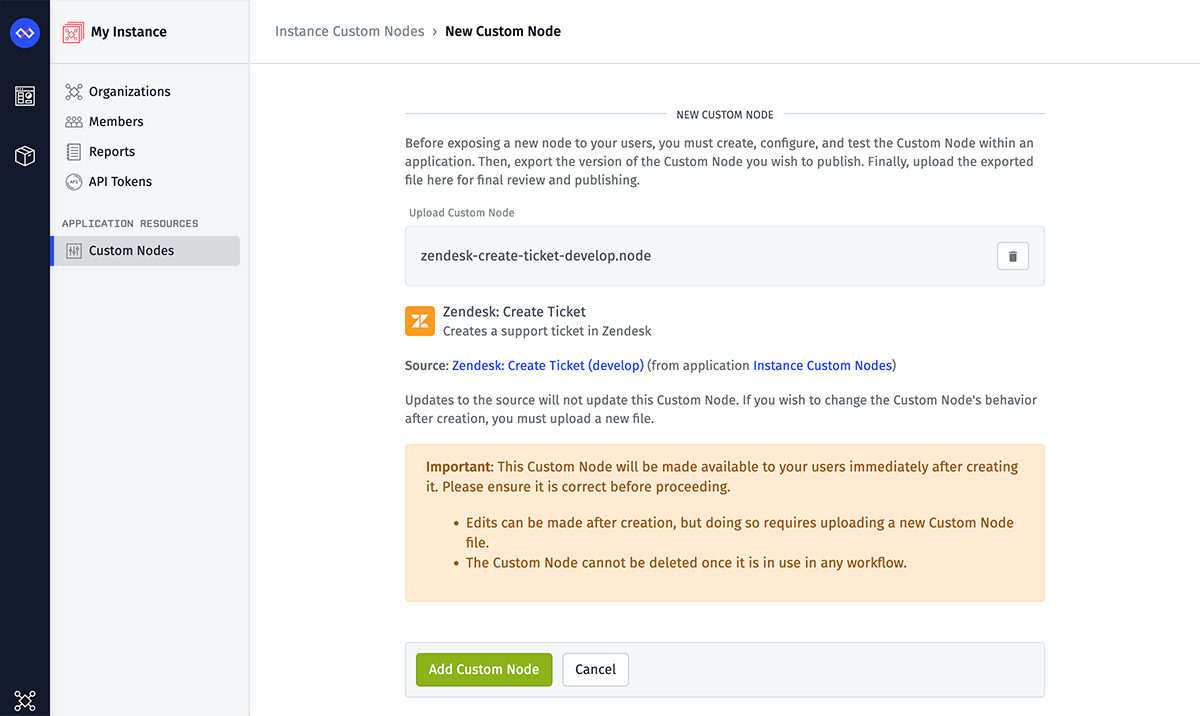
Then, upload your exported file and verify the display properties (name, icon, description, and source information). If all looks correct, click the "Add Custom Node" button. Depending on if it is cloud-based or edge-based, the node will immediately become available for use in all Application Workflows, Experience Workflows, and Application Custom Nodes), or Edge Workflows and Edge Custom Nodes under your instance.
Updating Nodes
There may come a time when you wish to extend the functionality of an Instance Custom Node or fix a bug in its implementation. To do so, you may do the following ...
- From the Instance Custom Node's "Properties" tab, export the currently utilized version of the node. Keep this file on your computer, as you may wish to revert any changes you make and having this file will allow you to do so easily.
- Within one of your applications, import the exported file as a new application-scoped Custom Node.
- Make the necessary changes within that Custom Node, and thoroughly test your work within the application. (Take care, when testing, to utilize the new application-scoped Custom Node and not the existing Instance Custom Node, which will still be utilizing your previous functionality.)
- Once you are satisfied with the changes, export the updated application-scoped Custom Node to a file.
- Return to the Instance Custom Node's "Properties" tab and upload the updated file.
- Verify the display properties and source information to ensure you have uploaded the correct file, and save.
- Any existing usages of an Instance Custom Node—and any new usages of it—in your applications' workflows will now utilize the new version.
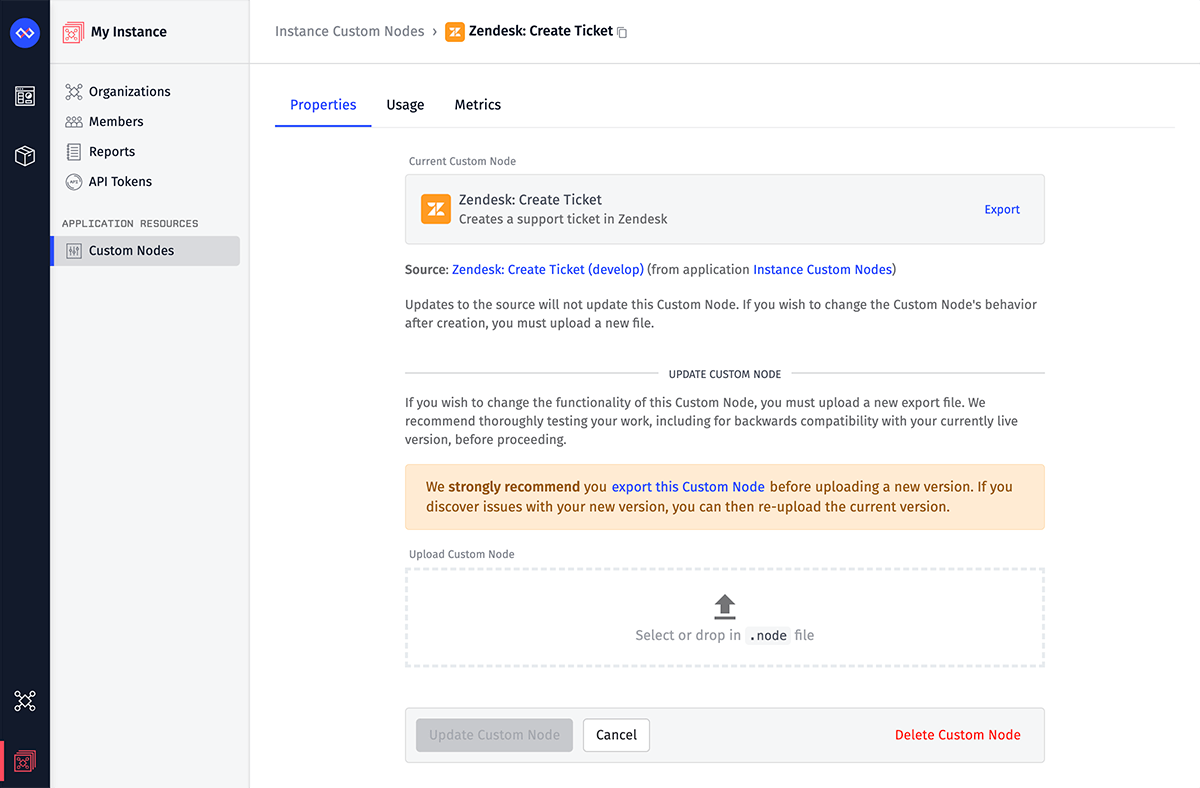
Note: On the Properties tab, the source application, workflow, and version are provided for the current Instance Custom Node (with links to the resources if you have access to them). Updating the source directly will not update the Instance Custom Node; you must import a new file with your changes if you wish to update the Instance Custom Node.
Special Considerations For Updating Edge Instance Custom Nodes
All Edge Workflows, including application-scoped Edge Custom Nodes and edge Instance Custom Nodes, have a minimum Gateway Edge Agent version. This is the minimum version of the Edge Agent that has the capability to perform all the requested functionality of the workflow. Be extremely cautious when increasing the target minimum version for an edge Instance Custom Node, as that may cause existing usage in workflows with a lower target to break or fail to deploy.
When updating an edge Instance Custom Node, this does not immediately change what is actively running in workflows deployed to Edge Agents that use the node. Edge Agents will continue to run the old version of the node until the Edge Agent syncs its workflows again. This will happen when the device next connects to the platform, or if new/changed workflows are deployed to the device.
Deleting Nodes
To delete an Instance Custom Node, click the "Delete Custom Node" button on the node's "Properties" tab. Doing so will immediately remove the node from the palette in all of your instance's workflow editors.
Note: Instance Custom Nodes may only be deleted if they are not in use in any workflow or workflow version. If you must delete an Instance Custom Node that is in use ...
- Consider updating the Instance Custom Node to add a deprecation warning well in advance.
- Offer your application builders an alternative; for example, provide the source of the Instance Custom Node and allow them to import it as an application-scoped Custom Node. (Take care not to expose any sensitive information that may be within the Instance Custom Node's settings.)
- If necessary, add yourself as a member of the organizations utilizing the Instance Custom Node and manually remove it from any workflows.
Using Instance Custom Nodes
Instance Custom Nodes are utilized in workflows just like any other node. They are selected from the workflow palette, dropped on the workflow canvas, and then configured using static values, templates, and payload paths. Depending on their configuration, they may return a result, and they may also behave as a branching node (taking a true or a false path on to the remainder of your workflow).
Tracking Instance Custom Node Usage
It is important for instance administrators to keep track of the usage of their Instance Custom Nodes—their prevalence through the instance's applications, number of executions, average execution times, and any errors that arise. Tools for tracking these metrics are provided within the Instance Manager.
Usage Per Organization
Under the Instance Custom Node's "Usage" tab, you will find a table listing all of the organizations that are currently utilizing the node. Each row also indicates the number of applications and workflows within that organization where the node is being used.
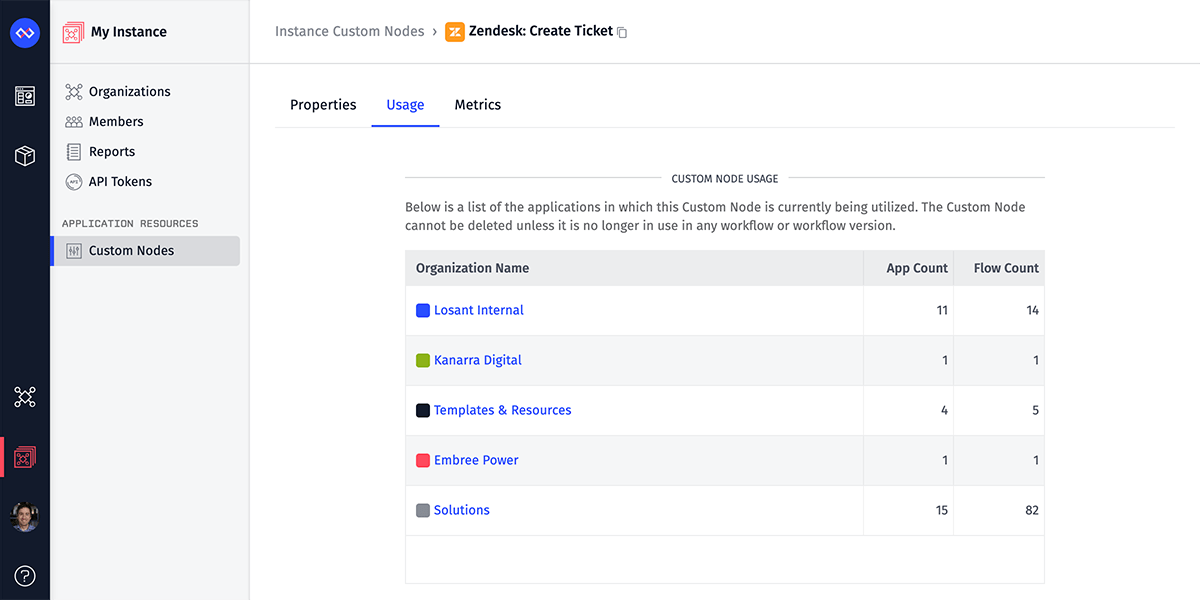
This information can be helpful in learning more about how your customers are using the Losant platform; it also provides a means for tracking down usage of the Instance Custom Node should you need to deprecate and eventually remove it.
Note: Any usage of the Instance Custom Node in sandbox-owned applications is aggregated under a single "Sandboxes" entry within the usage table.
Instance Custom Node Metrics
Under the Instance Custom Node's "Metrics" tab, you will find statistics about the node that are similar to what is exposed on a workflow's "Metrics" tab:
- How many successful and failing executions of the Instance Custom Node have occurred in a time period
- What is the average runtime per execution
- What errors have occurred within the Instance Custom Node, and which nodes threw the errors
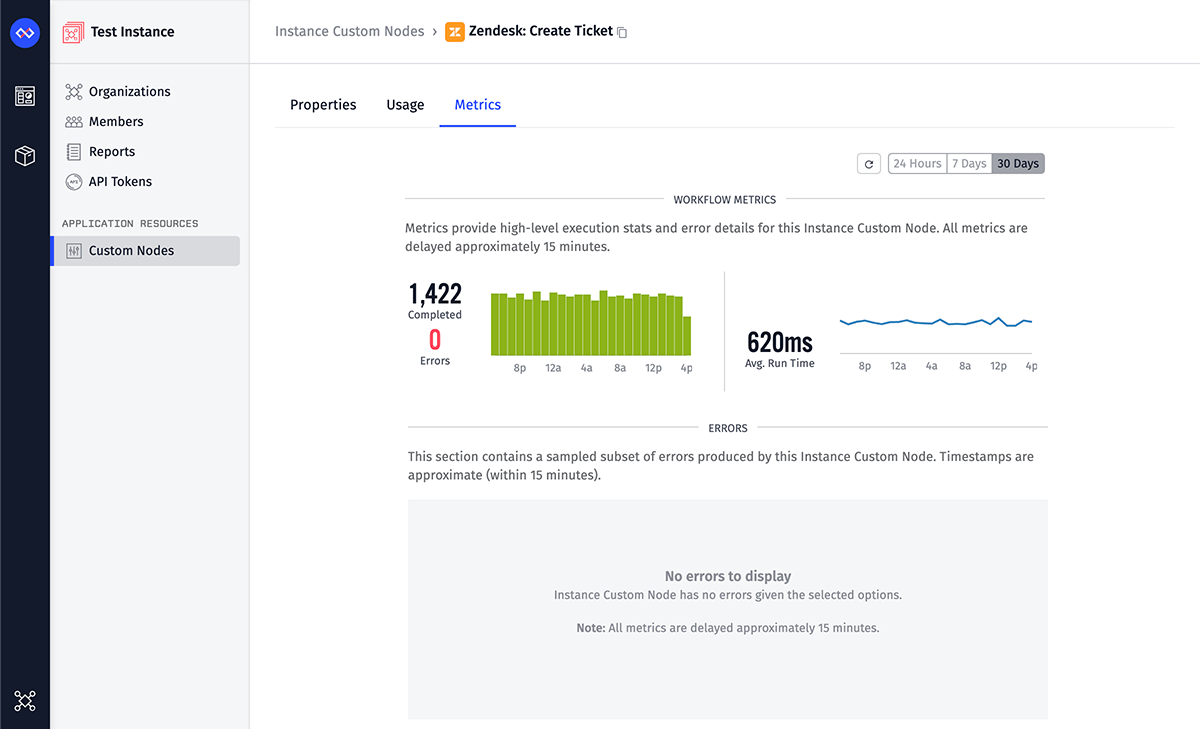
Much like it is for workflows, this information is useful for debugging issues and also improving the performance of the Instance Custom Node.
Was this page helpful?
Still looking for help? You can also search the Losant Forums or submit your question there.