Custom Nodes
Custom Nodes are wrapped-up groups of nodes that can be used in your application’s workflows. They can take input from the workflows calling the node and return values to be used later in those workflow runs.
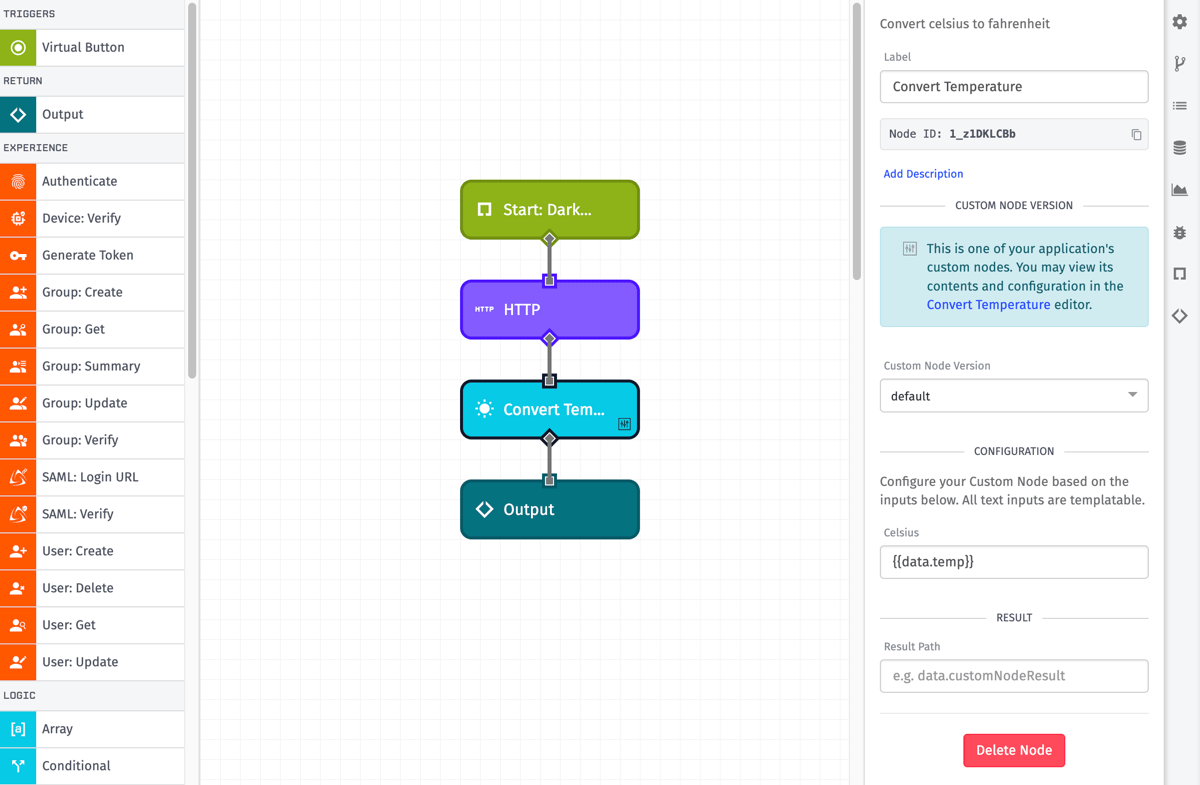
Custom Nodes have several use cases, such as:
- Encompassing common logic and formulae, such as converting temperatures from Fahrenheit to Celsius.
- Wrapping third-party API integrations, including setting constants (such as authorization tokens) and transforming results.
- Building a common user redirect framework for an Application Experience.
Creating and Viewing Custom Nodes
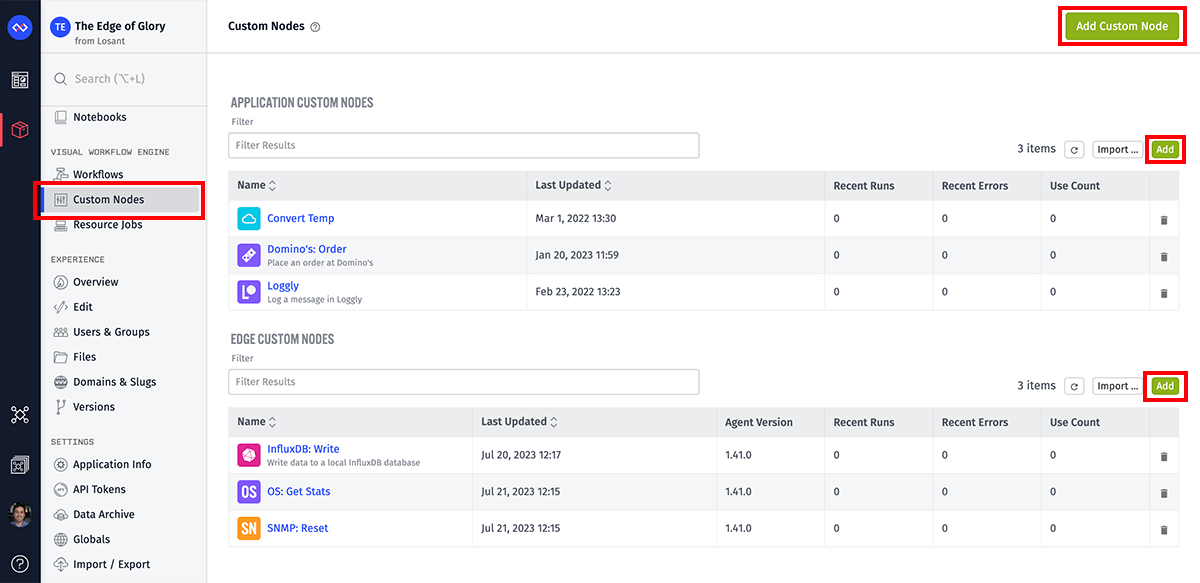
A list of your application’s Custom Nodes can be found under the “Custom Nodes” link. Here, Application Custom Nodes and Edge Custom Nodes are separated into two different lists. You may add a new Custom Node by clicking the “Add” button in the top right corner of the page or the top right corner of either list.
Importing Custom Nodes
Custom Nodes, like workflows, can be exported from your application and shared with other users for import into their own applications.
If you have an exported Custom Node file, you can also import that Custom Node into your application by clicking the “Import” button in the appropriate list and selecting the file.
In some cases, an Application Custom Node can be imported as an Edge Custom Node and vice-versa; whether this is possible depends on if all the nodes used in the exported Custom Node are valid for the desired import flow class.
Losant has a catalog of useful nodes available in our Template Library.
Note: When exporting a Custom Node, especially for sharing with other users, make sure you are not including any sensitive information such as API tokens within the configuration of any inner node (including any Virtual Buttons used for testing).
Configuration
Creating a Custom Node is very similar to building a workflow; however, there are a number of additional properties that go into configuring a Custom Node.
Node Type
First, you must choose which type of Custom Node to create; this type may not be changed later, and your choice of type determines which nodes and functionality are available within the new Custom Node.
Note: When creating a new Custom Node from one of the “Add” buttons tied to either the Application Custom Node or Edge Custom Node lists (as opposed to the larger button at the top of the “Custom Nodes” screen), this choice is implied by the button that was clicked, and the “Type” option is not presented in the creation form.
Application Custom Nodes
Application Custom Nodes can be used within Application Workflows, Experience Workflows, and other Application Custom Nodes. They can also be exported for use as Instance Custom Nodes.
Edge Custom Nodes
Edge Custom Nodes can be used within Edge Workflows and other Edge Custom Nodes. They can also be exported for use as Instance Custom Nodes. However, Edge Custom Nodes may not be used in on-disk workflows.
General Properties
Custom Nodes take several properties related to the node’s display in your application’s user interface. They are not version-specific; meaning, if you change these properties, they will change across all versions and deployed instances of your Custom Node.
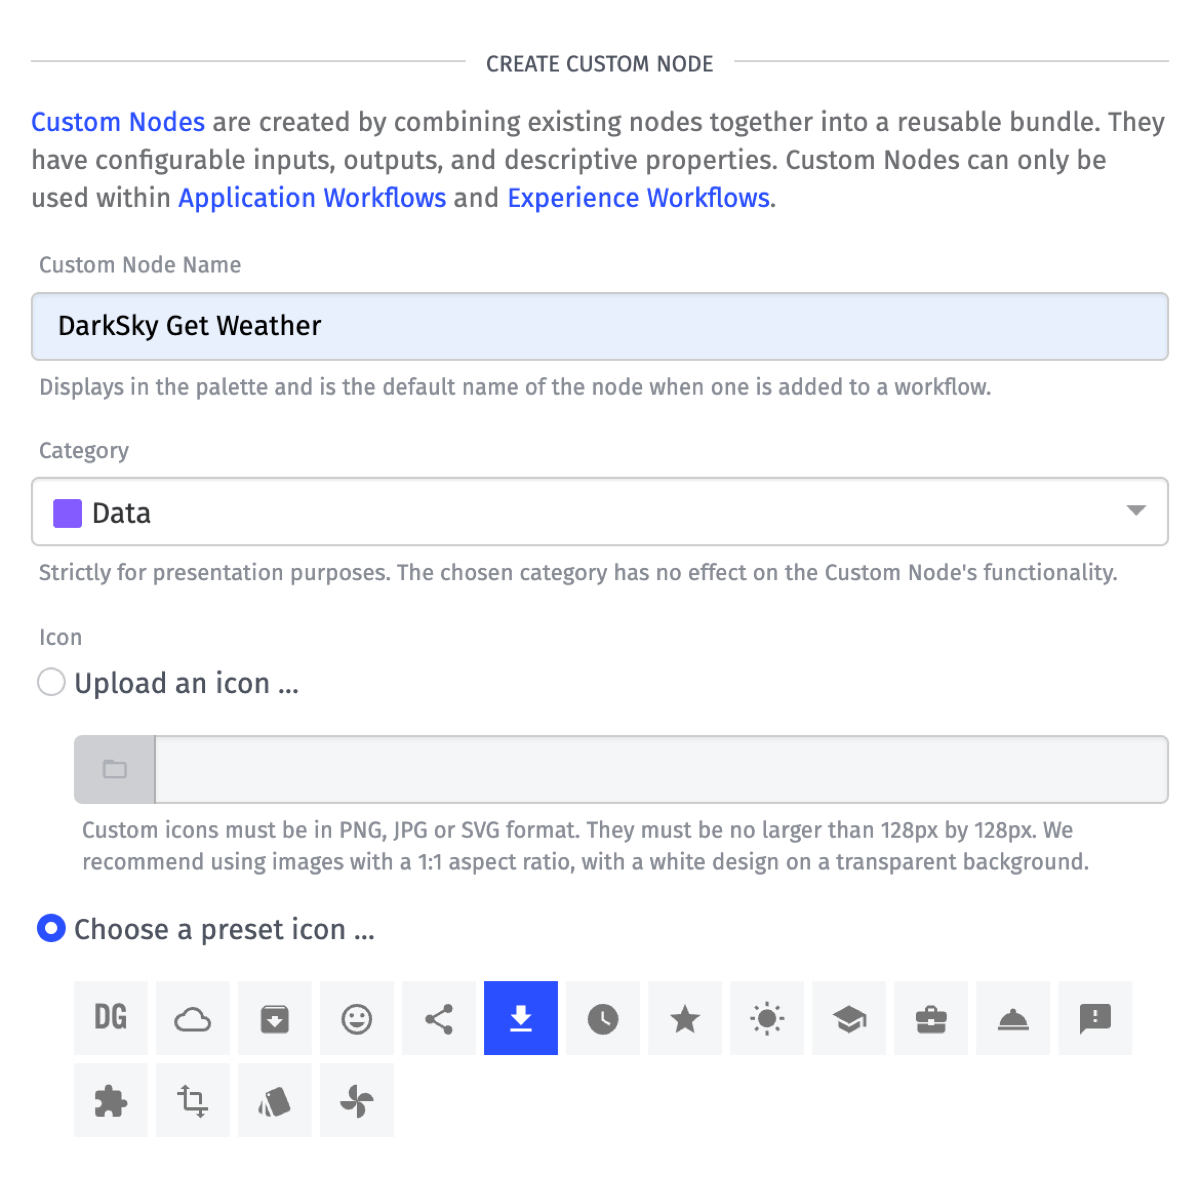
These properties are set on creation of the Custom Node, though they can be edited later in the Custom Node editor’s “Properties” panel:
- Name: This serves as the Custom Node’s label in the node palette, as well as the default label on the node immediately after it is dropped onto the canvas. The name must be unique within your application; no two Custom Nodes can share the same name.
- Category: This is the category that the Custom Node will be listed under in the node palette. If no category is set, the node will appear in the “Uncategorized” section at the bottom of the workflow palette.
- Icon: The Custom Node must have an icon, though one will be chosen for you by default based on the Custom Node’s name. There are also an array of icons available for quick selection. Alternatively, you may upload an icon to your application’s files, provided the icon is in JPG, SVG or PNG format and is no larger than 128px in width or height. We recommend a single-color white icon on a transparent background, built at a 1:1 aspect ratio. (Note: Changing the image that is at the file’s URL will not change the icon on the Custom Node; to update the icon, you will have to first remove it from your Custom Node configuration and then re-select the file at that URL.)
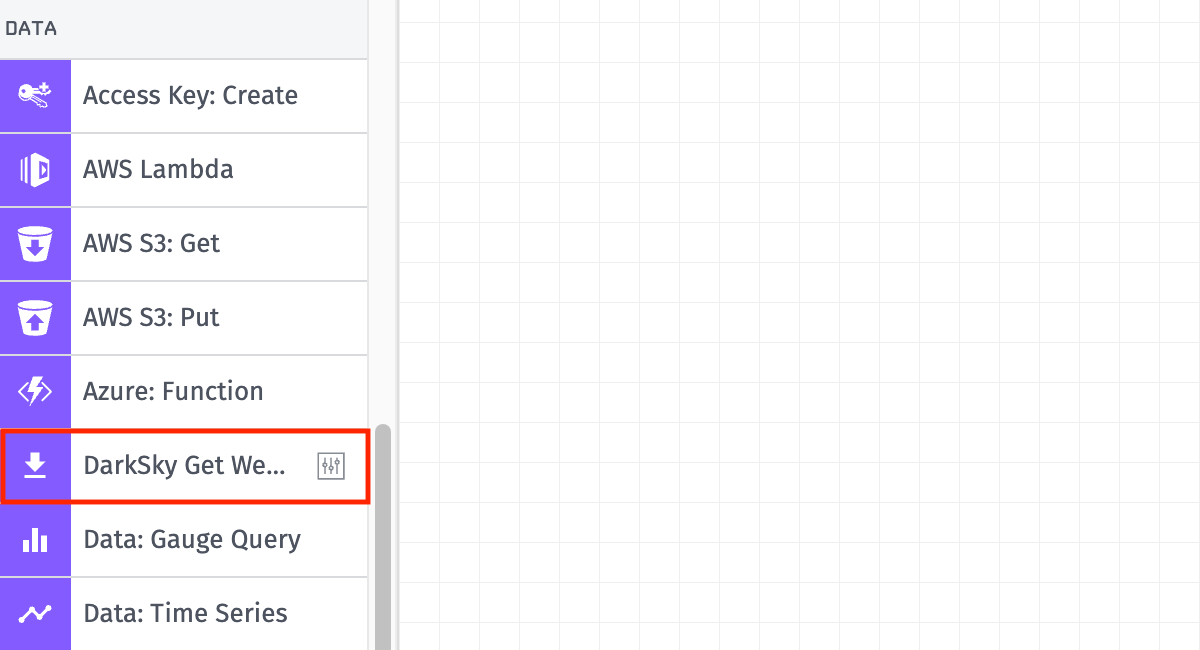
Once you have successfully created a Custom Node, It will be displayed in the node palette under the category you have specified.
Agent Version
When creating an Edge Custom Node, you must also choose a Minimum Agent Version for the node. Any Edge Workflow utilizing the new node must target that GEA version or a later one. This property can be changed later as new GEA versions are published. The value is set on the Custom Node’s “develop” version and is inherited by any workflow version created from “develop” at the time of version creation.
The earliest Gateway Edge Agent supporting Edge Custom Nodes is GEA v1.41.0.
Output Type
Your Custom Node can either have a single output, or it can have a branching output (like a Conditional Node) based on conditions you define.
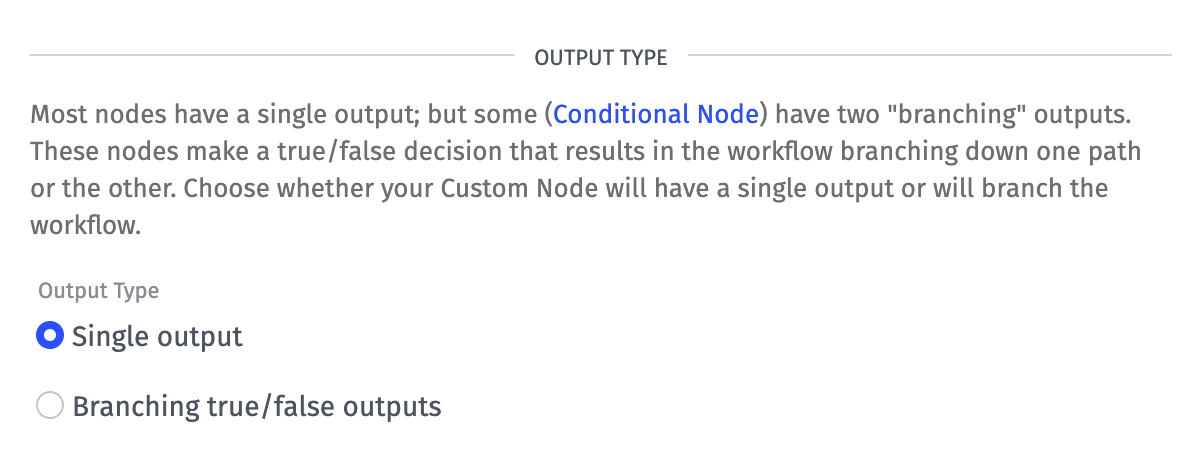
For example, you might consider building a branching Custom Node if:
- There will be multiple logic checks within your Custom Node.
- Your Custom Node makes a third-party HTTP request that has a significant chance of failing.
- Your Custom Node could be throttled (i.e. if it uses the Email Node).
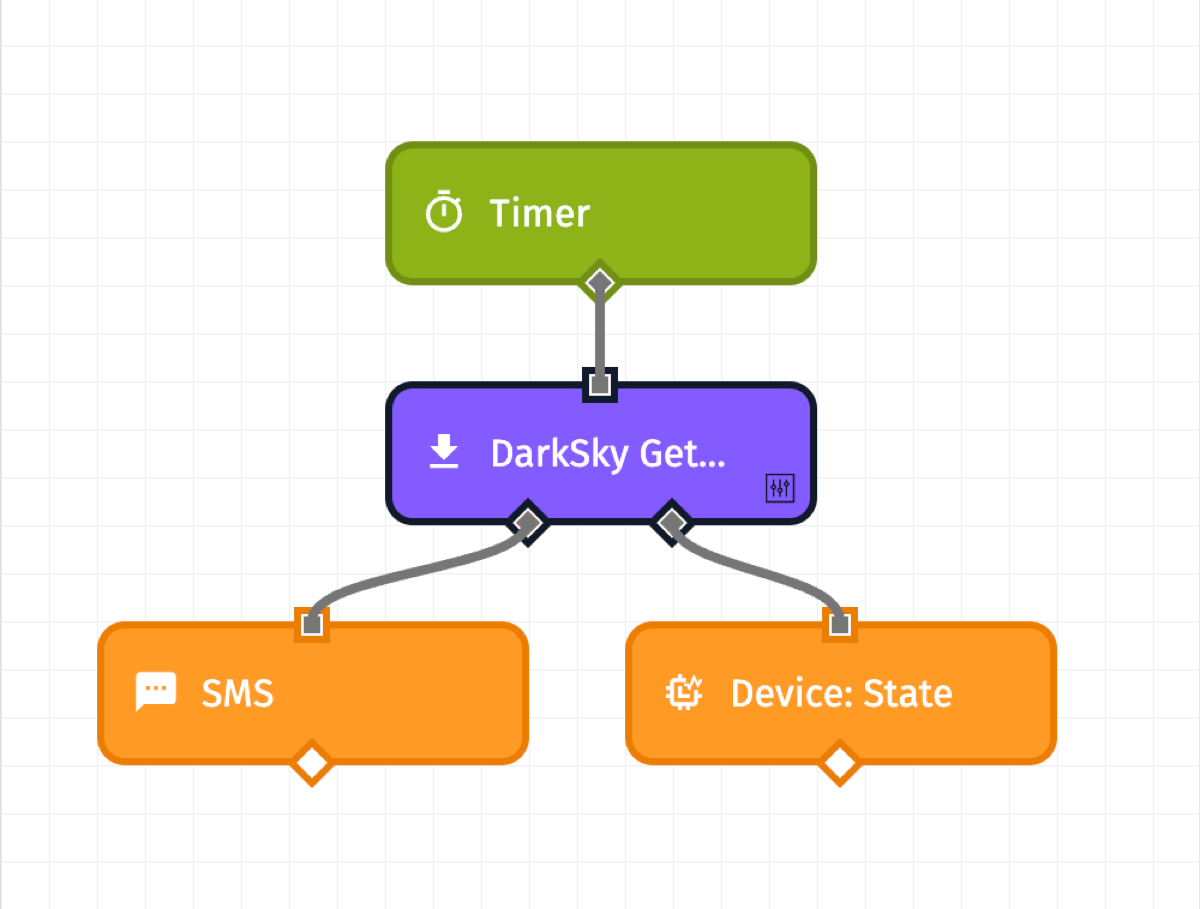
You can change the output type after creation in the Custom Node editor’s “Output” tab, but it will be much easier to craft your Custom Node if you decide whether you’re building a single output or a branching node before getting started.
Output Result
Custom Nodes cannot manipulate the payload of the workflow calling the Custom Node (also known as the “outer workflow”), but they can return a result to a payload path of the user’s choosing. The outer workflow can then use that result as it continues its run.
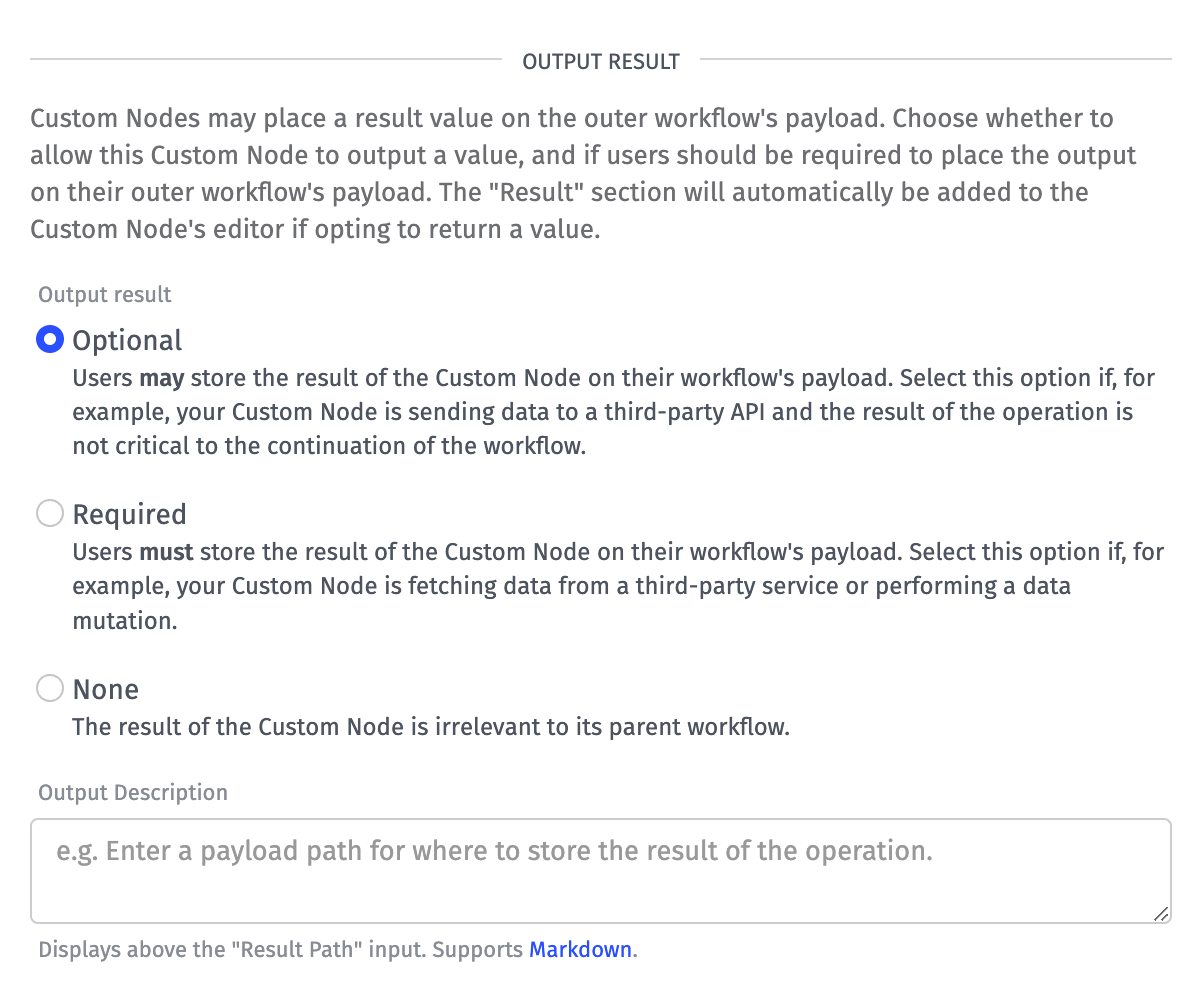
The Custom Node’s output result may be set to Optional, Required or None. You may also provide a Description of the expected result for your node users. This output result may also be changed later under the “Output” tab.
If choosing “Optional” or “Required”, your Custom Node users will see a payload path input at the bottom of the configuration panel for defining where the Custom Node’s result should be added to their workflow’s payload. If choosing “Required”, the Custom Node user must enter a payload path.
Descriptions
Optionally, you may provide some descriptive properties for your Custom Node that help your end users understand its purpose and how to use it.

- Short Description: This should describe the Custom Node in a few words. It is displayed as a tooltip in the node palette and in the Custom Nodes list.
- Long Description: This should describe the purpose of the Custom Node in one or two sentences. This is displayed at the top of the Custom Node’s editor panel. This field supports Markdown formatting.
- Documentation URL: This should provide a link to the Custom Node’s documentation. This is used at the top of the Custom Node’s editor panel help icon. When it is not provided it will point to the documentation you are currently seeing here.
User Inputs
After creating your Custom Node, the next step is to determine the information you require from your node users to execute it. Losant provides a simple form builder with a number of input types to solicit this information from your Custom Node users.
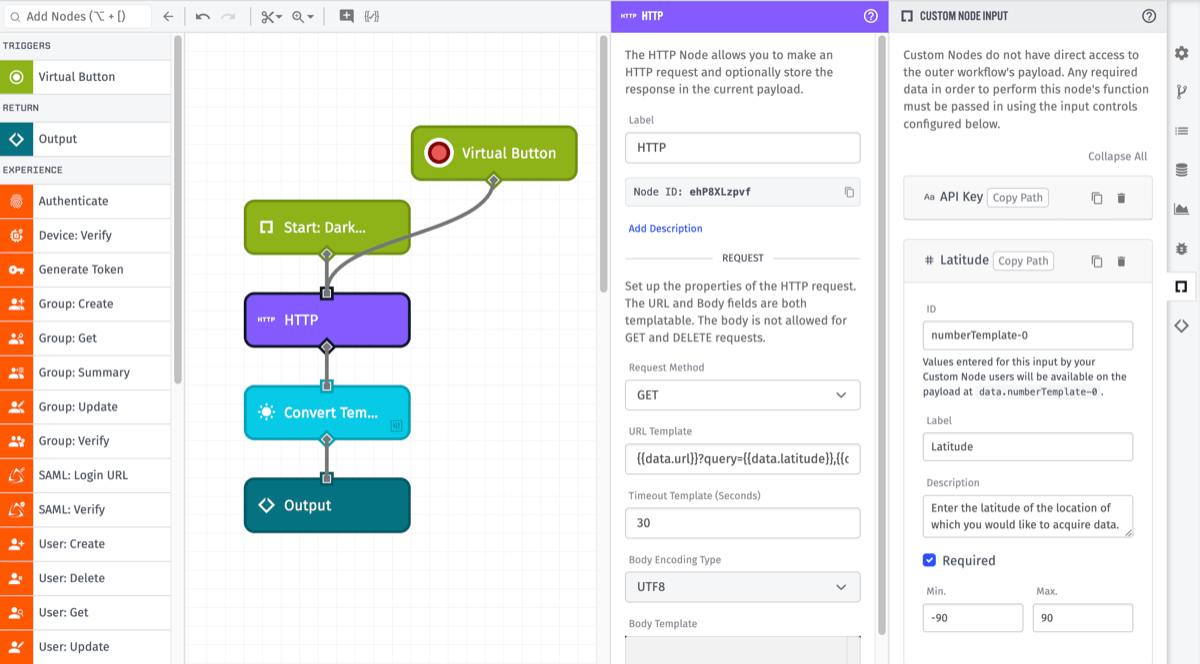
Each of these inputs requires a custom, unique ID, and the values provided by your users are available in the nodes that make up your Custom Node at the payload path of data.THE_UNIQUE_ID. Each field also requires a label and supports an optional description, which allows you to provide additional information about the data requested. The fields can also be sorted via drag-and-drop, and some allow for input validation - which is checked in the workflow editor prior to saving.
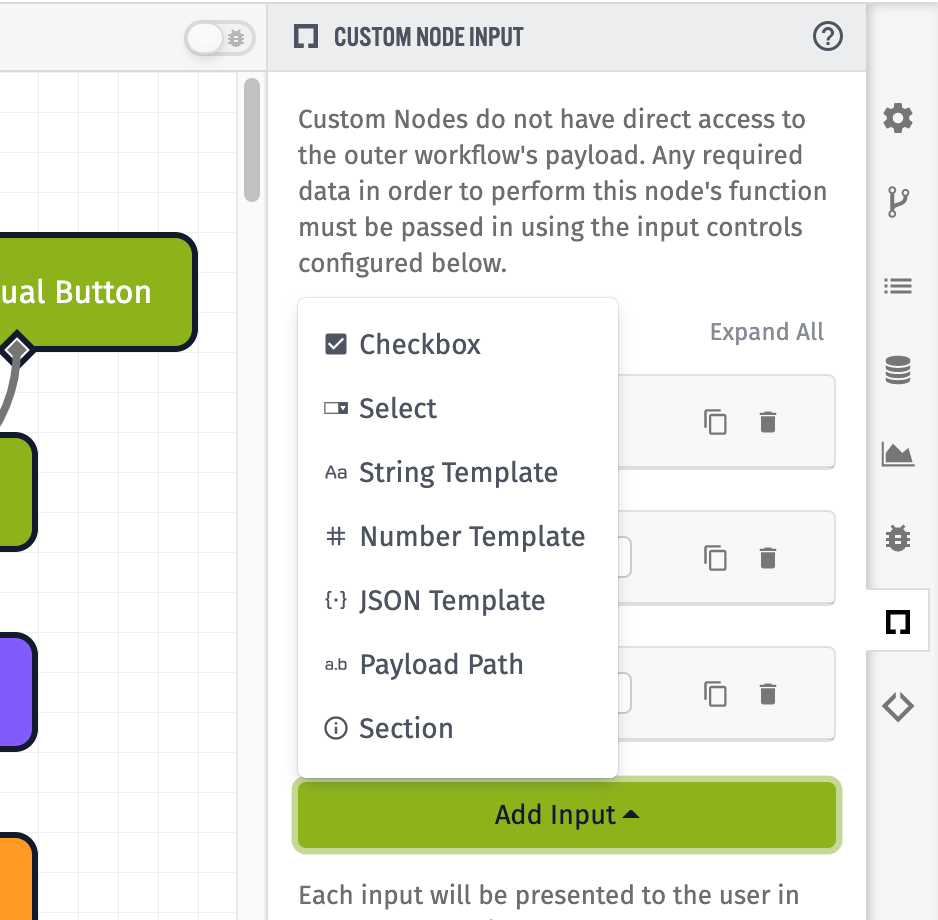
To add an input, click the “Add Input” button at the bottom of the “Inputs” panel and select the type of input you would like to add. Depending on the input type, each may also take some additional configuration properties:
- Checkbox: Users are presented with a checkbox; when checked, the input returns a value of
true, and an unchecked box returns a value offalse. You may also decide if the box should be checked by default. - Select: Users are presented with an HTML select box, and they must choose a value. To configure the input, enter an array of options and select which one should be chosen by default. Each option must include a “Value”, which is the string that is returned for the input when the node is invoked. You may optionally also provide a “Label” for a value; not providing one will result in the value itself being used as the option’s label.
- String Template: Users are presented with a simple text box where they may enter an arbitrary string or a string template, which should resolve to a string value from the outer workflow’s payload. Optionally, you may set a default value for the input; mark it as required (which wipes away the default value); or provide a regular expression for input validation (which is only checked if the user enters an arbitrary string).
- Number Template: Users are presented with a simple text box where they may enter a number or a string template, which should resolve to a number value from the outer workflow’s payload. Optionally, you may set a default value for the input; mark it as required (which wipes away the default value); or provide minimum and/or maximum values for the input (which are only checked if the user enters a number).
- JSON Template: Users are presented with a code editor where they may enter a JSON template. Optionally, you may set a default value for the input or mark it as required (which wipes away the default value).
- Payload Path: Users are presented with a simple text box where they may enter a payload path, the contents of which is made available to the Custom Node. Optionally, you may mark the input as required.
- Section Header: These are a special case as they require no input from your users, nor do they require a unique custom ID. Section headers are strictly for display purposes, allowing you to break your form fields into easily digestible sections for your Custom Node users.
Building Custom Nodes
Building a Custom Node is very similar to building a workflow; it is a combination of first-class Losant nodes and other Custom Nodes chained together to mutate data, make HTTP requests, branch your workflow based on payload conditions, and much more.
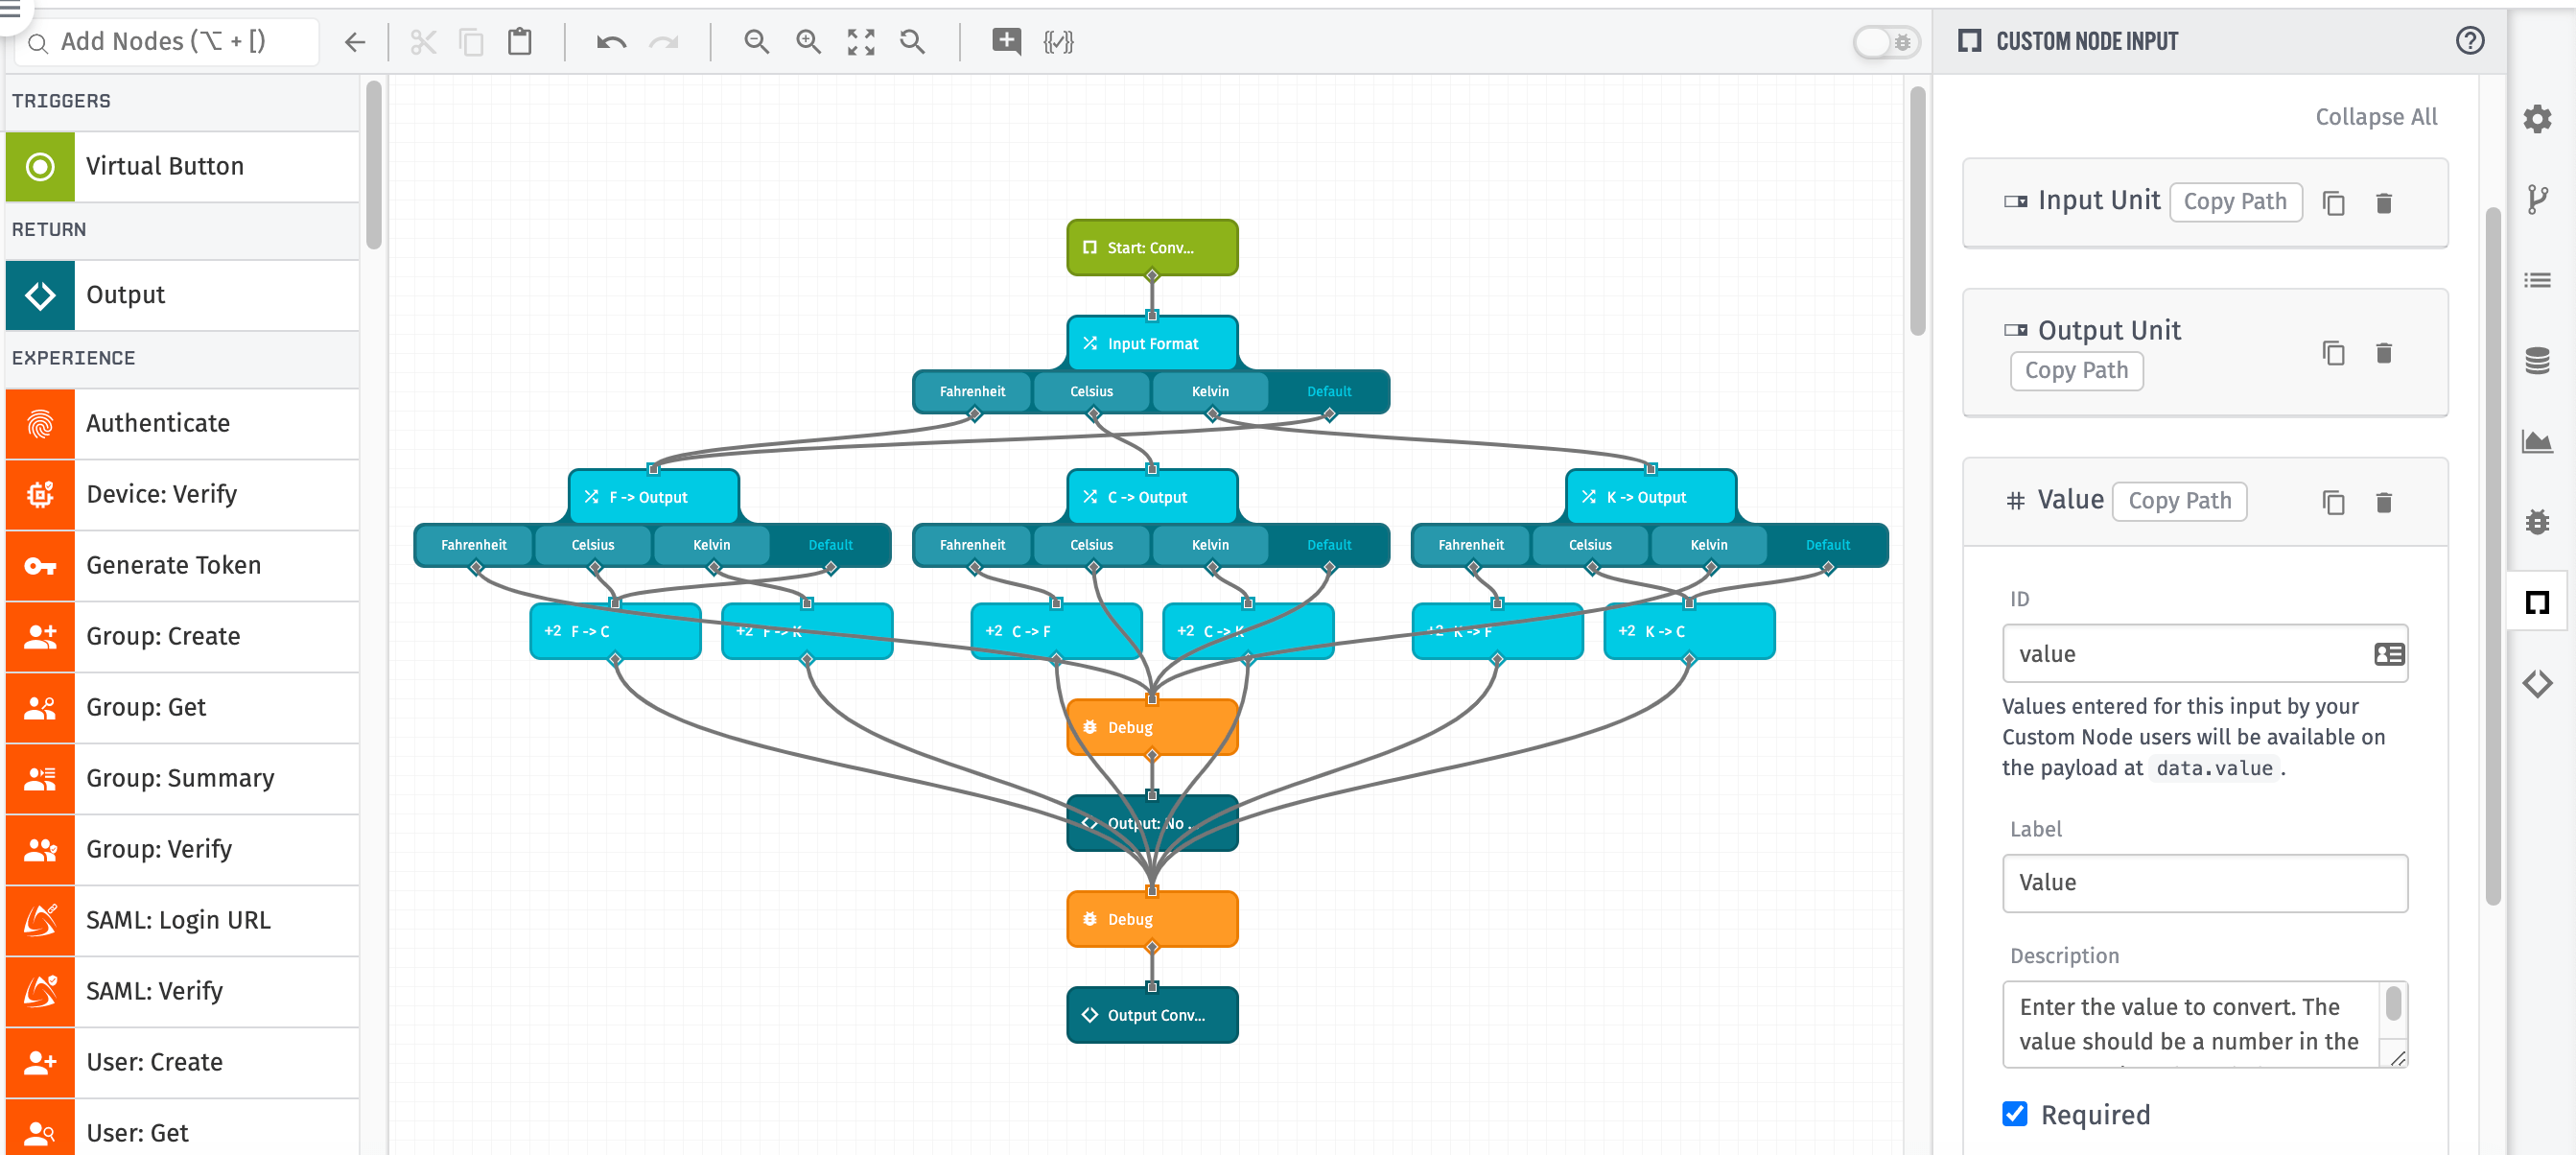
Despite the similarities, there are a few key differences between building Custom Nodes and traditional workflows:
Triggers
Other than the Virtual Button (which is useful for testing your Custom Node), Custom Nodes do not support workflow triggers. Instead, the Custom Node has just one “trigger”, which represents the starting point of the Custom Node execution.
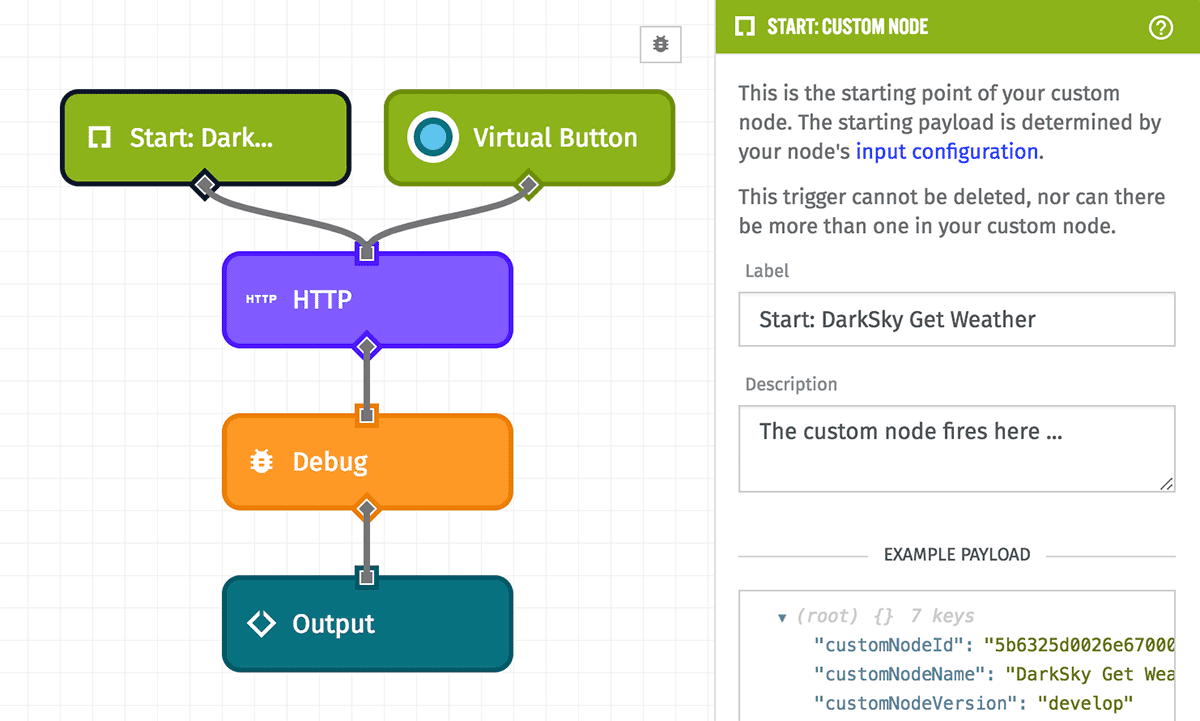
This trigger, like any workflow trigger, should be connected to additional nodes to run the Custom Node. It cannot be deleted, nor can more than one starting point exist on the Custom Node’s canvas.
Return Nodes
All branches of your Custom Node should terminate in a Return Node, which signifies the end of your Custom Node’s run. There is just one type of Return node for a single-output Custom Node; branching Custom Nodes have both Return False and Return True nodes, which tell the outer workflow which branch of your Custom Node to follow after execution completes. When one of these Return Nodes is hit, the outer workflow continues on with your Custom Node’s result on its payload (if applicable).
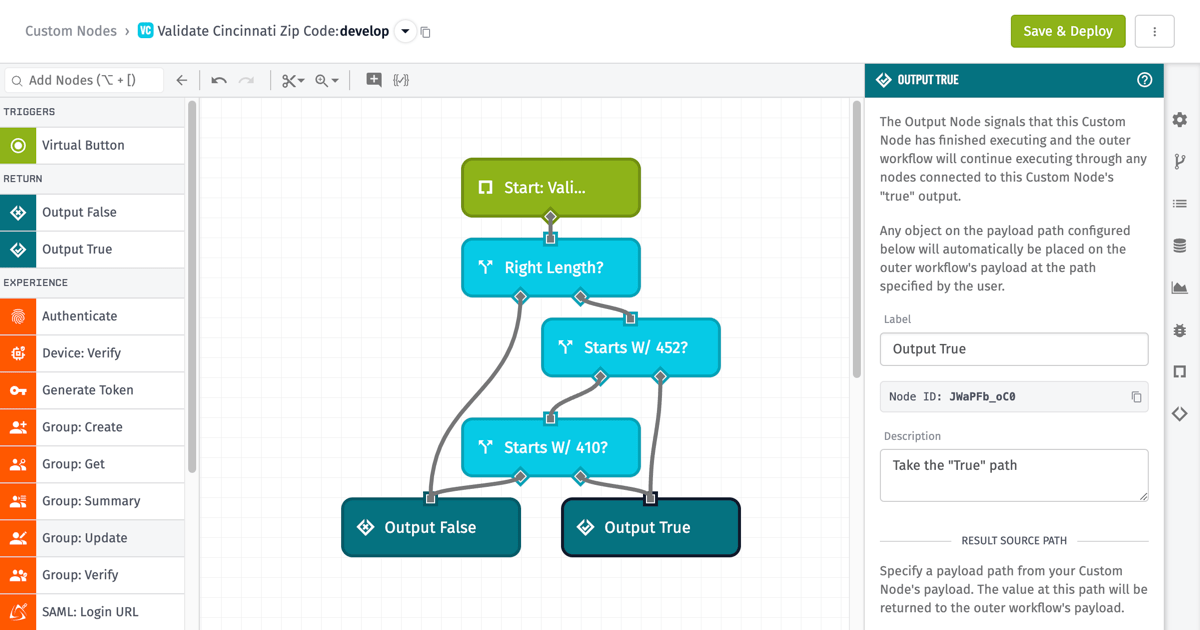
When you create a Custom Node, one will be placed on the editor canvas for you along with the start trigger; if you are creating a branching node, both a Return False and a Return True node will be placed on the canvas. Additional Return Nodes can be pulled off the node palette and placed at other spots on the canvas as well.
If your Custom Node returns a result, you will have to enter a payload path in the Return Node’s editor pointing to the value that should be returned to the outer workflow.
Note: Return Nodes cannot be used in the contents of a Loop Node. They must exist at the root level of your Custom Node.
Versioning
When using Custom Nodes, you must choose a version of the Custom Node to run. Since a Custom Node’s canvas, user inputs, output type and output result are all version-specific, your Custom Node’s functionality can differ greatly across versions.
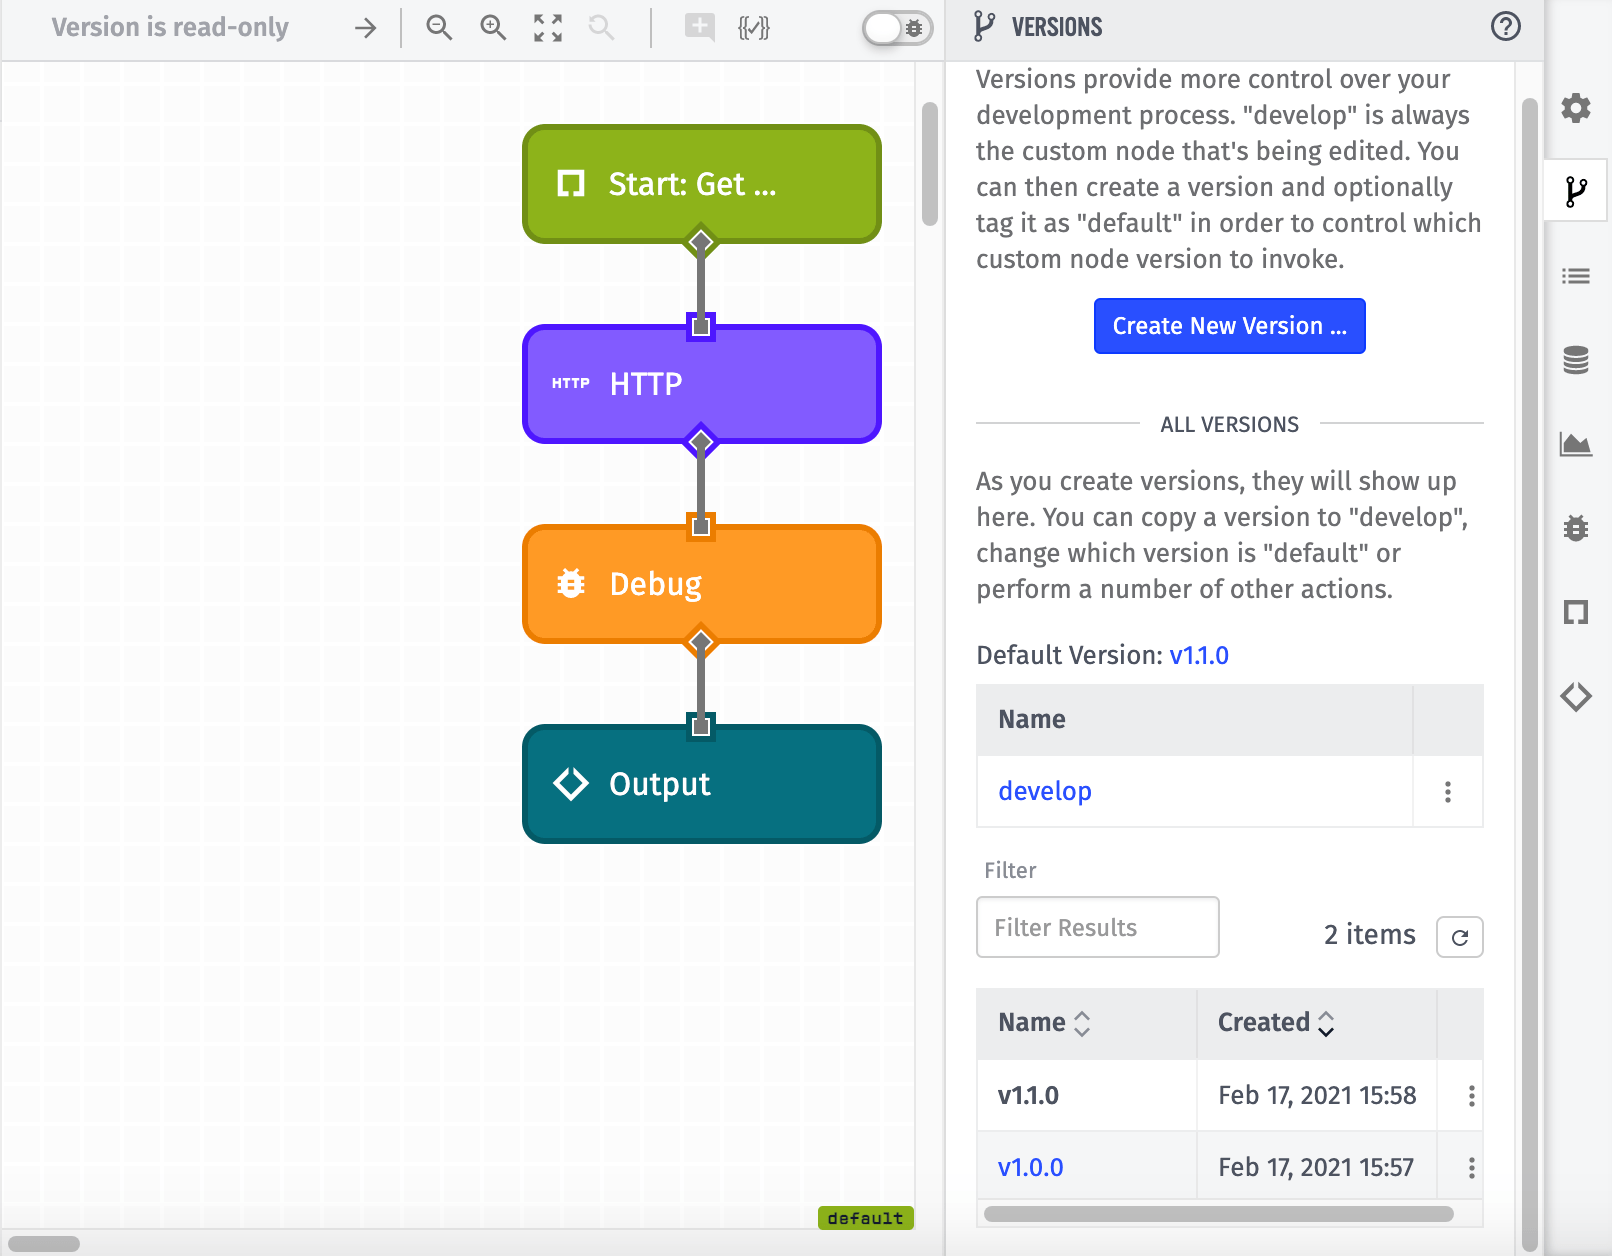
Creating and working with versions of Custom Nodes is similar to versioning as it works with Application Workflows, except Custom Node versions cannot be directly overwritten.
If you wish to make changes to an existing version, you must:
- Copy that version’s contents to your “develop” version.
- Make the necessary changes.
- Delete the existing version.
- Create a new version with the same version name.
Running the “Default” Version
Any version of an Application Custom Node can be set to “default,” which will be the version run in a given workflow unless another version is specified. By default, the “default” version of a Custom Node is the “develop” version.
For production, we highly recommend making another, non-”develop” version the default as changes to “develop” can have unintended effects, as described below.
Note: “Default” versions cannot be defined for Edge Custom Nodes; any uses of an Edge Custom Node must reference a specific version by name.
Running the “Develop” Version
For Application Custom Nodes, while it is possible to run the “develop” version in a workflow, we strongly recommend creating an immutable version of the node and referencing that in your workflows - whether directly by name or by designation as the “default” version. This is because changes to your Custom Node’s “develop” version will have an immediate impact on any instances of the Custom Node deployed to your workflows - including within uneditable versions of those workflows. Since Custom Node versions cannot be overridden, choosing a version for your Custom Node instance protects your workflows from these changes.
For Edge Custom Nodes, the “develop” version cannot be utilized in any Edge Workflow. However, the “develop” version may be deployed by itself to a test device as described below.
Using Custom Nodes
Once a Custom Node has been saved and deployed, it becomes available for use within your application’s workflows. Your Custom Nodes are ready to be used from the node palette. They are distinguished from native nodes with a special icon shown below.
![]()
These nodes can be dragged onto the canvas, moved around, connected to other nodes, configured and deleted just like any other node.

You can edit the Custom Node by clicking on the icon shown in the bottom righthand corner of the node.
Note: A Custom Node cannot be used within itself (otherwise known as recursion). This is to protect your Custom Node from infinite loops and workflow timeouts. Therefore, when editing your Custom Node, all other Custom Nodes within your application except that Custom Node itself will be available in the node palette.
Configuring Custom Node Instances
After dropping a Custom Node on the canvas, the first thing you should do is choose which version of the Custom Node to run, as the selected version can change the Custom Node’s configuration options - including whether the Custom Node branches.
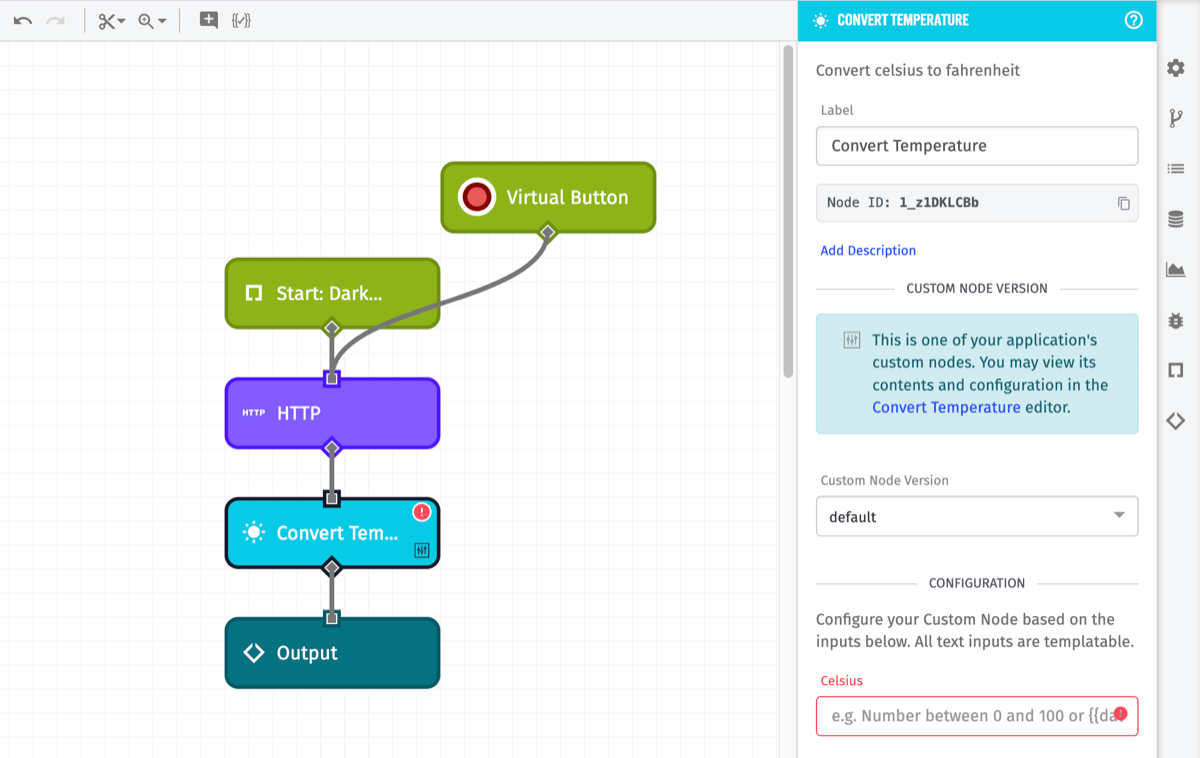
Beneath the version selector will be all of the user input fields defined for the Custom Node. Users of the node can input static values or reference values on their payload for each of these inputs (depending on the input type). Any validation rules configured for each input will also be enforced at this time, and just like with other nodes, the outer workflow cannot be saved or run until all of the Custom Node’s input validation is satisfied.
Edge Custom Node Usage
First, there are two additional requirements to use an Edge Custom Node within an Edge Workflow …
- You must create at least one version of the Edge Custom Node before it can be used in an Edge Workflow, since using the “develop” version is disallowed.
- The Minimum Agent Version of the Edge Workflow must be greater than or equal to the Minimum Agent Version of at least one of the Edge Custom Node’s versions. If not, the Gateway Edge Agent lacks the ability to execute the Edge Custom Node and thus the node cannot be used in any Edge Workflow on the device.
If these two requirements are not met, the node will appear in the Edge Workflow’s palette but cannot be added to an Edge Workflow.
If you wish to make changes to an Edge Custom Node’s functionality after it has been developed, versioned, and deployed within Edge Workflows, you must …
- Make the desired changes to the Custom Node on the “develop” version.
- Create a new version of the Custom Node.
- Update the “develop” version of an Edge Workflow utilizing the Edge Custom Node to use its new version.
- Create a new version of the Edge Workflow.
- Deploy the new version of the Edge Workflow to your device(s).
Viewing Custom Node Usage
You can view a list of where your Custom Node is being used across your application by clicking the “Custom Node Usage” tab in the right sidebar.
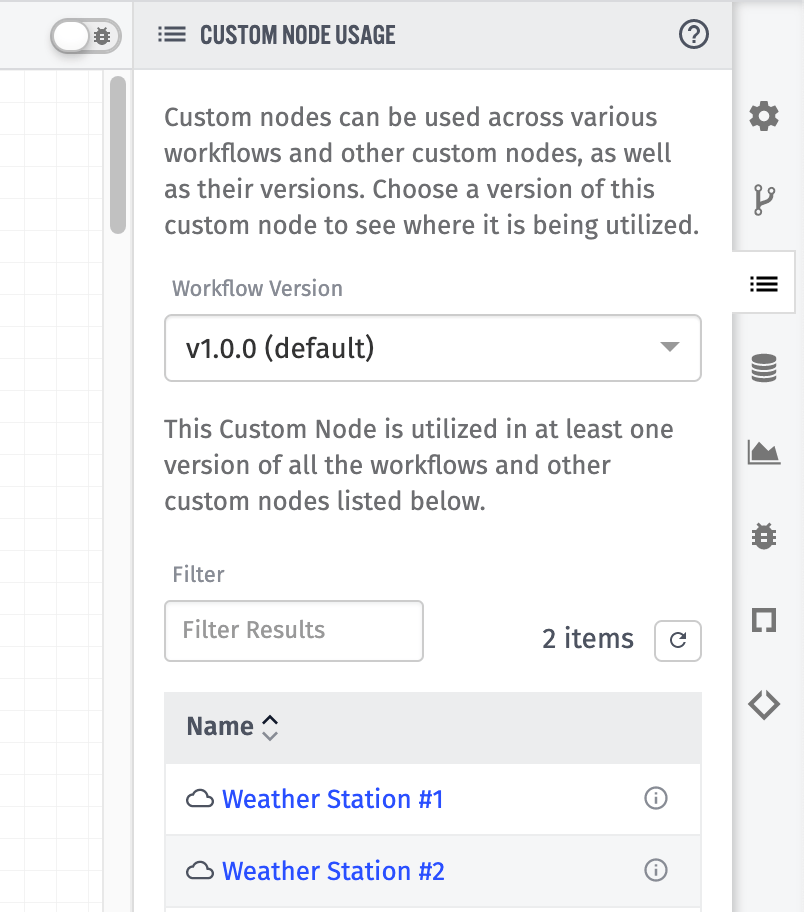
Optionally, you may select a specific version of your Custom Node, which will filter the table to only display workflows utilizing that version.
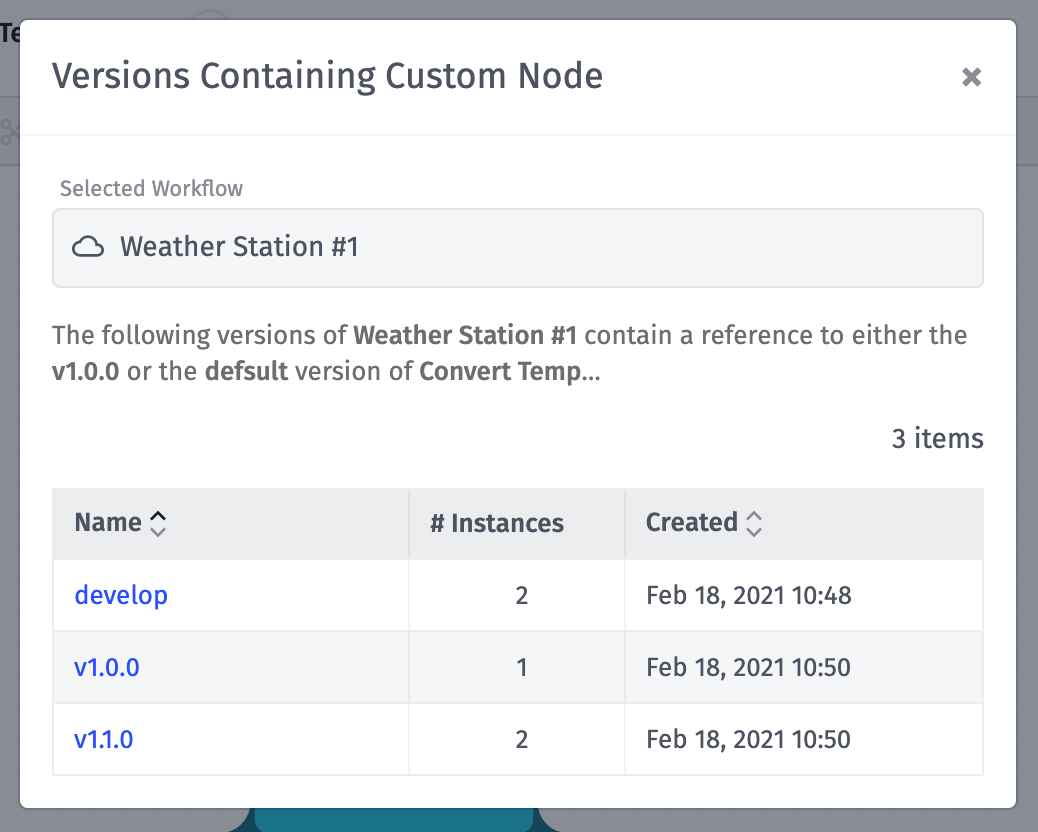
Clicking the information icon for a workflow or Custom Node in the table presents a modal with additional information about which versions use this Custom Node and how many times your Custom Node is used in each.
Testing Custom Nodes
The Virtual Button is provided as a trigger within the editor for the purpose of testing your Custom Nodes. This trigger, in conjunction with Debug Nodes, allows you to visualize payloads as they move through your Custom Node and to view outputs corresponding to potential user inputs.
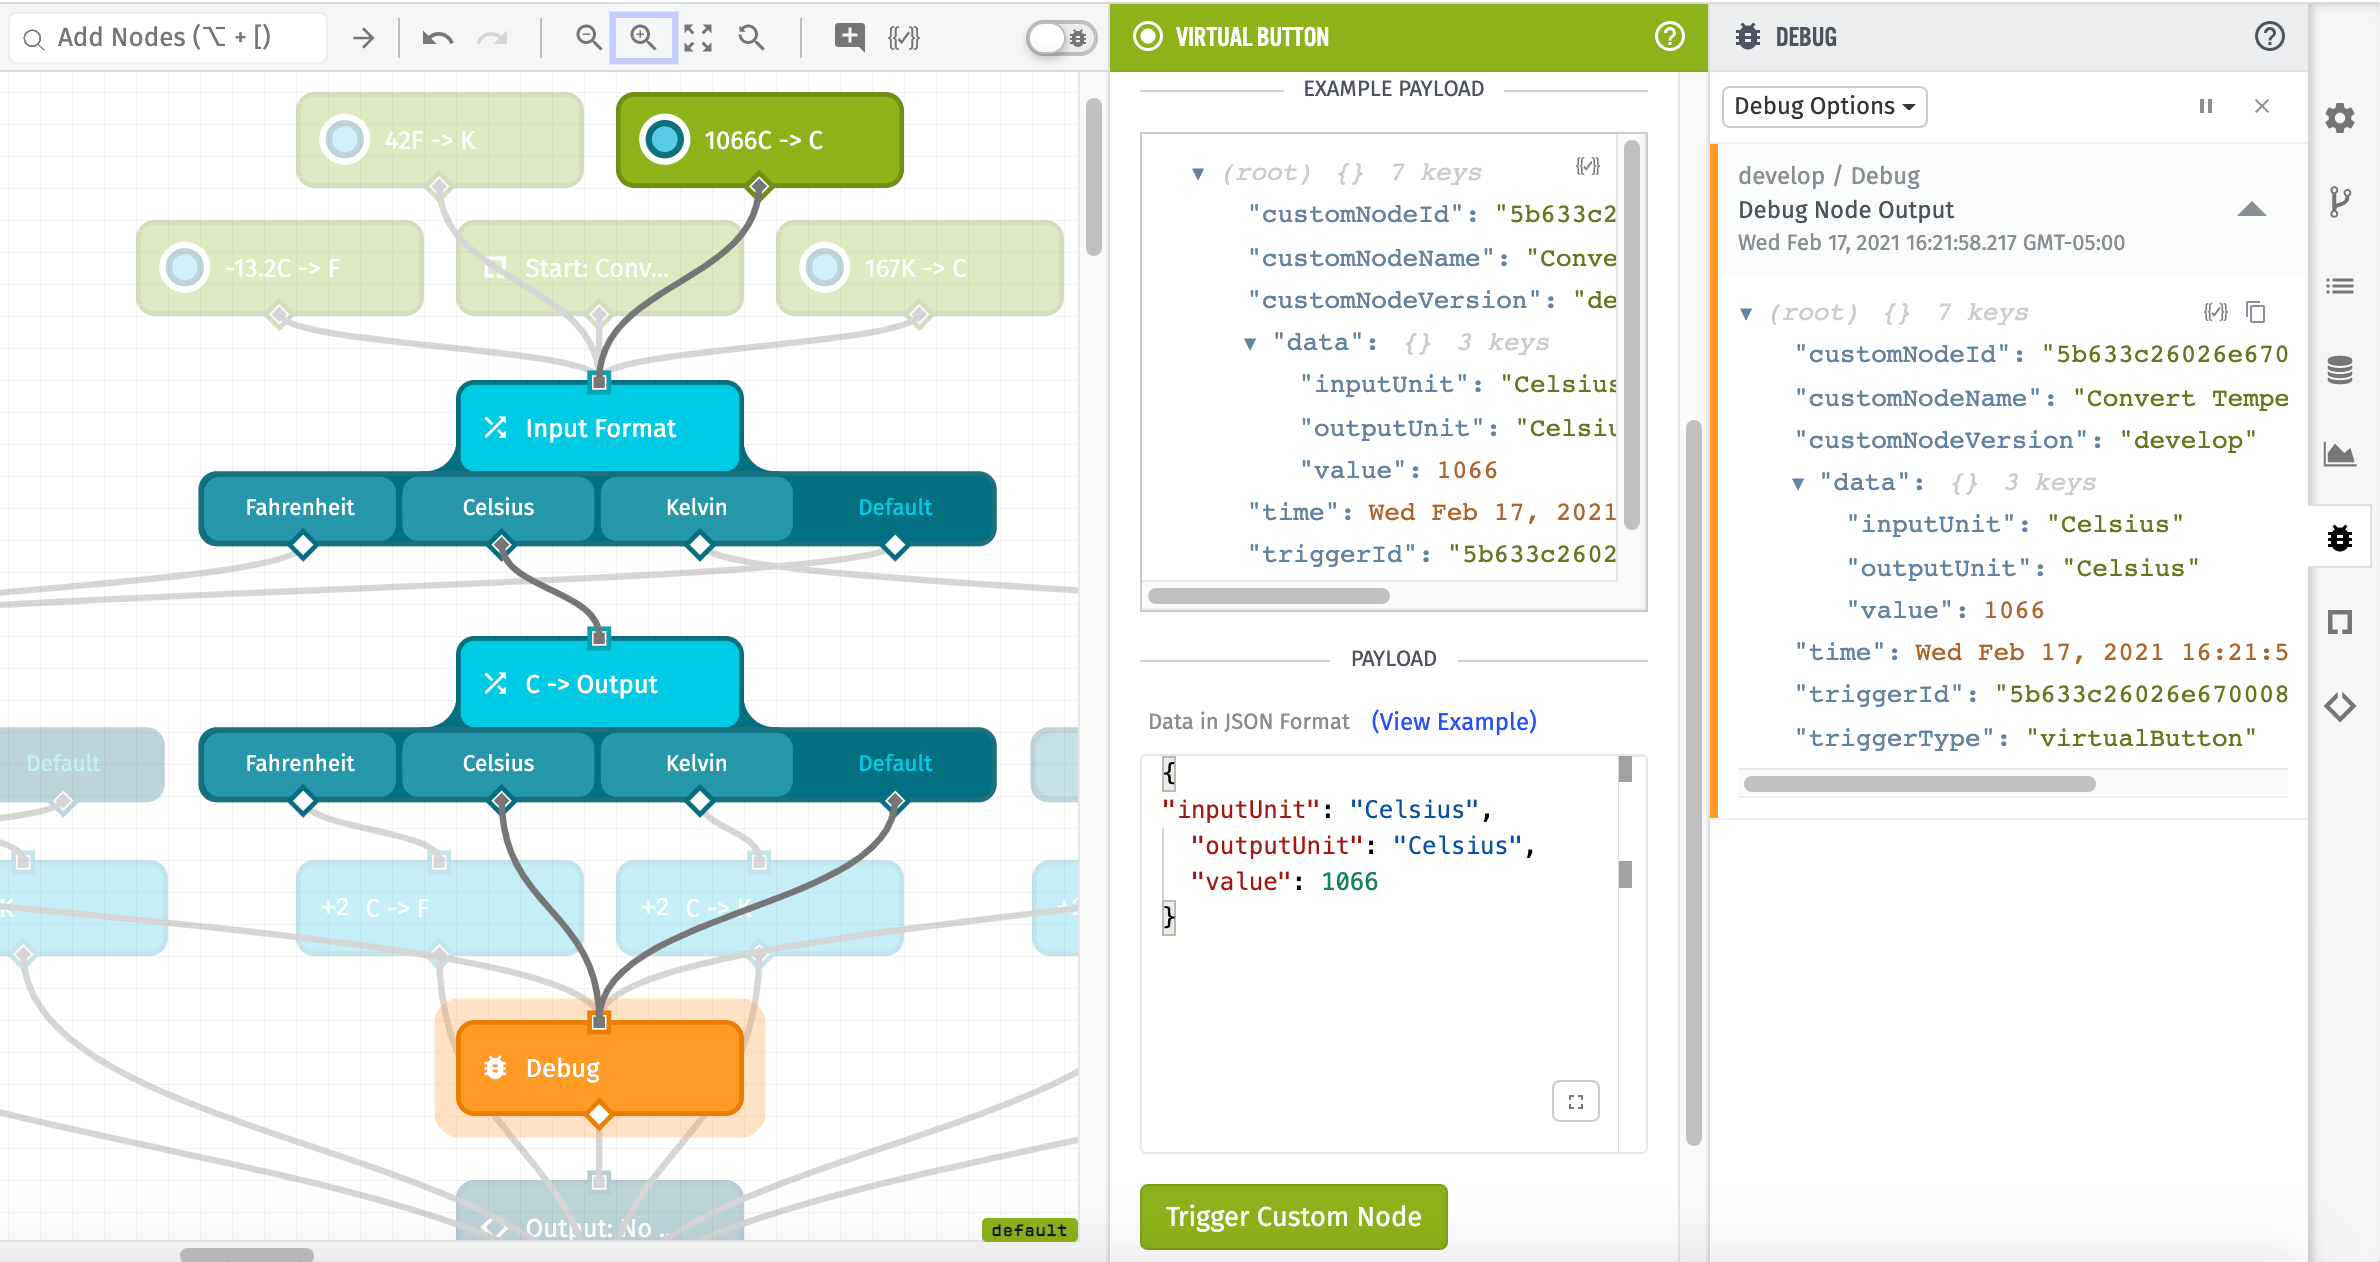
Debug output is available within the “Debug” panel in the workflow editor. Note that only debug messages generated by clicking Virtual Buttons will be visible here; payloads generated by instances of your Custom Node used in other workflows are not available in the Custom Node’s editor. If you wish to see debug output generated by Custom Nodes invoked in a workflow, you must view the workflow utilizing the Custom Node and select the “Enable messages from custom nodes” option.
Testing Edge Custom Nodes
Since Edge Custom Nodes ultimately run in the Gateway Edge Agent as configured on your own hardware, it is necessary to test your work by deploying the node to this same hardware and execution environment. To facilitate this, Edge Custom Nodes allow for deploying the “develop” version to a single test device, as can be done for Edge Workflows.
By choosing a test device for deployment and utilizing the Virtual Button Trigger, developers can provide different example payloads to the Edge Custom Node and verify the expected output of the node’s execution on the device itself. When a test device is configured, and the device is both running the GEA and is connected to Losant’s MQTT broker, changes to the “develop” version are immediately deployed to the device on every save.
Outside of the “develop” version, no other version of an Edge Custom Node can be deployed to hardware directly; they may only reach the device by being used in an Edge Workflow. Also, as noted above, the “develop” version of an Edge Custom Node may never be used within an Edge Workflow - neither in an Edge Workflow’s “develop” version or in a snapshotted version.
Deleting Custom Nodes
In order to delete a Custom Node, or a version of the Custom Node, that node / version must not be in use in any of your application’s workflows. Deleting such a Custom Node would cause your workflow to error and cease to function.
You must first delete any instances of that Custom Node you wish to delete - or, if you are attempting to delete a Custom Node version, you must switch all instances of that Custom Node to a version other than the one you wish to delete. If you wish to delete a Custom Node’s default version, you must first specify a new default version.
Once none of your workflows are using the resource you are trying to delete, the Custom Node / version can be deleted in the same ways a workflow or workflow version can be deleted.
Exporting Custom Nodes
In order to export a Custom Node, first save and deploy a version of it. Then click the down arrow next to “Save & Deploy” to open the dropdown menu and select “Export”.
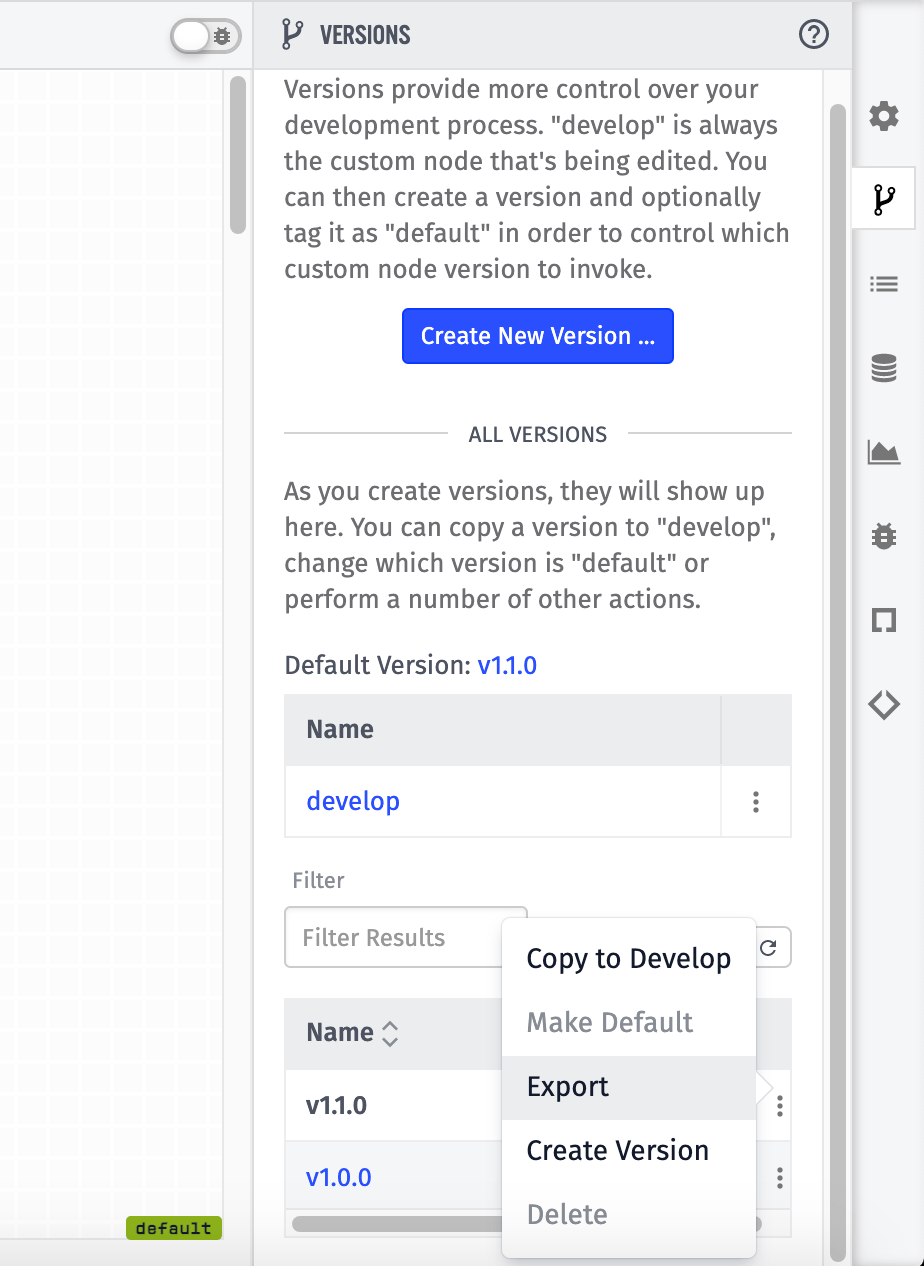
You can also export specific versions of a Custom Node by clicking the “Versions” tab in the right sidebar, clicking the down arrow next to the version you wish to export, and clicking “Export”.
Was this page helpful?
Still looking for help? You can also search the Losant Forums or submit your question there.
