How To Use Import Features to Manage an Application Development Lifecycle
This guide outlines how to implement application lifecycle management (ALM) within the Losant platform - specifically development, testing, acceptance, and deployment of changes across multiple environments.
Setting Up Lifecycle Environments
Within Losant, each lifecycle environment is represented as a separate Losant Application. For example, if your process requires three lifecycle environments (develop, staging, production), you will create three separate Losant applications. For this guide, we will use the following example applications:
- Station Monitor - develop - Where active development of new features, usability improvements, and bug fixes take place.
- Station Monitor - staging - Where proposed changes are validated against data and configuration settings that mirror your end product.
- Station Monitor - production - Where actual customer data and production hardware resides, against which active development should never be performed.
Even though we’re using three environments as the example, the techniques outlined in this guide apply to any number of lifecycle stages.
Development Process Considerations
Application lifecycle promotes changes in one direction: develop → staging → production. Therefore, all development should occur on the Losant application that represents the lowest stage in your application lifecycle. In our example, development occurs on the Station Monitor - develop application.
To best support application lifecycle and promotion of changes, the following considerations must be taken into account when developing your Losant application:
Use Unique and Matching Resource Names
When promoting changes, a resource’s type/name is the most common way to identify matching resources between the environments. Some resources may match on other unique identifiers; for example ...
- Experience Users match by email address.
- Experience Endpoints match by the combination of route and HTTP method.
- Workflows match by the combination of name and flow class (i.e. if your application has a "Check Alerts" Application Workflow and a "Check Alerts" Edge Workflow, those are considered separate resources).
Let's assume our lifecycle applications each have an Application Workflow named "Check Alerts". Depending on the options provided in the import request, when the changes to Station Monitor - develop are promoted to Station Monitor - staging, any changes made to the "Check Alerts" workflow in develop will be applied to the "Check Alerts" workflow in staging.
The promotion process is covered in more detail later in this guide.
Note: Within each application, it is critical that no two resources of the same type share the same name/identifier. For example, if your develop application has two separate devices named "My Great Device" (something that Losant allows but discourages), this will lead to errors when promoting that application's resources.
Application Lifecycle Supplants Per-Resource Versioning
There are resources within Losant that support their own versioning (Custom Nodes, Workflows, Experiences). Per-resource versioning is designed to manage and release resources within the same application, which works well for individual developers or small teams. Application lifecycle elevates the versioning and releasing of resources to the application level, rendering per-resource versioning confusing and redundant.
Exceptions to this rule are Edge Workflows and Embedded Workflows, for they must be versioned to be deployed and tested. It is common to have many versions of these workflows in your develop application, and you may not wish to migrate these testing versions up to your other environments. (Changes to a workflow's "develop" version will still be applied if opting to promote "Workflows" but not "Workflow Versions".)
Also, the promotion process does not automatically deploy Edge or Embedded Workflows. As part of your organization’s overall release process, a release engineer must subsequently deploy the updated workflows to the target devices. This process can be automated through the Losant API if desired.
Environment-Specific Resources
Promoting an application across environments will apply changes from the source application (develop in our example) to the destination application (staging) - whether it be the creation of new resources or the updating of existing resources with matching names / identifiers. It is common, however, to have resources that are specific to a single environment that should not be promoted - most commonly devices, Experience Users, and Experience Groups.
For example, Station Monitor - develop will have a set of devices that developers can use for testing. Station Monitor - staging will have a completely separate set of devices used for quality assurance and verification. Finally, Station Monitor - production has customer-owned devices. These devices are independent, encapsulated resources within each application, and edits to one device do not have any effect on devices of the same name in another application - unless overwriting that device as part of an import process.
Losant provides basic and advanced options for controlling which resources are included when promoting changes. Therefore, very little consideration has to be taken into account when developing or making changes to an application when it comes to what resources to utilize. You have full control over which resources will ultimately be promoted.
Promoting Changes
Promoting changes between lifecycle environments is done using Losant’s Application Import/Export functionality. This functionality has features specifically designed for this purpose, including a Dry Run feature to verify potential changes before they are applied.
To best illustrate promoting a change, let’s go through an actual example:

We have three applications representing the three lifecycle environments (develop → staging → production). This application uses a Resource Job to poll data from every U.S. weather station. For step-by-step instructions for building this application, please see the guide, How To Use Resource Jobs to Poll Device State From an API.
There is a change that needs to be made to this application and then promoted to staging and production. For a subset of stations, the weather.gov API returns a 404 Not Found response code. Currently, those are acknowledged as iteration failures.

We instead want to change the job’s workflow to catch 404 responses, acknowledge the iteration as successful, and add a message to the final report indicating a 404 was received. Since all changes must be applied to the application representing the lowest stage in the application lifecycle, these changes are made to Station Monitor - develop.
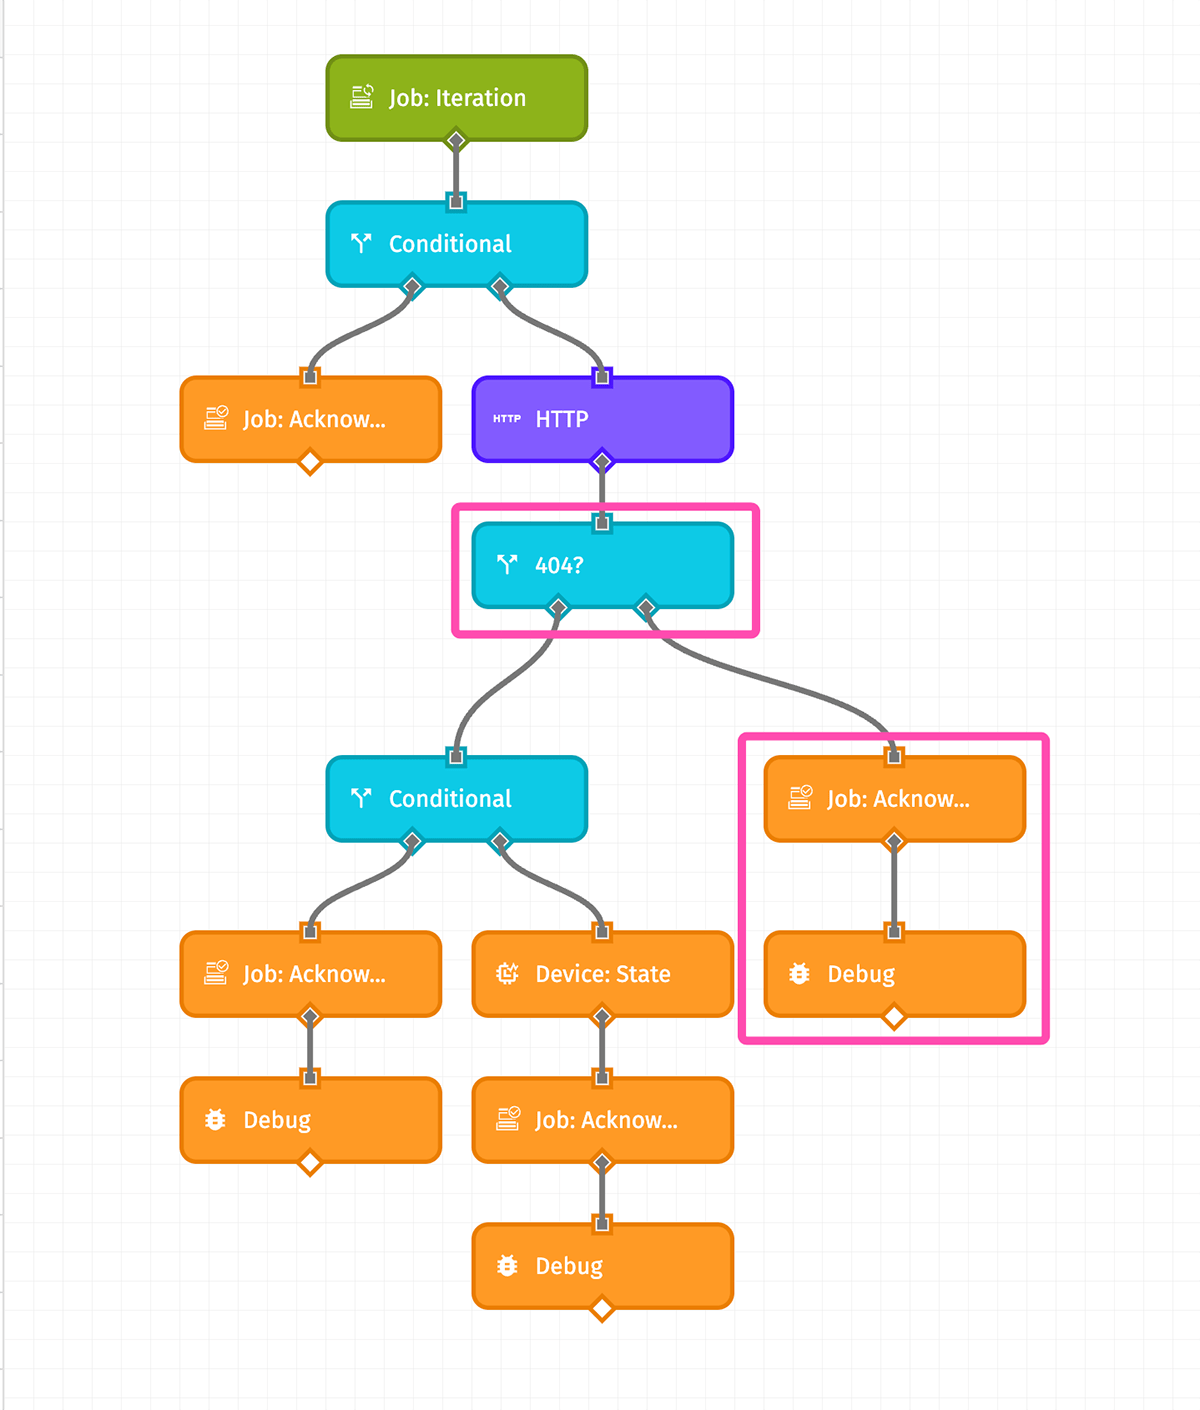
The actual details of the workflow aren’t important for this guide, but the screenshot below shows the new workflow with added logic to catch and acknowledge the 404 status codes.
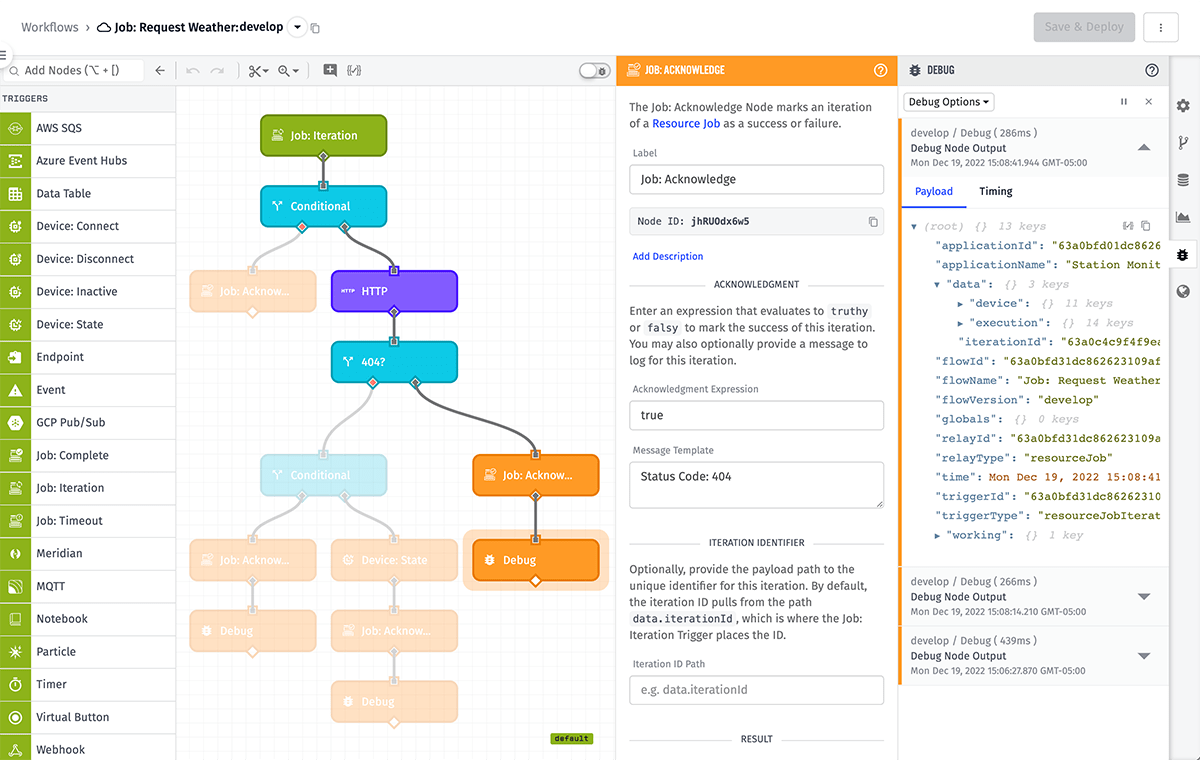
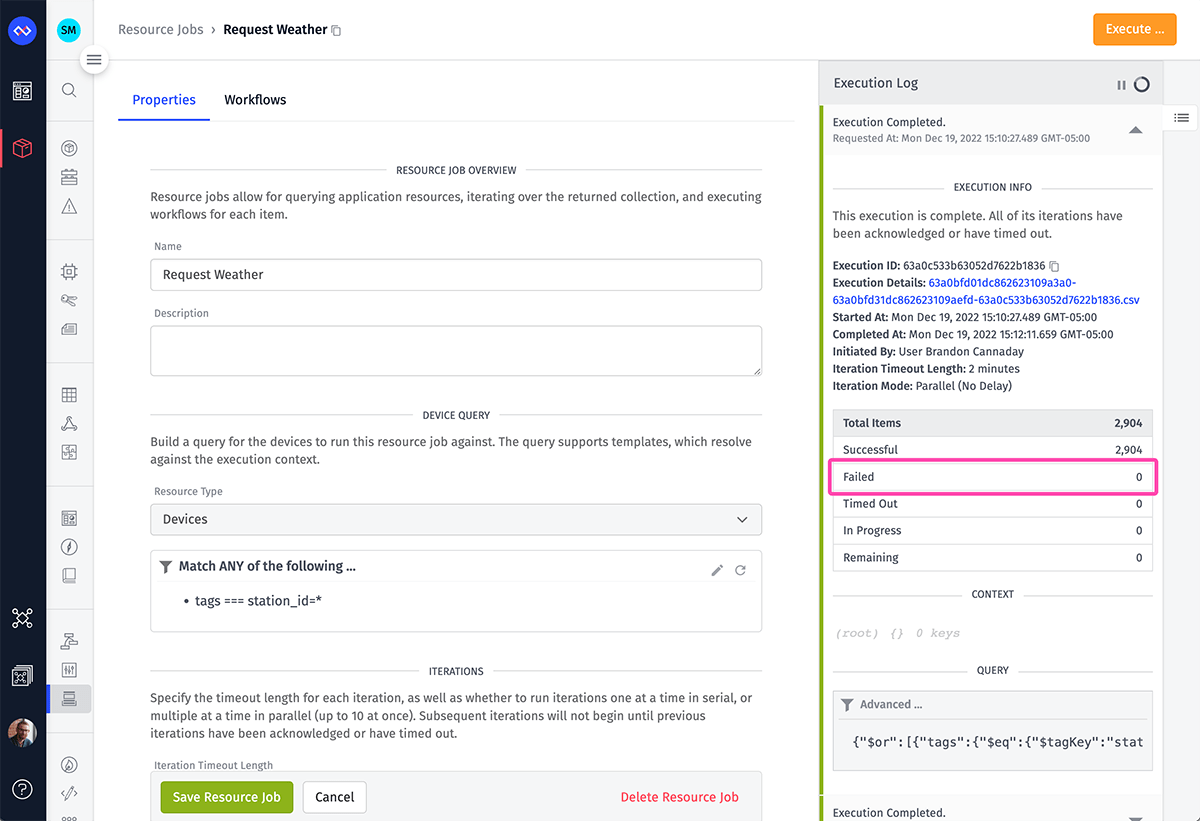
We can also see in the screenshot below that the 81 failures are gone with our changes.
Now that the application has been tested, we can promote the changes to Station Monitor - staging. In this example, we’re only promoting a single change for demonstration purposes. In most cases, promotions will contain changes to many different resources.
Request an Import Dry Run
Before performing any import, it’s important to always request a dry run. This returns a CSV file containing the action that will be performed on each resource given the import configuration you provide. This is a protection mechanism to ensure that you’ve selected the appropriate Conflict Behavior.
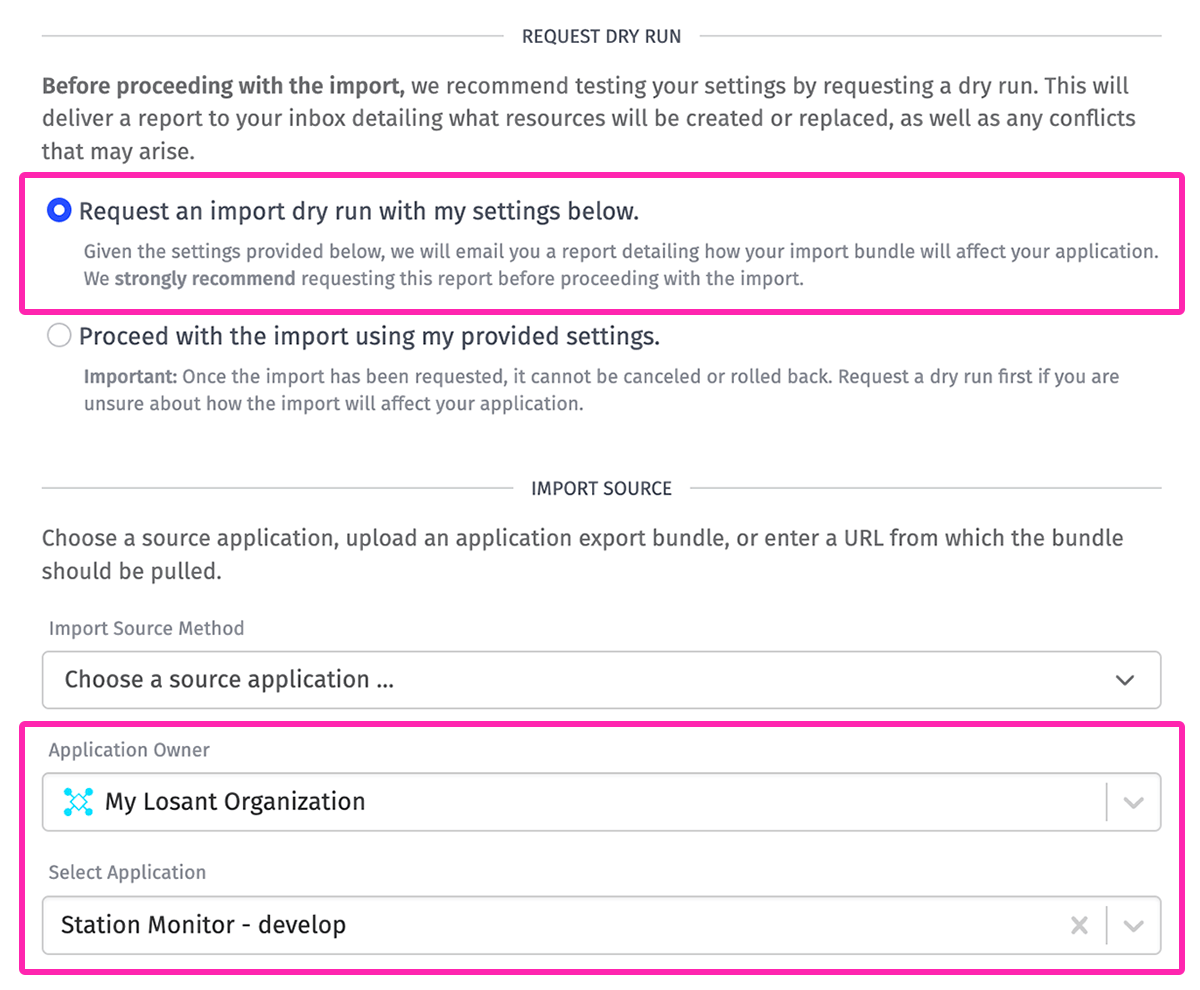
Switch over to the Station Monitor - staging application and visit its Application Import interface. "Request an import dry run" is selected by default.
Choosing a Source Application
In the Import Source section, the "Choose a source application" option is selected by default. Choose the Station Monitor - develop application as the source for this request.
Resources to Import
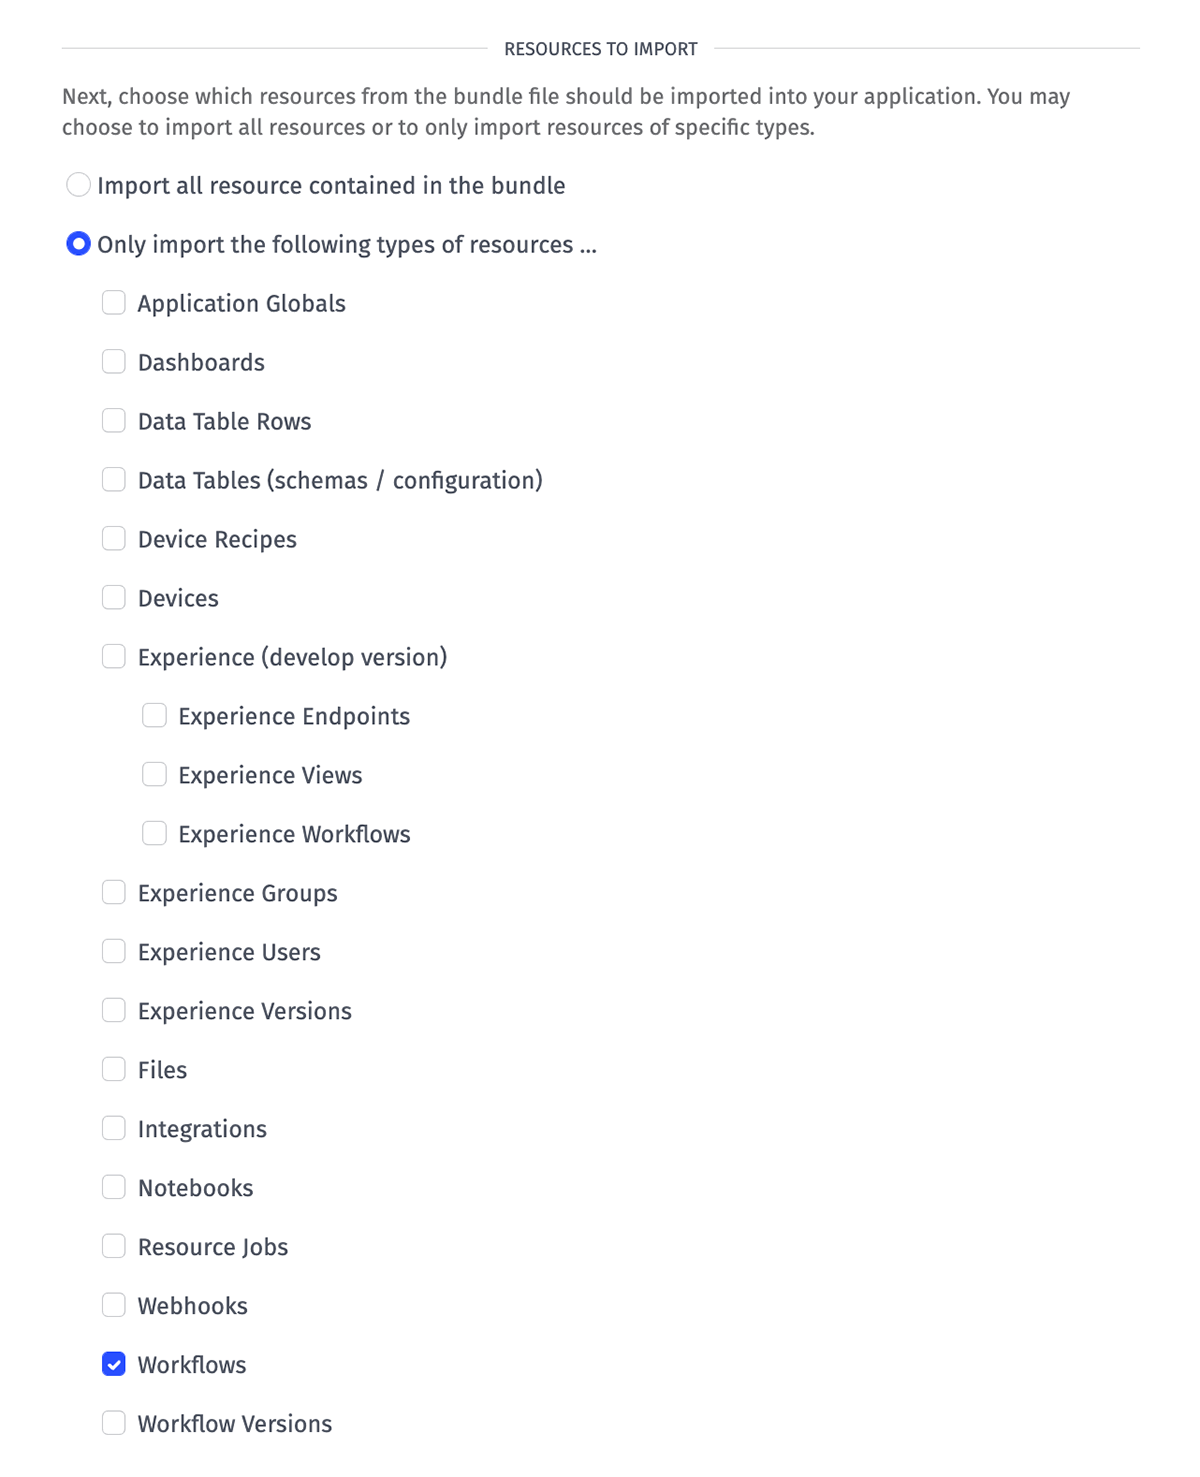
When importing resources from any source, you have additional control over which types of resources to import using the Resources to Import section. In this example, we’re going to import all resources. However, since we know that only a workflow has been changed, we could choose only "Workflows" as an added measure of protection.
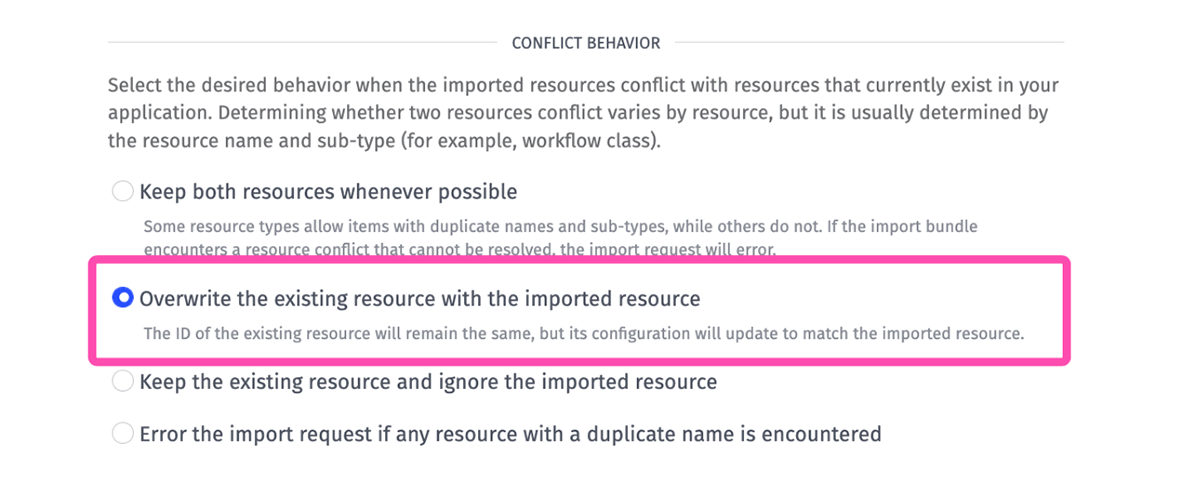
Conflict Behavior
The Conflict Behavior highlighted in the screenshot below ("Overwrite the existing resource with the imported resource") is specifically designed to facilitate application lifecycle. This option will find matching resources between the source and destination applications and determine how to apply changes to the destination application.
Dry Run Report
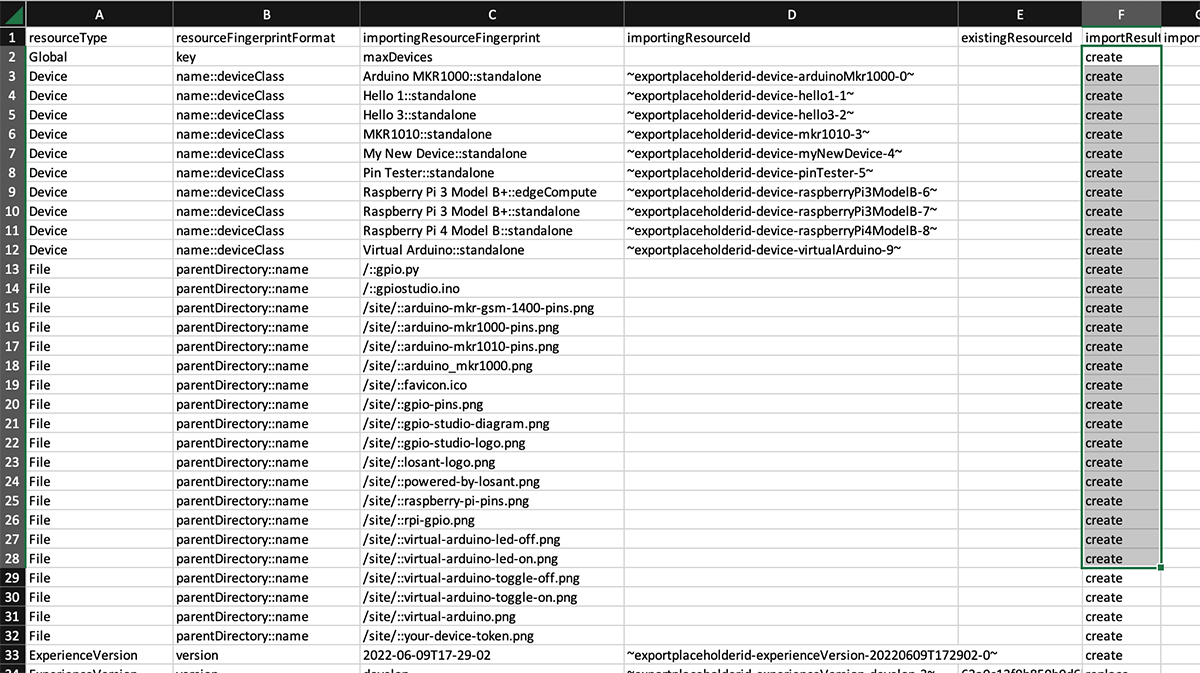
At this point we can request the dry run and inspect the results once the report is available:

The screenshot above is showing the output of our dry run. It is telling us that it found several matching resources between our source application ("develop") and our destination application ("staging"). Notice how the majority of the resources are marked as "no change" - meaning that there were no updates to the "develop" resources since the last time the application was imported into "staging". The exception to this is our "Job: Request Weather", which we updated in the "develop" version. As a result, the dry run indicates that this resource will be “replaced” by the imported resource.
Note: If this were the first time we were importing "develop" into "staging", all resources would be marked with a "replace" importResult. This is because differences are detected by storing a hash of the resource configuration, and prior to an import attempt, that hash has not yet been generated.
This CSV is important to review when performing a promotion. For example, below is a screenshot where the wrong application was imported.
This CSV is reporting that several resources will be created, which is not the expected result. In most cases, we expect a relatively few number of new resources and a high number of identical ("no change" or "replace") resources. This report provides a quick confirmation that something is wrong and the import configuration should be reviewed.
Import Changes Into the Destination Environment
Once we’ve confirmed the dry run appears to be correct, we can perform the import. Configuration options selected while requesting the dry run will remain selected in the application import interface, assuming you do not navigate your browser away from the import interface. Return to the top of the page and select "Proceed with the import using my provided settings.", and then submit the request.
If you do navigate away, previous import requests (including dry run requests) are available in the Import Request Log. From here, previous request settings can be copied to a new request.
Once the import is complete, we can quickly verify the changes were applied to our workflow.
The workflow in Station Monitor - staging was correctly updated (highlighted nodes in the screenshot above) by the import process. We can also validate the workflow changes by running the Resource Job and seeing that the failures have disappeared.
Once your organization has completed QA and acceptance testing on the staging environment, the promotion process can be repeated from staging to production.
Advanced Topics
This guide serves as a starting point for introducing an application development lifecycle to your Losant-powered IoT solutions. There are several additions you can make to this process to improve your organization's developer experience.
Environment-Specific Access Controls
Within Losant, access rights can be granted on a per-application basis. This allows access rights to be specific for each lifecycle environment. For example, you may grant Collaborator permission to a group of developers only for the Station Monitor - develop application, where actual development takes place. Then, for Station Monitor - staging and Station Monitor - production, developers may only have Viewer permission while a release engineer has the Collaborator permission required to promote changes.
Using External Version Control
Most organizations prefer to version control applications in something like GitHub. The format of an exported Losant application was designed specifically to work well with version control systems like Git.
At any time, you may take an application export bundle, unzip it to a local folder, and commit the contents to your Git repository. (Most users take this step between the promotion from staging to production, after changes have been verified and accepted.) An exported Losant application is represented by text-based, human-readable YAML files. Losant maintains resource and property name ordering within each YAML file so that Git diffs are legible and meaningful.
Changes that make it to your production environment should then be tagged. For example, the simple change made in this guide would be considered a “patch” in semantic versioning, so we would commit this export to GitHub and tag it something like 1.0.3 (where the previous tag would be 1.0.2).
Advanced Control Over Promoted Resources
Losant provides high-level control over which resources will be promoted from one application to another. In some cases, more advanced control may be required. For example, applications may have some Data Tables that should be promoted and others that should not. Losant provides control over resource families (i.e. all data tables or no data tables), but does not provide control over specific, individual resources (e.g. importing only one out of three data tables from an application bundle).
For advanced control over promoted resources, we recommend exporting the source application first so that its contents can be directly edited. In the data table example, each table's configuration is represented by a single YAML file, and the data stored in that table is in a separate CSV. To remove a specific data table from the promotion process, the YAML file and the CSV file representing that data table can be removed from the export bundle; then, the contents can be re-zipped and imported without that table. You may then re-zip the bundle and import it into the destination application as a zip file, instead of choosing a source application as described above.
In most cases, an organization will automate this process using a script as part of the overall release process (versus manually editing the YAML files). The YAML files are human-readable and identifying which file represents which resource is fairly straightforward.
Automating Edge Deployments
As mentioned above, edge deployments are not automatically covered as part of this application development lifecycle process, but Losant does provide the tools to automate this process.
When requesting an application import, you may optionally provide a callback URL to which Losant will make a POST request on import completion, with details about the success or failure of the import.
By providing the URL to a Webhook in your destination application, you can ...
- Trigger an Application Workflow on completion of the import process.
- Use the Losant API Node to create versions of your newly imported Edge Workflows.
- Request deployments of your new workflow versions to your Edge Compute Devices.
The same process can also be applied to Embedded Workflows; however, because of hardware memory constraints and the need to create deployment bundles for every unique combination of Embedded Workflow versions, we recommend handling this process manually.
Was this page helpful?
Still looking for help? You can also search the Losant Forums or submit your question there.