How To Use Resource Jobs to Poll Device State From an API
When using dedicated device management or connectivity services as part of your IoT solution, it’s common for these services to also be the source of your device’s sensor or telemetry data (i.e. Device State). In most cases, these services can push data to Losant using MQTT or a Webhook. Pushing data to Losant is the recommended solution, but not all services support it. Some services require device data to be periodically polled from an API.
Polling an API for device data sounds straightforward, but things get complicated when your application has thousands of devices. For example, if the API takes 200 milliseconds to respond and your application has 10,000 devices, it will take over 30 minutes to request data for every device. Since Losant Workflows have a maximum execution time of 60 seconds, there’s no way to loop over every device before the workflow times out.
Resource Jobs (a.k.a. “jobs”) provide a way to trigger a workflow for each individual item in a collection of Losant application resources. If your application has 10,000 devices, Losant will trigger a workflow 10,000 times. Each workflow invocation then only needs to request the API for a single device. Resource Jobs also track the success or failure of each iteration, allowing you to diagnose issues after the job is complete.
Requesting Data from Weather Observation Stations
As the example source of data for this guide, we’ll be polling the National Weather Service (NWS) API. There are approximately 3,000 observation stations and this API allows us to request the latest data for each.
https://api.weather.gov/stations/{stationId}/observations/latest
Details about this endpoint can be found in the NWS API documentation.
The NWS API is RESTful and uses JSON as the data format. This type of API is by far the most common. The lessons learned in this guide should apply to nearly any API.
For this example, every observation station is represented by a Losant Device. The resource job iterates over every device, uses the API endpoint above to request the latest data, and saves that data on the device’s attributes. Lastly, a workflow is used to schedule this job to run every day at 2:00 AM.
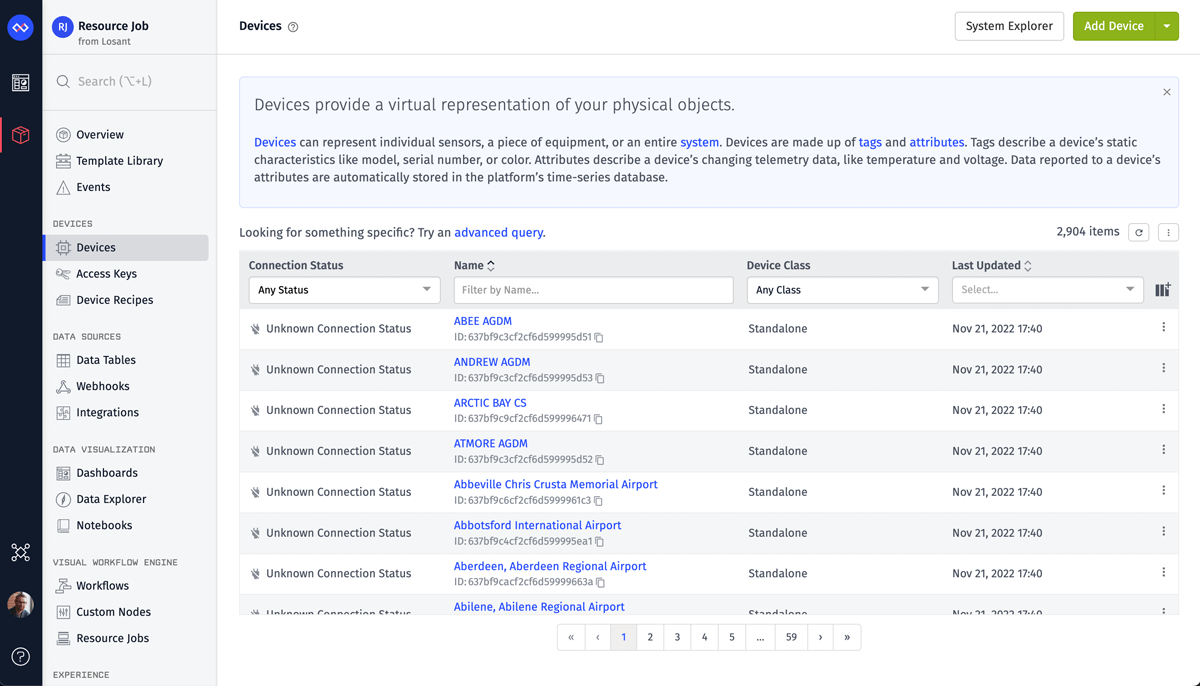
Creating the Devices
For this guide, our devices were created by converting the weather station list XML into a CSV file. We then used the bulk device creation functionality to create our devices from that CSV file. Since it’s unlikely that your use case involves observation stations, the detailed steps for doing this are beyond the scope of this guide.
The result is 2,904 devices:
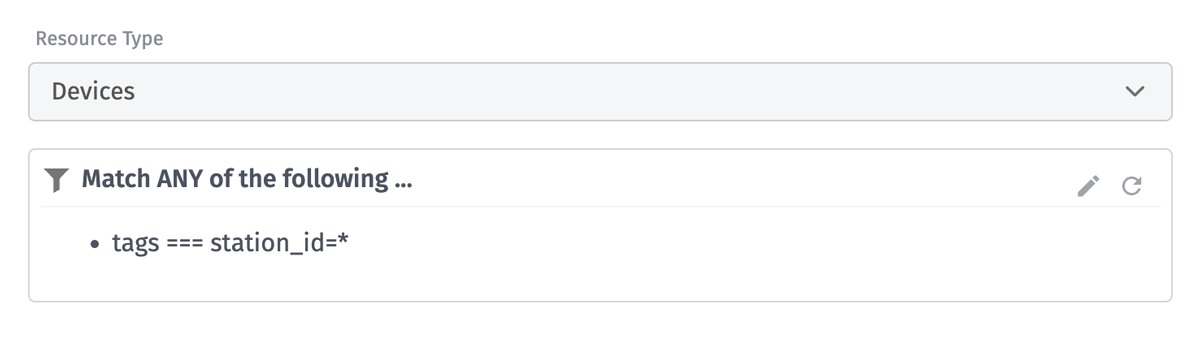
When iterating over devices, the workflow receives the full device object. For a resource job, the most important information is likely stored on the device’s tags. In our case, the API endpoint requires the station ID. Therefore, each of our devices has a station_id tag with its unique identifier.
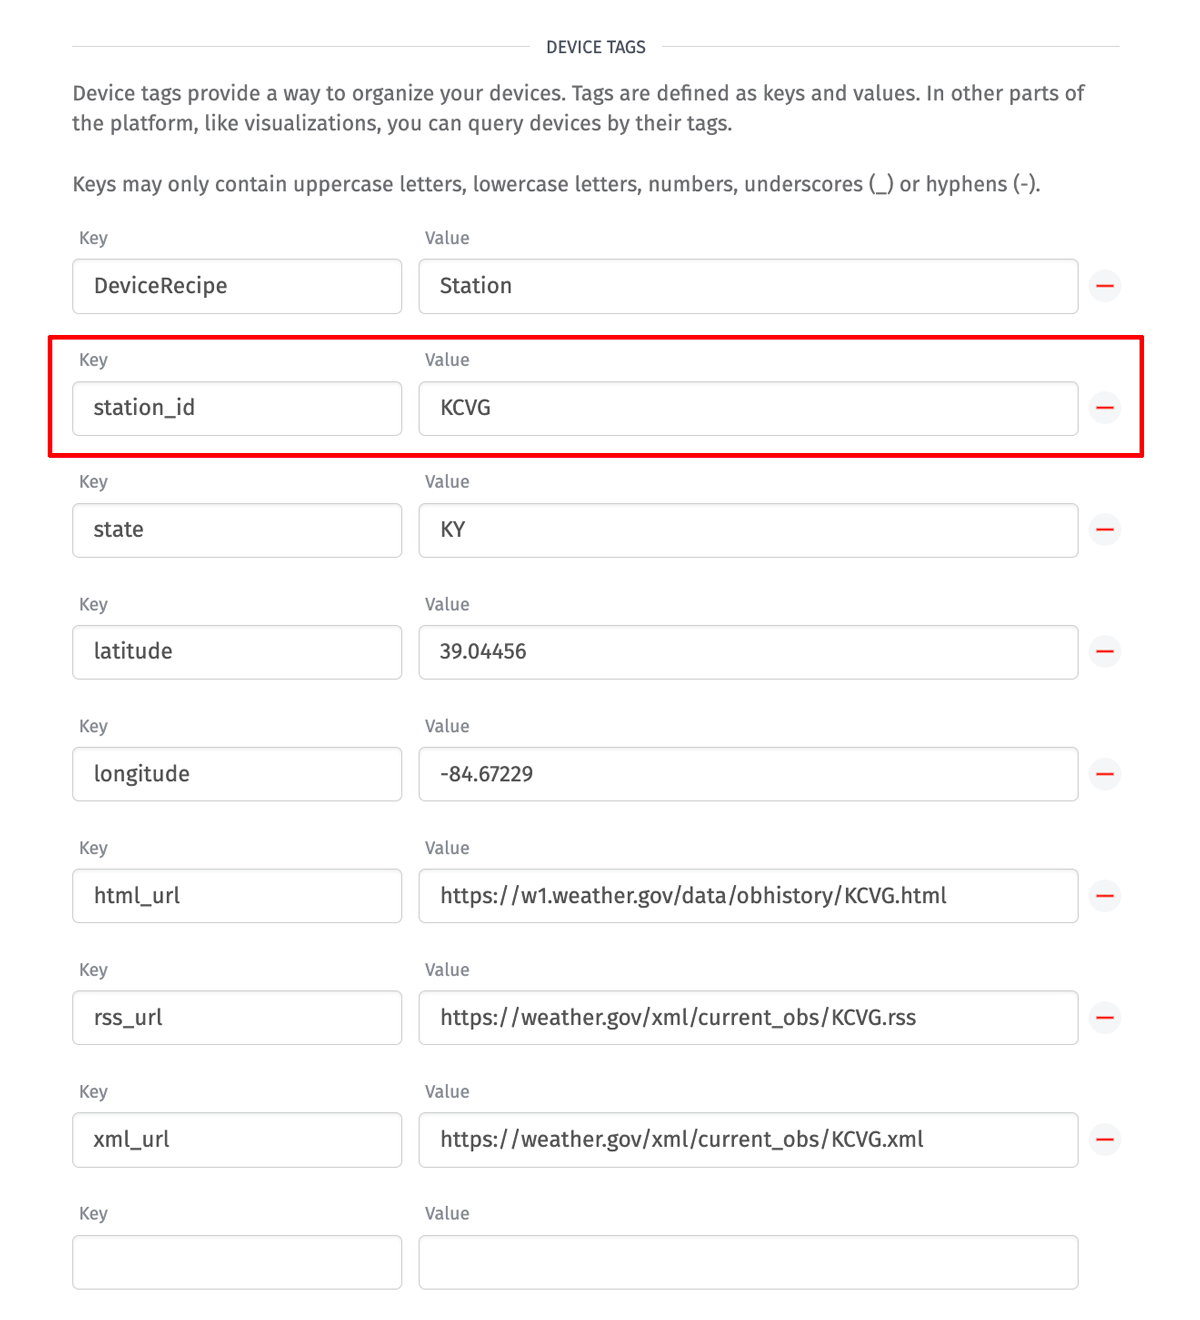
Depending on your use case, you’ll need to replace station_id with whatever your API uses to identify devices.
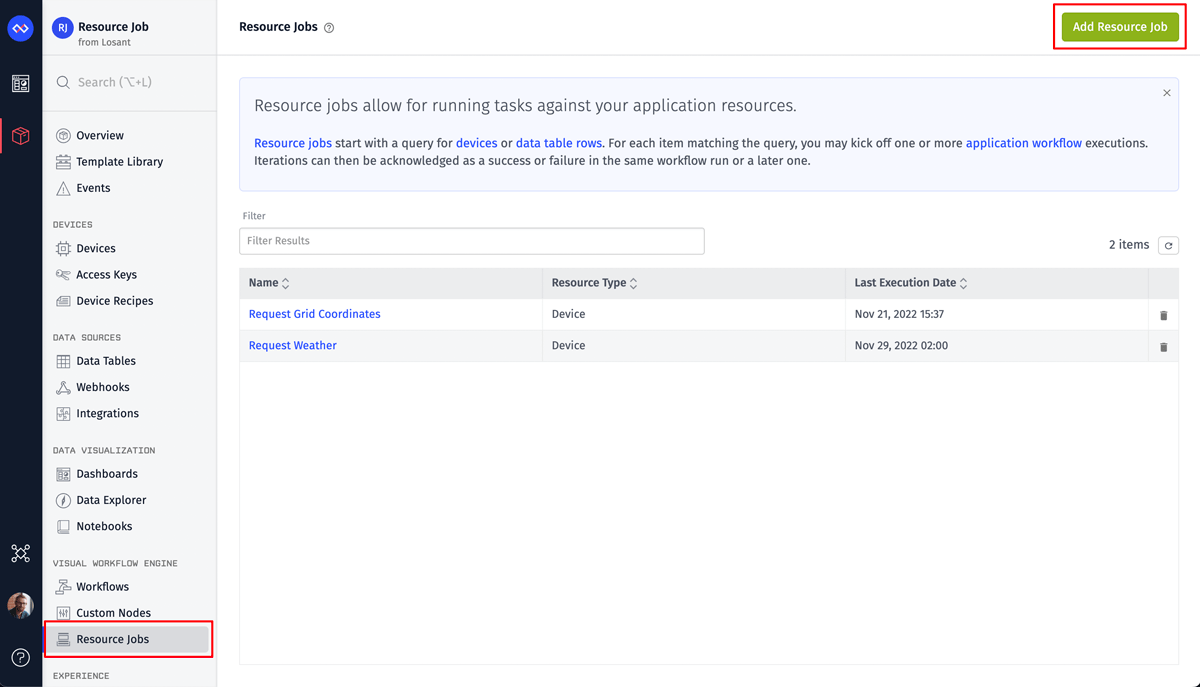
Create a Resource Job
On the left application menu, you’ll see a menu item called Resource Jobs. This is where your jobs are created and managed. Click the Add Resource Job button at the top right corner of the page to create a new job.
Below is a screenshot for our job’s configuration. The details of each option are described after the image.
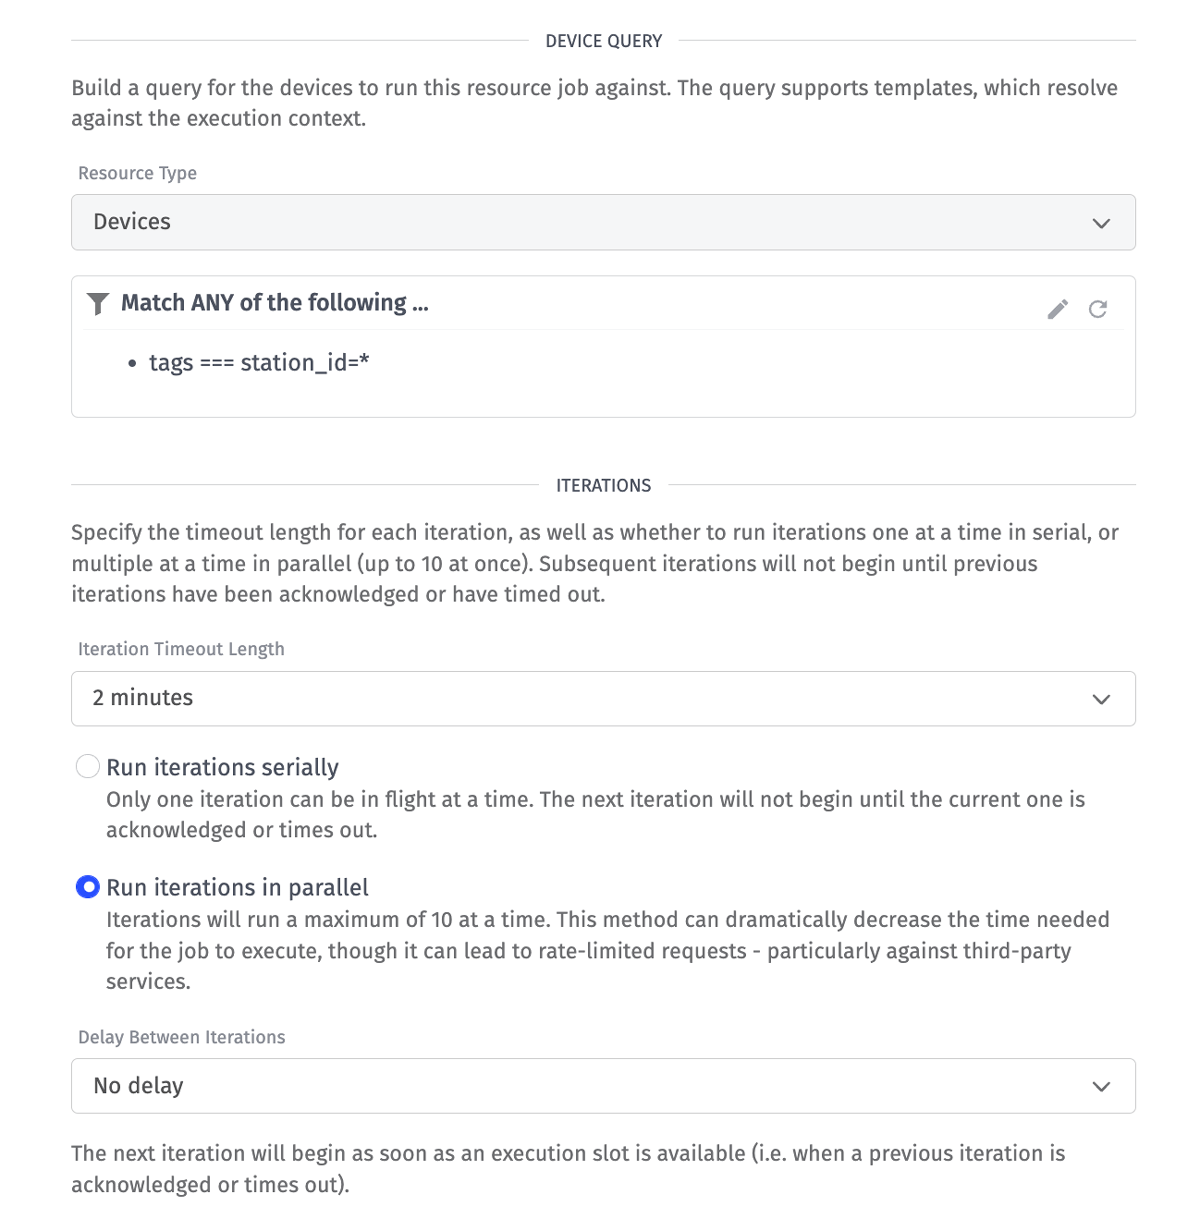
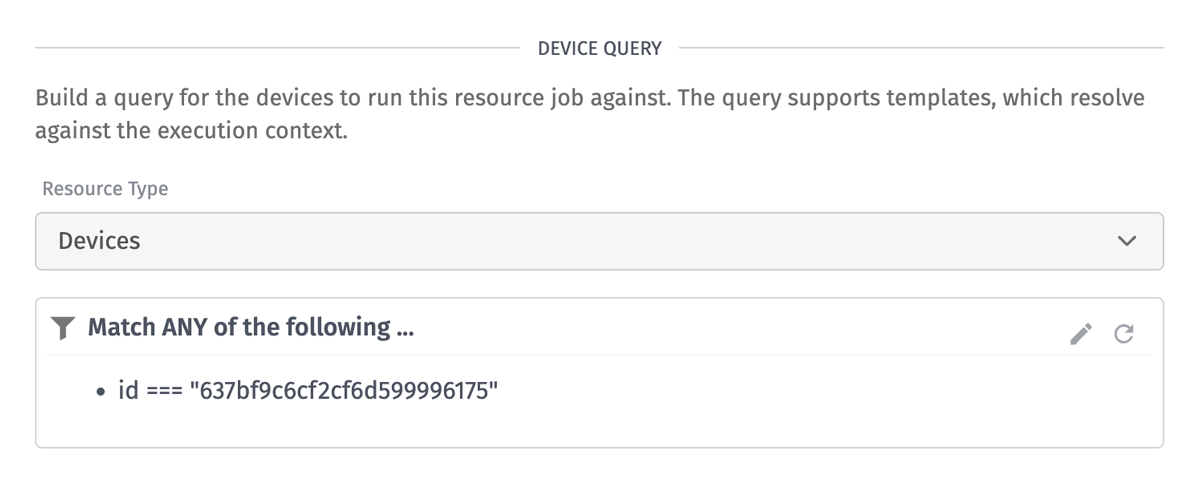
Resource jobs have two required configuration sections. The first section controls which resources to iterate over. For this job, we’re iterating over every device that has a station_id tag, regardless of its value. If your use case requires a job to only iterate over a subset of your devices, using tags is the recommended way to create those subsets.
The second required configuration section controls the execution behavior of the job’s iterations. Iteration Timeout Length controls how long the job will wait for each iteration to be acknowledged. Iterations do not have to be acknowledged in the same workflow that was originally triggered. Each iteration receives a unique ID and that ID can be provided to the Job: Acknowledge Node in the current or any workflow triggered in the future. This behavior is useful for things like over-the-air (OTA) updates that require back and forth communication with the device before the iteration can be eventually acknowledged.
The Run iterations serially and Run iterations in parallel options control how many iterations will execute at the same time. This option is particularly important when polling an API. It’s very common for APIs to implement some form of rate limiting, and a job running iterations in parallel can easily exceed limits. The NWS API we’re using does say a rate limit exists, but does not document the specific details. In our testing, the parallel option has not exceeded their limit.
The Delay Between Iterations option is intended to be used when running iterations serially. This option provides further control over how fast iterations will execute. For example, if your API has a rate limit of 10 requests per second, setting the delay value to 100ms or greater will guarantee the job will never exceed the API’s limit.
Building and Testing the Resource Job Workflow
We now have a job configured, but we’re not triggering any workflows. Resource Jobs can trigger one or more Application Workflows using the Job: Iteration Trigger. In most cases, your application will have a single workflow for each job. When the job is executed, that workflow will be repeatedly triggered for every configured resource.
The first thing you’ll want to do when initially building and testing a workflow is to modify the job’s configuration to run on a single resource. This lets us rapidly execute the job to test the workflow while it’s being built. This step is especially important if your job is modifying or destroying data. It’s very easy for workflows to have bugs while actively being developed. You don’t want to accidentally perform a destructive action on every device.
For this example, we’ve changed the job to execute against a single device ID. It’s a good idea to manually test this device against your API to ensure it works. For our use case, we’ve confirmed that this device’s station_id returns valid data.
For our first attempt at executing a job, we’re going to make a workflow that only contains three nodes. We want to test that everything is plumbed together correctly before adding any real logic.
Getting Started
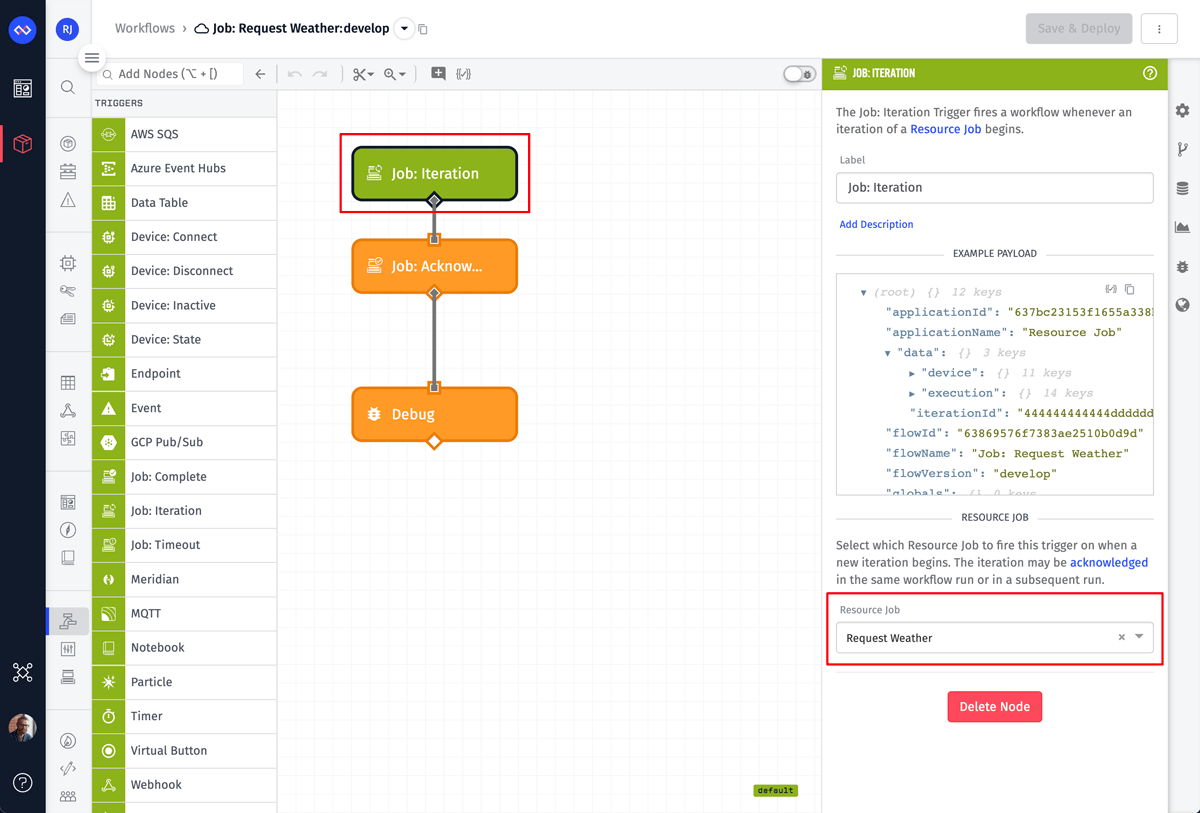
The first node is the Job: Iteration Trigger. This node only has one configuration field, which is the resource job that, when executed, should trigger this workflow.
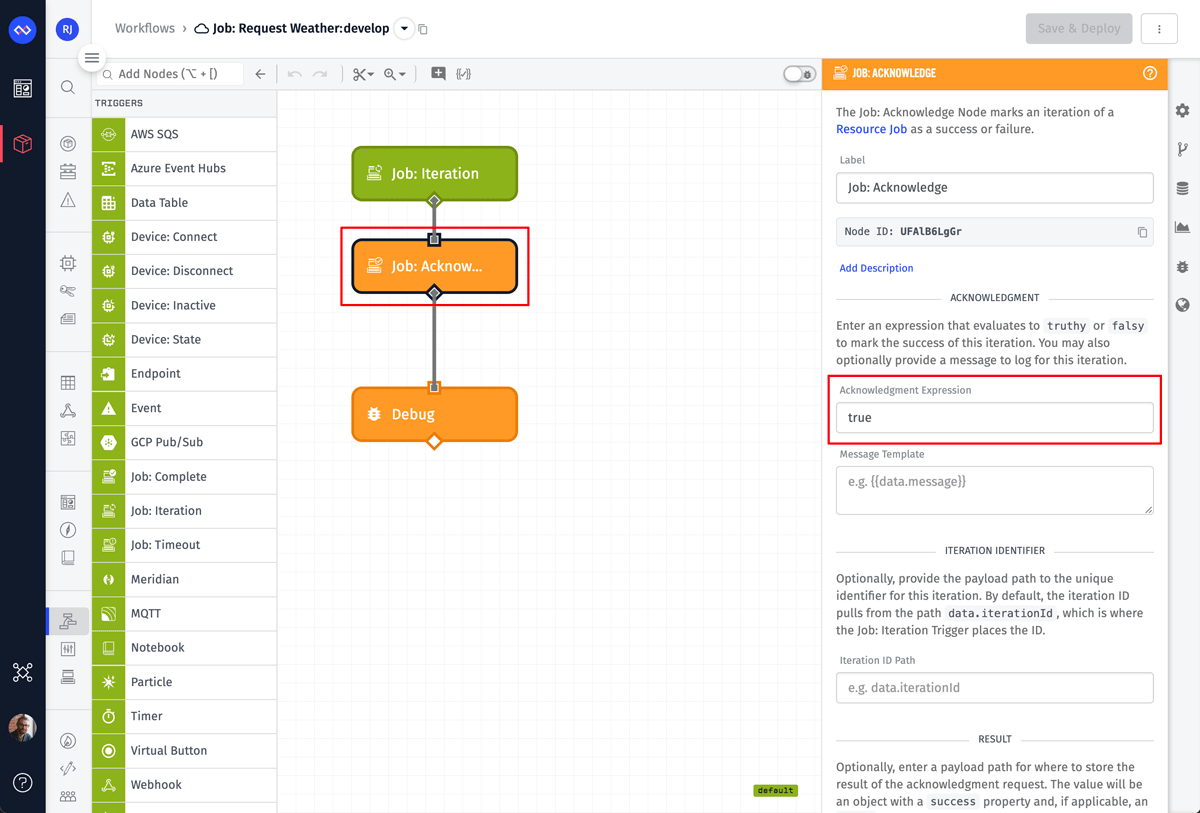
The next node is a Job: Acknowledge Node. For this test, the only configuration value we need to provide is an Acknowledgment Expression. This node acknowledges an iteration as either a success or a failure. In most cases, this value will be a simple true or false, but the field does support expressions to dynamically determine the value based on payload data.
The final node is a Debug Node. This lets us see that the workflow triggered and allows us to inspect the payload we receive on each iteration.
Test Execution
We can now execute our job and make sure everything is properly connected together. A workflow’s debug output does not persist if the workflow’s browser tab is closed. Therefore, during this test, it’s important that you keep the workflow tab open.
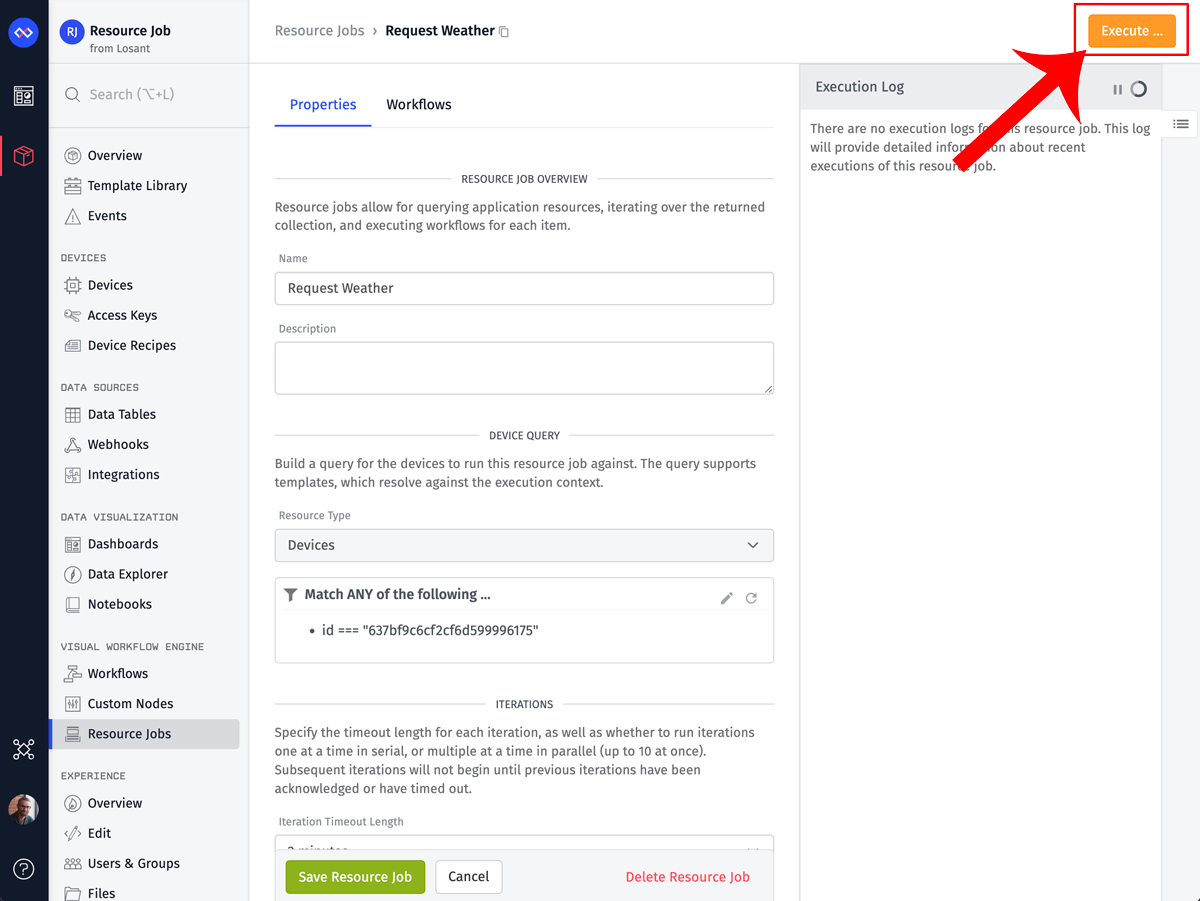
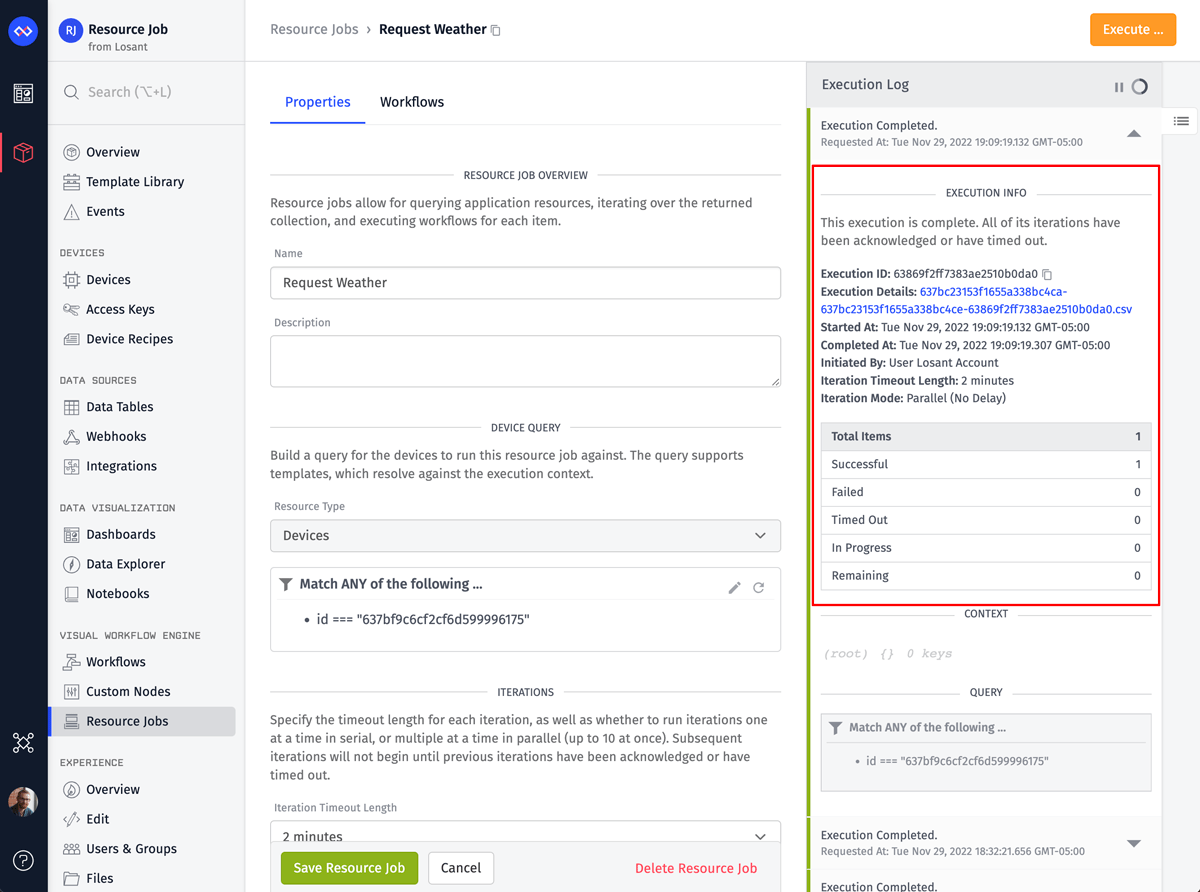
To execute this job, click the Execute button on your job’s configuration page. Clicking this button will bring up a modal where you can optionally provide custom context for each iteration. Our use case doesn’t require context, but it’s a useful feature to change the behavior of your job without having to modify the workflow.
After executing the job, we can now return to the workflow, inspect the debug output, and verify everything is working properly.
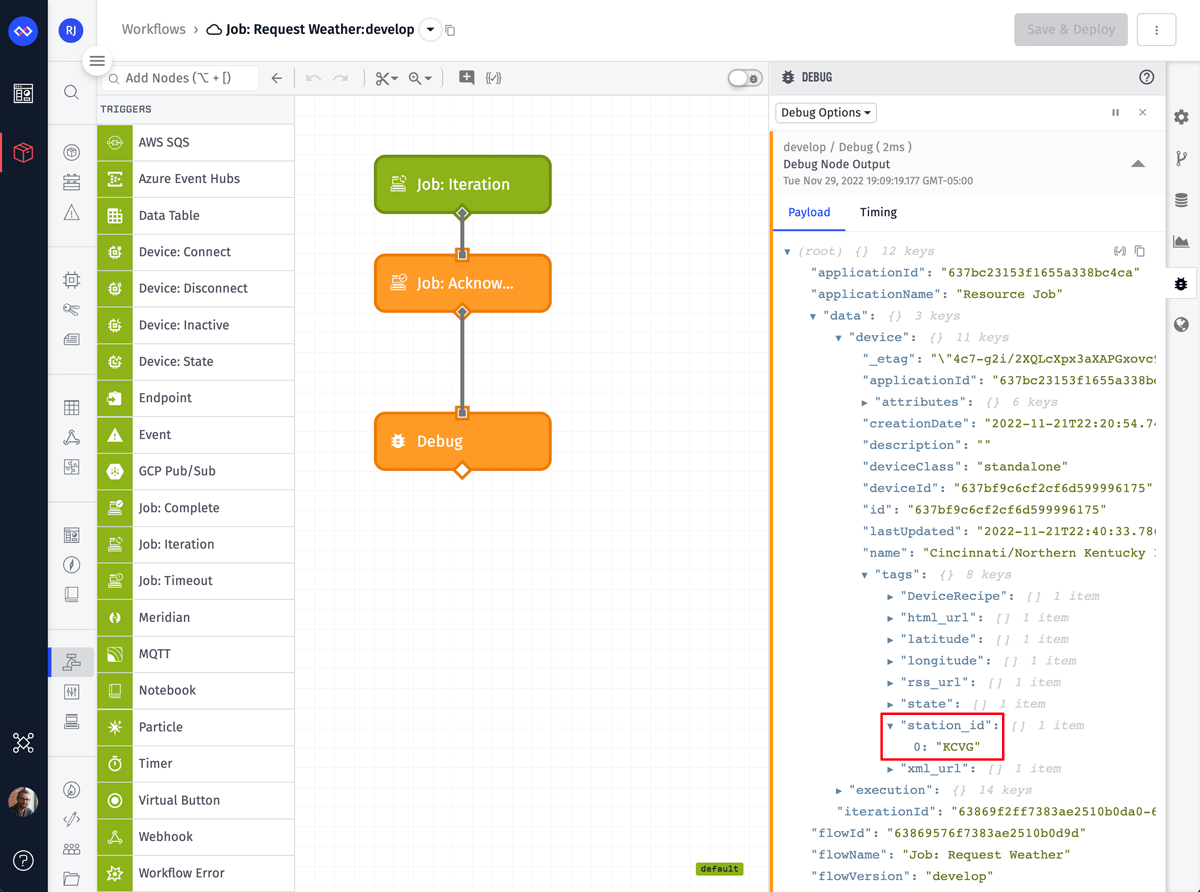
As you can see in the screenshot above, this workflow triggered for our test device. The entire device object was put on the payload at data.device. Most importantly, we can see the value for the station_id tag, which is required to make our API request.
Returning to the job’s configuration page, we can also see a successful execution in the log. The execution log is covered in greater detail later in this guide.
Workflow Buildout
At this point, you can continue building and testing the workflow until you’ve got it working for a single test device. Here’s the complete workflow for this guide:
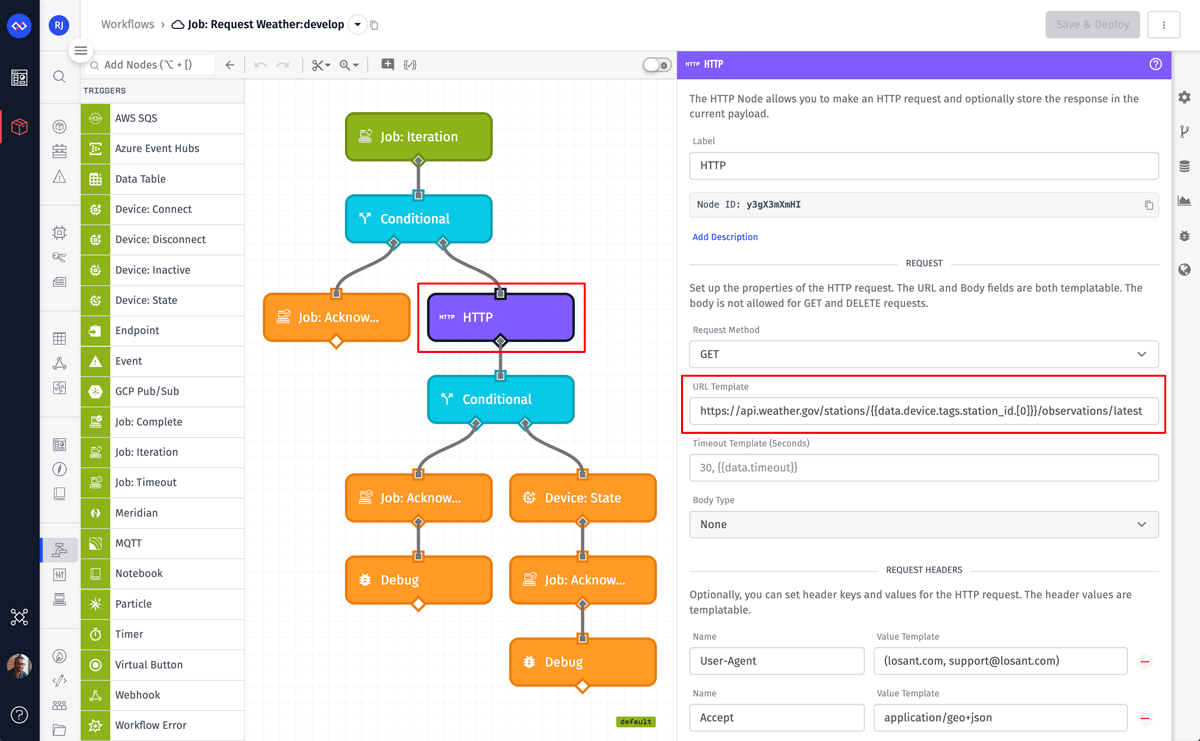
The HTTP Node is where the actual API request is performed. We’re using a template for the URL so that each iteration makes an API call specific to that device:
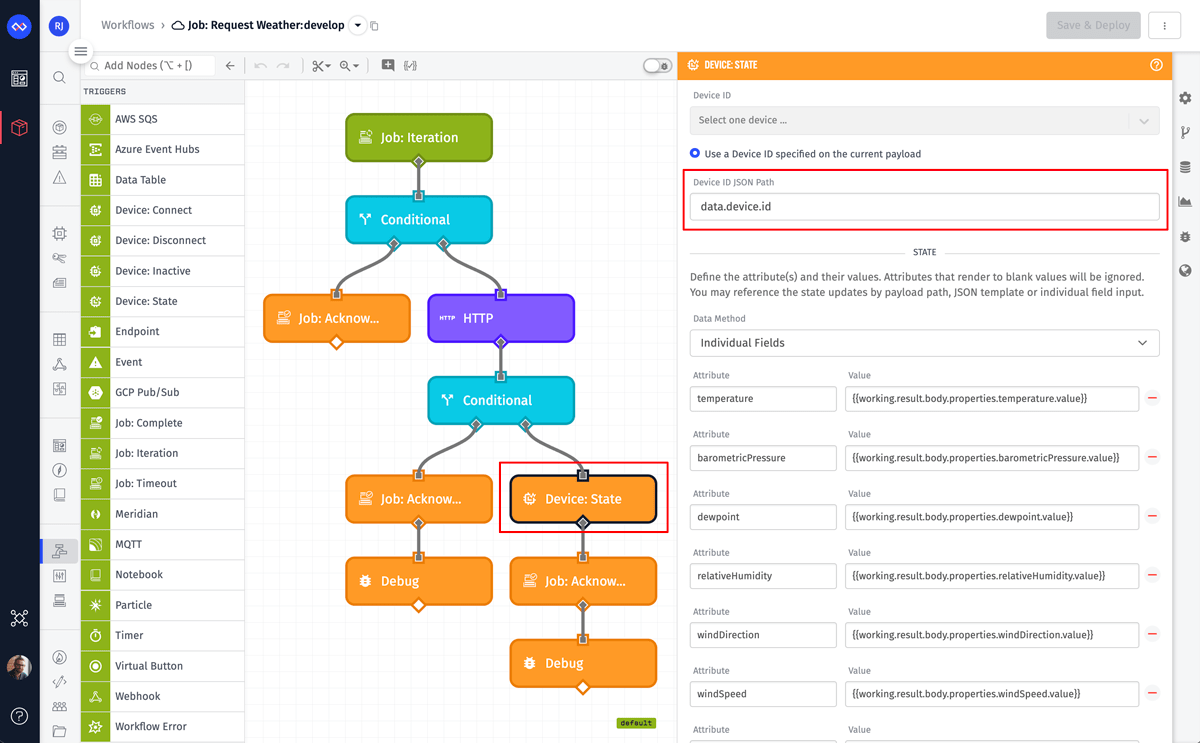
The Device State Node is where the result of the API request is being saved to the device’s attributes. The Job: Iteration Trigger places the ID of the device on the payload at data.device.id. This is the value we’re using for the Device ID JSON Path field so that state is saved for the correct device. As for the attributes and their values, they will be different for your devices and your API. You’ll have to modify your workflow accordingly.
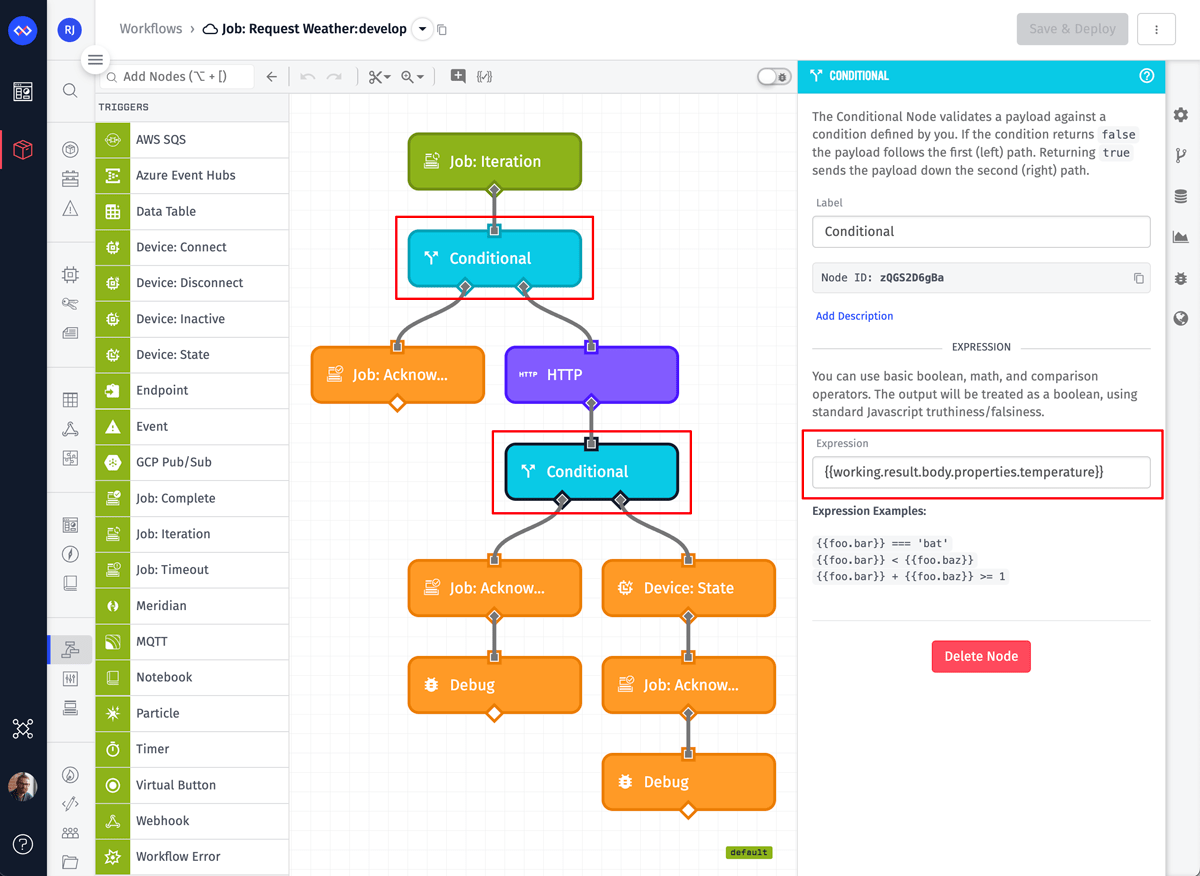
The Conditional Nodes are validating the incoming device object and the result of the API request. If either fail, the workflow branches to a Job: Acknowledge Node with the acknowledgment value set to false and a custom message to help debug why the failure occurred.
The second conditional node, highlighted above, is checking that a required value exists on the payload. The NWS API does not return every attribute for every station. For this use case, the minimum value we require is the temperature.
There are many reasons why an HTTP request can fail, so making proper use of the acknowledgment message is important. For this example, the message will include either a status code (if the API returned an error) or an error string (if a network error prevented the API request). If the message includes a status code of 200, then we know that the API request was successful, but the result did not include a temperature value.
You might think the first conditional node is not needed, since the only required data is the device’s station_id and our job is configured to only run against devices with that tag. For any Losant workflow, you should never assume the data you require is on the payload. For resource jobs specifically, there is a window of a few milliseconds between an iteration being queued and the device object being read from the database and placed on the workflow. During this window of time, the station_id tag could have been removed, or the entire device could have been deleted. In practice, it’s very unlikely you’ll hit this scenario; however, this could lead to one of those rare and random bugs that can be very hard to track down. Always validate your input.
Since our workflow is recording device state, the last thing to verify is that state data is making it to our device. We can do this by opening the device overview page and switching to the Attributes tab.
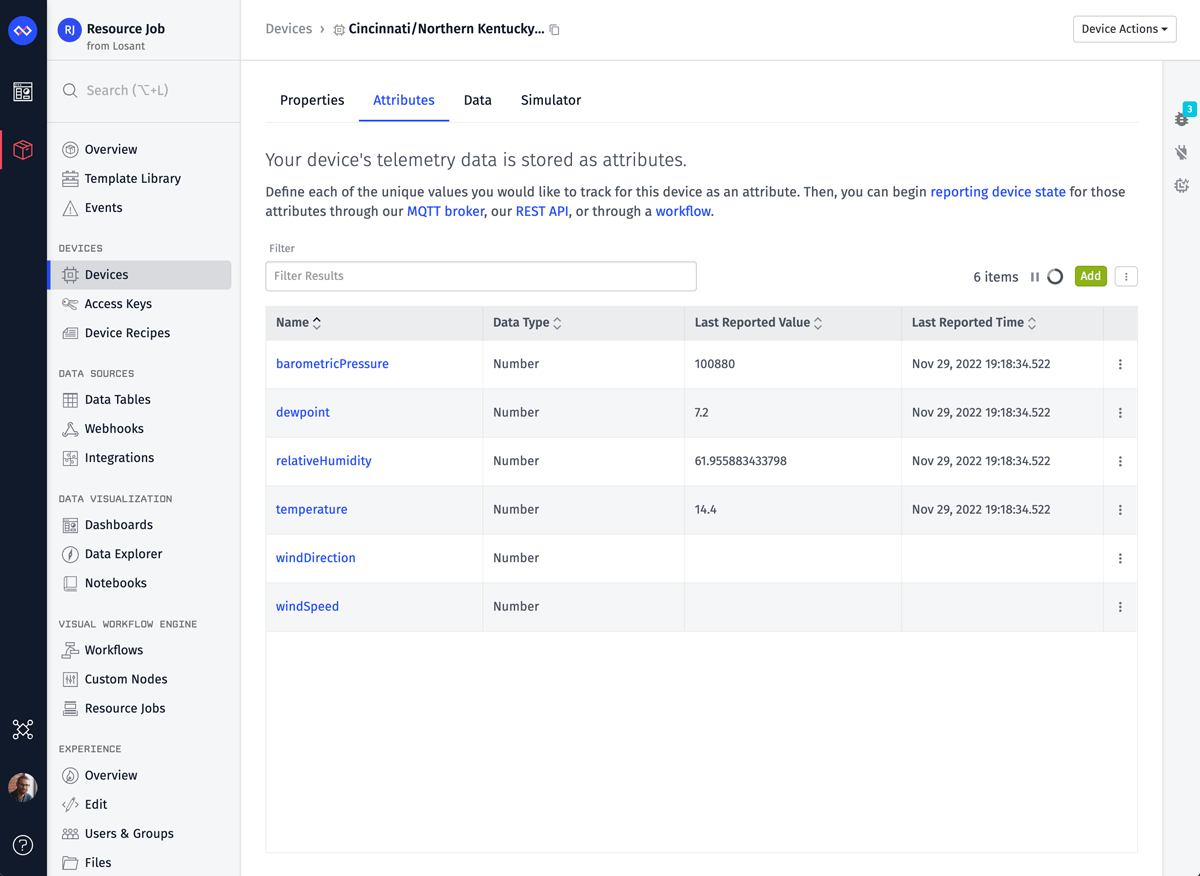
Data is successfully being recorded and this specific station is not currently receiving data for windDirection or windSpeed.
Executing at Scale and Interpreting Results
Now that we have a job that successfully executes for one device, we can change the job to execute for all 2,904 devices.
A job running in parallel will execute iterations extremely fast. If you’re watching the workflow’s debug output or the Application Log, you’ll likely see the following message:
Maximum per-second limit reached.
This message only relates to how quickly Losant sends log and debug messages to your browser. Behind the scenes, every iteration is still being executed and every workflow is still being triggered.
While a job is executing, you can view the results in real time by monitoring the Execution Log. Once the job is complete, you’ll be given a link to download a CSV file containing the results of every iteration.
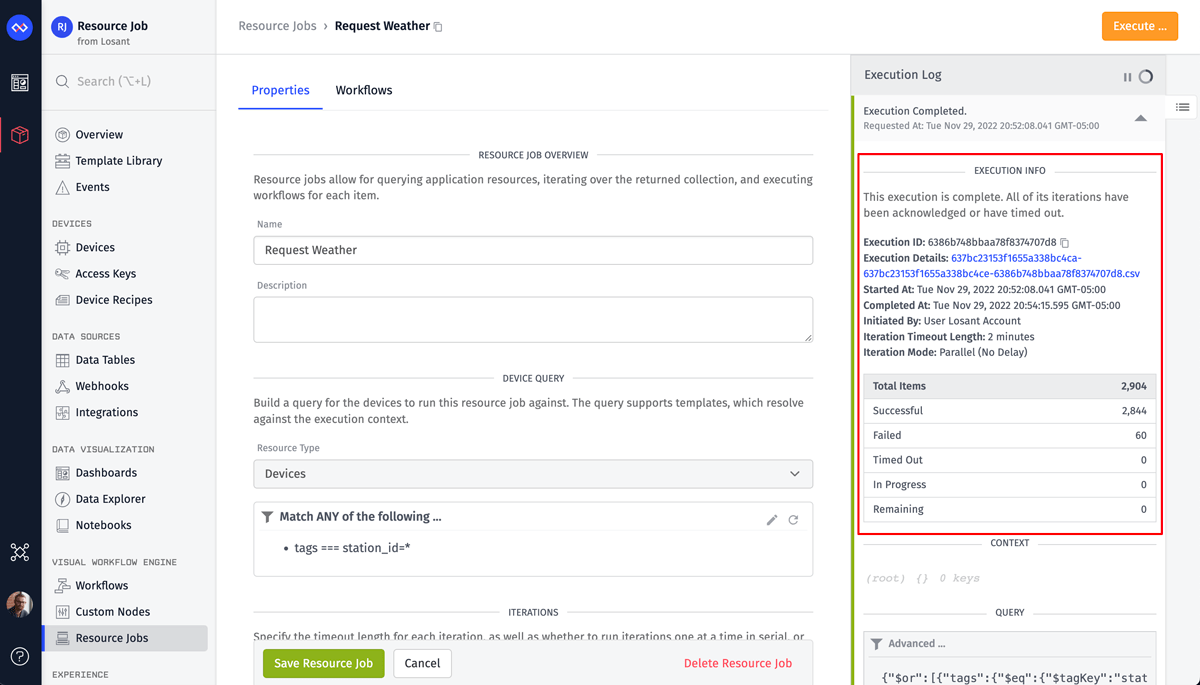
In the screenshot above, you can see that this job executed against all 2,904 devices, but 60 of them failed. Those failures correspond to any Job: Acknowledge Node that provided false as the acknowledgment value. Our workflow has two paths that result in a failure, but fortunately we made good use the failure message to help diagnose why a failure occurred.
Let’s download and open the CSV file to find the iterations that failed. If you’re using Excel, you can filter the status column using the steps below:
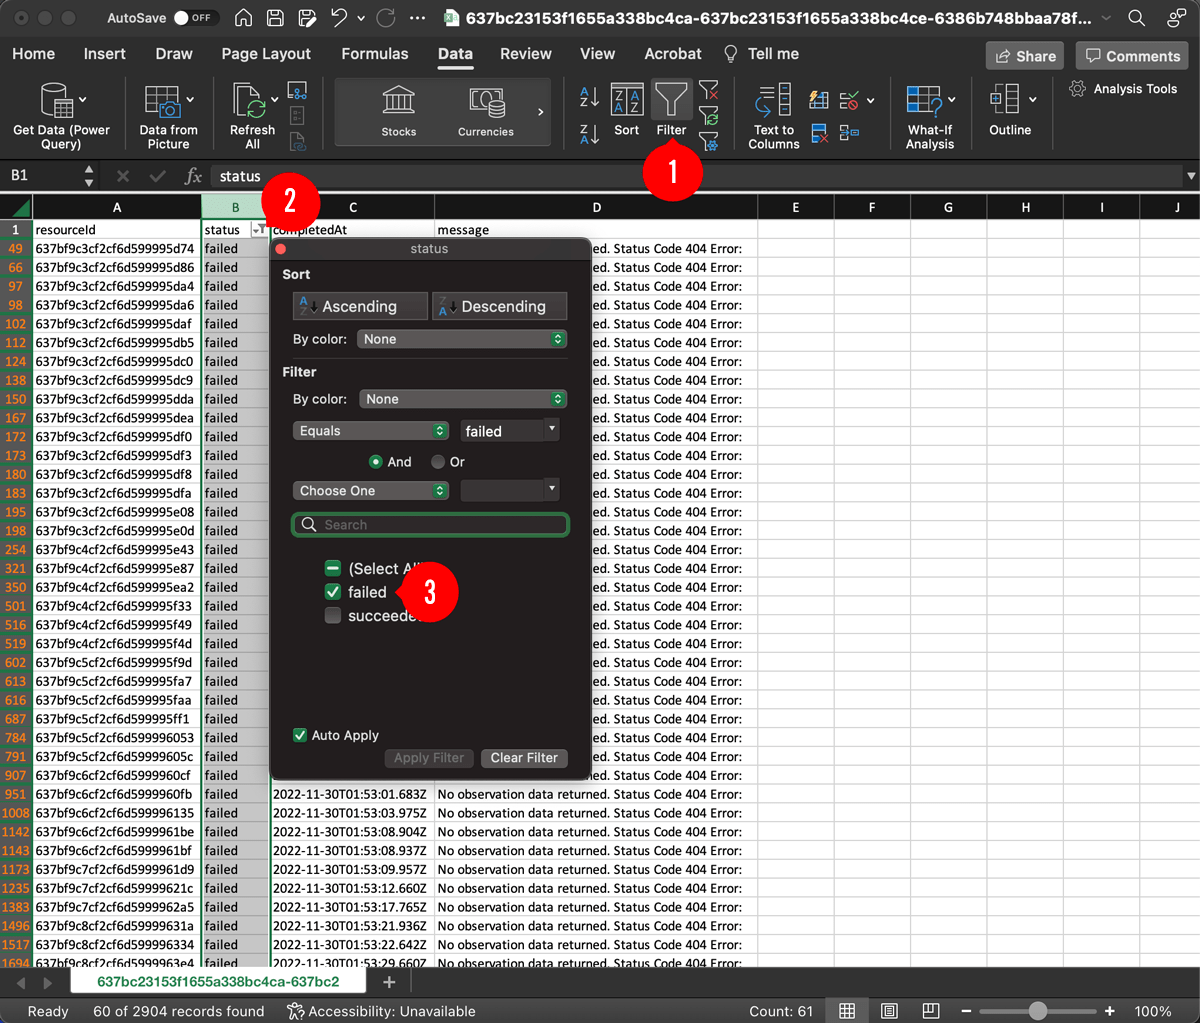
In this case, all 60 failures had the following message:
No observation data returned. Status Code 404 Error:
This means the API request was successful, but the API returned a 404 (Not Found) status code. It turns out that the NWS API does not return data for all 2,904 stations. This was not something we caught until we ran the test at full scale. At this point we have a few options:
- Do nothing and accept that these iterations will fail.
- Modify the workflow to accept a
404as a successful iteration. - Add a tag to the device and modify the job’s configuration to filter out these devices.
- Remove these devices from our application.
For production applications, iteration failures should be rare and exceptional occurrences. That said, we would not recommend #1 or #2 as viable solutions. All iterations should succeed under normal conditions. For this use case, we’d recommend #3, which temporarily removes the devices from the job. This allows us to continue testing and easily restore these devices if the API starts returning data. It’s likely that your API will have some unexpected behavior when the job is executed at full scale. Similar to the scenario above, you’ll have to adjust the workflow based on your specific use case.
Scheduling the Job to Execute Daily
Up until this point we’ve been executing our jobs manually. However, one of the most powerful features of Resource Jobs is that they can be executed by other workflows.
The workflow below uses a Timer Node that’s configured to run every day at 2:00 AM EST. Once triggered, this workflow uses the Job: Execute Node to execute our job.
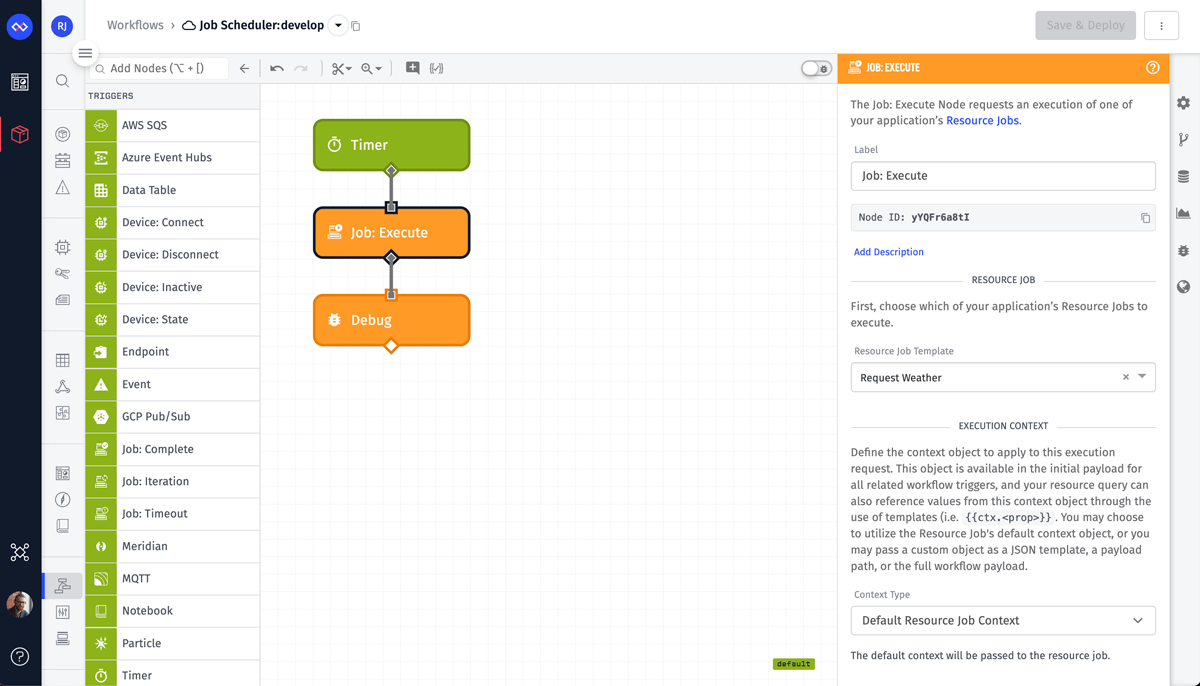
The only required configuration for this node is the job to execute. This node also allows you to provide custom context data. Although we’re not using context, dynamically executing jobs with programmatic context is a powerful combination for advanced Resource Jobs use cases.
Handling Execution Results
As a final exercise for you, check out the Job: Complete Trigger. This trigger fires whenever a job completes and provides the same information that’s in the execution log. For production applications, this trigger is critical for capturing and alerting if any iterations in a job fails. The CSV report link, which is available in the workflow payload and in the execution log, is only valid for 7 days.
You can use this trigger to also upload the CSV report to your Application Files or custom cloud storage bucket (AWS S3, Google Storage, or Azure Storage). This gives your team more time to diagnose issues and keep a permanent audit log of job executions.
Was this page helpful?
Still looking for help? You can also search the Losant Forums or submit your question there.