Embedded Edge Agent Walkthrough
This walkthrough provides instructions for anyone new to Losant’s Embedded Edge Agent (EEA). It starts by getting you acquainted with WebAssembly and ends with you deploying your first Embedded Workflow.
All of the code in this walkthrough is written in Python 3, however the concepts apply to nearly any language that supports a WebAssembly runtime. You can find examples for other languages in our EEA Examples repository.
Each section in this walkthrough builds on the previous section, so we recommend following this walkthrough in order:
- What is WebAssembly?
- Loading Your First WebAssembly Module
- Interacting with the Hello World Module
- Understanding the WebAssembly Memory Model
- Implementing the EEA API
- Working with Registered Functions
- Receiving Embedded Workflows over MQTT
- Deploying Your First Embedded Workflow
What is WebAssembly?
WebAssembly (WASM) is an open standard for portable and executable programs. WASM was originally designed to bring high-performance web applications to browsers. However, due to its portable design, WASM applications can run in nearly any environment.
The Losant Embedded Edge Agent makes use of WebAssembly because of its high performance, small footprint, and portability. When you deploy Embedded Workflows, Losant compiles them into a WebAssembly module that can then be executed on a wide variety of devices and environments.
WebAssembly modules aren’t directly executed. For example, you can’t double-click a WASM file on your desktop and have it run like you would a .exe file. WASM modules are executed within other applications. When WASM is used for the web, that other application is typically a web browser. For the Losant EEA, the WASM module is executed within your custom edge application, which can be written in any language that supports a WASM runtime.
Loading Your First WebAssembly Module
The goal for this section is to eliminate all variables and get a WebAssembly module working in your application at the most fundamental level. For anyone new to the EEA and new to WebAssembly, this is often the most challenging step.
Some languages may have multiple choices when it comes to WebAssembly runtimes. Other languages, like JavaScript (Node.js), support WebAssembly out of the box. For Python, we recommend either wasmer or pywasm3. All of the example code in this walkthrough will be using wasmer. If you’re using something like a Raspberry Pi, we recommend pywasm3 since wasmer is not supported on 32-bit operating systems. The code is similar between wasmer and pywasm3 and the EEA Examples repository has full Python examples using both runtimes.
To make it as easy as possible to get started with WebAssembly, we’ve provided a “Hello World” module that removes the majority of the EEA API. This allows you to focus on getting WebAssembly working instead of debugging potential issues implementing the EEA API.
Not every WASM runtime supports imported memory, so choose the download that is most appropriate for your environment.
- Hello World WASM Module - Imported Memory (
wasmer, JavaScript) - Hello World WASM Module - Exported Memory (
pywasm3)
The rest of the code in this walkthrough will be using wasmer. To install wasmer, run the following commands:
$ pip3 install wasmer==1.0.0
$ pip3 install wasmer_compiler_cranelift==1.0.0
As a reminder, all examples in this walkthrough are using Python 3. Depending on your system, the default pip command may reference Python 2. In many systems, the Python 3 versions of both Python and pip are accessible using the python3 and pip3 commands.
Next, create a new folder anywhere on your system and copy the Hello World WASM file you downloaded above to the new folder. The code in this example will be using hello-world-memory-import.wasm. In that same folder, add a blank file named step1.py, which will contain the actual Python application that we’re building in this walkthrough. You can also view the related code.
Let’s now create the WebAssembly runtime and load the Hello World module from disk. This walkthrough covers loading modules over MQTT in a later section, but the goal for now is to get WebAssembly working by removing all other complexities. Copy the code below to your step1.py file.
from wasmer import engine, Store, ImportObject, Function, Module, Instance, Memory, MemoryType
from wasmer_compiler_cranelift import Compiler

# The store represents all global state that can be
# manipulated by WebAssembly programs. The store
# holds the engine, which is responsible for compiling
# the module into something that can be executed.
#
# https://wasmerio.github.io/wasmer-python/api/wasmer/#wasmer.Store
store = Store(engine.JIT(Compiler))

# Define the memory to be imported into the module.
# minimum=1 starts the memory at one page (64Kb).
# You can optionally provide a maximum to limit memory use.
# shared=False does not allow the memory to be accessed between threads.
#
# https://wasmerio.github.io/wasmer-python/api/wasmer/#wasmer.MemoryType
memory_type = MemoryType(minimum=1, shared=False)

# Define the memory instance, which consists of a vector of bytes.
#
# https://wasmerio.github.io/wasmer-python/api/wasmer/#wasmer.Memory
memory = Memory(store, memory_type)

# Compile the module to be able to execute it.
#
# https://wasmerio.github.io/wasmer-python/api/wasmer/#wasmer.Module
module = Module(store, open("./hello-world-memory-import.wasm", "rb").read())

print("Successfully loaded WASM module!")
You can execute this code using the following command:
$ python3 step1.py
If everything works, the program will print the following message and exit:
Successfully loaded WASM module!
If the program failed, an exception will be logged to the console with details. The best place to receive support at this stage is the community behind the WebAssembly runtime you’ve chosen. For wasmer specifically, we recommend their forums or to open a GitHub issue.
Interacting with the Hello World Module
The Hello World module implements a subset of the EEA API. The goal for this section is to get familiar with the concept of WebAssembly’s imported and exported functions, which is the primary way your code interacts with the EEA and your Embedded Workflows.
The Hello World Module exports eea_init and eea_loop, and imports eea_trace. Next, create a new file named step2.py with the following content. View the code.
import time

from wasmer import engine, Store, ImportObject, Function, Module, Instance, Memory, MemoryType
from wasmer_compiler_cranelift import Compiler

# The store represents all global state that can be
# manipulated by WebAssembly programs. The store
# holds the engine, which is responsible for compiling
# the module into something that can be executed.
#
# https://wasmerio.github.io/wasmer-python/api/wasmer/#wasmer.Store
store = Store(engine.JIT(Compiler))

# Define the memory to be imported into the module.
# minimum=1 starts the memory at one page (64Kb).
# You can optionally provide a maximum to limit memory use.
# shared=False does not allow the memory to be accessed between threads.
#
# https://wasmerio.github.io/wasmer-python/api/wasmer/#wasmer.MemoryType
memory_type = MemoryType(minimum=1, shared=False)

# Define the memory instance, which consists of a vector of bytes.
#
# https://wasmerio.github.io/wasmer-python/api/wasmer/#wasmer.Memory
memory = Memory(store, memory_type)

# Compile the module to be able to execute it.
#
# https://wasmerio.github.io/wasmer-python/api/wasmer/#wasmer.Module
module = Module(store, open("./hello-world-memory-import.wasm", "rb").read())

#
# Helper function to decode a string from the WASM memory buffer
# from the starting pointer and length.
#
def decode_string(memory, ptr_start, length):
    buffer = memoryview(memory.buffer)
    return str(buffer[ptr_start:(ptr_start + length)], "utf-8")

#
# Called by the EEA to log tracing information. This is useful
# during development to help debug what the EEA is doing.
#
def eea_trace(message_ptr:int, message_length:int, level:int) -> int:
    print("eea_trace")
    print(str(level) + ": " + decode_string(memory, message_ptr, message_length))
    return 0

# Import memory and functions.
# https://wasmerio.github.io/wasmer-python/api/wasmer/#wasmer.ImportObject
import_object = ImportObject()
import_object.register(
    "env",
    {
    "memory": memory,
    "eea_trace": Function(store, eea_trace),
    }
)

# Create the executable instance of the WebAssembly module.
# https://wasmerio.github.io/wasmer-python/api/wasmer/#wasmer.Instance
instance = Instance(module, import_object)

# Initialize the EEA.
return_code = instance.exports.eea_init()
print("eea_init return code: " + str(return_code))

while(True):
    # Every second, invoke the eea_loop exported function.
    # Pass the current time, in milliseconds since epoch.
    instance.exports.eea_loop(int(time.time() * 1000))
    time.sleep(1)
When this code is executed, the script will run forever and print a message to the console once per second:
$ python step2.py
eea_trace
2: Hello World from WebAssembly!
eea_init return code: 0
eea_trace
2: Loop called with value: 1633635983885
eea_trace
2: Loop called with value: 1633635984890
eea_trace
2: Loop called with value: 1633635985895
eea_trace
2: Loop called with value: 1633635986898
eea_trace
2: Loop called with value: 1633635987903
...
Whenever eea_init or eea_loop is executed, a message is sent back to your code from the Hello World module through the eea_trace imported function.
For eea_init, the message is “2: Hello World from WebAssembly!”. For eea_loop, the message is “2: Loop called with value: <ticks_milliseconds>”. The “2” prefix is the log level of the trace message. “2” indicates an “All/Verbose” message. When using an actual EEA WebAssembly module, you have the ability to configure the level of trace messages to increase or decrease the amount of tracing information you receive.
WebAssembly does not support threads in all runtimes, so your code must constantly “pump” the EEA by calling eea_loop. In the code above, eea_loop is being invoked in an infinite loop with a one-second delay between invocations. A one-second delay works for this example to reduce the console output, but in practice we recommend invoking eea_loop with a delay that’s no longer than 100 milliseconds.
WebAssembly also does not have the concept of time, so on every call to eea_loop you must pass in the current time in milliseconds. The time can be since boot (for embedded devices) or since Epoch (for gateways or other devices with a real-time clock). The time value you provide is primarily used by the EEA to know when to fire Timer Triggers.
The last thing you may have noticed is that eea_trace does not directly receive a string, it instead receives a pointer and a length. This has to do with WebAssembly’s memory model and how data can be passed back and forth between a WebAssembly module and your application’s code.
Understanding the WebAssembly Memory Model
When it comes to communicating between your application code and a WebAssembly module, there’s only a few numeric types that are directly supported (integers and floats). Therefore, in order to pass complex types, like strings, we’re required to use pointers.
The WASM module either imports or exports a memory buffer. This means your application code has direct access to the memory that is being used by the WASM module. So whenever the WASM module needs to send a string to your code, it sends a pointer, as an integer, to where the string is located in memory. You can think of the memory as an array of bytes and the pointer as an index into that array.
So looking again at the eea_trace function, we can see that it accepts a pointer and the length of the string, in bytes:
def eea_trace(message_ptr:int, message_length:int, level:int) -> int:
    print("eea_trace")
    print(str(level) + ": " + decode_string(memory, message_ptr, message_length))
    return 0
Since decoding strings is done in various places when using the EEA, we’ve also added a helper function, decode_string, that does the actual decoding:
def decode_string(memory, ptr_start, length):
    buffer = memoryview(memory.buffer)
    return str(buffer[ptr_start:(ptr_start + length)], "utf-8")
Every language has a different way to decode strings from a buffer, but for Python we’re using the memoryview standard type. Next, we extract a subset of bytes from the memory starting at the pointer we received and ending at (pointer + length). The EEA only sends and receives strings encoded as UTF-8, so the last step is to decode the raw bytes into a UTF-8 string.
In some cases, like eea_get_device_id, your application code needs to send a string to the WASM module. In these situations, the WASM module still sends a pointer, but instead of that pointer containing a string, your application must encode a string starting at that address in memory.
There are plenty of examples of encoding and decoding data from memory further in this walkthrough. The important concept to understand is that in many cases you will be required to access data directly from the WASM module’s memory buffer.
Implementing the EEA API
The Hello World module we’ve been using only implements a small subset of the EEA API. It’s now time to switch away from the Hello World module and starting using a real EEA compiled bundle. From this point on, we’ll be using the term “bundle” to mean a WebAssembly module that contains real workflows.
Please download one of the following EEA bundles:
The EEA API bundle is compiled from the following workflow:
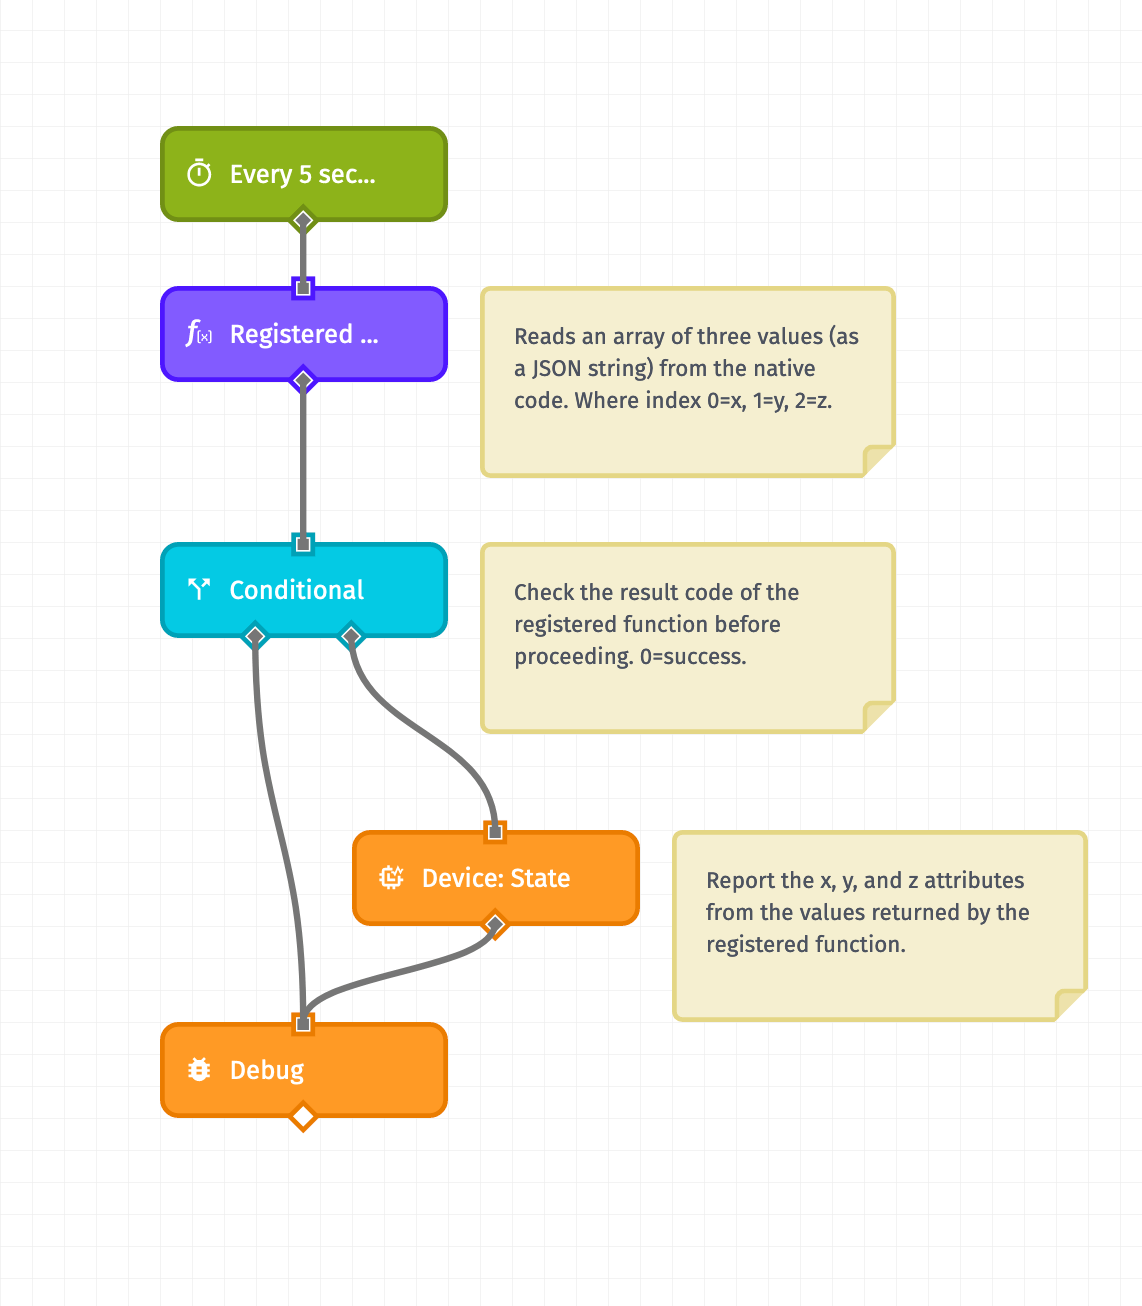
If you’d like to see the workflow itself, you can download the workflow and import it into your own Losant application. This workflow runs every 5 seconds, reads a single accelerometer reading ([x,y,z]) using a Registered Function Node, and then reports those readings using a Device State Node.
This workflow, as simple as it may seem, exercises a significant amount of the EEA API since it involves receiving data from, and sending data to, your application code.
At this point in the walkthrough, our Python code is too large to directly post; instead, view the code on GitHub. From this point on, we’ll be extracting and explaining specific code snippets.
You may immediately notice the code has been re-organized and we’ve introduced threads.
#
# Main entry point for the Python script.
# Start a thread for the EEA.
#
if __name__ == "__main__":
    eea_thread = threading.Thread(target=thread_eea)
    eea_thread.start()
If you recall, eea_loop must be called continually in an infinite loop. This loop will block whatever thread it’s in and up until now it has blocked the main thread. Using threads makes things easier when we introduce MQTT in the next section. This is because the MQTT client, just like the EEA, has a loop function that also must be called continually. Separating these two infinite loops into their own threads will be easier than trying to call both loop functions from the same thread.
Depending on what language you’re using, threads may or may not be required. JavaScript, for example, does not require threads since it uses an event loop. When using FreeRTOS, you’d likely use two tasks, which provide similar functionality as threads.
The most important part of this code is the imported functions. To successfully load any EEA bundle, you must import a set of pre-defined functions. Imported functions are defined in your application code, but are invoked by the EEA. Below is the section of code that contains all required imported functions:
#
# Called by the EEA to provide pre-allocated message buffers.
# These buffers are used to send data to the EEA for
# direct triggers, commands, etc.
#
def eea_set_message_buffers(buffer_topic:int, topic_buffer_len:int, buffer_payload:int, payload_buffer_len:int) -> int:
    print("eea_set_message_buffers")
    nonlocal ptr_buffer_topic
    nonlocal ptr_buffer_payload
    ptr_buffer_topic = buffer_topic
    ptr_buffer_payload = buffer_payload
    return 0
#
# Called by the EEA to log tracing information. This is useful
# during development to help debug what the EEA is doing.
#
def eea_trace(message_ptr:int, message_length:int, level:int) -> int:
    print("eea_trace")
    print(str(level) + ": " + decode_string(memory, message_ptr, message_length))
    return 0
#
# Called by the EEA to send a message over MQTT.
#
def eea_send_message(ptr_topic:int, topic_length:int, ptr_payload:int, payload_length:int, qos:int) -> int:
    print("eea_send_message")
    print("Topic: " + decode_string(memory, ptr_topic, topic_length))
    print("Payload: " + decode_string(memory, ptr_payload, payload_length))
    return 0
#
# Called by the EEA to persist workflow storage values.
#
def eea_storage_save(ptr_values:int, values_length:int) -> int:
    print("eea_storage_save")
    return 0
#
# Called by the EEA to retrieve persisted workflow storage values.
#
def eea_storage_read(out_ptr_values:int, buffer_len:int, out_ptr_values_length:int) -> int:
    print("eea_storage_read")
    return 0
#
# Called by the EEA to sleep the thread running the EEA.
#
def eea_sleep(milliseconds:int) -> int:
    print("eea_sleep")
    time.sleep(milliseconds / 1000)
    return 0
#
# Called by the EEA to retrieve the current device ID.
#
def eea_get_device_id(out_ptr_device_id:int, buffer_len:int, out_ptr_id_len:int) -> int:
    print("eea_get_device_id")
    encode_string(memory, DEVICE_ID, out_ptr_device_id, buffer_len, out_ptr_id_len, 1)
    return 0
#
# Called by the EEA to retrieve the current time, in milliseconds since epoch.
#
def eea_get_time(out_ptr_ticks_milliseconds:int) -> int:
    print("eea_get_time")
    encode_int(memory, int(time.time() * 1000), 8, out_ptr_ticks_milliseconds)
    return 0
Instead of going through this code line-by-line, let’s execute this script and see how these imported functions are being utilized based on the console output.
$ python3 step3.py

Loading wasm bundle...
eea_set_message_buffers
eea_get_device_id
eea_trace
2: EEA initialized.
eea_trace
2: Looping with tick count: 1633724872921.
eea_trace
2: Checking timers...
eea_trace
2: 1 timer queued.
eea_trace
2: Flow, step3, running...
eea_fn_read_accelerometer
eea_trace
2: read_accelerometer ran successfully.
eea_send_message
Topic: losant/000000000000000000000000/state
Payload: { "time": 1633724872921, "data": {"x":0,"y":1,"z":1.5} }
eea_trace
2: Device changed state successfully.
eea_get_time
eea_send_message
Topic: losant/000000000000000000000000/fromAgent/debug
Payload: [{"flowId":"61609944b3b5dddc647d64a8","flowVersion":"2021-10-08T19-21-28","message":"","payload":{"data":{},"deploymentId":"61609a3cf513e31860041126","deviceId":"000000000000000000000000","flowId":"61609944b3b5dddc647d64a8","flowName":"step3","flowVersion":"2021-10-08T19-21-28","globals":{},"isConnectedToLosant":false,"time":1633724872921,"triggerId":"fz8gIb7tPW_2rTwBzpXvd","triggerType":"timer","working":{"readings":[0,1,1.5]}},"prevNodes":["f3mraDwfFF","HI7q8WVGiN"],"sourceNode":"17vfxFqpam","time":1637300442,"triggerUiIds":["467S0cLOox"]}]
eea_trace
2: [{"flowId":"61609944b3b5dddc647d64a8","flowVersion":"2021-10-08T19-21-28","message":"","payload":{"data":{},"deploymentId":"61609a3cf513e31860041126","deviceId":"000000000000000000000000","flowId":"61609944b3b5dddc647d64a8","flowName":"step3","flowVersion":"2021-10-08T19-21-28","globals":{},"isConnectedToLosant":false,"time":1633724872921,"triggerId":"fz8gIb7tPW_2rTwBzpXvd","triggerType":"timer","working":{"readings":[0,1,1.5]}},"prevNodes":["f3mraDwfFF","HI7q8WVGiN"],"sourceNode":"17vfxFqpam","time":1637300442,"triggerUiIds":["467S0cLOox"]}]
eea_trace
2: Finished running workflow for trigger id: 467S0cLOox.
eea_trace
2: Looping with tick count: 1633724873924.
eea_trace
2: Checking timers...
eea_trace
2: 0 timers queued.
...
With the trace level set to 2, the EEA sends a lot of useful information to the eea_trace function, which our code is printing to the console.
Starting at the top and working our way down, we can see what imported functions are being executed and in what order. After our application code calls eea_init, we can see that the EEA is invoking eea_set_message_buffers and eea_get_device_id. Once initialization is complete, our application code begins calling eea_loop.
On each loop iteration, among other things, the EEA checks to see if any Timer Triggers need to fire. All Timer Triggers will fire on the first loop iteration after initialization, which is why we see a message indicating one has been queued. After the first execution of each timer, they will only fire again based on their configured intervals, which in our example is every 5 seconds.
Now that the timer has fired, the EEA is running our workflow. The very first node is a Registered Function Node that invokes eea_fn_read_accelerometer. The next node is a Device State Node, which is used to report the accelerometer data to the Losant platform. WebAssembly modules cannot communicate directly to the Internet, so to report state, the EEA invokes eea_send_message, which is instructing your application code to send the message on its behalf. Since our code does not yet have an MQTT client, all we’re doing is printing the topic and payload to the console:
    eea_send_message
    Topic: losant/000000000000000000000000/state
    Payload: { "time": 1633724872921, "data": {"x":0,"y":1,"z":1.5} }
The last node in our workflow is a Debug Node, which also invokes eea_send_message to instruct our application code to send a debug message to the platform.
Every call to eea_loop will execute at most one workflow and will block until that workflow is complete. Near the bottom of the console output we can see that the workflow execution has completed and eea_loop has been called again. Since 5 seconds has not elapsed, this iteration does not perform any action.
Working with Registered Functions
Registered functions provide a way for your workflows to invoke any custom function defined by your application code. One of the most common uses for registered functions is to receive data from system resources (e.g. files) or attached sensors and peripherals (e.g. an accelerometer).
Registered functions are defined like any other imported function:
def eea_fn_read_accelerometer(
    out_ptr_readings_str:int,
    str_buffer_len:int,
    out_ptr_readings_len:int) -> int:

    print("eea_fn_read_accelerometer")
    encode_string(
    memory, "[0, 1, 1.5]", out_ptr_readings_str,
        str_buffer_len, out_ptr_readings_len)

    return 0
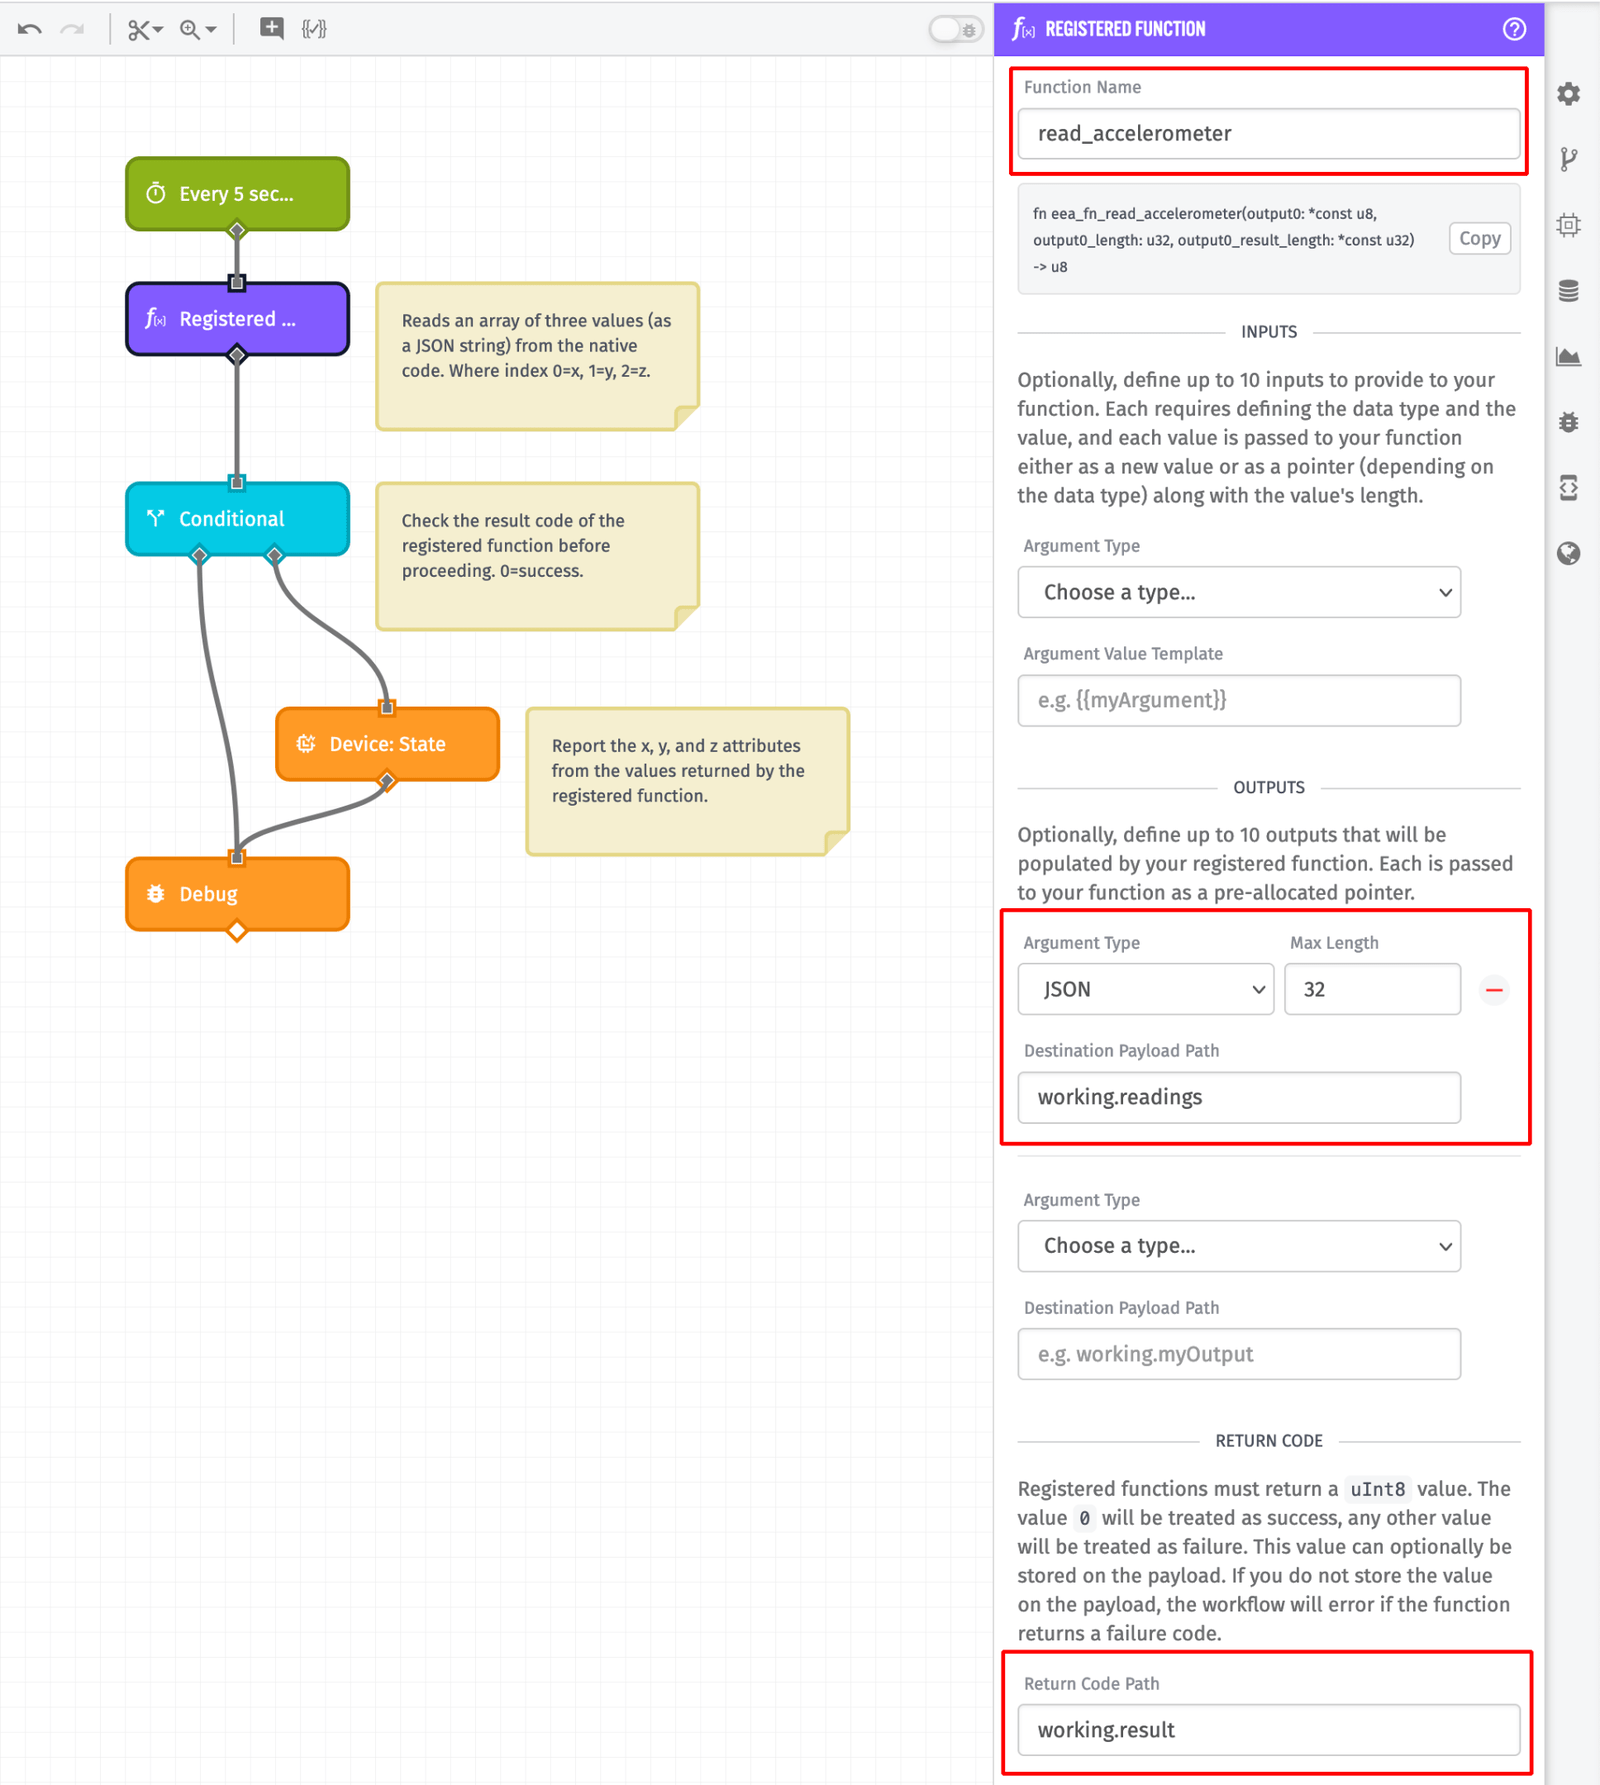
The required signature for a registered function depends on its inputs and outputs. For details, please review the documentation on registered functions. To avoid potential name conflicts, all registered functions must be imported with the prefix eea_fn_. In the workflow editor, when configuring the Registered Function Node, you will not include the prefix, so the function name field would be set to just “read_accelerometer”.
Registered functions have both inputs (receive data from the workflow payload) and outputs (provide data to add to the workflow payload). Registered functions also have a return code, which can indicate whether or not the function was successfully executed. A return code of 0 indicates success and your application can return any other number (1-255) as a custom error code. (Note: Losant utilizes a set of error codes for internal use, and they should be avoided if possible.)
This registered function has no inputs and a single output. We’re expecting this function to output a JSON string that is no larger than 32 bytes. Let’s look again at the signature of this registered function and how it maps to the node’s configuration:
def eea_fn_read_accelerometer(
    out_ptr_readings_str:int,
    str_buffer_len:int,
    out_ptr_readings_len:int) -> int:
As we described in Understanding the WebAssembly Memory Model, it’s not possible for complex types like strings to directly pass between the EEA and your application code.
To output a string from your code, the EEA provides you a pointer (out_ptr_readings_str) to the location in memory where your code should place the string. The EEA must pre-allocate this memory, and the amount it allocates is defined by the Max Length field in the node’s configuration, which is set to 32 (bytes) in the screenshot above. This length is also provided to your code (str_buffer_len) so your code can ensure it does not attempt to write more bytes than what has been allocated (i.e. a buffer overflow).
For the EEA to decode this string, it also needs to know how many bytes your code actually wrote to the buffer. Even though we allocated 32 bytes, your code is not required to use all 32. To accomplish this, the EEA provides you another pointer (out_ptr_readings_len) which is the location in memory where your code must encode a 32-bit unsigned integer that contains the number of bytes written.
Receiving Embedded Workflows over MQTT
Up until now we’ve been loading WASM modules from disk. Now that we’ve successfully implemented the EEA API, we can begin receiving EEA bundles over MQTT.
Whenever you deploy a workflow to a device, the Losant platform compiles that workflow, and any other workflows you’ve deployed to that device, into a single WASM module (i.e. the bundle). That bundle is then published to the device over MQTT.
For your application to successfully receive bundles over MQTT, it must include an MQTT client and implement the EEA MQTT Specification.
At this point, we’re going to switch to the full Python example source code. This code expands on what we’ve seen already and introduces the Paho MQTT Client. There’s far too much code to go through step-by-step, but your first exercise is to clone the example repo and get the Python application running locally and connected to the Losant broker. To do this, you’ll need to create an Embedded Device in the Losant platform and create an Access Key and Secret for it. These credentials are passed to the Python application as environment variables:
DEVICE_ID=YOUR_DEVICE_ID \
ACCESS_KEY=YOUR_ACCESS_KEY \
ACCESS_SECRET=YOUR_ACCESS_SECRET \
python3 main.py
Once you run this script, you’ll see output similar to the following:
python3 main.py
send_hello_message
{'service': 'embeddedWorkflowAgent', 'version': '1.0.0', 'bundle': 'nullVersion', 'compilerOptions': {'traceLevel': 2}}
Attempting to connect to MQTT broker...
Sending CONNECT (u1, p1, wr0, wq0, wf0, c1, k30) client_id=b'616dc21ce05986cd5aa6f01a'
Attempting to reconnect to MQTT broker...
Sending CONNECT (u1, p1, wr0, wq0, wf0, c1, k30) client_id=b'616dc21ce05986cd5aa6f01a'
Received CONNACK (0, 0)
Sending SUBSCRIBE (d0, m1) [(b'losant/616dc21ce05986cd5aa6f01a/command', 0)]
Sending SUBSCRIBE (d0, m2) [(b'losant/616dc21ce05986cd5aa6f01a/toAgent/#', 0)]
Sending PUBLISH (d0, q0, r0, m3), 'b'losant/616dc21ce05986cd5aa6f01a/fromAgent/hello'', ... (119 bytes)
Received SUBACK
Received SUBACK
Since you have no workflows deployed to this device, the only output you’ll see for now is from the MQTT client. The client is subscribing to the EEA topics as defined in the EEA MQTT Specification and is also publishing its Hello Message.
The Hello Message is the most important part of this connection process. It’s what tells the platform the ID of the bundle that’s currently loaded, or “nullVersion” if nothing is loaded. The platform then uses this information to determine what, if any, bundles should be published to this device.
This application is now connected to the platform and waiting for you to deploy an Embedded Workflow.
Deploying Your First Embedded Workflow
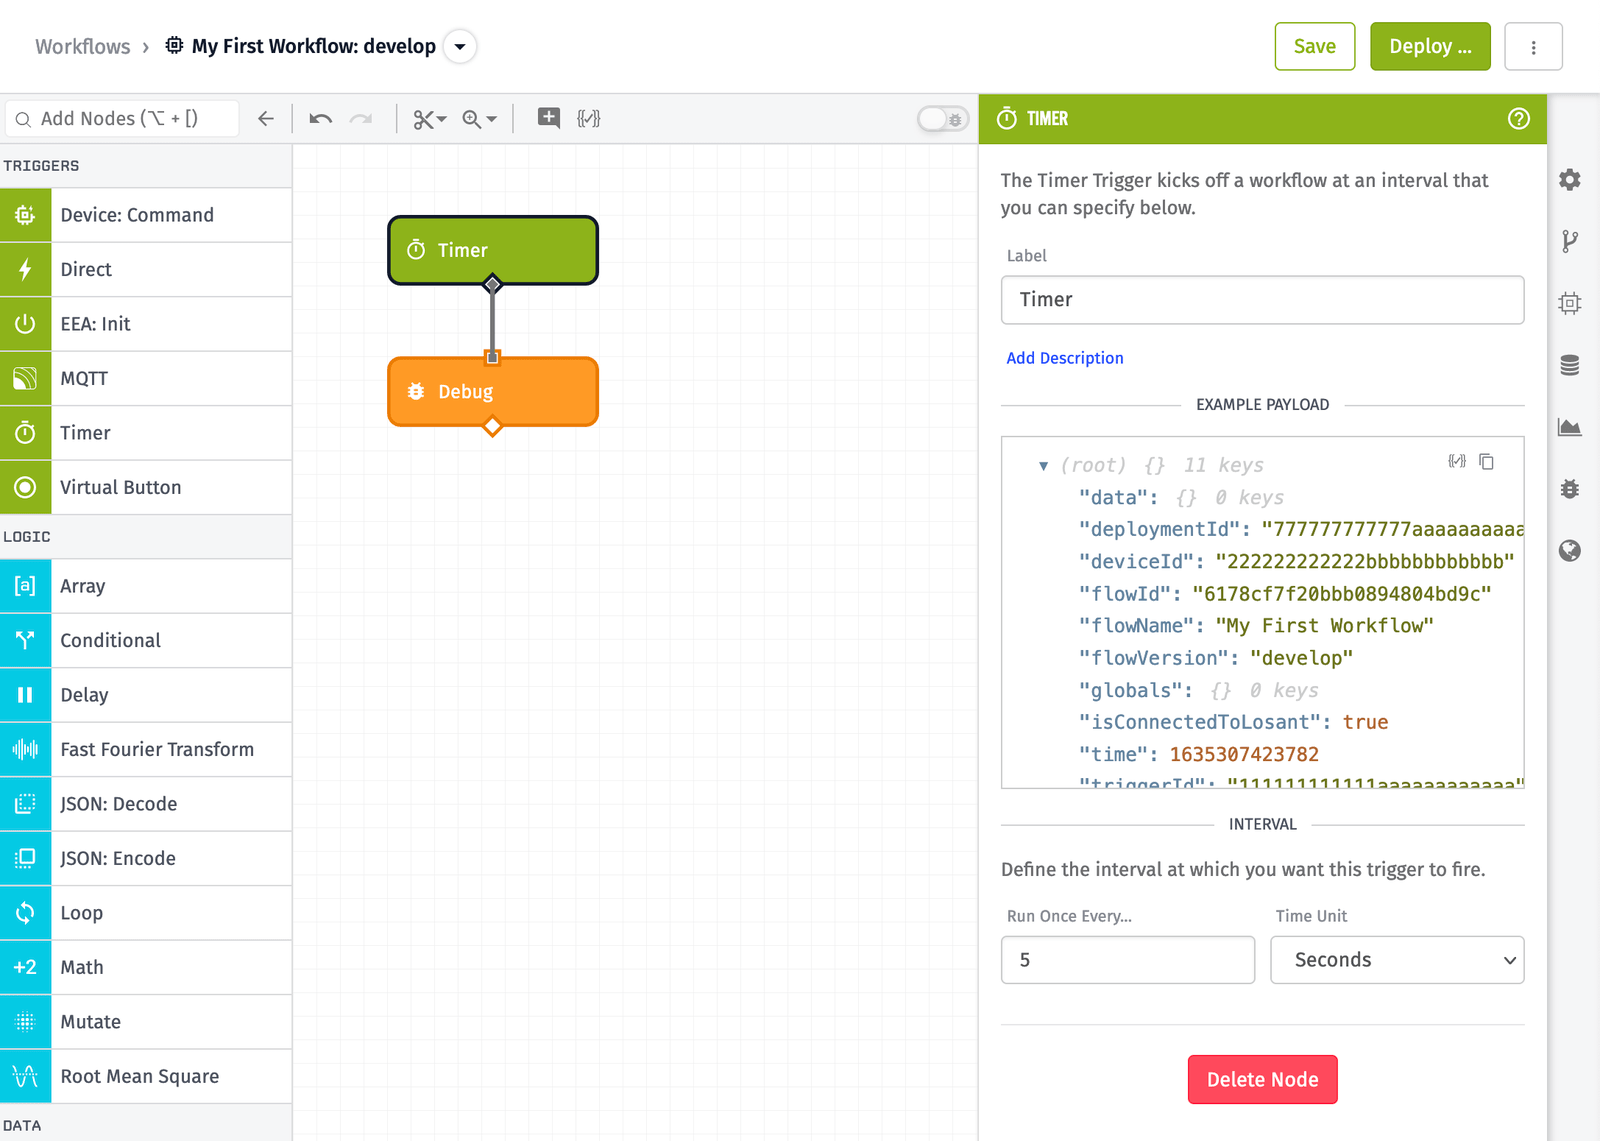
For this step, we recommend starting with a simple workflow and no registered functions. The goal is to make sure the deployments are working with no added complexity. The recommended workflow is only two nodes: a Timer Trigger and a Debug Node.
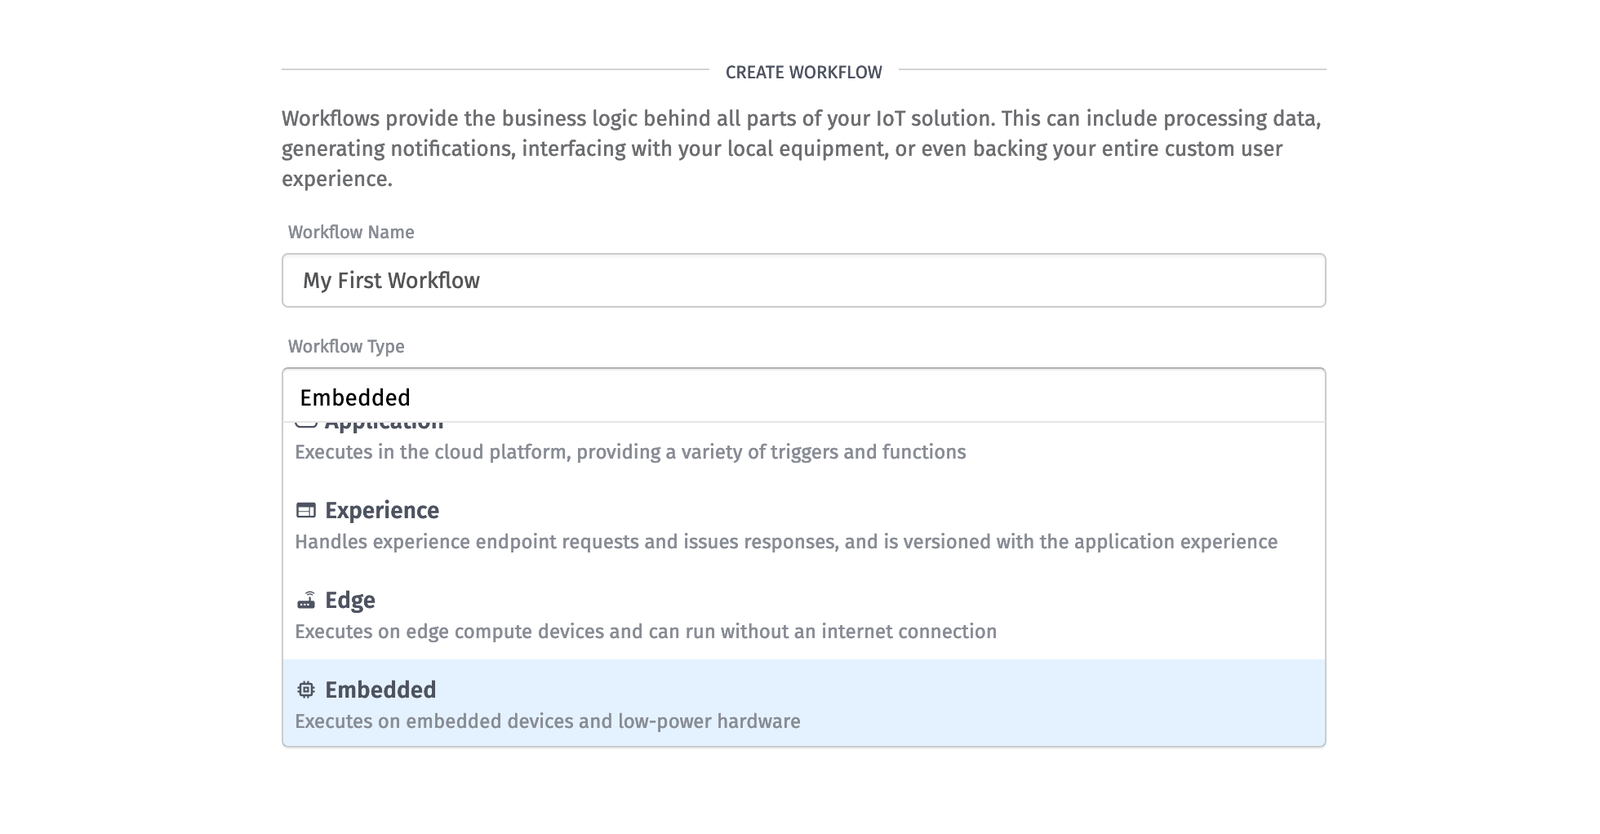
To do this, navigate to the Workflows main menu and click the Add Workflow button at the top right corner. You can name the workflow anything you’d like and make sure Embedded is selected as the workflow type.
On the workflow canvas, drag and drop the Timer Trigger and set it to to every 5 seconds. Next, drag a Debug Node on the canvas and connect it to the Timer Trigger.
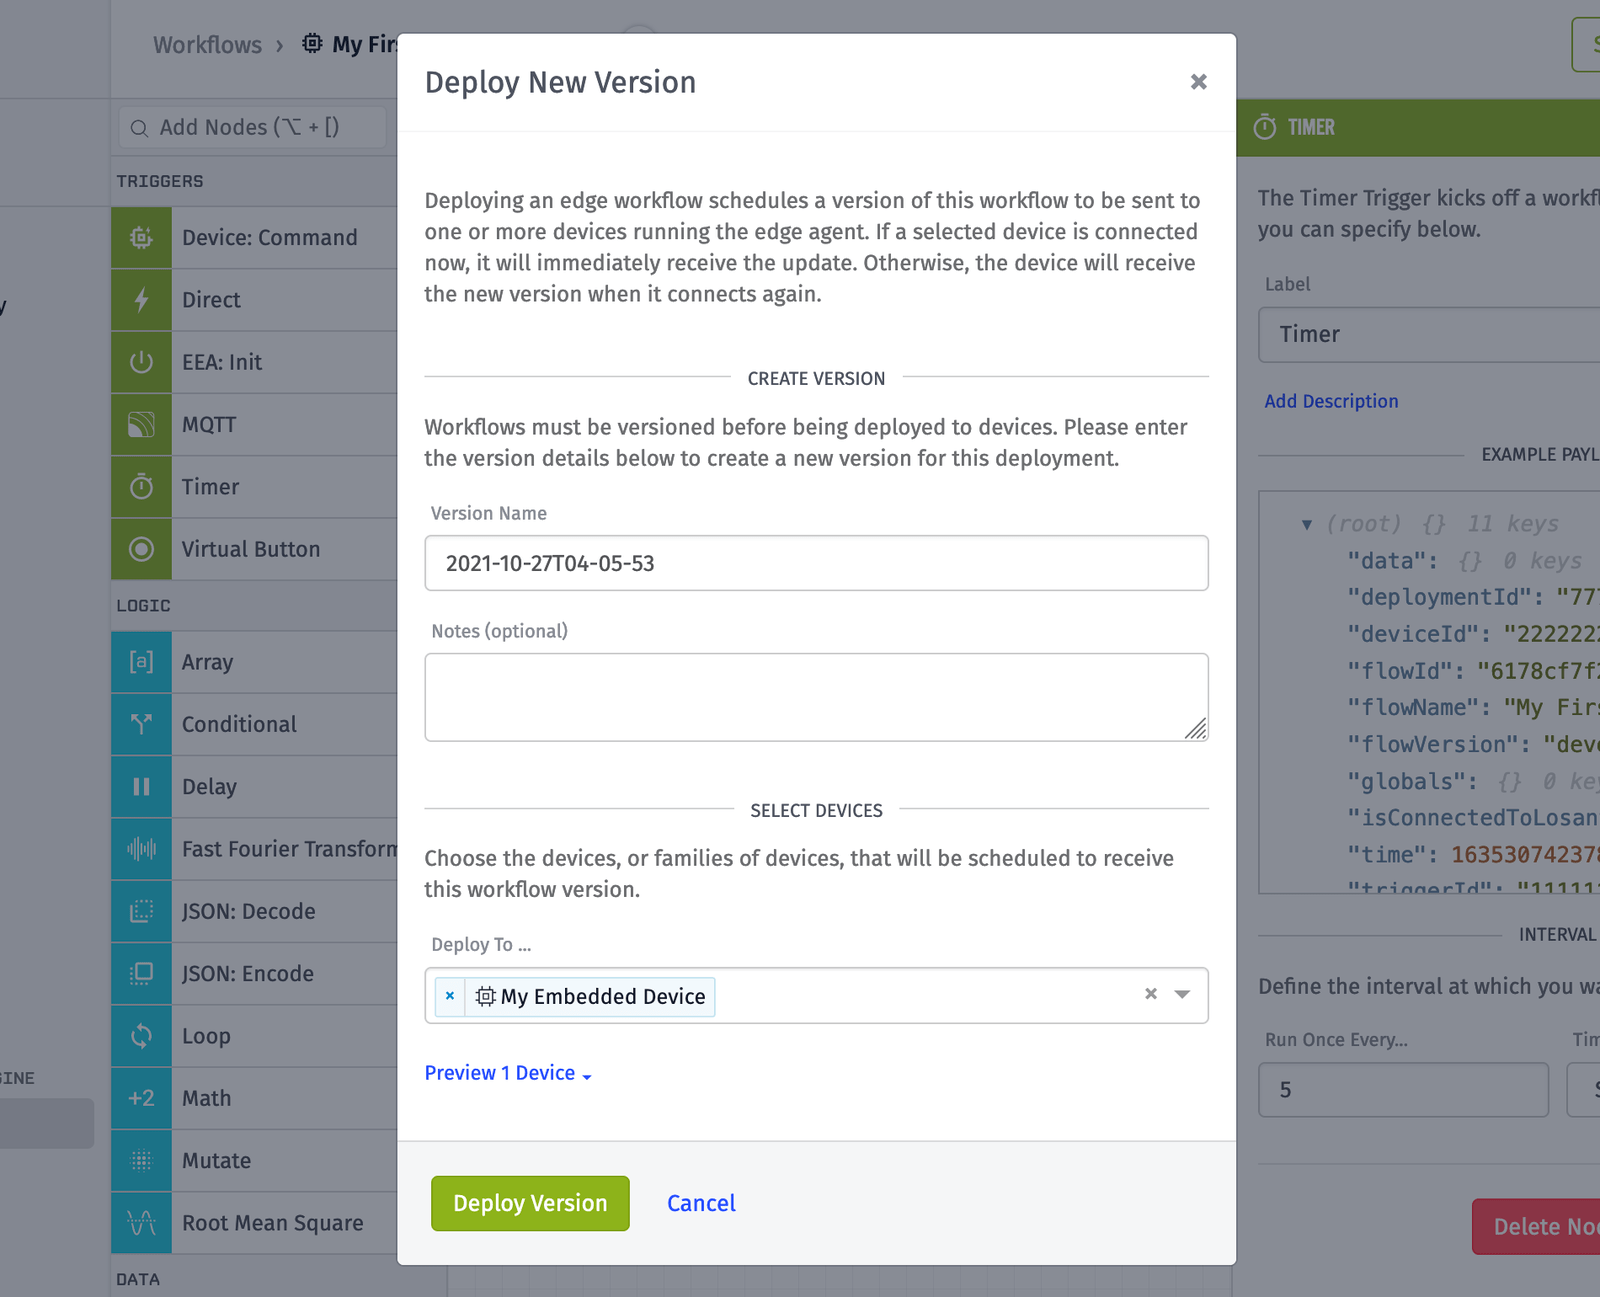
This workflow is now complete, so click the Deploy button at the top right corner of the screen. On the resulting dialog, select your device and click the Deploy Version button.
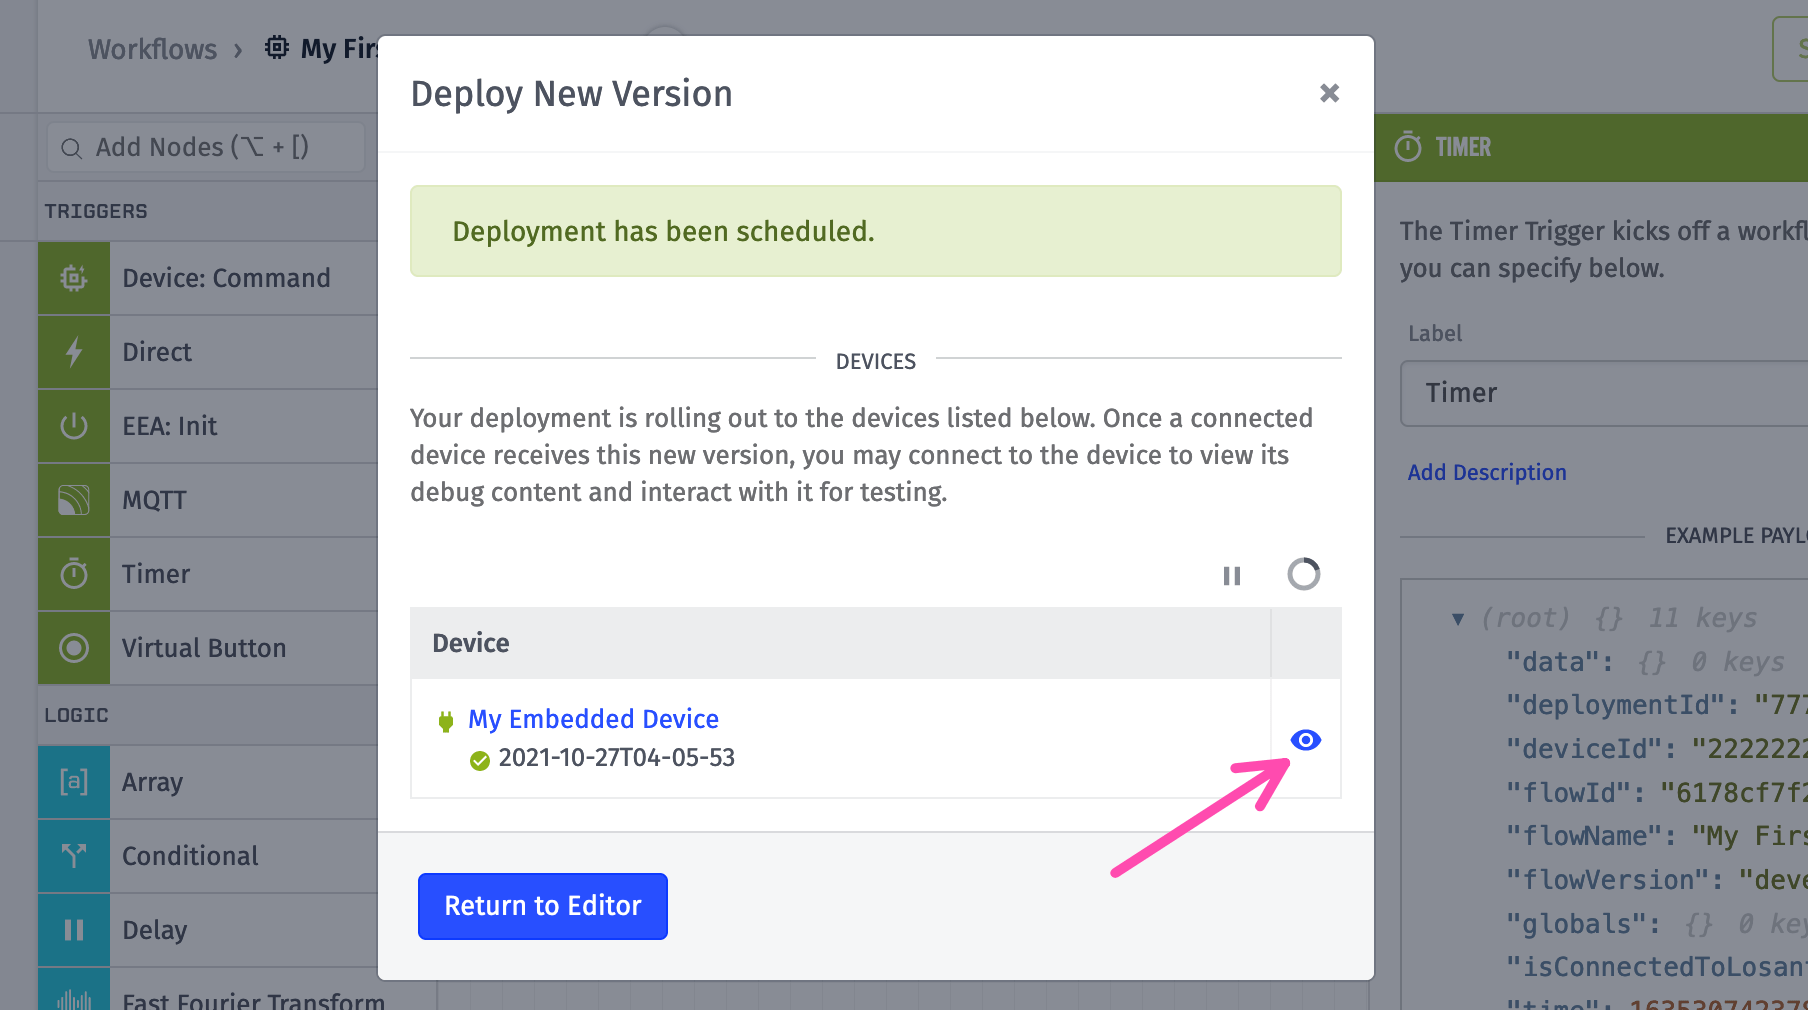
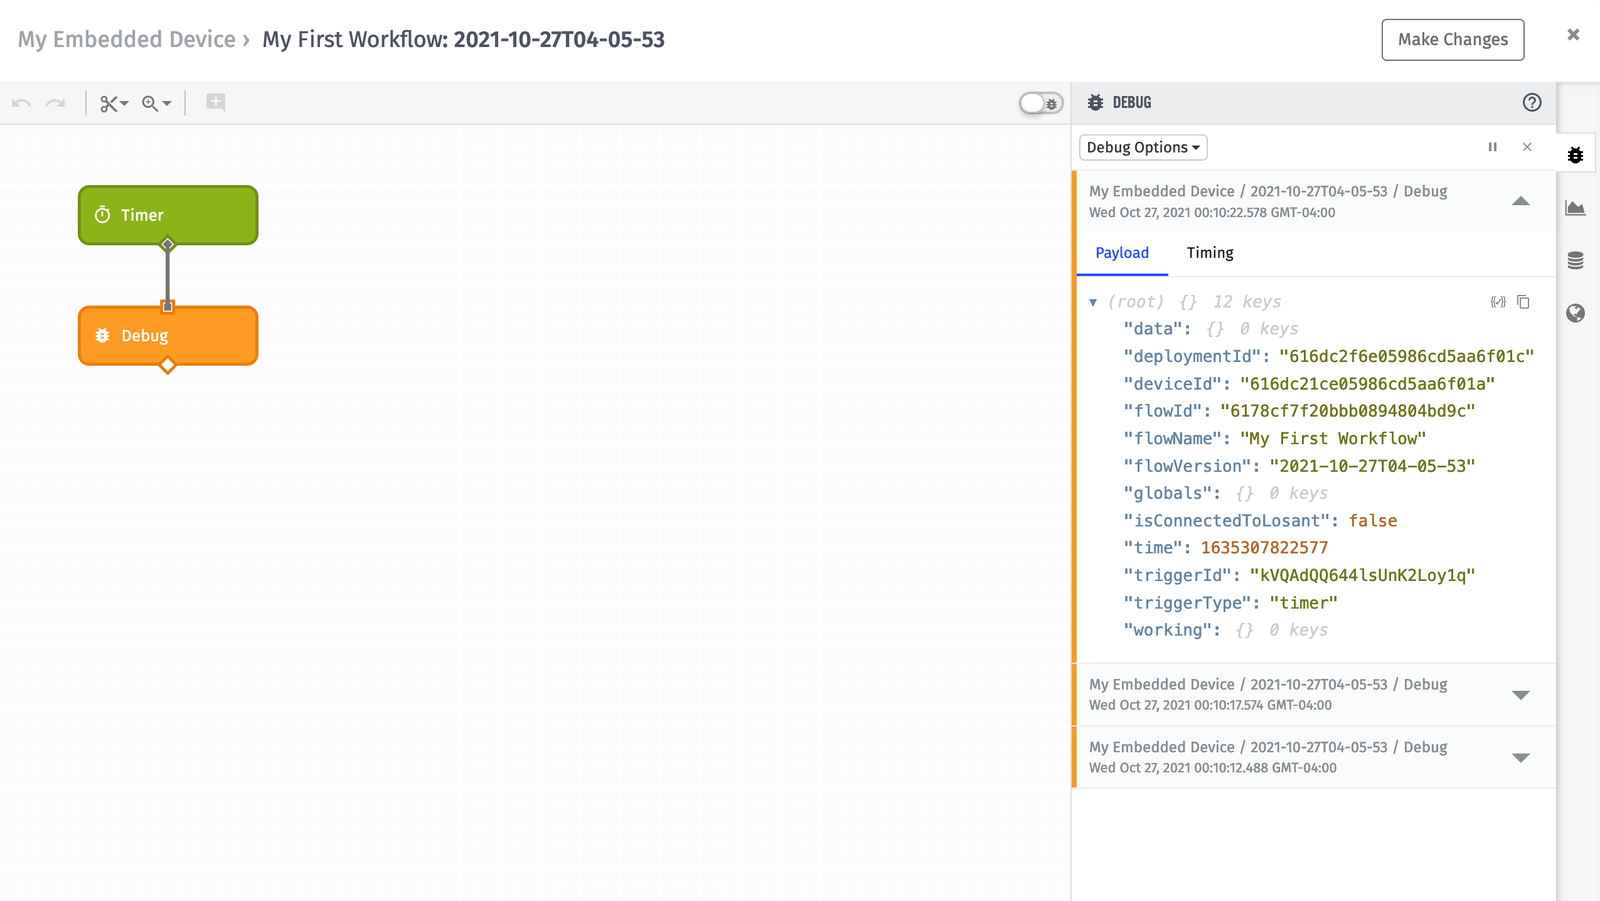
Deploying an EEA bundle can take 20 to 30 seconds due to the WebAssembly compilation process. Once the deploy is complete, you can click the Live Look button to see the debug log entries coming from your workflow back to the Losant platform. You will also see a stream of console output coming from the Python application.
At this point you’ve got a good foundation on which to build. The code in the EEA Examples repository is meant to act as a starting point for your own edge application. In most cases, the next step is to add the required registered functions so that your workflows can access the sensor data they require.
Resources
Was this page helpful?
Still looking for help? You can also search the Losant Forums or submit your question there.