How To Integrate With The Things Stack
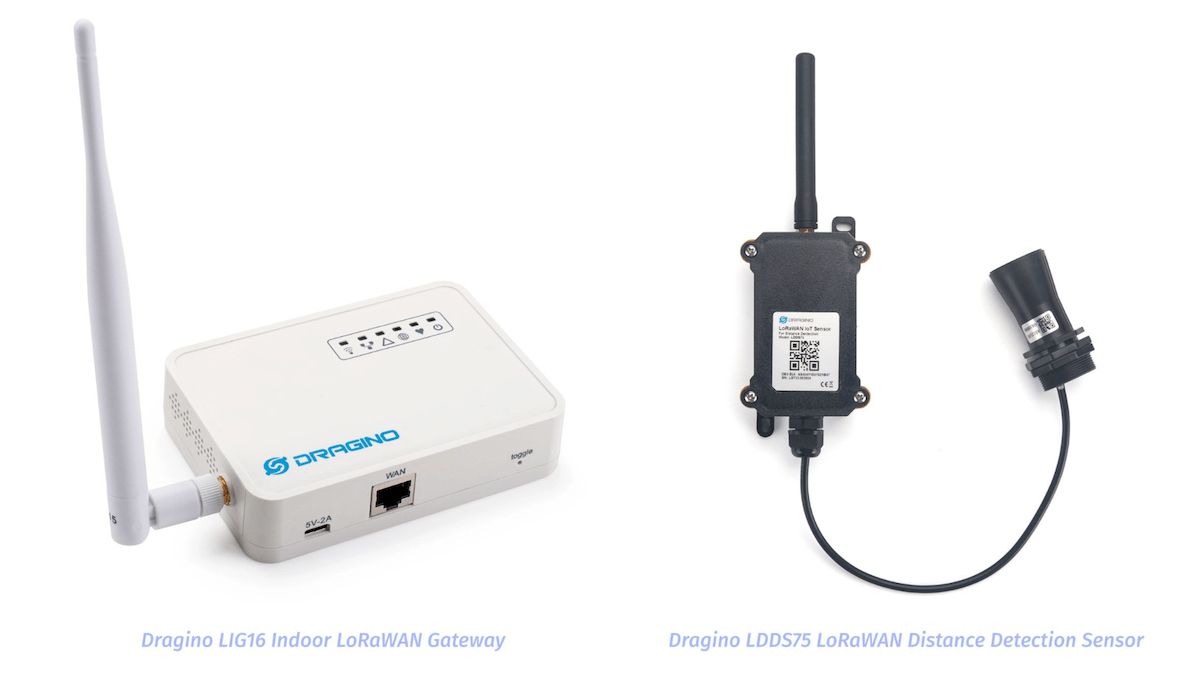
This How-To Guide will walk you through connecting a LoRaWAN device to the Losant Platform using The Things Stack (TTS). The hardware that is used in this tutorial is the Dragino LIG16 Indoor LoRaWAN Gateway and the Dragino LDDS75 LoRaWAN Distance Detection Sensor.
Step 1: Configure Your Gateway to Connect to TTS
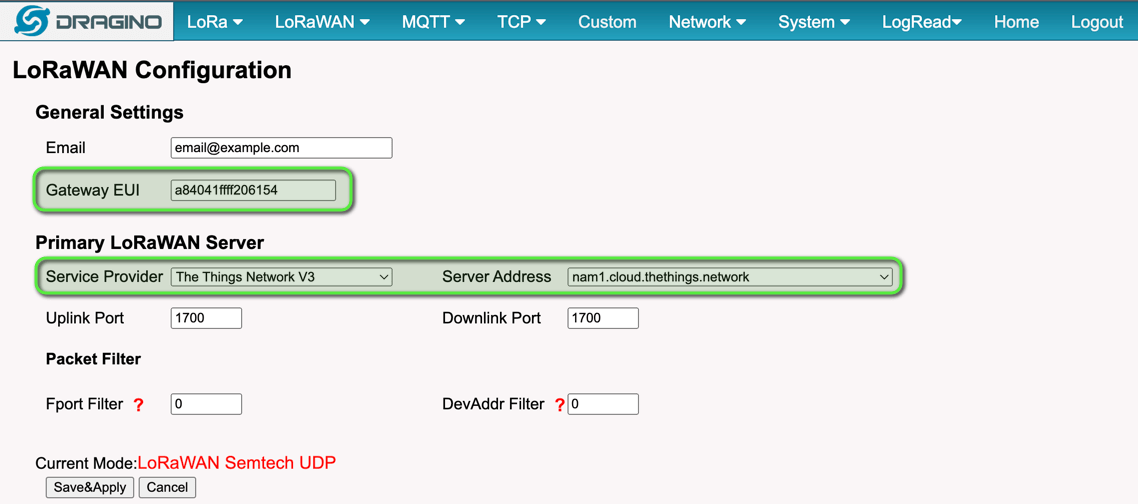
Log in to your gateway and configure the gateway to connect to TTS. For the Dragino LIG16, navigate to the LoRaWAN Semtech UDP page and enter the Primary Service Provider and Server Address that you will be using for your gateway. The remaining fields, including the Gateway EUI (which is required to register the gateway to TTS), are left at their default values.
Ensure the gateway has access to the internet so that it can connect to TTS.
Step 2: Set Up a TTS Account
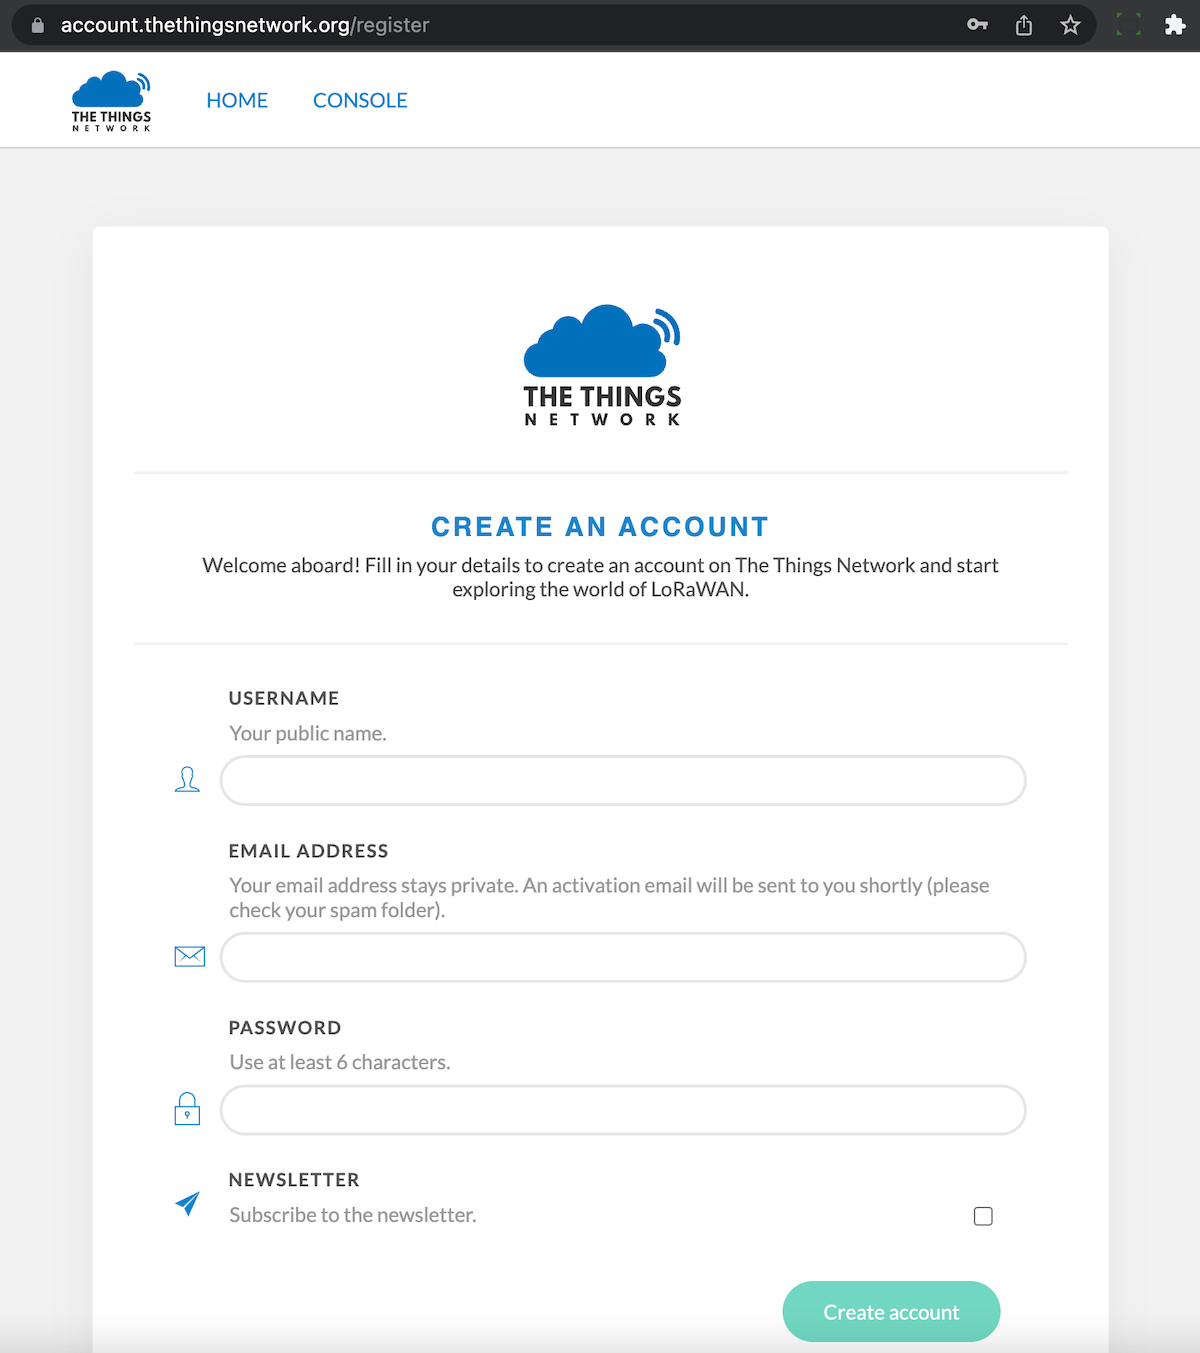
Register for a free TTS account. Once you register, open the verification email from TTS and click the provided link to activate your account.
Step 3: Add a LoRaWAN Gateway to Your TTS Account
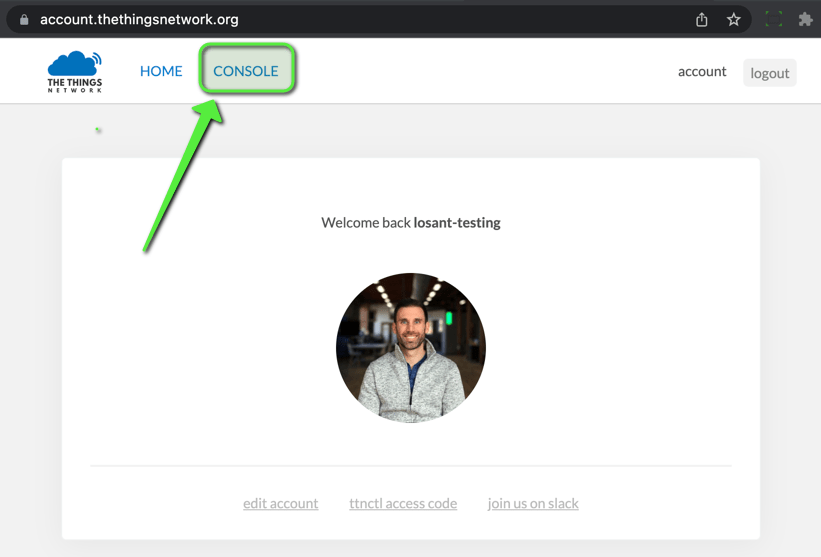
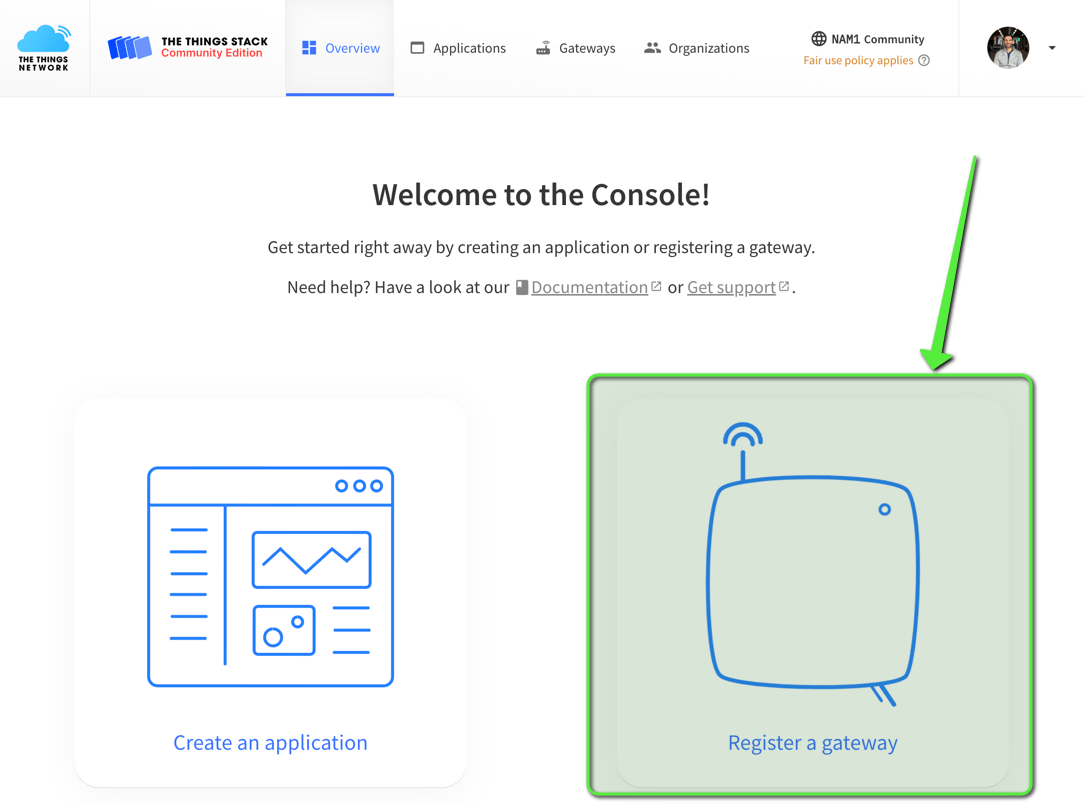
Once your account is activated, click on CONSOLE.
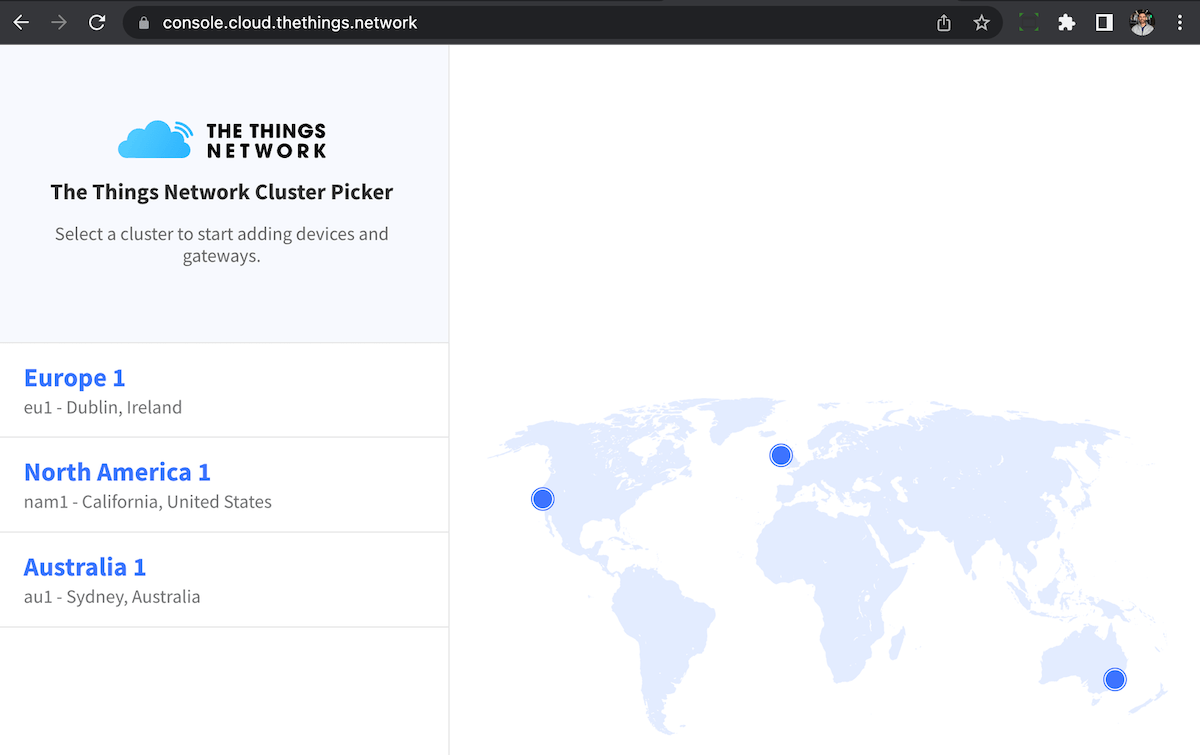
Select the region in which your LoRaWAN gateway and sensors will be deployed.
Click Register a gateway to register your gateway.
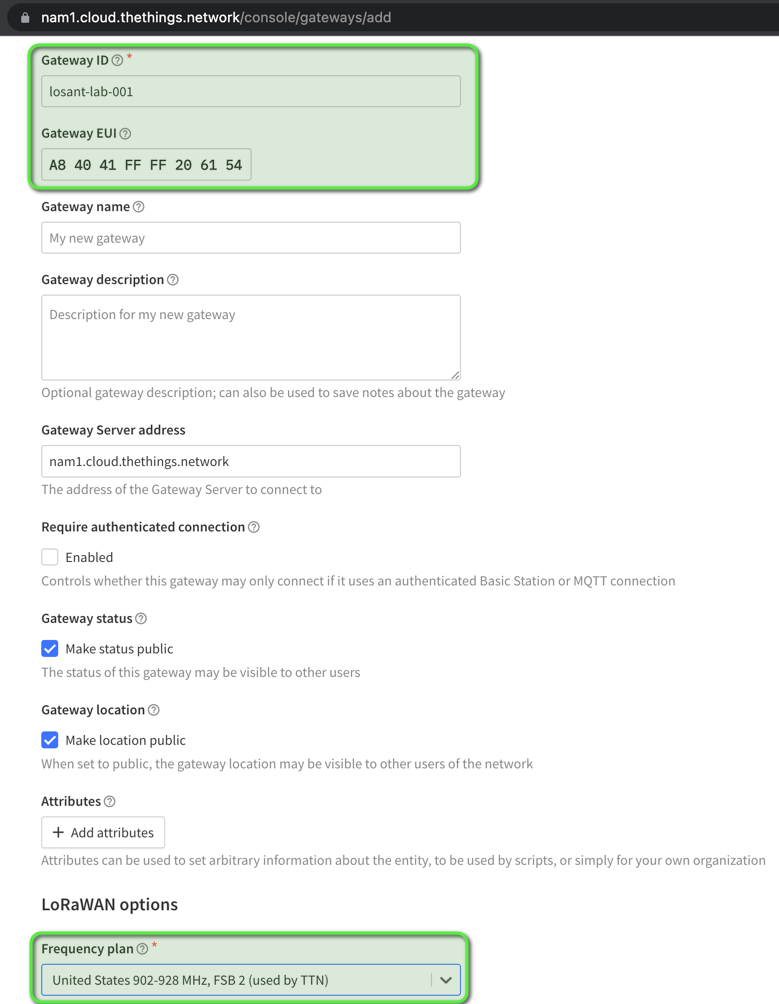
Enter a Gateway ID, Gateway EUI (which will come from the gateway), and frequency plan for your gateway, and then click Create gateway.
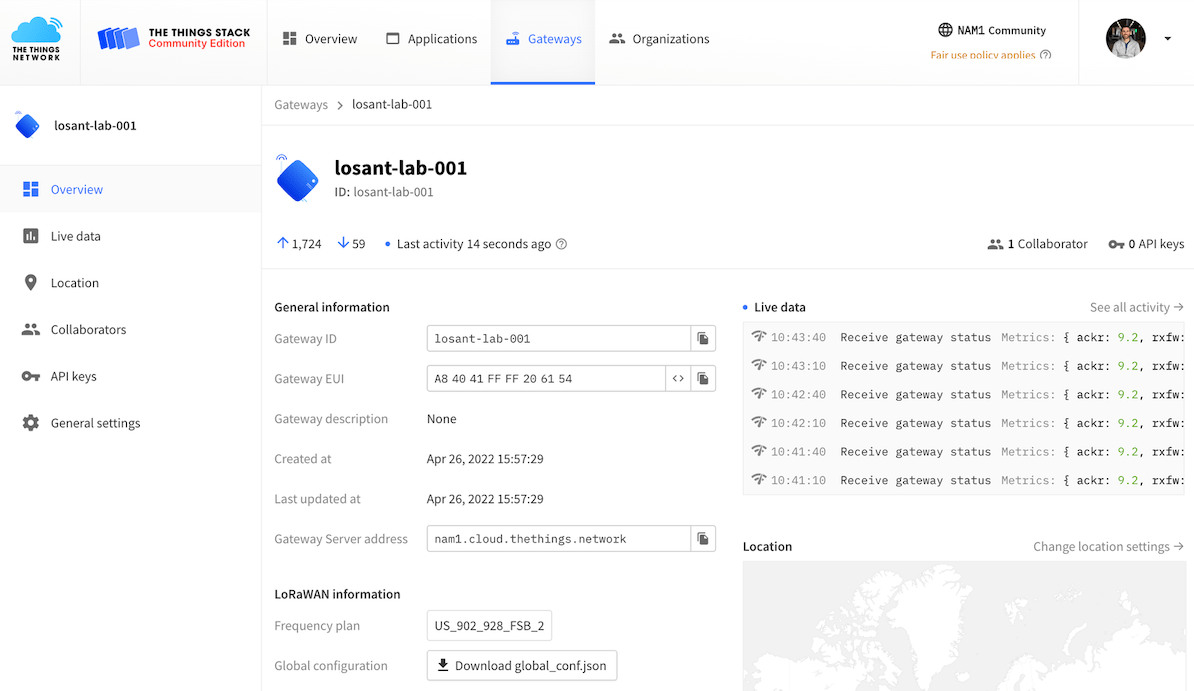
Verify that your gateway is connected to TTS by checking that live data (gateway status) is being received from the gateway.
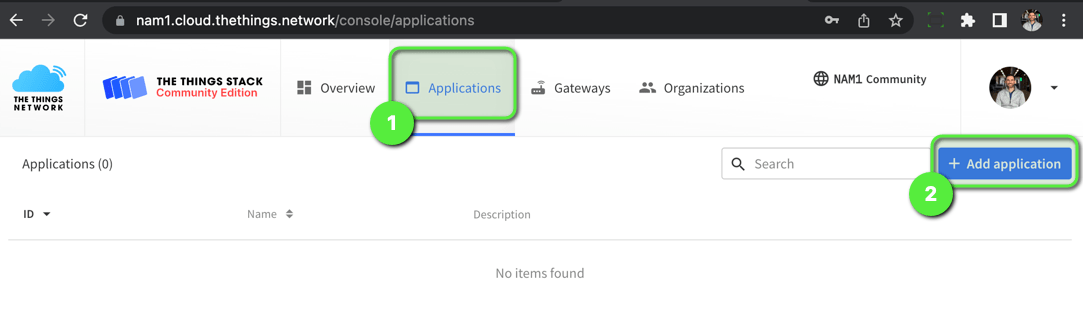
Step 4: Add a TTS Application with a LoRaWAN Sensor
Click on Applications and then Add application.
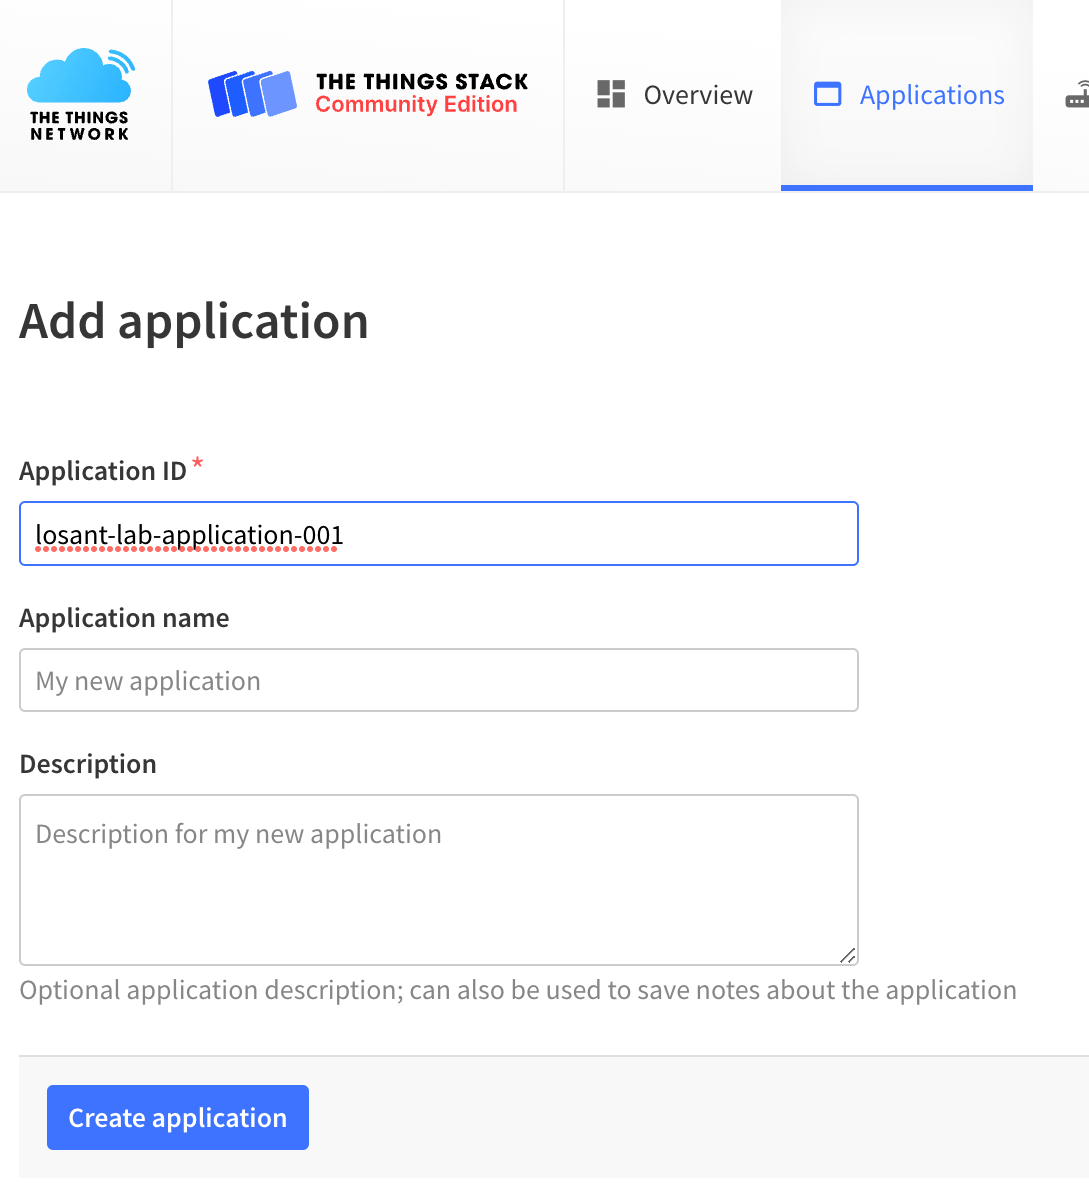
Fill in an Application ID (optionally, you may also enter a name and description) and then click Create application.
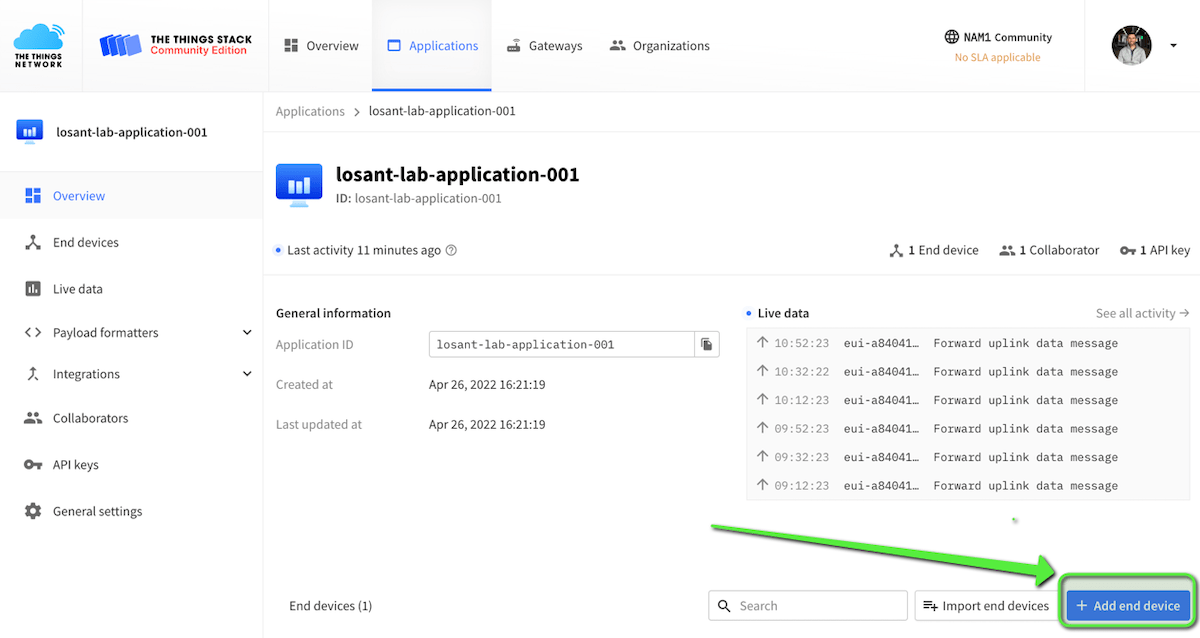
Now that the application is created, click Add end device. This can also be found by clicking on the side navigation bar and clicking on End devices and then Add end device.
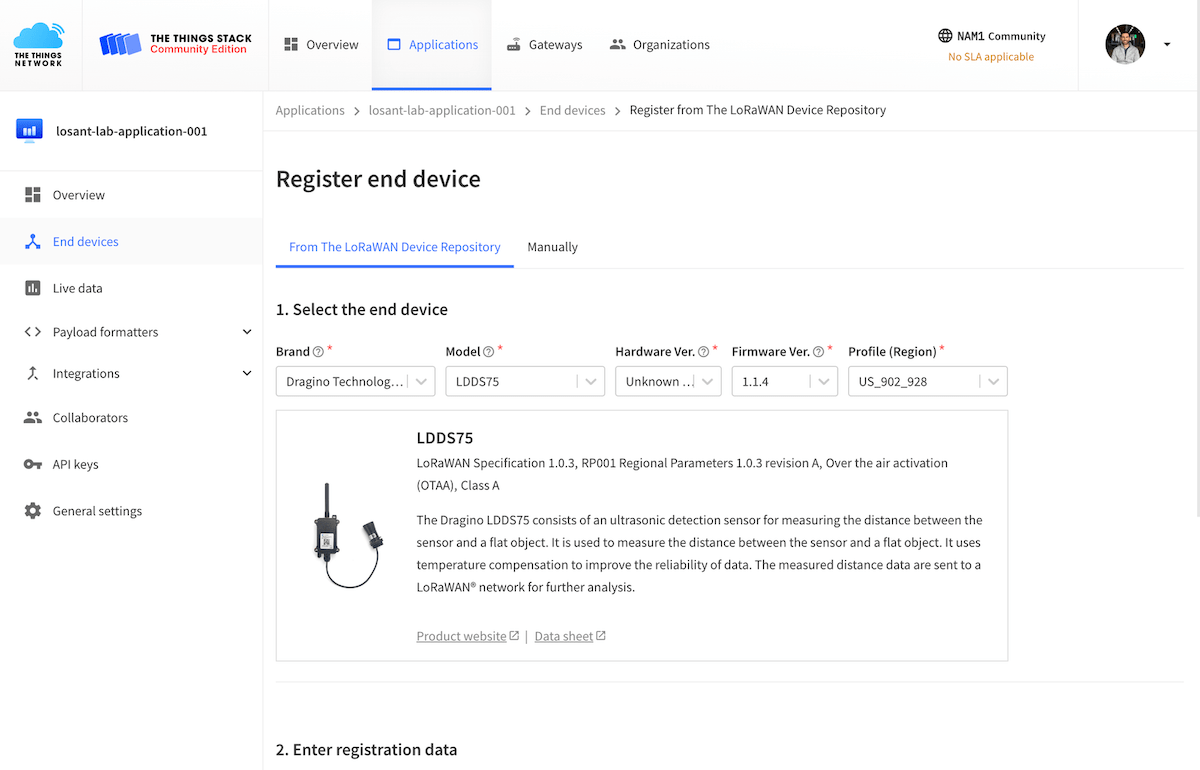
Registering your device in TTS will take place in two steps.
First, if your device brand and model has a first-class integration with TTS then select the Brand, Model, Hardware Ver., Firmware Ver., and Profile (Region). Note: If your device is not supported, then follow these steps to manually register your device.
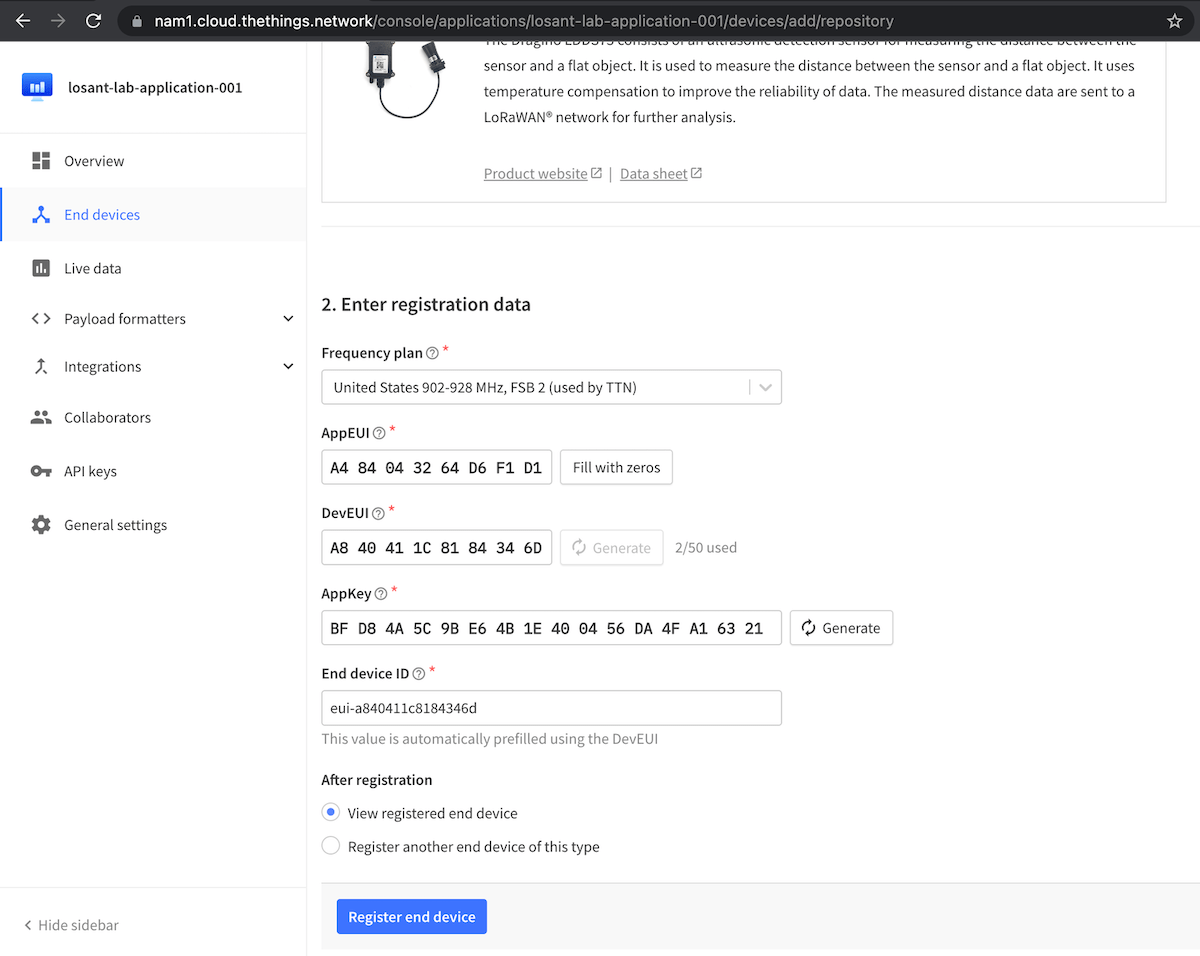
Finally, fill in the following information:
Frequency Plan: This must match the frequency plan that was selected for the gateway in Step 3.AppEUIDevEUIAppKeyEnd device ID
Note: AppEUI, DevEUI, and AppKey are provided by the end device manufacturer and are typically printed on a label on the sensor’s box.
Then click Register end device.
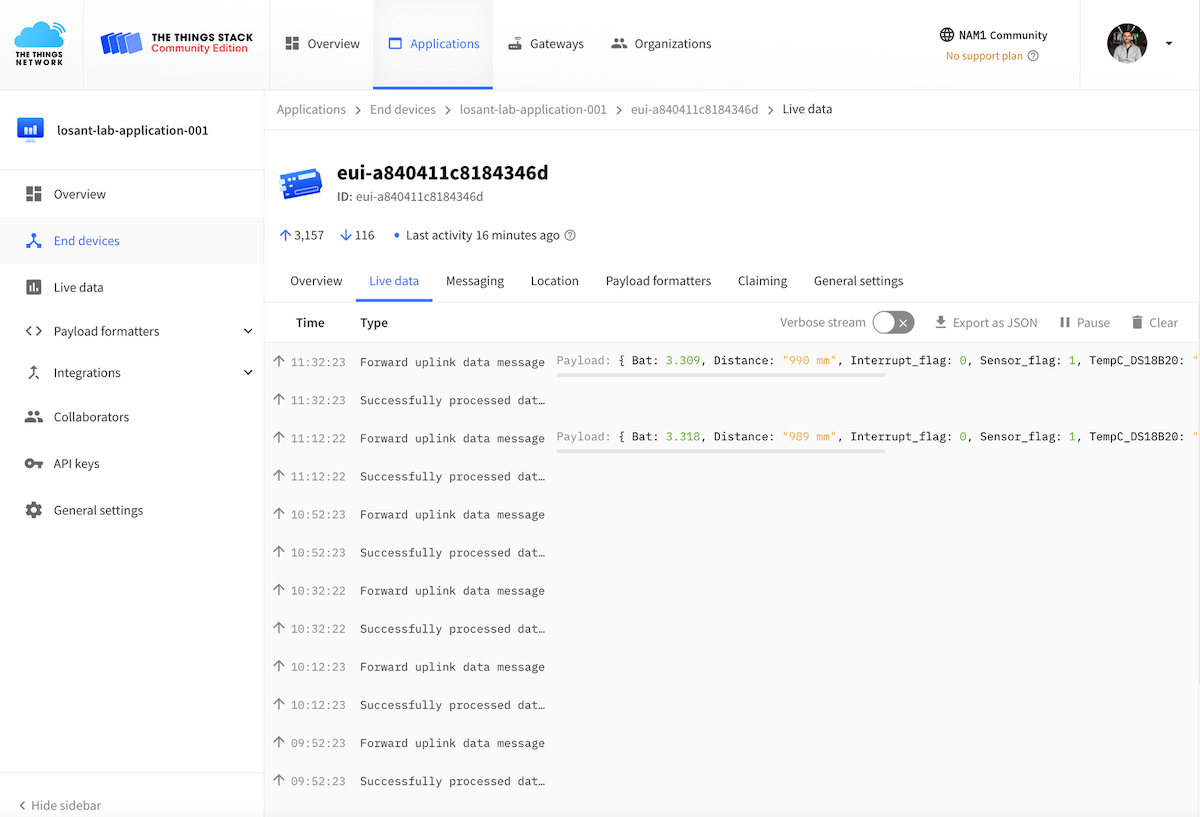
Confirm that you are receiving data from this device. You will only see activity when the sensor reports data; check with the manufacturer to see the default reporting interval for your device, which is likely several minutes or more.
Step 5: Create a Losant Webhook
If you do not have a Losant Account, you can sign up for a free Losant Developer Sandbox account. Once you have an account, create a new application. You can start from a blank application or from a Losant Application Template, like The Things Network Application Template.
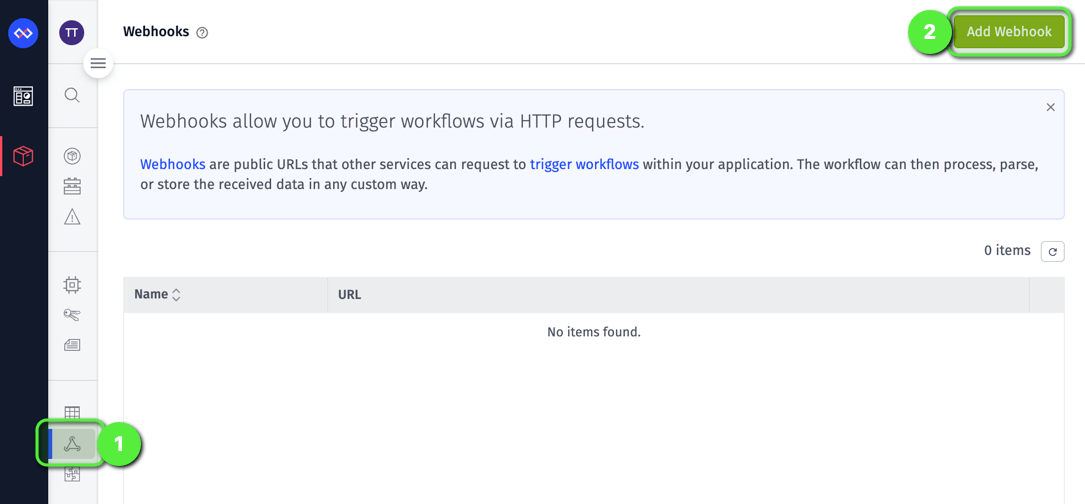
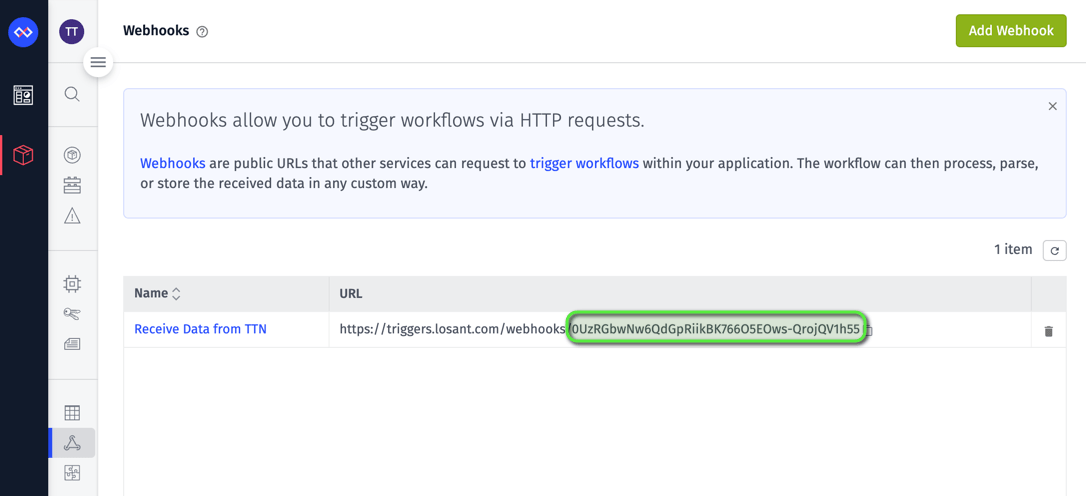
Once you’ve created a new application, click Webhooks and then Add Webhook.
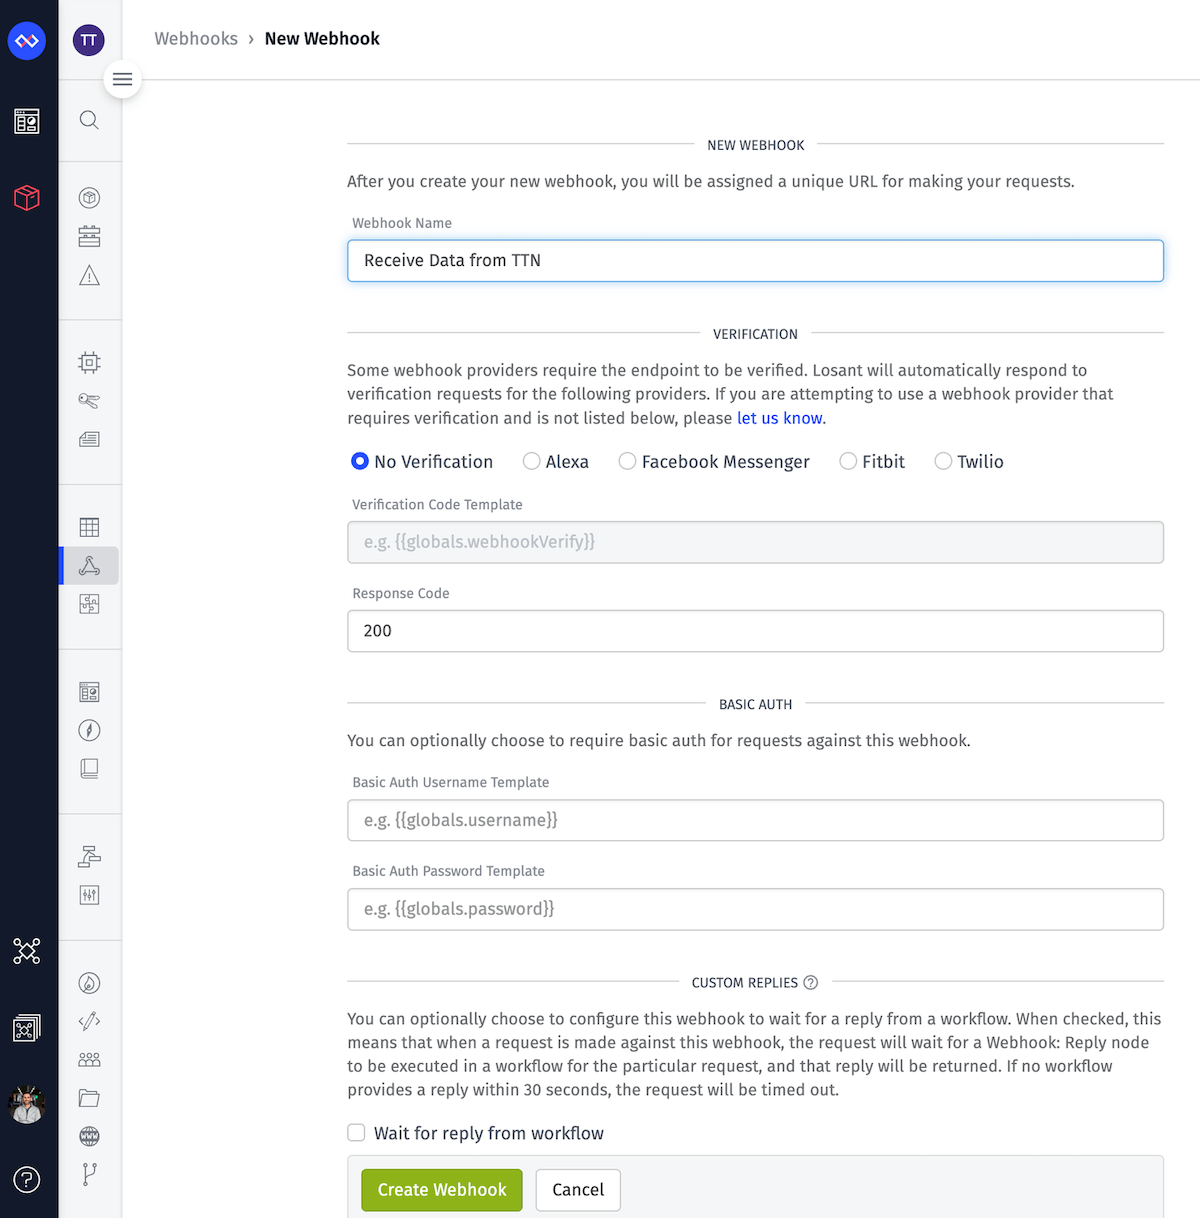
Enter a Webhook Name and then click Create Webhook. You may also enter a username and password to use Basic Auth. If you use Basic Auth, you will need to edit your Losant Webhook in TTS.
Once the Webhook is created, copy the unique identifier from the URL that comes after https://triggers.losant.com/webhooks/.
Step 6: Configure TTS to Use the Losant Webhook
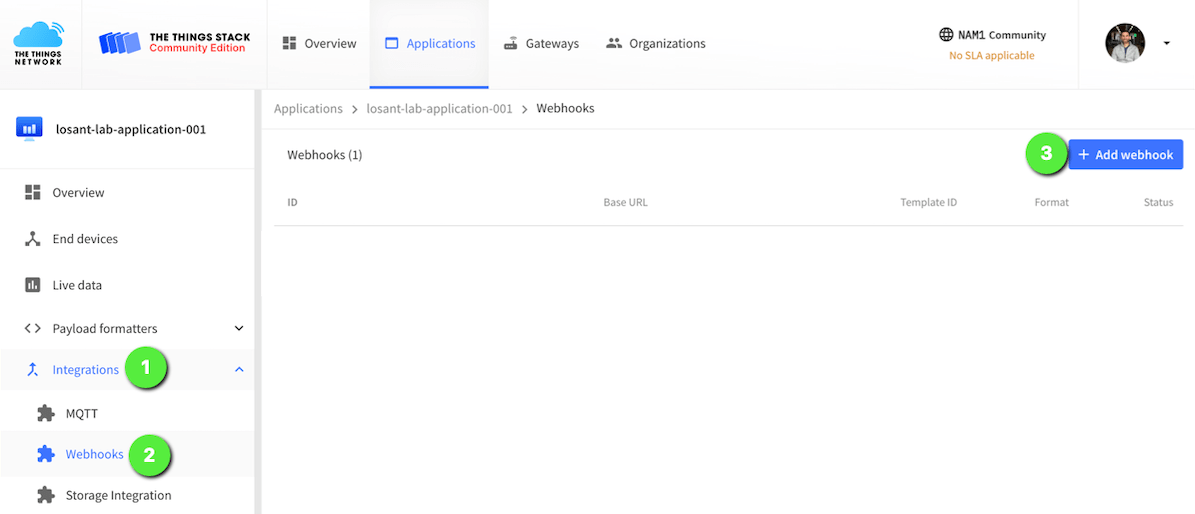
In the TTS application that was created in Step 4, click on Integrations, then Webhooks, and then Add webhook.
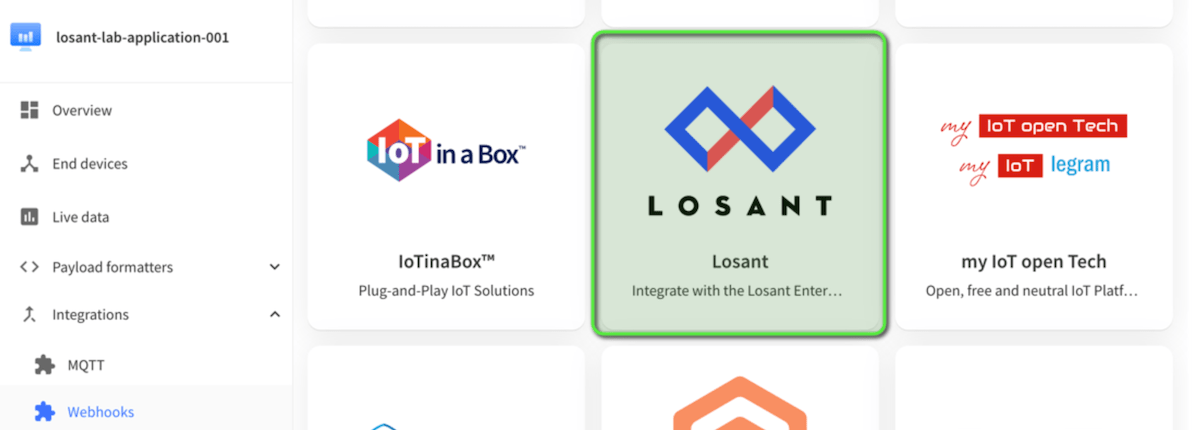
Click on the Losant Webhook tile. If you are using Basic Auth for this Webhook or need to subscribe to more than just uplink messages, then please review the end of this How-To Guide in the section named Editing Your Losant Webhook in TTS.
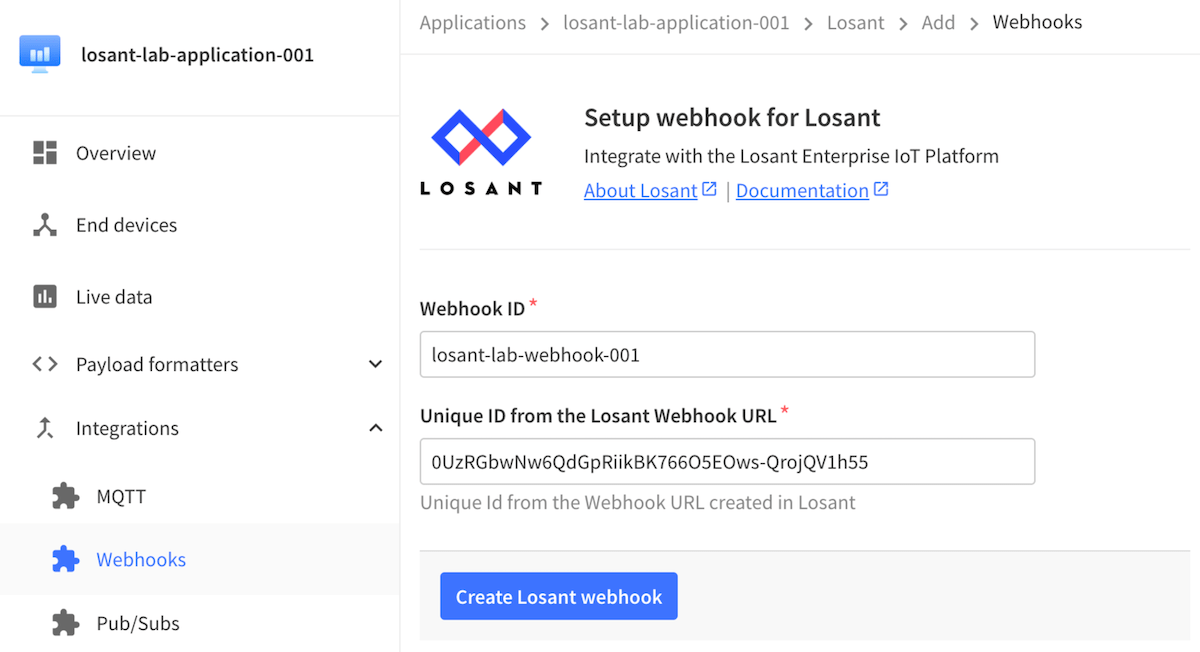
Enter the following information into the Losant Webhook configuration:
Webhook ID: Make up any name that you would like. This does not have to be the ID of the webhook as it is stored in Losant.Unique ID of Losant Webhook URL: This is the Losant Webhook unique ID that was copied to the clipboard in Step 5.
Finally, click Create Losant webhook. If you need to configure additional options (e.g. Basic Auth or additional messages to subscribe to), use the TTS Custom Webhook Template or add these options once the Webhook in TTS is created by following the last section of this guide, Editing Your Losant Webhook in TTS.
Step 7: Create a Losant Application Workflow to Receive Data from the LoRaWAN Sensor and Confirm Data Flow to Losant via Uplinks
Since TTS is now configured to forward data to the Losant Webhook, let’s create a Losant Application Workflow to receive the data from TTS.
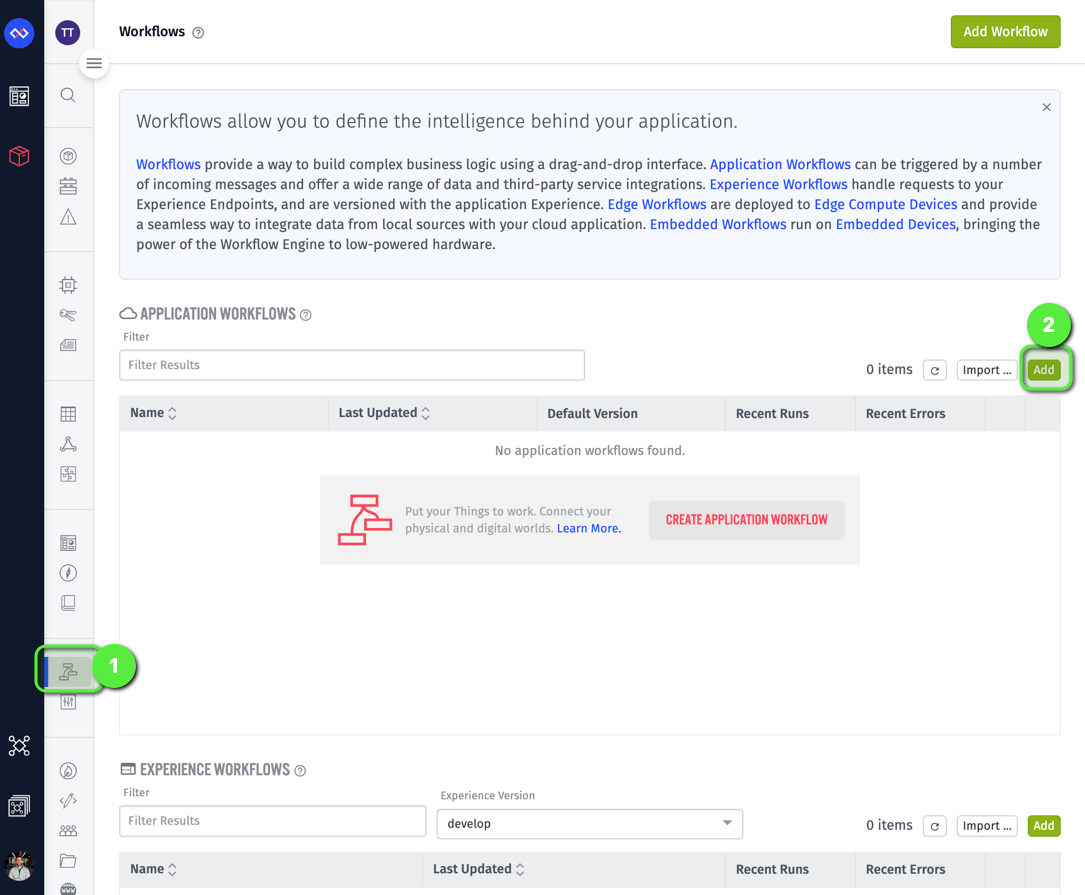
Click on Workflows and then in the Application Workflow section, click Add to create a new Application Workflow.
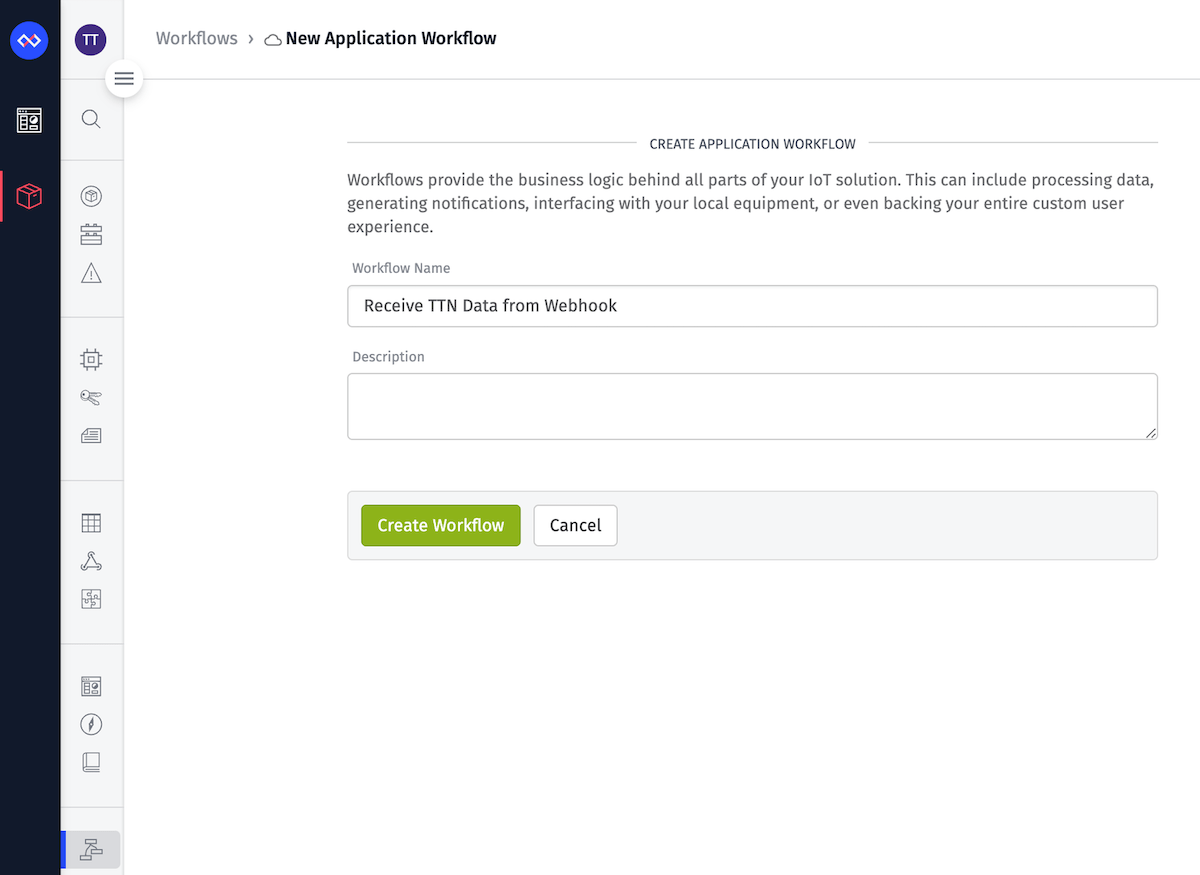
Enter a name for your Application Workflow (as well as a description if you'd like) and click Create Workflow.
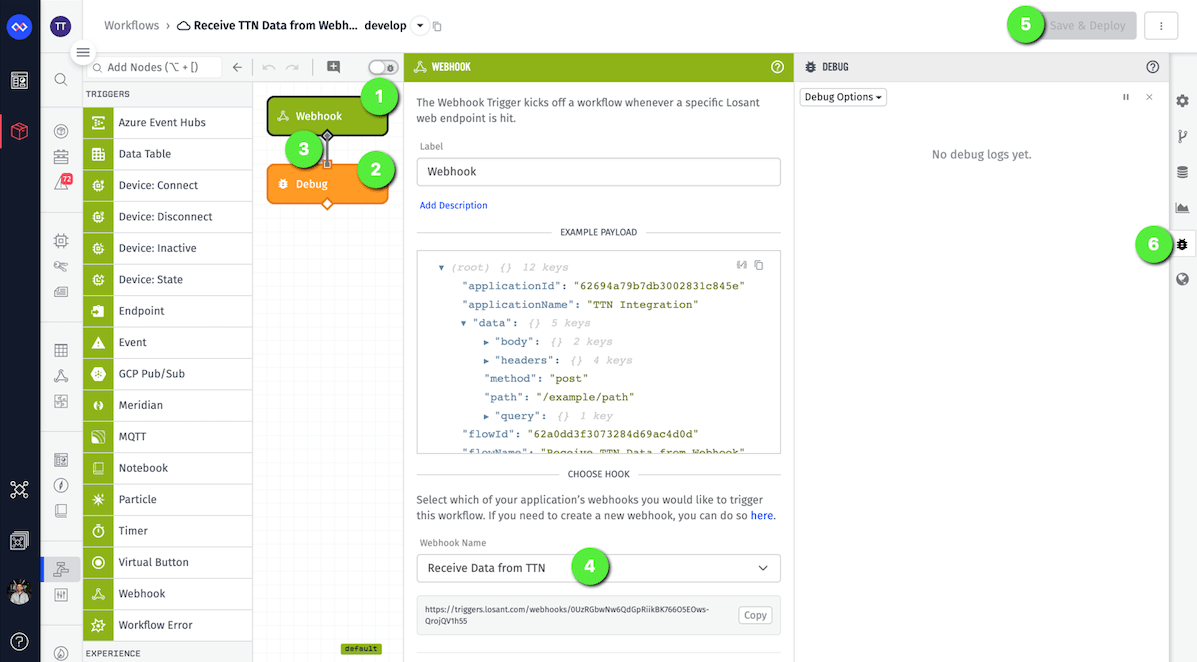
Drag and drop the Webhook Trigger and the Debug Node onto the visual workflow engine’s canvas and connect them together. If you have only one webhook in this Losant application, it will be automatically selected for the Webhook Trigger. If you have multiple webhooks, select the one that was created in Step 5. Next, click Save and Deploy. Now that this workflow is deployed, click on the Debug Panel.
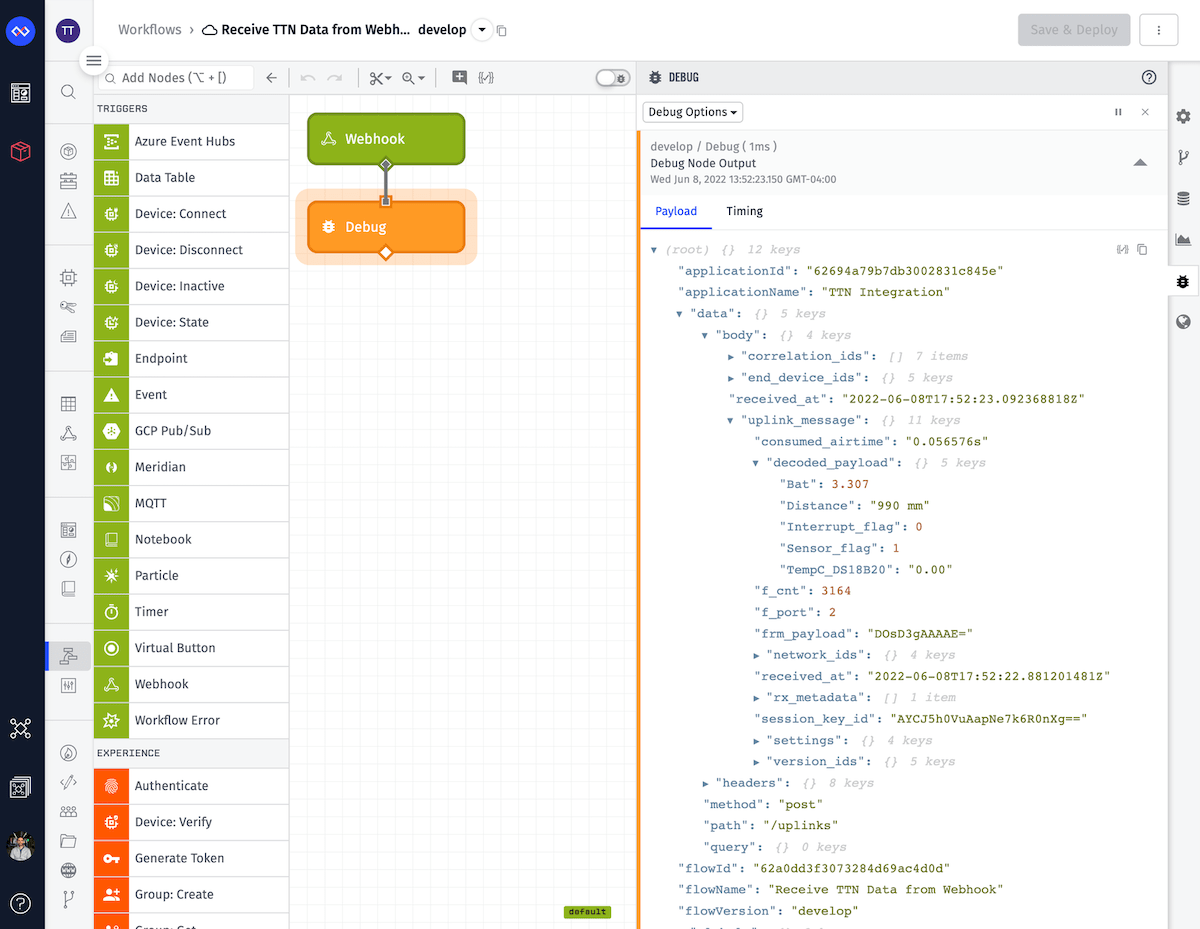
When TTS receives new data from the sensor, it will send that data to Losant over the Losant Webhook and trigger this workflow. Each time this workflow runs, new data will be displayed in the Debug Panel as shown below.
Note: If TTS is not automatically decoding your data as shown below in data.body.uplink_message.decoded_payload, then you can decode your LoRaWAN device data in this Losant Application Workflow. Check out the blog post How To Decode and Visualize Your LoRaWAN Sensor Data Using TTS and Losant to learn more about decoding LoRaWAN data in Losant.
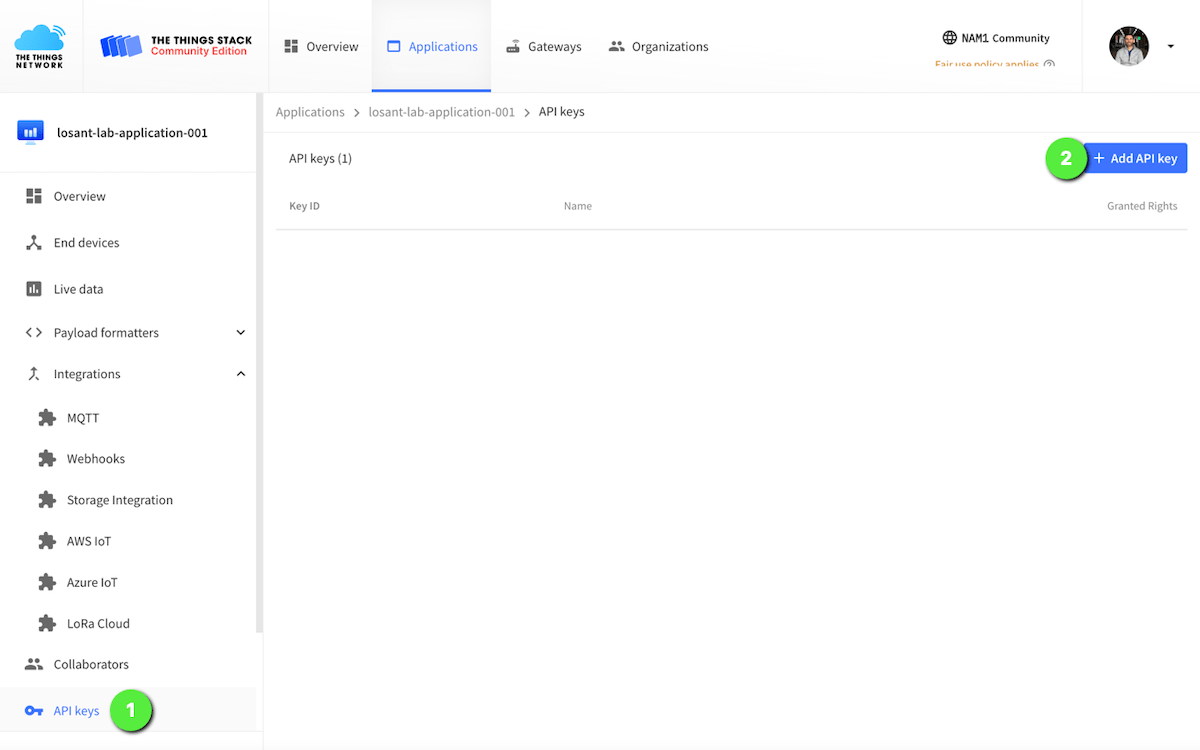
Step 8: Create a TTS API Key for Downlinks
In the TTS application that was created in Step 4, click on API keys and then Add API key.
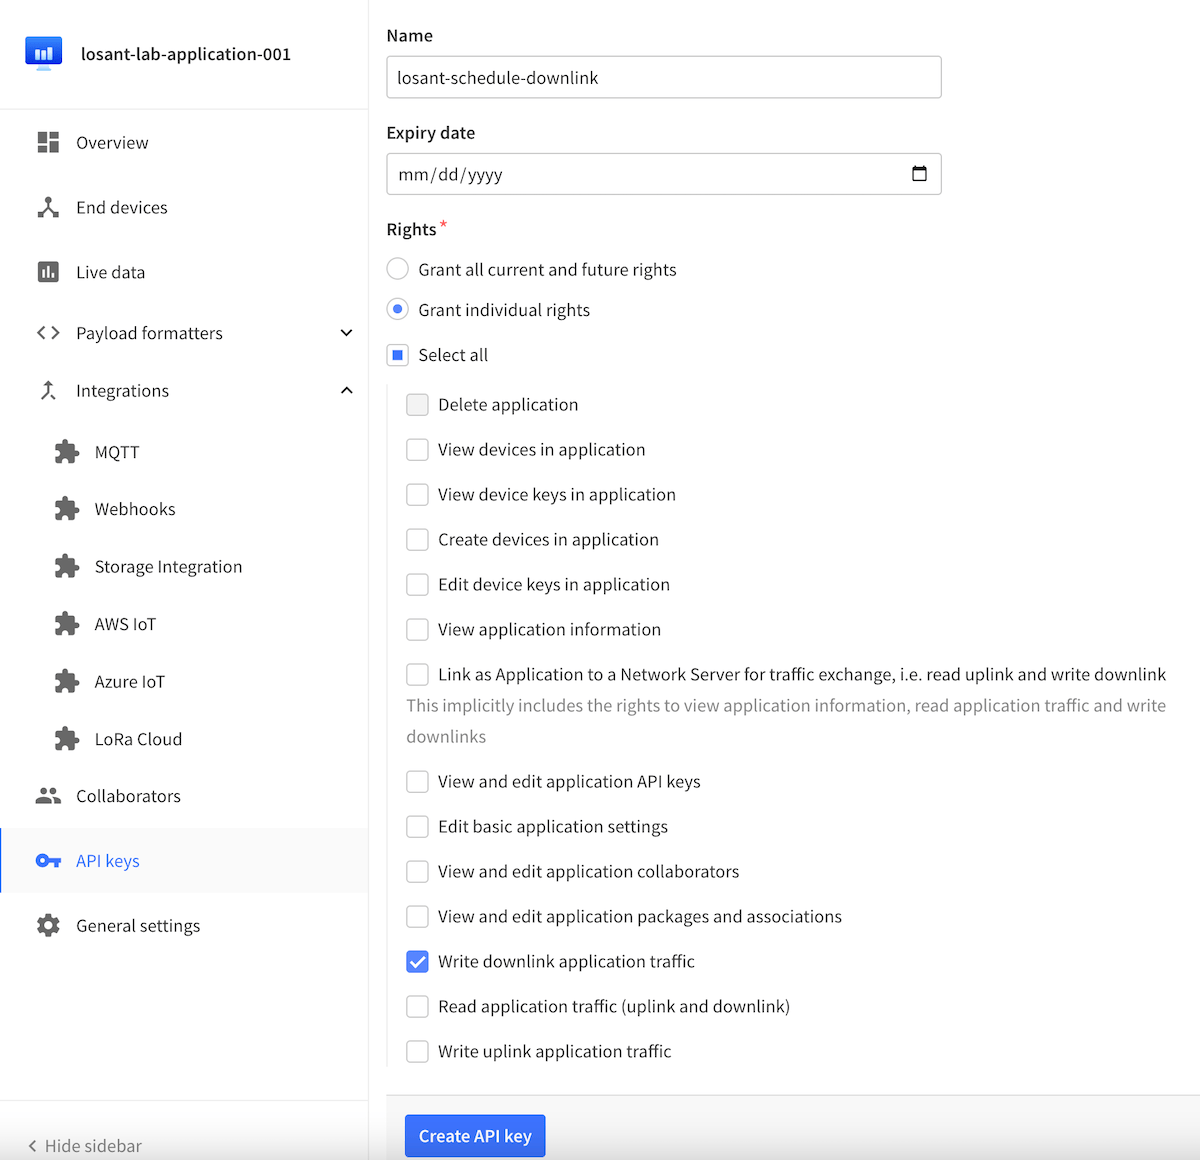
Give the API key a name, select Grant individual rights, select Write downlink application traffic, and then click Create API key.
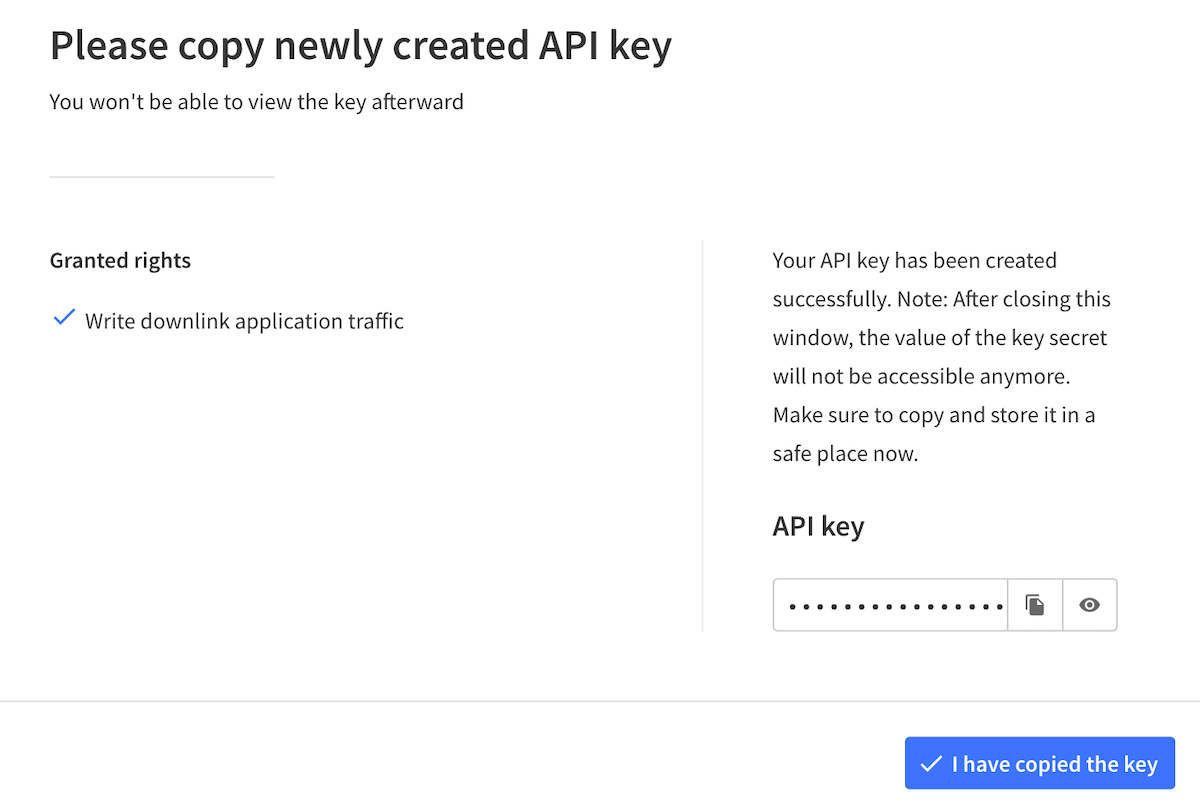
Copy the API key and then click I have copied the key.
Step 9: Send Commands From Losant to the LoRaWAN Sensor via Downlinks
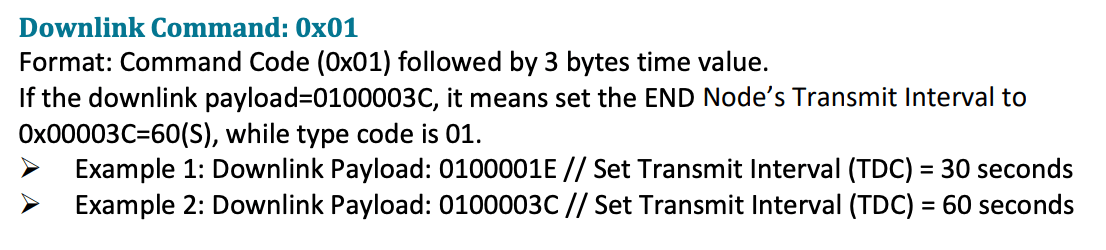
To send downlinks to your device, you will have to reference your device’s manual to find out which commands are supported by your device. For the Dragino Distance Sensor, we will update the interval at which the device sends data to TTS and ultimately to Losant. The Dragino End Device AT Commands and Downlink Commands Manual states that the downlink command is 0x01 followed by the interval time as shown below.
In your Losant application, import the Send Downlink: Uplink Interval Application Workflow into your application. After importing, you must set the following workflow global values:
tts-losant-schedule-downlink-api-key: The key that was generated in TTS and copied in the previous step.tts-webhook-id: The TTS webhook ID created in Step 6 (losant-lab-webhook-001).tts-application-id: The TTS application ID created in Step 4 (losant-lab-application-001).tts-api-url: The TTS base API URL for sending downlink messages. (https://nam1.cloud.thethings.network/api/v3/as/applications). More information can be found in the TTS API Endpoints documentation.tts-device-id: The unique identifier assigned to your device in TTS.
Once the variables have been set, save the workflow. Then, enable the workflow through the “Properties” panel to allow for pressing the Virtual Buttons.
The workflow contains:
- Multiple Virtual Button Triggers for setting the downlink payload to different values.
- A Function Node for converting the hex-encoded downlink value to Base64-encoded (which is what TTS accepts).
- An HTTP Node that calls a TTS webhook.
- The URL is constructed from the workflow’s global variables.
- The request is authenticated using a token that is also set in a global.
- The body is constructed as a JSON object, utilizing the Base64-encoded instructions from the pressed Virtual Button. The object format matches what our LoRaWAN device expects.
- A
User-Agentheader is included based on recommended best practices from TTS, though the header is not actually required.
- A Debug Node that prints the result of the request to your workflow’s debug log.
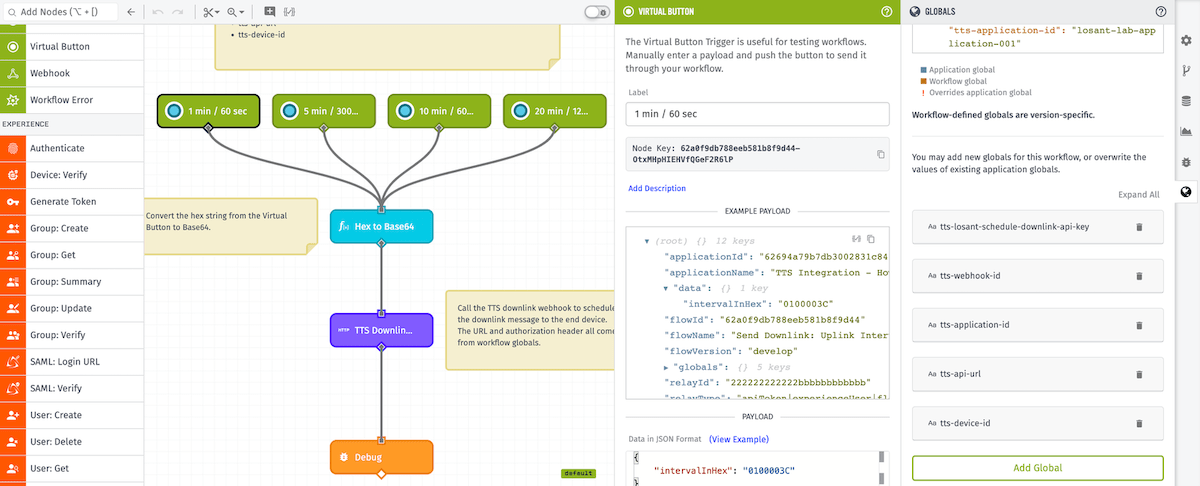
As you can see in the screenshot above, there are four Virtual Buttons to command the device’s report interval to different times (1 min, 5 mins, 10 mins, and 20 mins). Each of these Virtual Buttons includes a different downlink command, starting with the hex-encoded value for the uplink interval command and followed by the hex-encoded uplink interval time.
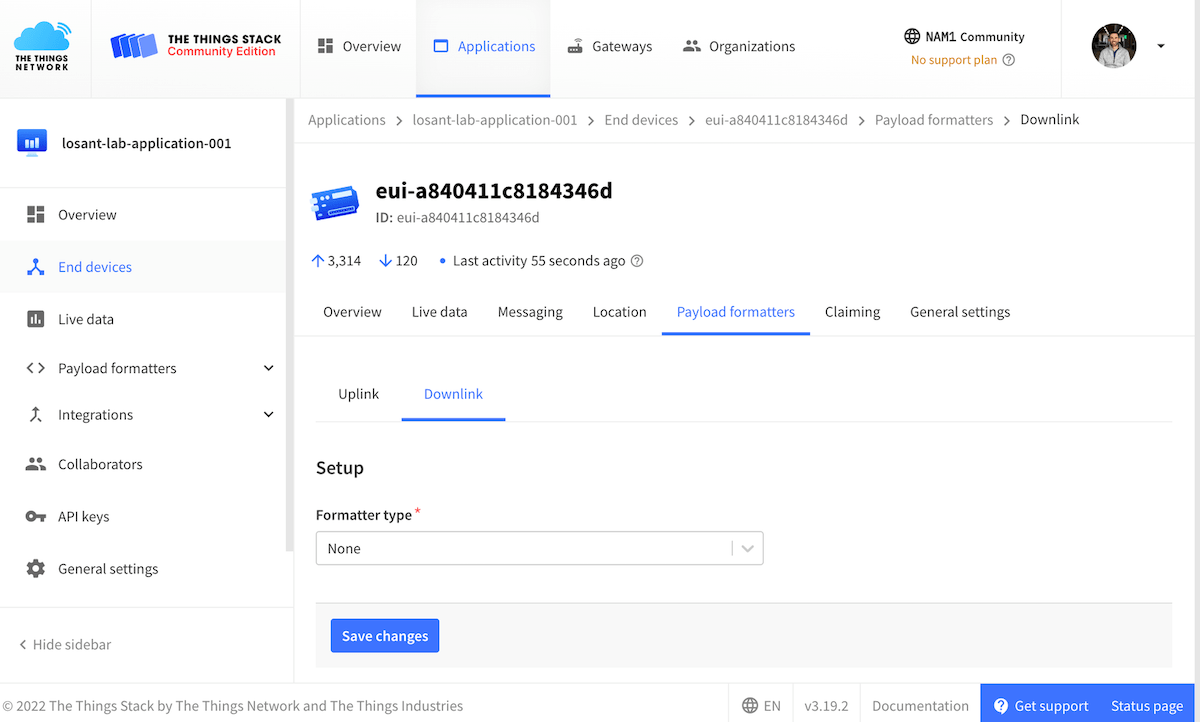
Since we are configuring the HTTP body in the format that the LoRaWAN sensor expects it in, we have to ensure that in TTS we set the downlink payload formatters to NONE as shown below for our device.
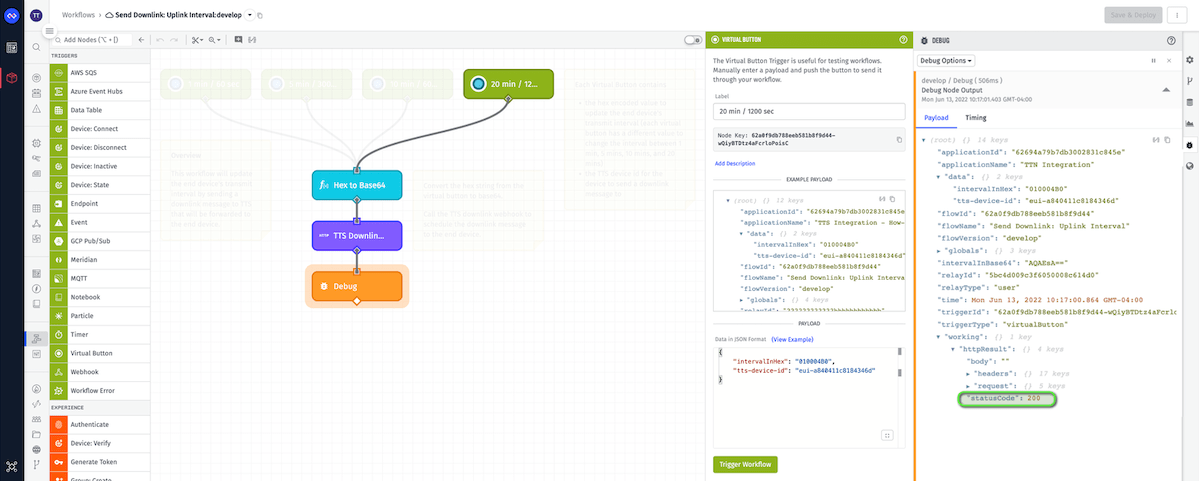
Clicking the “20 min” Virtual Button will send the downlink command to TTS. The result of the HTTP request in Losant is shown below.
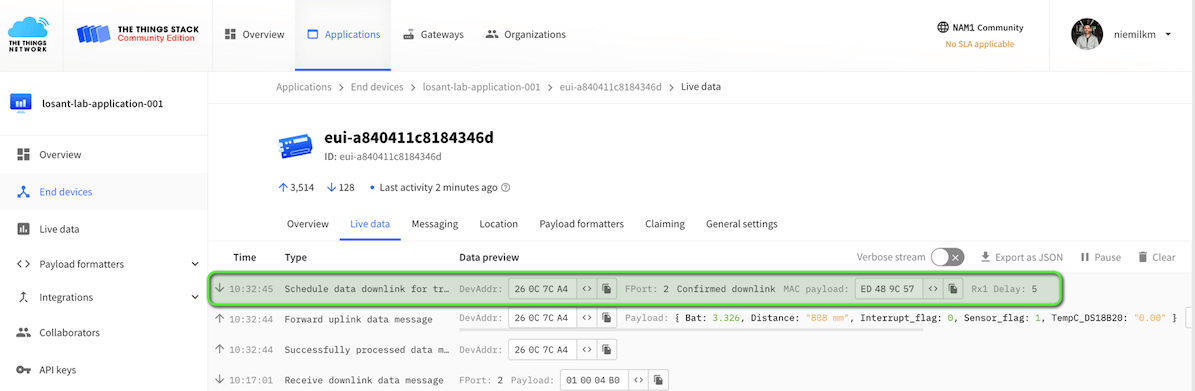
Once the downlink command is received from Losant in TTS, then the TTS Live data update will display that it received that command as shown below.
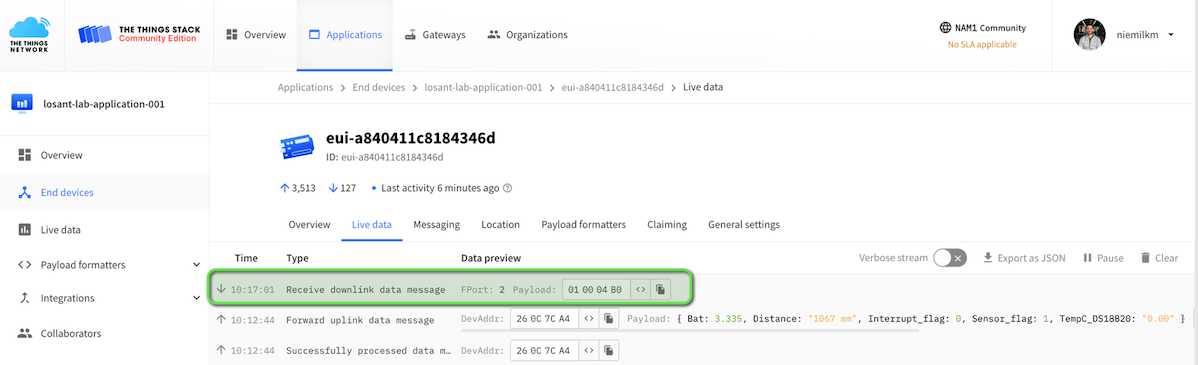
Once the downlink to the device is successful, the Live data in TTS will update as shown below.
Editing Your Losant Webhook in TTS
Once the Losant Webhook integration in TTS is created, you are now able to edit that Webhook in TTS to modify its configuration as detailed below.
- Basic Auth can be added, which is easily configured in Losant.
- Initially, the Webhook will only forward uplink messages to Losant. You can add additional event types (Join accept, Downlink failed, etc.) to be forwarded to Losant.
- In Step 8, a Downlink API key was created. You can edit the Webhook and include the Downlink API key. By including this Downlink API Key here, the Webhook headers also include the URL in its correct form that we parsed together in Step 9 above with the TTS Application ID, TTS Webhook ID, and TTS Device ID that was needed to schedule downlinks.
Resources
Was this page helpful?
Still looking for help? You can also search the Losant Forums or submit your question there.