Data Tables
Data tables allow for the storage of arbitrary data within your applications. This data can then be edited, queried or deleted either directly through the table interface or through a Losant workflow.
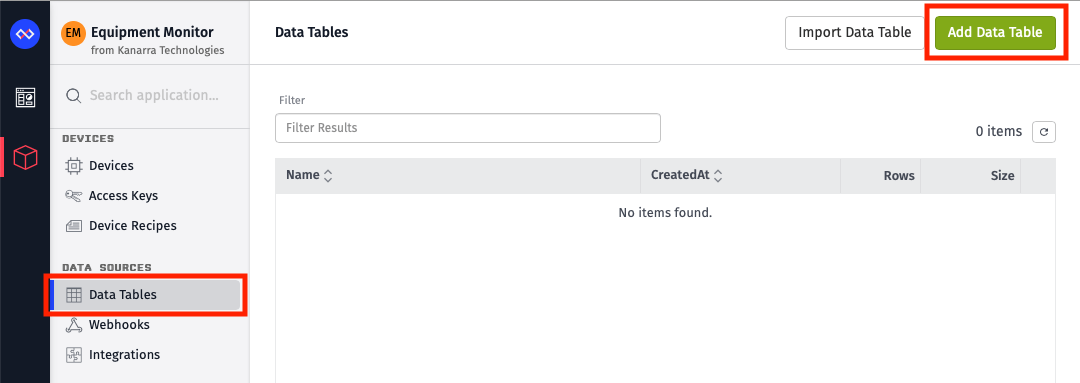
A list of your application’s data tables can be reached by clicking “Data Tables” in your application.
Creating a Data Table
To create a data table, click the “Add Data Table” button in the top right corner of your application’s data table list.
A data table’s configuration consists of:
- Name - The table’s name. This field is required, though the name of the table itself has no effect on its functionality.
- Description - This is an optional, longer description of the table.
- Columns - Though columns are optional, a table without columns is effectively useless. More information about column definition is below.
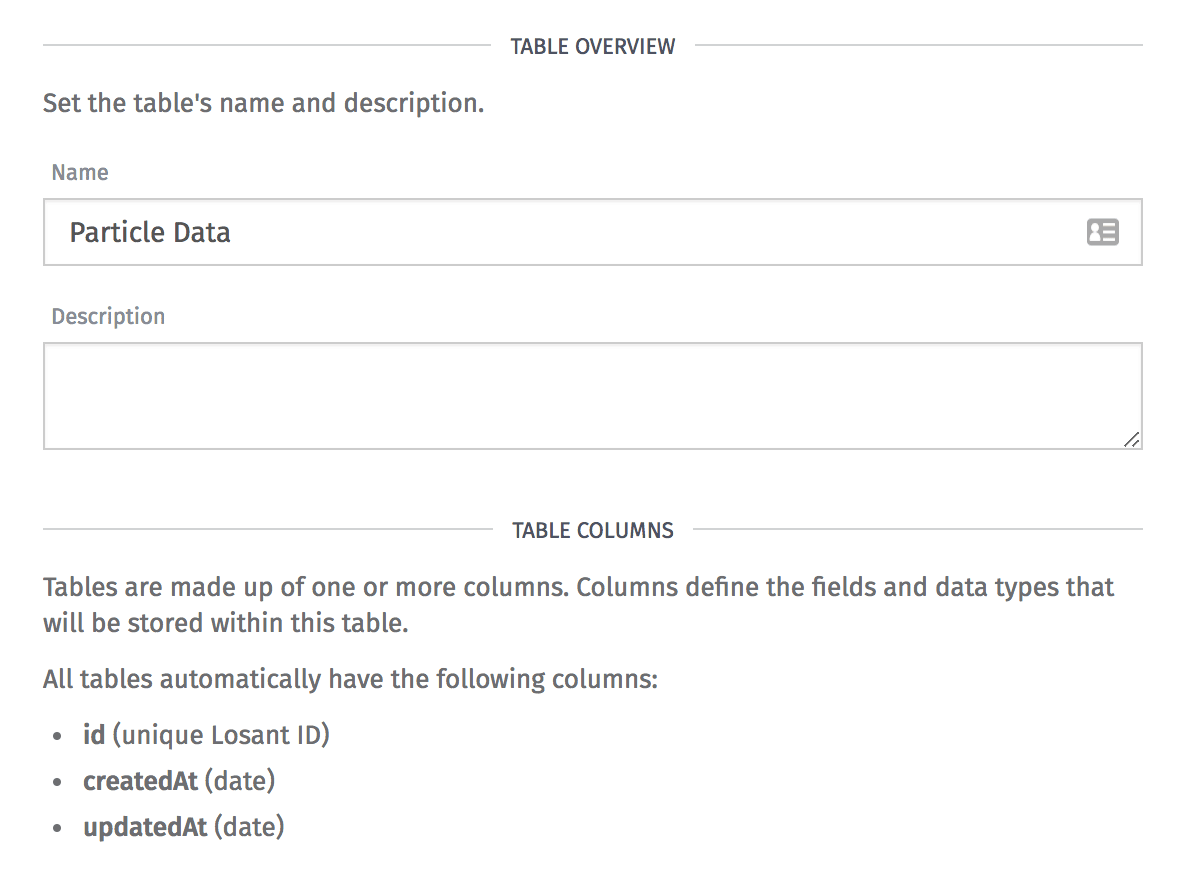
Once your configuration is complete, click the “Create Data Table” button in the page’s footer.
Table Columns
You may define as many as 50 columns per table in addition to the default columns listed below.
The column name, which is the unique identifier against which data will be added and queried, must meet the following rules:
- Must be 1 to 255 characters.
- May only consist of uppercase letters, lowercase letters, numbers, underscores (_) and hyphens (-).
- Must be unique within the table; the same column name cannot be used twice.
- Must not conflict with any of the default column names listed below.
Default Columns
Every table automatically has the following columns, whose values per row are auto-generated:
- id is a Losant-generated alphanumeric ID for the row. This value cannot be changed.
- createdAt is the time at which the row was inserted into the table. This timestamp will never change.
- updatedAt is the last time the row was updated. If the row has never been updated, this will be equal to the timestamp in the
createdAtcolumn; otherwise, the timestamp will reflect the last time the row was edited.
Column Data Types
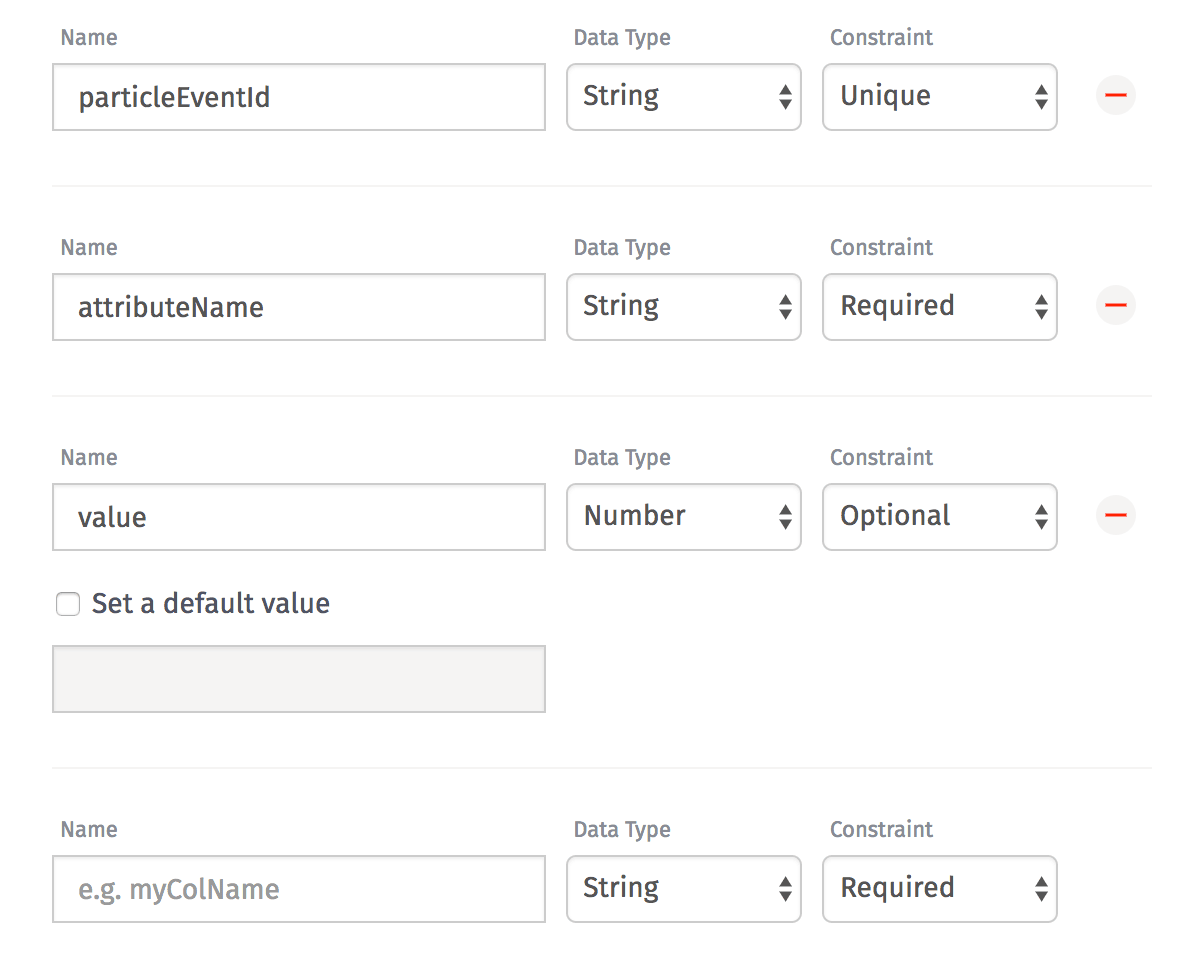
When defining a column, you must set its data type as one of the following:
- String columns can contain any string as its cells’ values. The maximum number of allowed characters is 768.
- Number means the column’s values must be any rational number.
- Boolean columns must contain values of either
trueorfalse.
The one exception to the data type rules is that, if the column’s constraint is defined as optional (see below), a cell within a column of any data type may also have its value explicitly set to null.
Column Constraints
Every column requires one of three constraints be defined:
- Unique requires the value to be unique across all rows in your data table. Attempting to add or update a row where the value for this column matches the value in another row, the action will fail.
- Required means a value other than
nullmust be supplied for this column. (For string data types, empty strings are OK.) Failing to provide a value will cause the addition / edit to fail. - Optional puts no constraints on the value entered for the column, so long as the value’s data type matches the type defined for the column.
Default Values
For optional columns, you may also define a default value for the column. If provided, this value will be inserted into that row’s column (on row creation only, not on row edit) if you do not define a property for that column. Note that providing a value of null will not lead to the default value being entered in the column; rather, null will be inserted for that column’s value.
Editing a Data Table
A table’s name and description may be changed at any time without any adverse effect on the table and its data. Columns can also be added or removed at any time; however, these actions can lead to undesirable results.
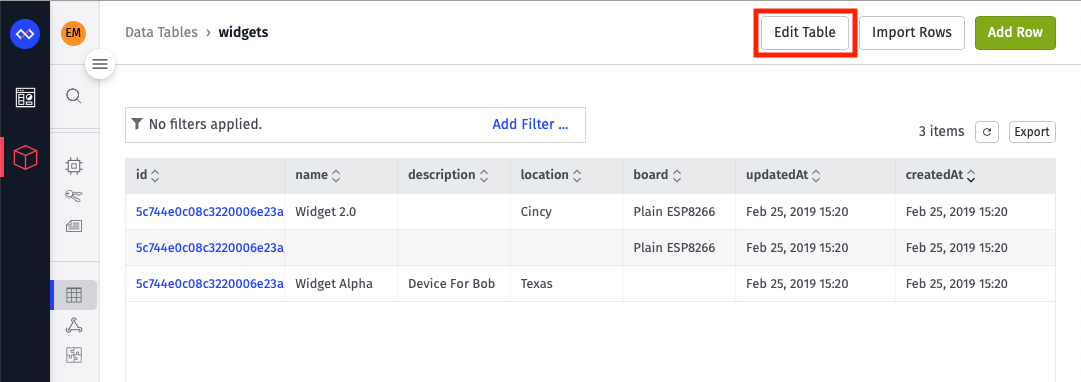
To edit the properties of an existing table, click the “Edit Table” button in the top right corner of the table.
Adding a Column
Adding a column to your table is not a dangerous action, but there are a few things to note when doing so:
- Any rows that existed before the creation of the new column will have
nullvalues set for that column, even if the new column has theUniqueorRequiredconstraint. The value can be changed at any time, but the new value must validate against the column’s data type and constraint. - If you define a default value for the column, the default will only be applied to new rows; existing table rows will not retroactively get the default value for the new column.
- Adding a column of the same name as a previously deleted column will not restore data from the deleted column, even if the new column’s data type and constraint also match the deleted column.
Removing a Column
You will receive a warning if you attempt to remove a column from your table, as doing so will have the following consequences on your application:
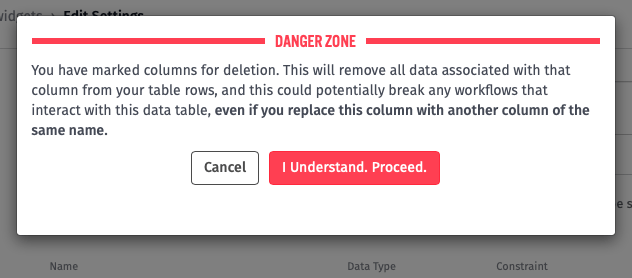
- All data for the column will be deleted, even if you immediately add a new column with the same name, data type and constraint. This data cannot be recovered.
- Any Table Get Rows nodes that query against the removed column will throw errors in your workflows, as the query is invalid if the column no longer exists.
- Any workflows inserting or updating rows with values defined for the removed column will continue to function normally; values for the removed column will simply be ignored.
Working with Table Data
To view the data within your table, click a table’s name within the list of your application’s tables. This will lead to an interface where you can browse table rows, edit data and perform advanced queries.
Sorting Data
By default, your table displays up to 1,000 rows per page, sorted by creation date with the most recently created row at the top. You may change the sort field or the sort direction by clicking the arrows alongside each column’s name.

Adding a Row
To manually add a row to a data table, click the “Add Row” button in the top right corner of the table browsing interface. This will open an editor pane alongside the table where values can be added for each column. Then, click the “Save Row” button at the bottom of the pane to insert the row into the table.
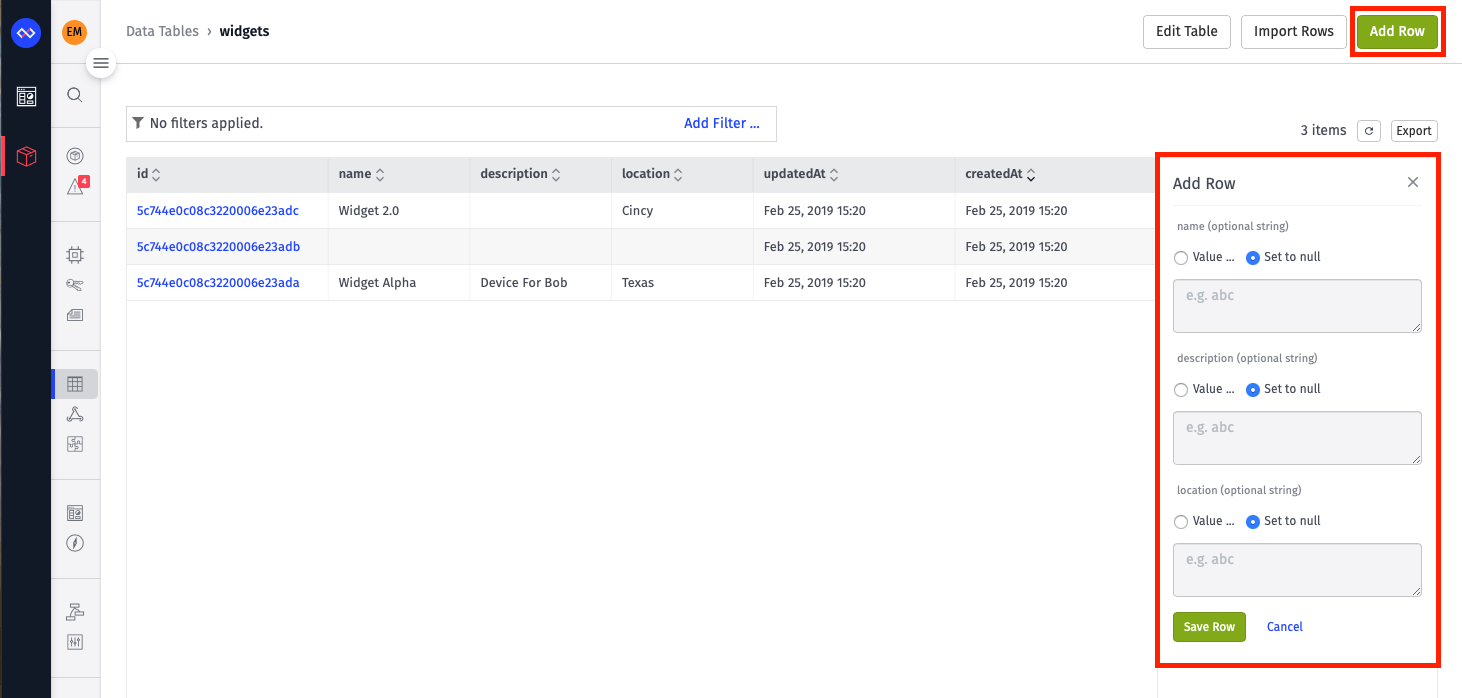
Note: Depending on the values entered for the row and the table’s current sort / query rules, your new row may not be immediately visible after it is added.
Alternatively, you may add table rows through a workflow using the Table Insert Row node.
Importing Rows
Like importing a new data table you can import a CSV file with like columns. To import your CSV files click the “Import Rows” button in the top right corner of the data table list. This will open your operating system’s native file browser dialog, where you can select a single file to import.
Note: Protected column names (“id”, “createdAt”, and “updatedAt”) will be removed, so exported rows can be easily imported.

Editing a Row
You may edit any table row by clicking the row ID in the table browsing interface. This will bring up an editor pane, similar to adding a row but with the row’s current values filled in. The same validation rules around data types and column constraints apply when editing a row; for example, if editing a uniquely constrained string column, the new value must also be unique within the table. (Once the edit is complete, the original value will be available for use in other table columns.)
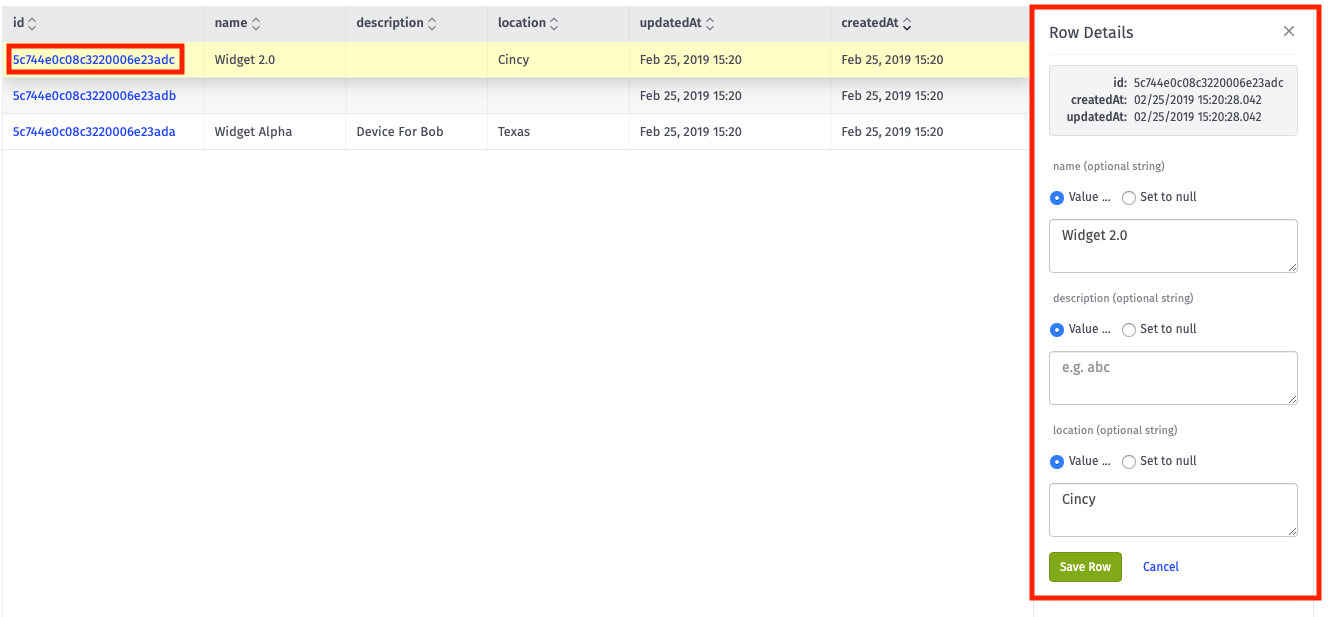
You may also use the Table Update Row node to update a row using a workflow.
Deleting a Row
To delete a table row, select a row as if to edit its contents and click the “Delete Row” button in the editor pane. Once a row has been deleted, any uniquely constrained values within the row will be available for other rows to use.
You may also use the Table Delete Row node to delete a row using a workflow.
Querying Table Data
To filter your table rows based on the data within them, you may provide an advanced query within the table browsing interface. All data tables allow for querying by the following properties:
- id columns can only be tested for equality or inequality against a valid Losant ID.
- createdAt and updatedAt columns can be tested against dates that are equal to, not equal to, or before or after a provided date.
The rest of the columns within your table can also be queried against, and the operators available for each type vary depending on if the data type is Number, Boolean, or String. (All three types also support null comparisons.)
Deleting Data Table Rows
To delete all rows within a data table:
- Ensure no advanced query have been applied.
- Select “Delete Rows” within the “Bulk Row Actions” drop-down menu.
Workflows configured to run on row deletions will not run.

To delete a subset of rows within a data table:
- Provide an advanced query.
- Select “Delete Rows” within the “Bulk Row Actions” drop-down menu.
Workflows configured to run on row deletions will run once for each row.

Deleting a Data Table
To delete a data table, click the “Delete” icon next to any table on the list page, or by clicking the “Delete” button in the footer of a data table’s edit page.
Note that deleting a data table will also delete all table data and may possibly cause any workflows that interact with your data table to throw errors. Deleting a data table cannot be undone.
When to Use Data Tables
Store static or semi-static data: Information that would change rarely or not at all. Some examples: fault code details, custom security rules, additional metadata for users or devices.
Dashboarding: The only dashboard block that can utilizes data tables is the Data Table block, which displays the data table itself. See below if you would like to utilize the graphs.
When Not to Use Data Tables
Storing time series data: This type of data belongs on a device in state, even if there is not a physical device or it is a collection of devices or sensors.
Data Aggregation: By storing data on a device, you can utilize the Data Explorer, the Data: Time Series Node, and the Data: Gauge Query all of which would allow you to do different types of querying or aggregations across all devices.
Dashboards: All of the data visualization blocks for dashboard utilize the device’s state, including but not limited to Bar Charts, Pie Charts, Time Series Graphs etc.
Export Data: If you would like a copy of your device data in the form of a data table (CSV) you can use the device data export tool to retrieve a copy of all the data currently stored for a single device.
Archive Data: If you would like to continuously get a copy of your devices state data in a CSV format, enable your Application Archiving feature.
Data Table Limits
There are two factors by which data tables are limited per organization or sandbox:
- The number of individual data tables across all applications
- The amount of stored data (in bytes) across all data tables
Data tables are not limited by the number of rows, neither per table nor across your organization or sandbox.
Was this page helpful?
Still looking for help? You can also search the Losant Forums or submit your question there.
