Losant Workflow Lab Overview
The Losant Workflow Lab is an interactive tool that provides a set of challenges to solve using Losant’s Visual Workflow Engine. The Workflow Lab is intended to be used by both new and experienced users to grow their workflow development skills.
If you are new to Losant, or the Workflow Engine, it's highly recommended you take a look at Course Five: Workflows of Losant University. It provides a great foundation for building workflows, and the Workflow Lab is an excellent followup to the course to sharpen your skills.
This guide is to walk you through how the Workflow Lab works and provides an example to help you get started.
How the Lab Works
The Workflow Lab is broken into test suites (Math, Array, etc.) which contain individual tests. Each test triggers a workflow with random input and expects a specific output. For each test, your job is to build an Application Workflow that performs the test logic. Here is an example of the test description:
In this test, A JSON object containing two random numbers, "num1" and "num2", will be provided to your webhook. Your workflow should return a JSON object containing a single field, "result", that is the sum of "num1" and "num2".
From these instructions, your workflow is provided num1 and num2. In a workflow, you must add these and return the result.
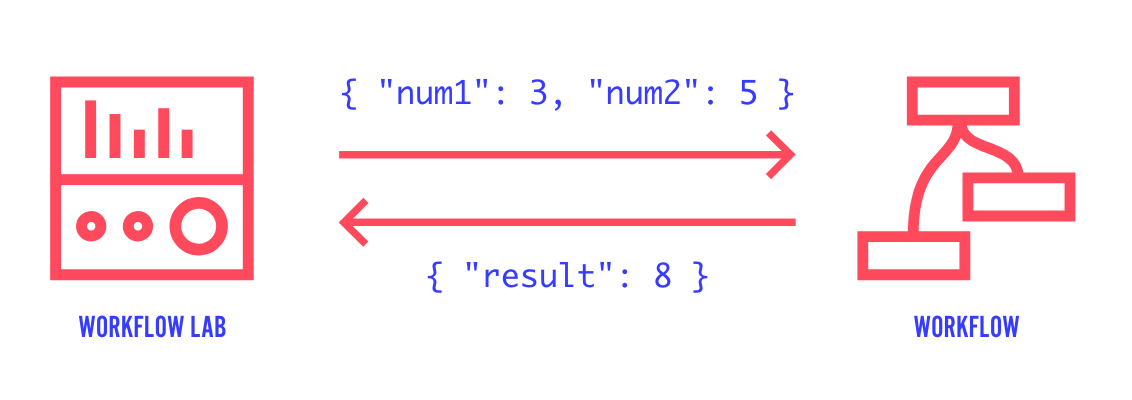
The Workflow Lab doesn't use any hidden functionality to send data to your workflow. Behind the scenes, it simply uses Webhooks. The test input is sent as JSON in the body of the webhook request, and the Lab parses the response as the test output.
If you're unfamiliar with webhooks or HTTP requests, the rest of the instructions should help your understanding.
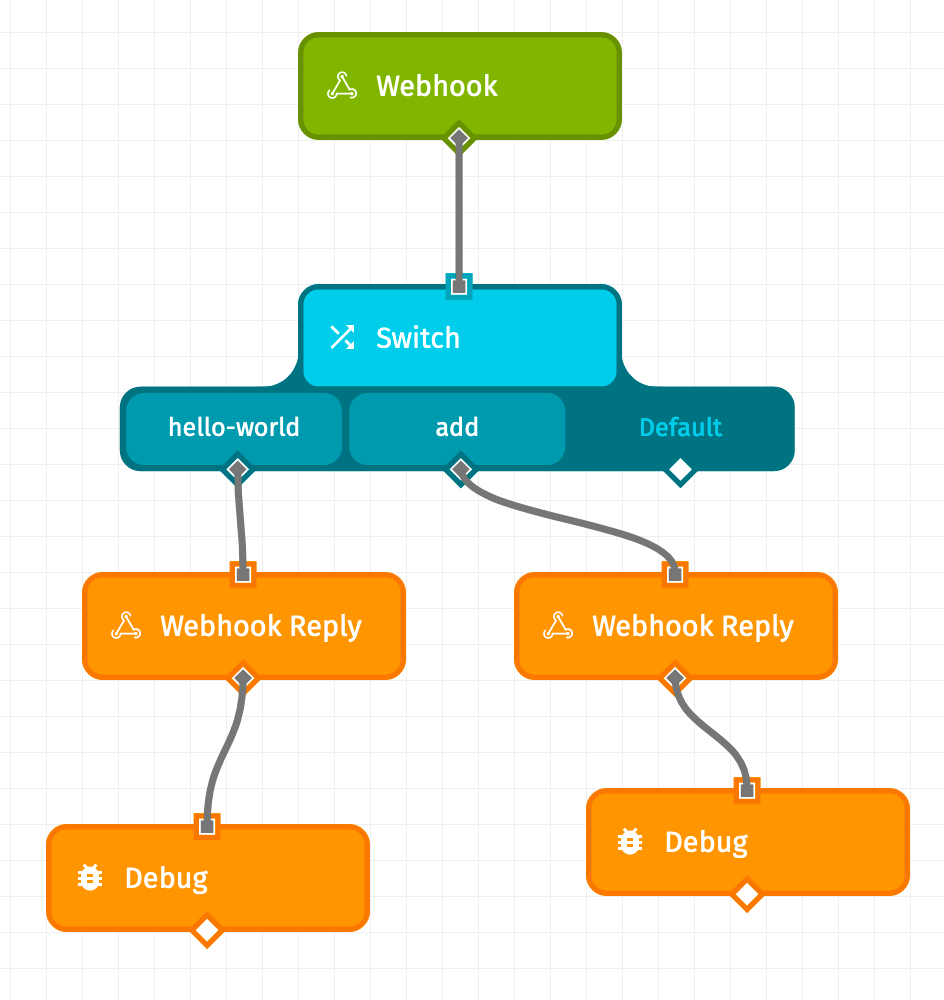
Each test suite in the Lab includes multiple tests. We recommend using one webhook / workflow per suite. This avoids creating a giant workflow attempting to answer every test in the Lab. Here is an example of a test workflow:
The Workflow Lab uses query parameters to indicate which test question is being asked. The query parameter is id=test-id. For example, when the Lab invokes the first test, it requests the following URL:
https://triggers.losant.com/webhooks/your-webhook-id?id=hello-world
The Switch Node in the test workflow allows you to branch based on the query parameter. This approach is what allows you to use a single webhook and a single workflow to answer an entire suite.
Lab Anatomy
Now, let's look at our first test. Here is your first suite, it's called "Hello World":
Hello World
The questions in this test suite are designed to get you working comfortably with the Losant Workflow Lab.
The Starter Workflow for this test suite is available here.
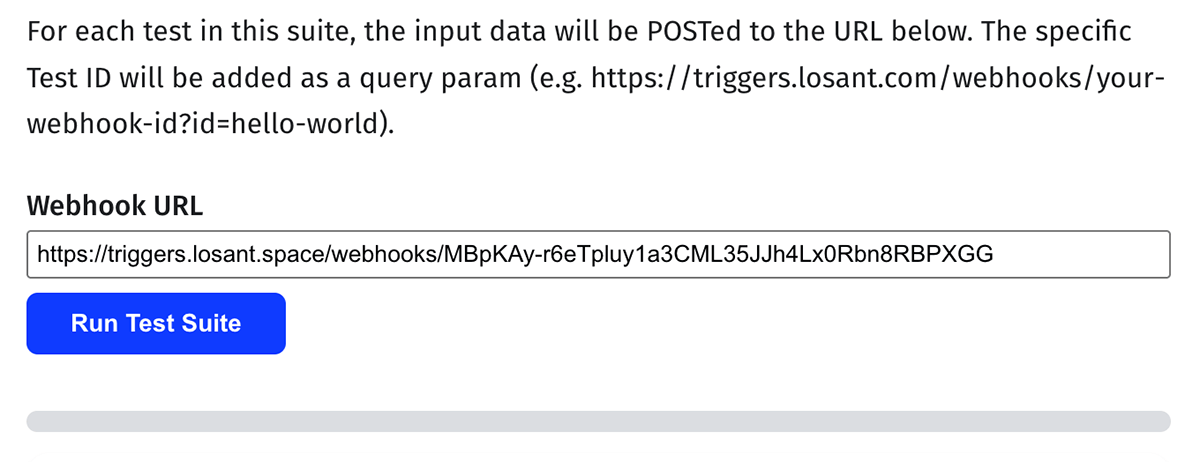
For each test in this suite, the input data will be POSTed to the URL below. The specific Test ID will be added as a query param (e.g. https://triggers.losant.com/webhooks/your-webhook-id?id=hello-world).
Hello World
In this test, a JSON object containing two strings, "string1" and "string2", will be provided to your Webhook. Your workflow should return a JSON object containing a single field, "result", that is the concatenation of "string1" and "string2".
Example Input
{
  "string1": "Hello",
  "string2": " World"
}
Example Output
{
  "result": "Hello World"
}
Results
This test has not been run yet.
Add Two Numbers
In this test, a JSON object containing two random numbers, "num1" and "num2", will be provided to your Webhook. Your workflow should return a JSON object containing a single field, "result", that is the sum of "num1" and "num2".
Example Input
{
  "num1": 3,
  "num2": 5
}
Example Output
{
  "result": 8
}
{
  "num1": 7,
  "num2": 21
}
{
  "result": 28
}
Results
This test has not been run yet.
If you click on the suite above, it expands. Let's take a look at the anatomy of a suite, test, and example workflow.
Suite Anatomy
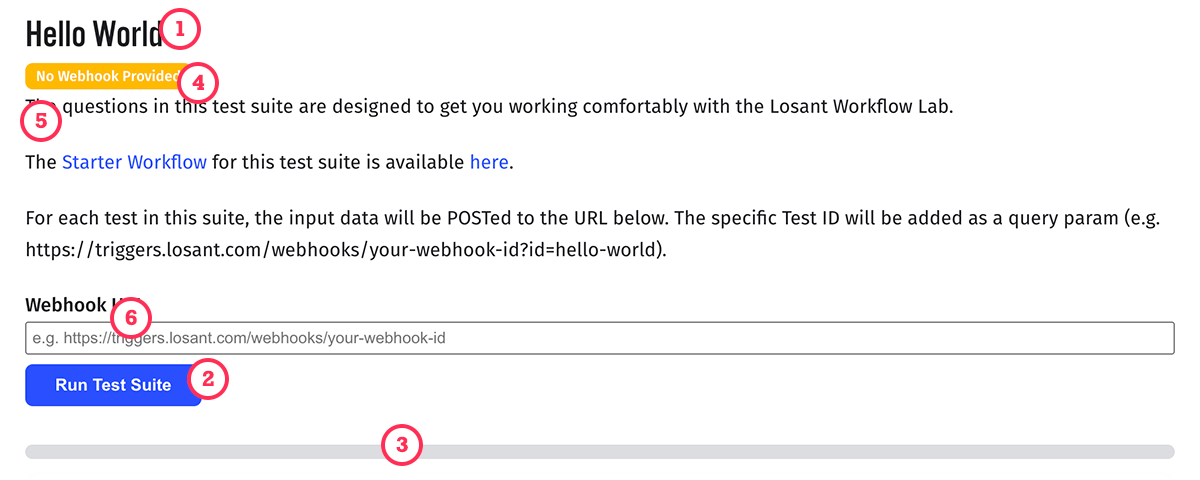
- Suite Title - This is simply the title or theme of the suite. Each test within the suite is grouped based on this theme.
- Run Test Suite - This is how you run the entire suite of tests. If you press this, the Lab fires test input at the provided webhook URL for each test in the suite.
- Suite Status Bar - This updates based on the completion of tests. Blue in the bar color means that tests have not been run. Red means that tests have failed. Green means that tests have passed.
- Suite Status - This updates based on the completion of tests, and provides information to how many tests you've passed out of the total number of tests within the suite.
- Suite Description - In this description, you'll read about what the suite is, and why it's important.
- Webhook URL - Each suite allows you to provide a webhook URL. We recommend a unique webhook and Workflow per suite.
Test Anatomy
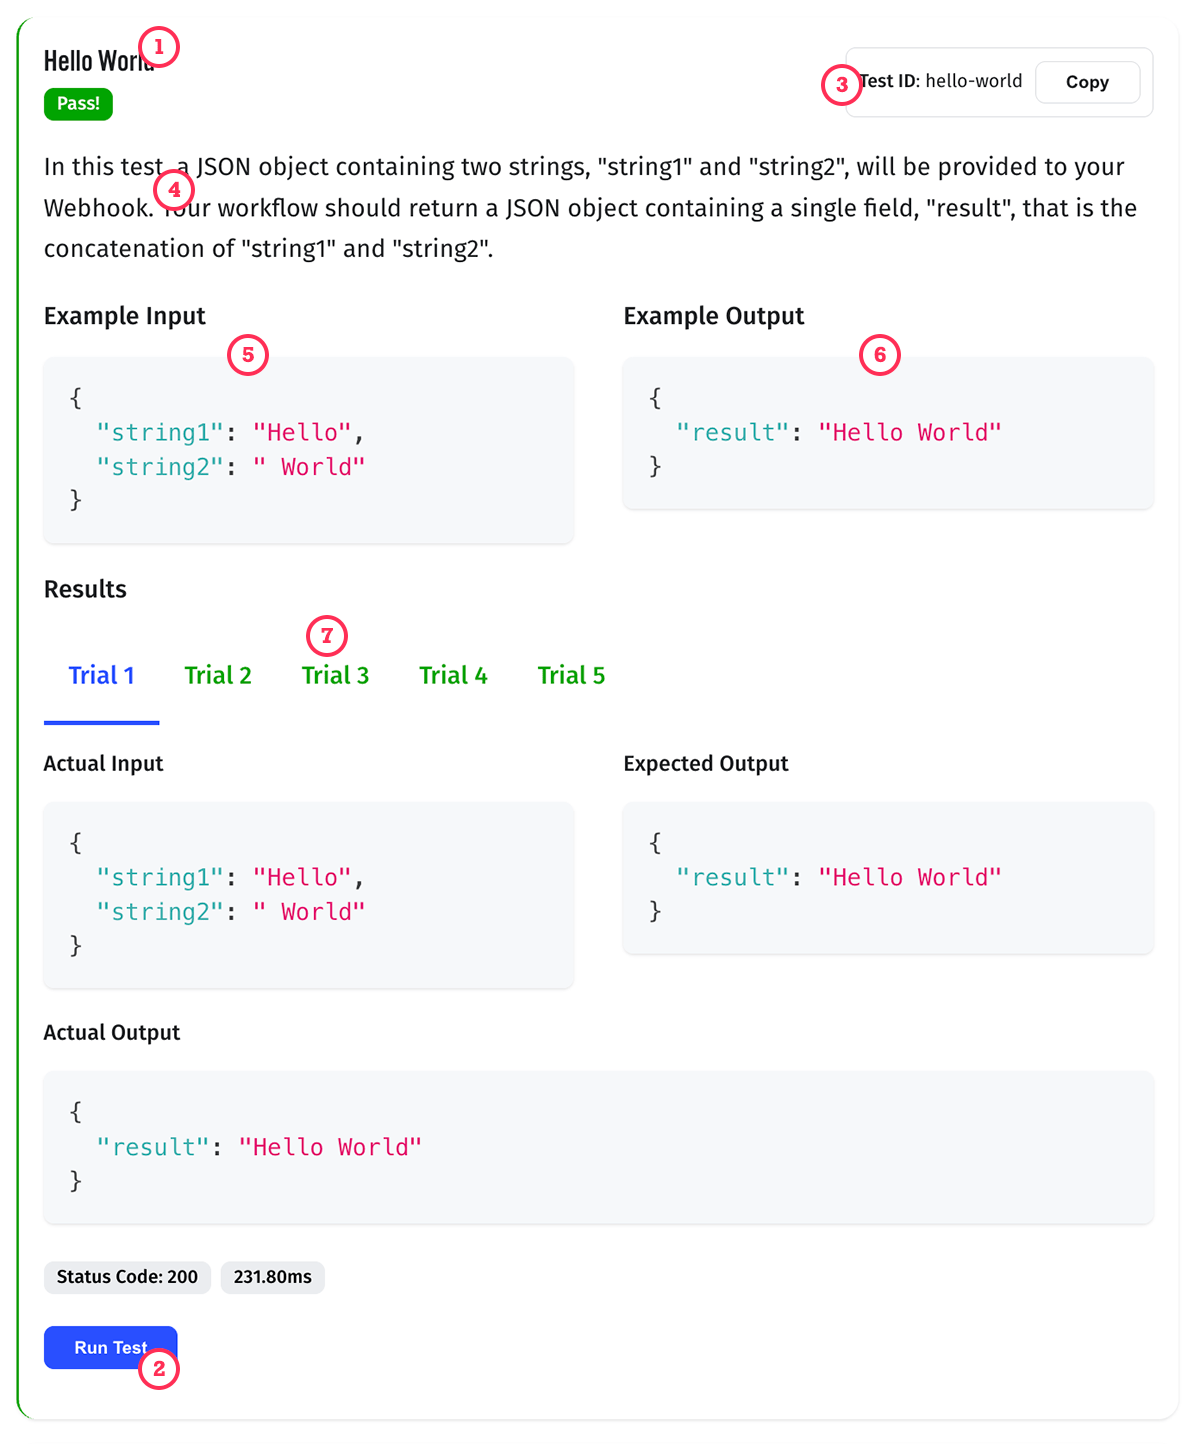
- Test Title - This is simply the title of the test.
- Run Test - This is how you run this specific test. If you press this, the Lab fires this test's input at the provided webhook URL configured for the suite.
- Test ID - Since we recommend one webhook URL per suite, the Test ID allows you to identify which is being run by the Lab.
- Test Description - In this description, you'll read about what the test is, and why it's important.
- Example Input - This is an example of the input the Lab sent to your workflow.
- Expected Output - This is an example of the output the Lab expects to see from your workflow.
- Results - Each time you run your test, the Lab generates random input. Here, you are able to see what was sent by the Lab, what the Lab received, and what the Lab expected. Each test is run multiple times, and you will see the result of each "Trial".
Test Workflow Anatomy
Here is an example test workflow. The beautiful thing is, we provide Starter Workflows for each suite to avoid building all of them from the ground up.
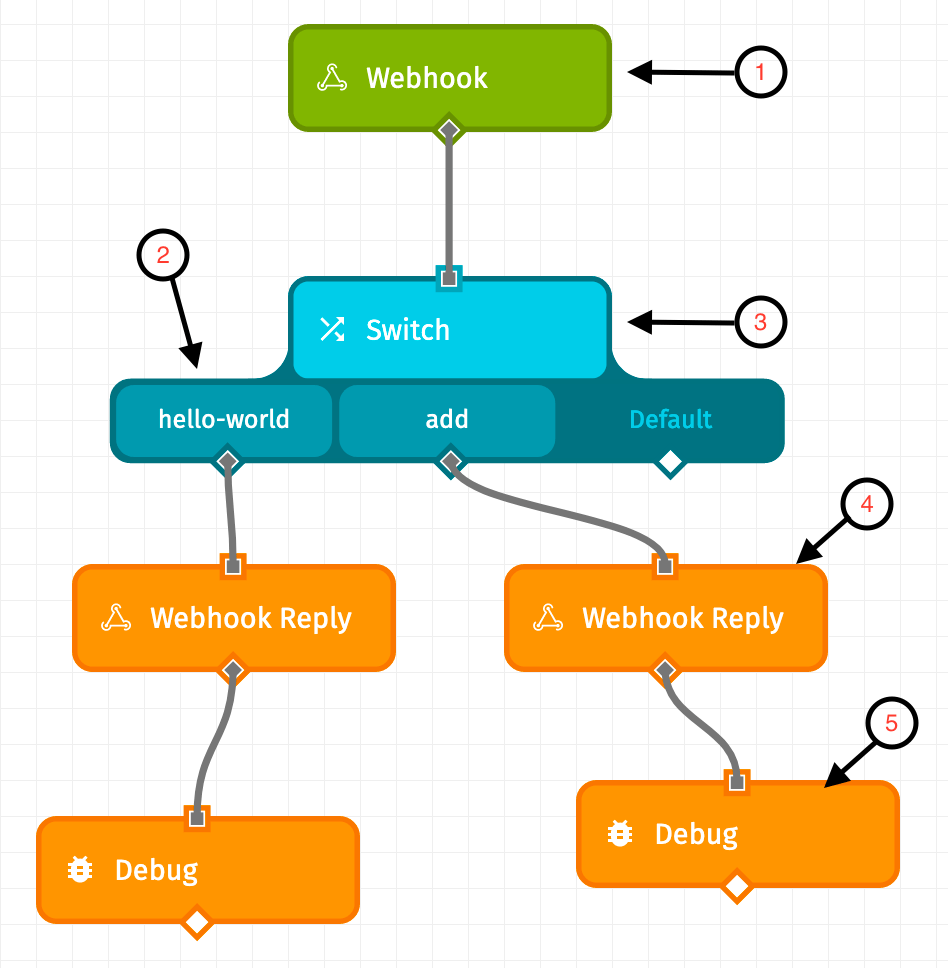
- Webhook Trigger - The Webhook Trigger fires when a run button is pressed. The Lab sends input values in the body (
data.body) of the webhook request and places it on the payload. - Test ID - In the Switch Node, branching is done based off of the Test ID. Since the Test ID is human-readable, it allows you to know which tests belong to which path.
- Switch Node - The Switch Node allows for workflow paths for each test within the suite. The Switch Template (
{{ data.query.id }}) is the location of the Test ID on the payload. - Webhook Reply Node - Sending your test output back to the Lab is done with a Webhook Reply Node. It sends the JSON formatted result as the body of the webhook response.
- Debug Node - Adding a Debug Node to the end of a workflow path gives more visibility to which values exist on the payload.
Test Walkthrough
This is your step-by-step walkthrough of the Hello World suite.
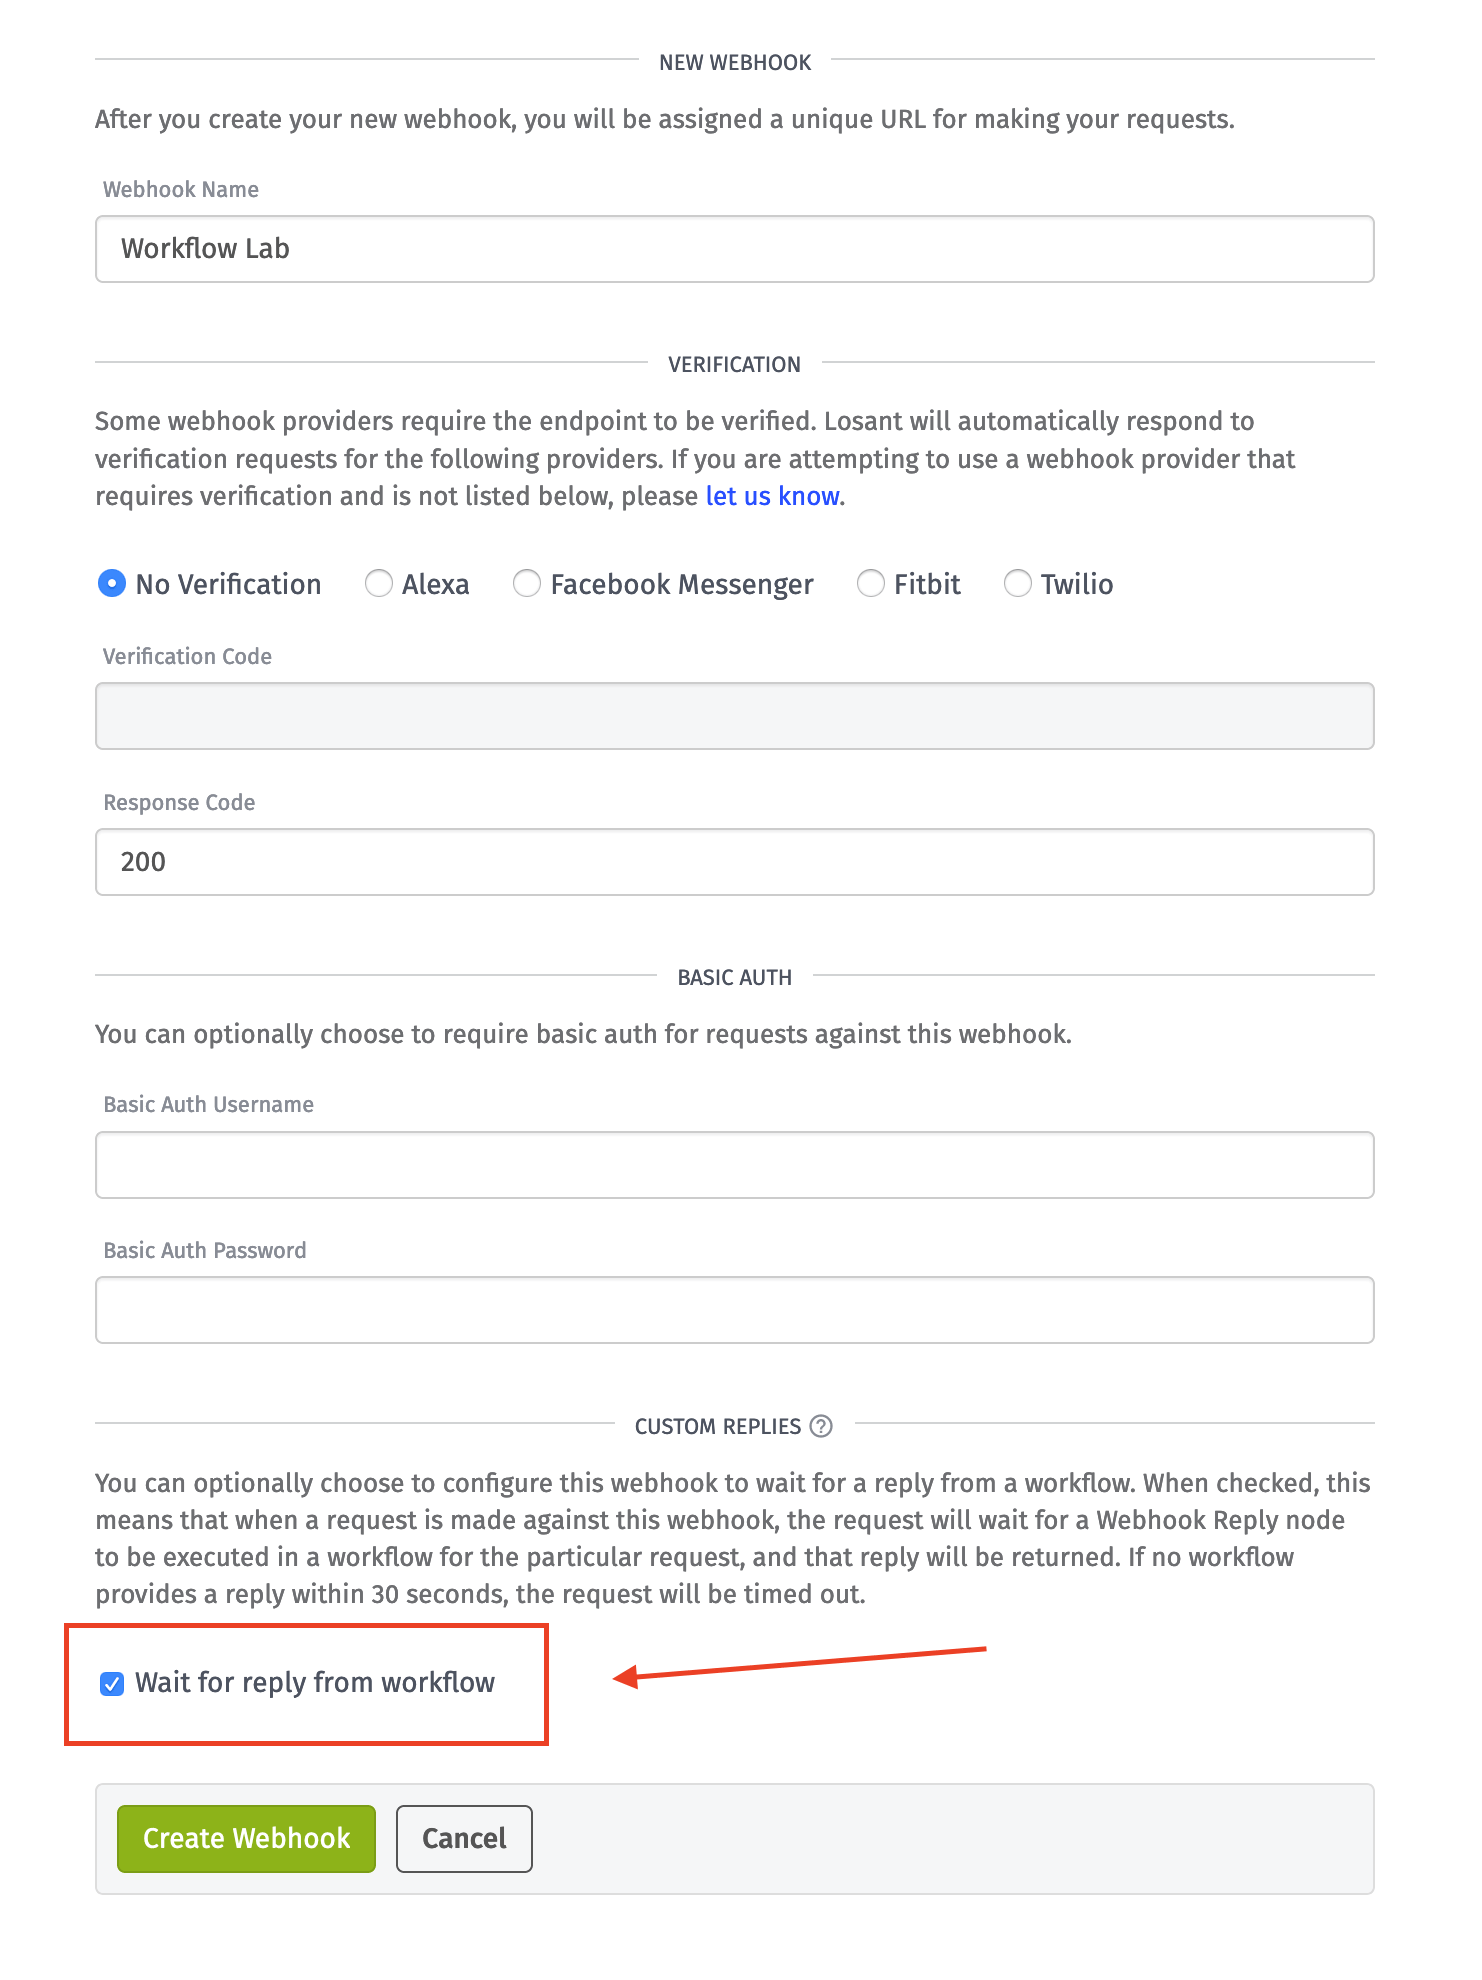
Create a Webhook
Now, let's create a webhook. We mentioned above that the test input is sent as JSON in the body of the webhook request, and the Lab parses the JSON response as the test output.
Create a Webhook with the “Wait for reply from workflow” option checked. This option is critical to ensure that your test workflow replies to the Lab.
Setting Up Your Test Workflow
You may build these Workflows yourself, but in the Hello World Suite above, you should see: The Starter Workflow for this test suite is available here.
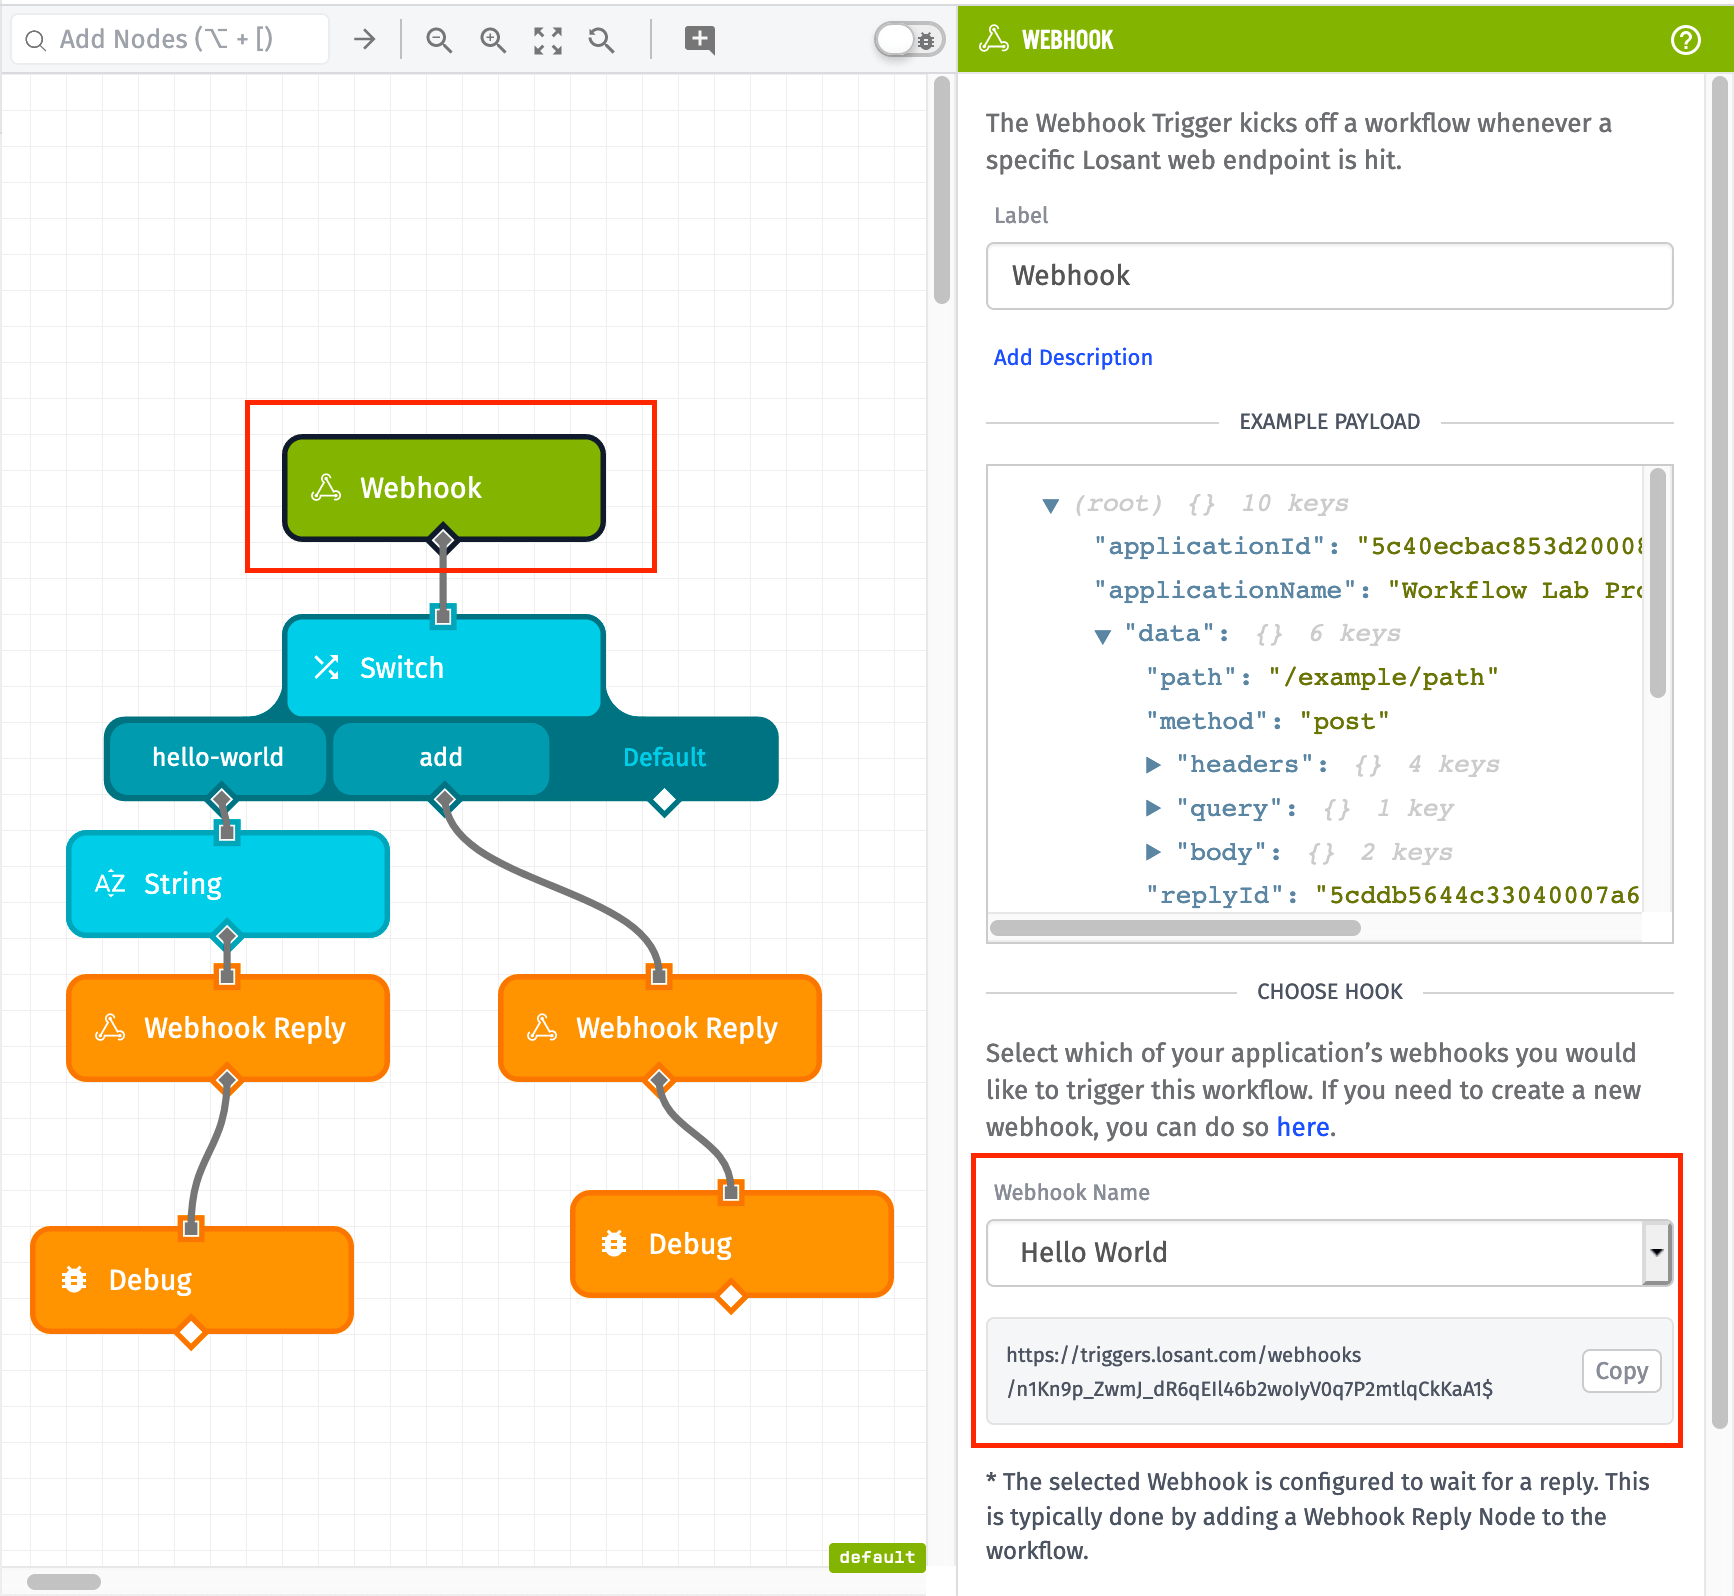
Let's download and import this workflow into our application. Once done, you should see this workflow:
If you take a look a the Switch Node, you can see the Switch Template ({{ data.query.id }}). This is how the workflow knows what test we are running.
Now that we have our webhook URL, we need to configure your Webhook Trigger with the webhook you created above:
Solving Your First Test
For your convenience, here is the Hello World Suite again:
Hello World
The questions in this test suite are designed to get you working comfortably with the Losant Workflow Lab.
The Starter Workflow for this test suite is available here.
For each test in this suite, the input data will be POSTed to the URL below. The specific Test ID will be added as a query param (e.g. https://triggers.losant.com/webhooks/your-webhook-id?id=hello-world).
Hello World
In this test, a JSON object containing two strings, "string1" and "string2", will be provided to your Webhook. Your workflow should return a JSON object containing a single field, "result", that is the concatenation of "string1" and "string2".
Example Input
{
  "string1": "Hello",
  "string2": " World"
}
Example Output
{
  "result": "Hello World"
}
Results
This test has not been run yet.
Add Two Numbers
In this test, a JSON object containing two random numbers, "num1" and "num2", will be provided to your Webhook. Your workflow should return a JSON object containing a single field, "result", that is the sum of "num1" and "num2".
Example Input
{
  "num1": 3,
  "num2": 5
}
Example Output
{
  "result": 8
}
{
  "num1": 7,
  "num2": 21
}
{
  "result": 28
}
Results
This test has not been run yet.
Be sure to paste in your webhook URL:
Our first test states that:
In this test, A JSON object containing two strings, "string1" and "string2", will be provided to your webhook. Your workflow should return a JSON object containing a single field, "result", that is the concatenation of "string1" and "string2".
Your workflow will be sent:
{
  "string1": "Hello",
  "string2": " World"
}
And the Lab expects:
{
  "result": "Hello World"
}
Because this is the "Hello World" test, your workflow is sent exactly the example input above and expects exactly the example output. Before we solve this, let's just run the test (not the suite). Here is what you should see:
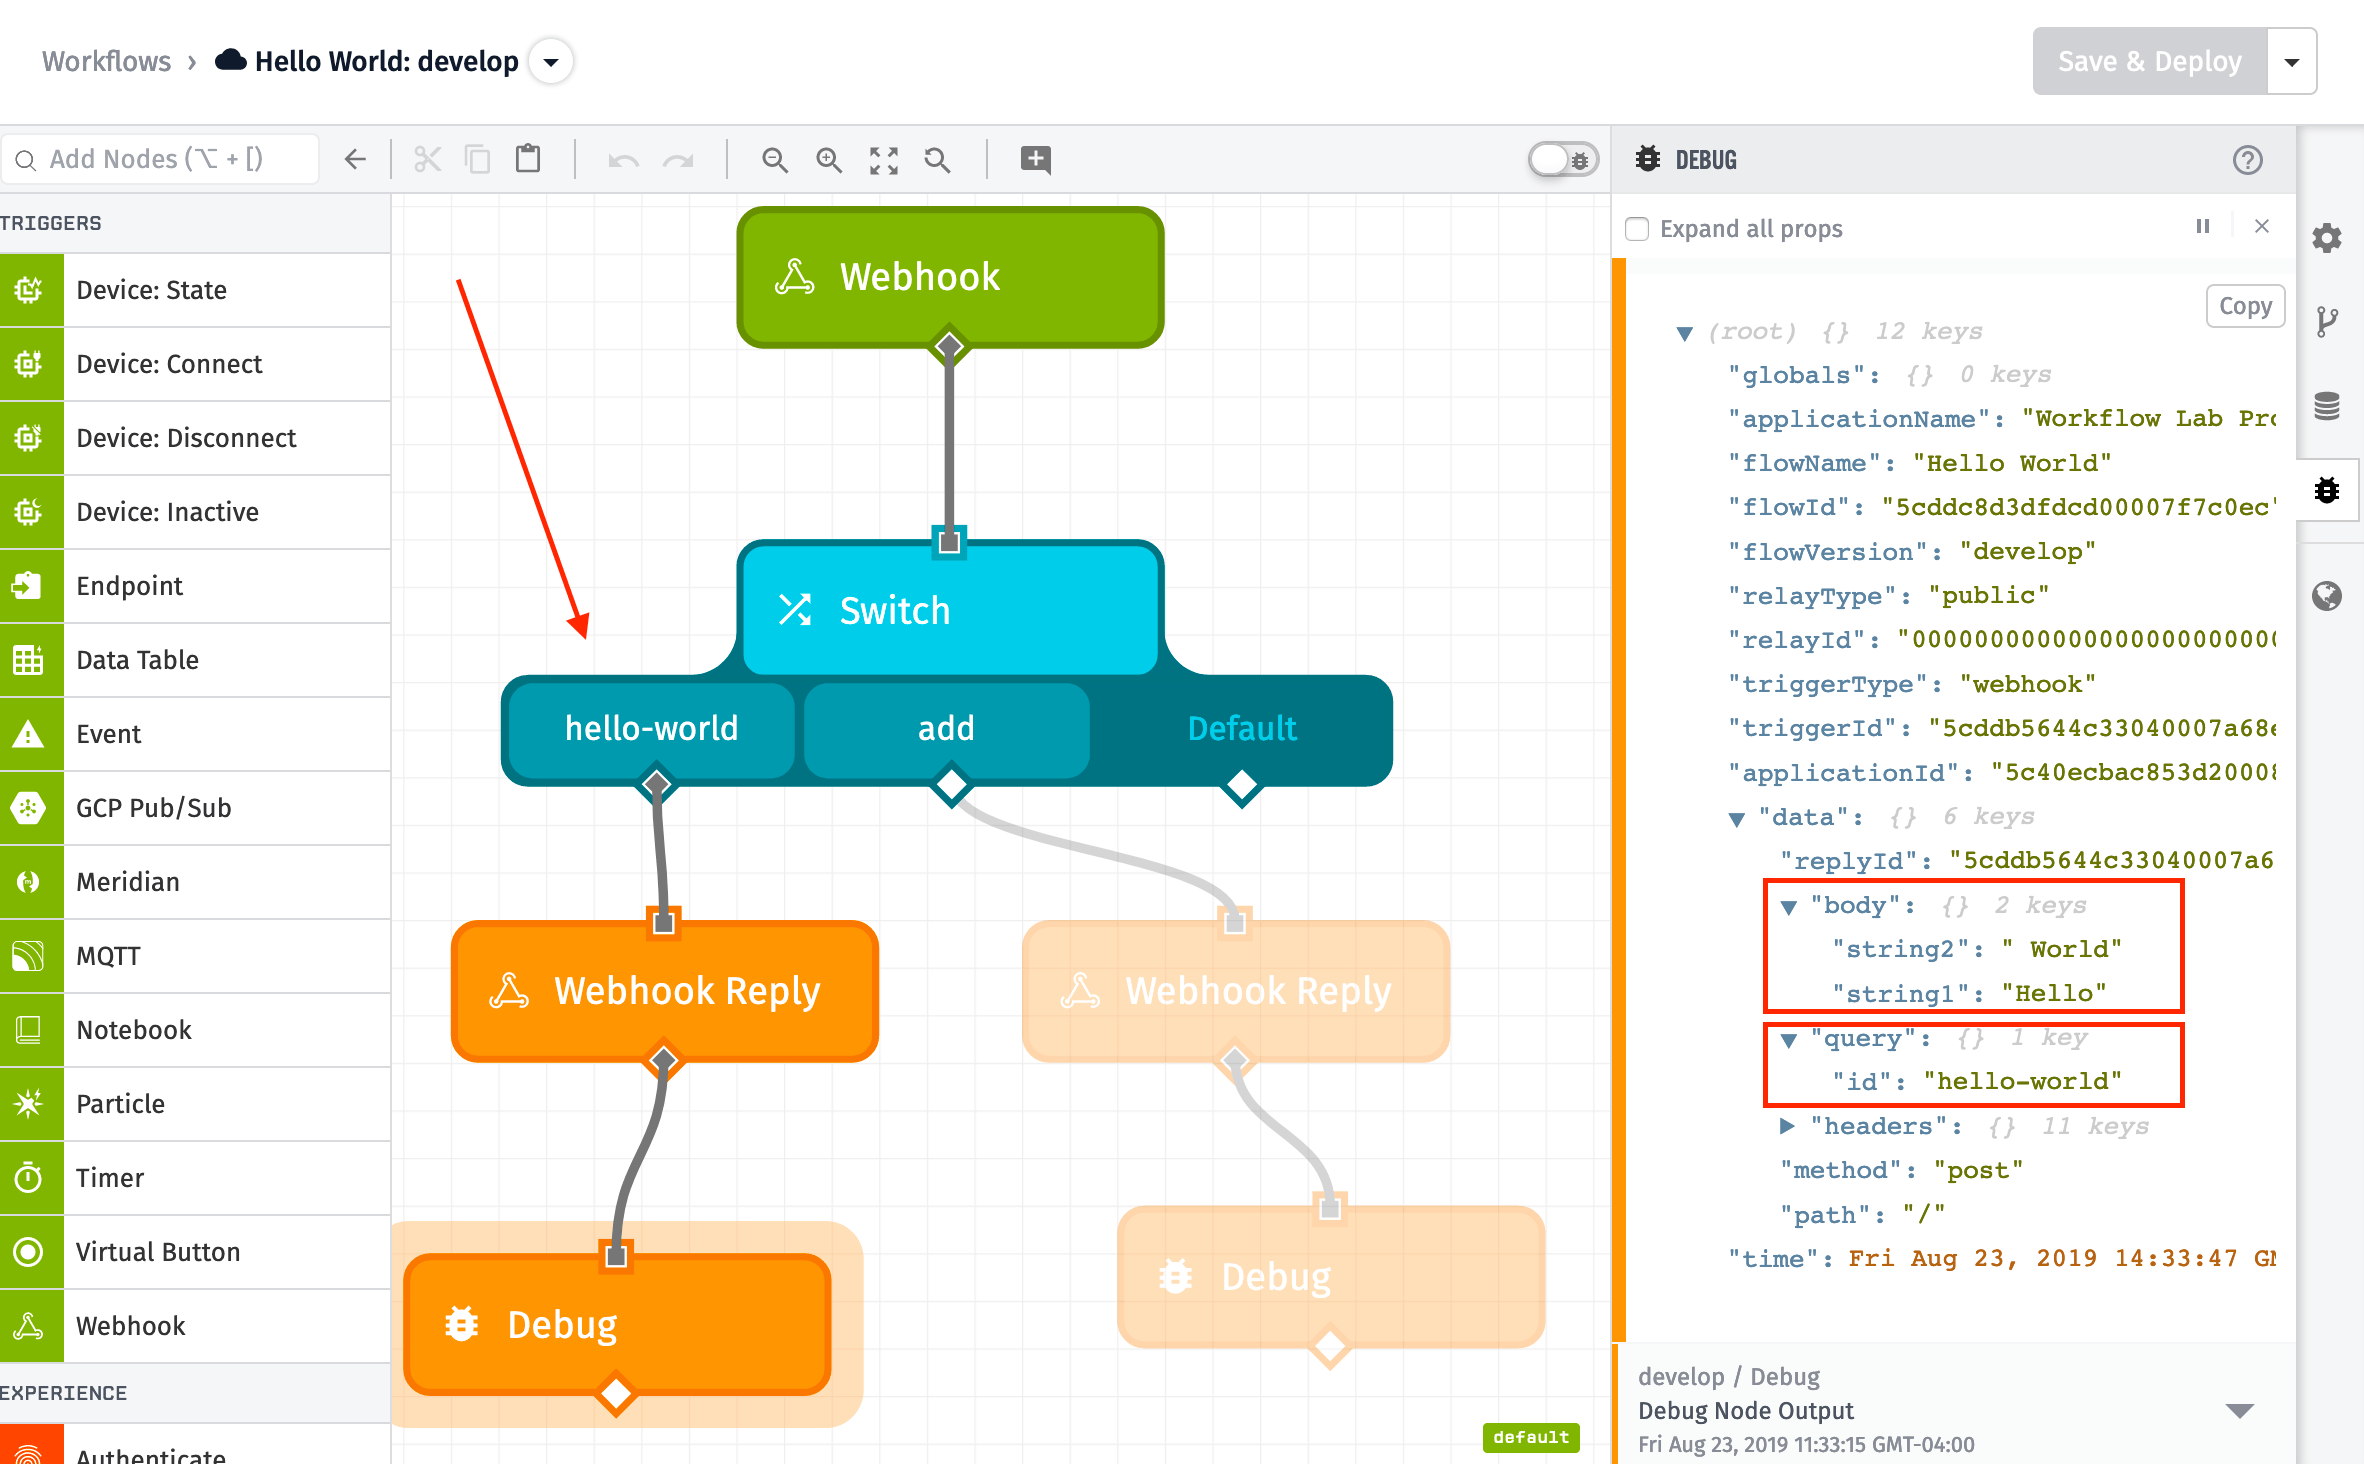
Notice a couple of things:
- As we hover over the Debug output, the path of the
hello-worldTest ID is highlighted. This means we triggered the right test. - At
data.query.idyou can see the Test ID that's used in the Switch Node. - At
data.bodyyou should seestring1andstring2. Because we are using webhooks, all Lab input will be atdata.body.
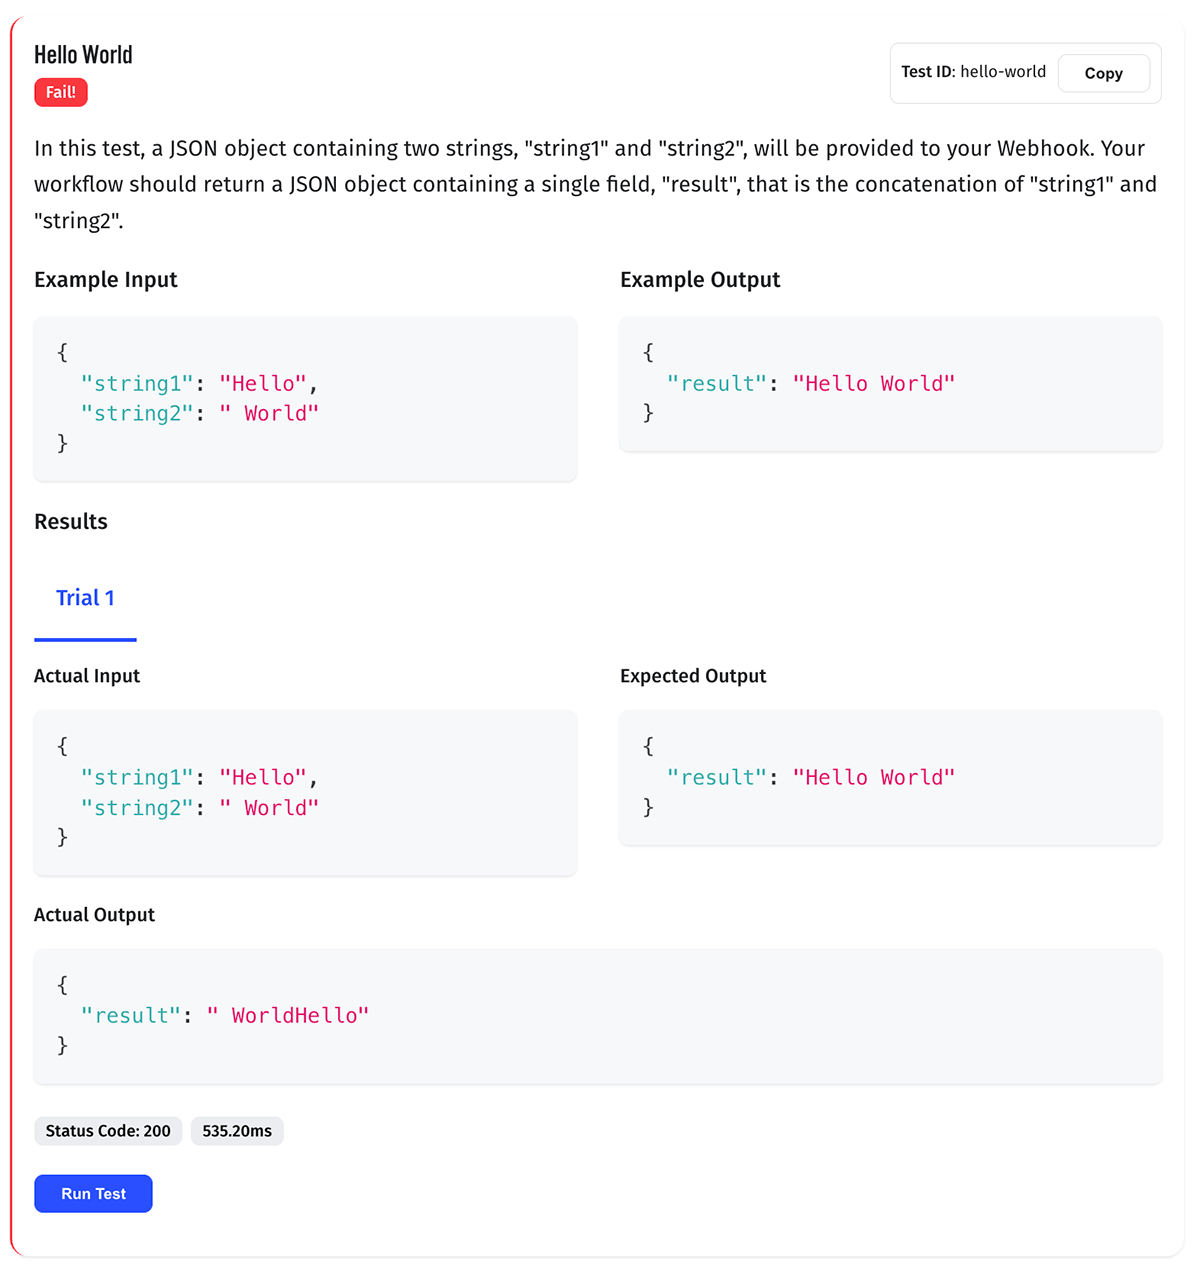
Your test should fail because we didn't actually solve the test:
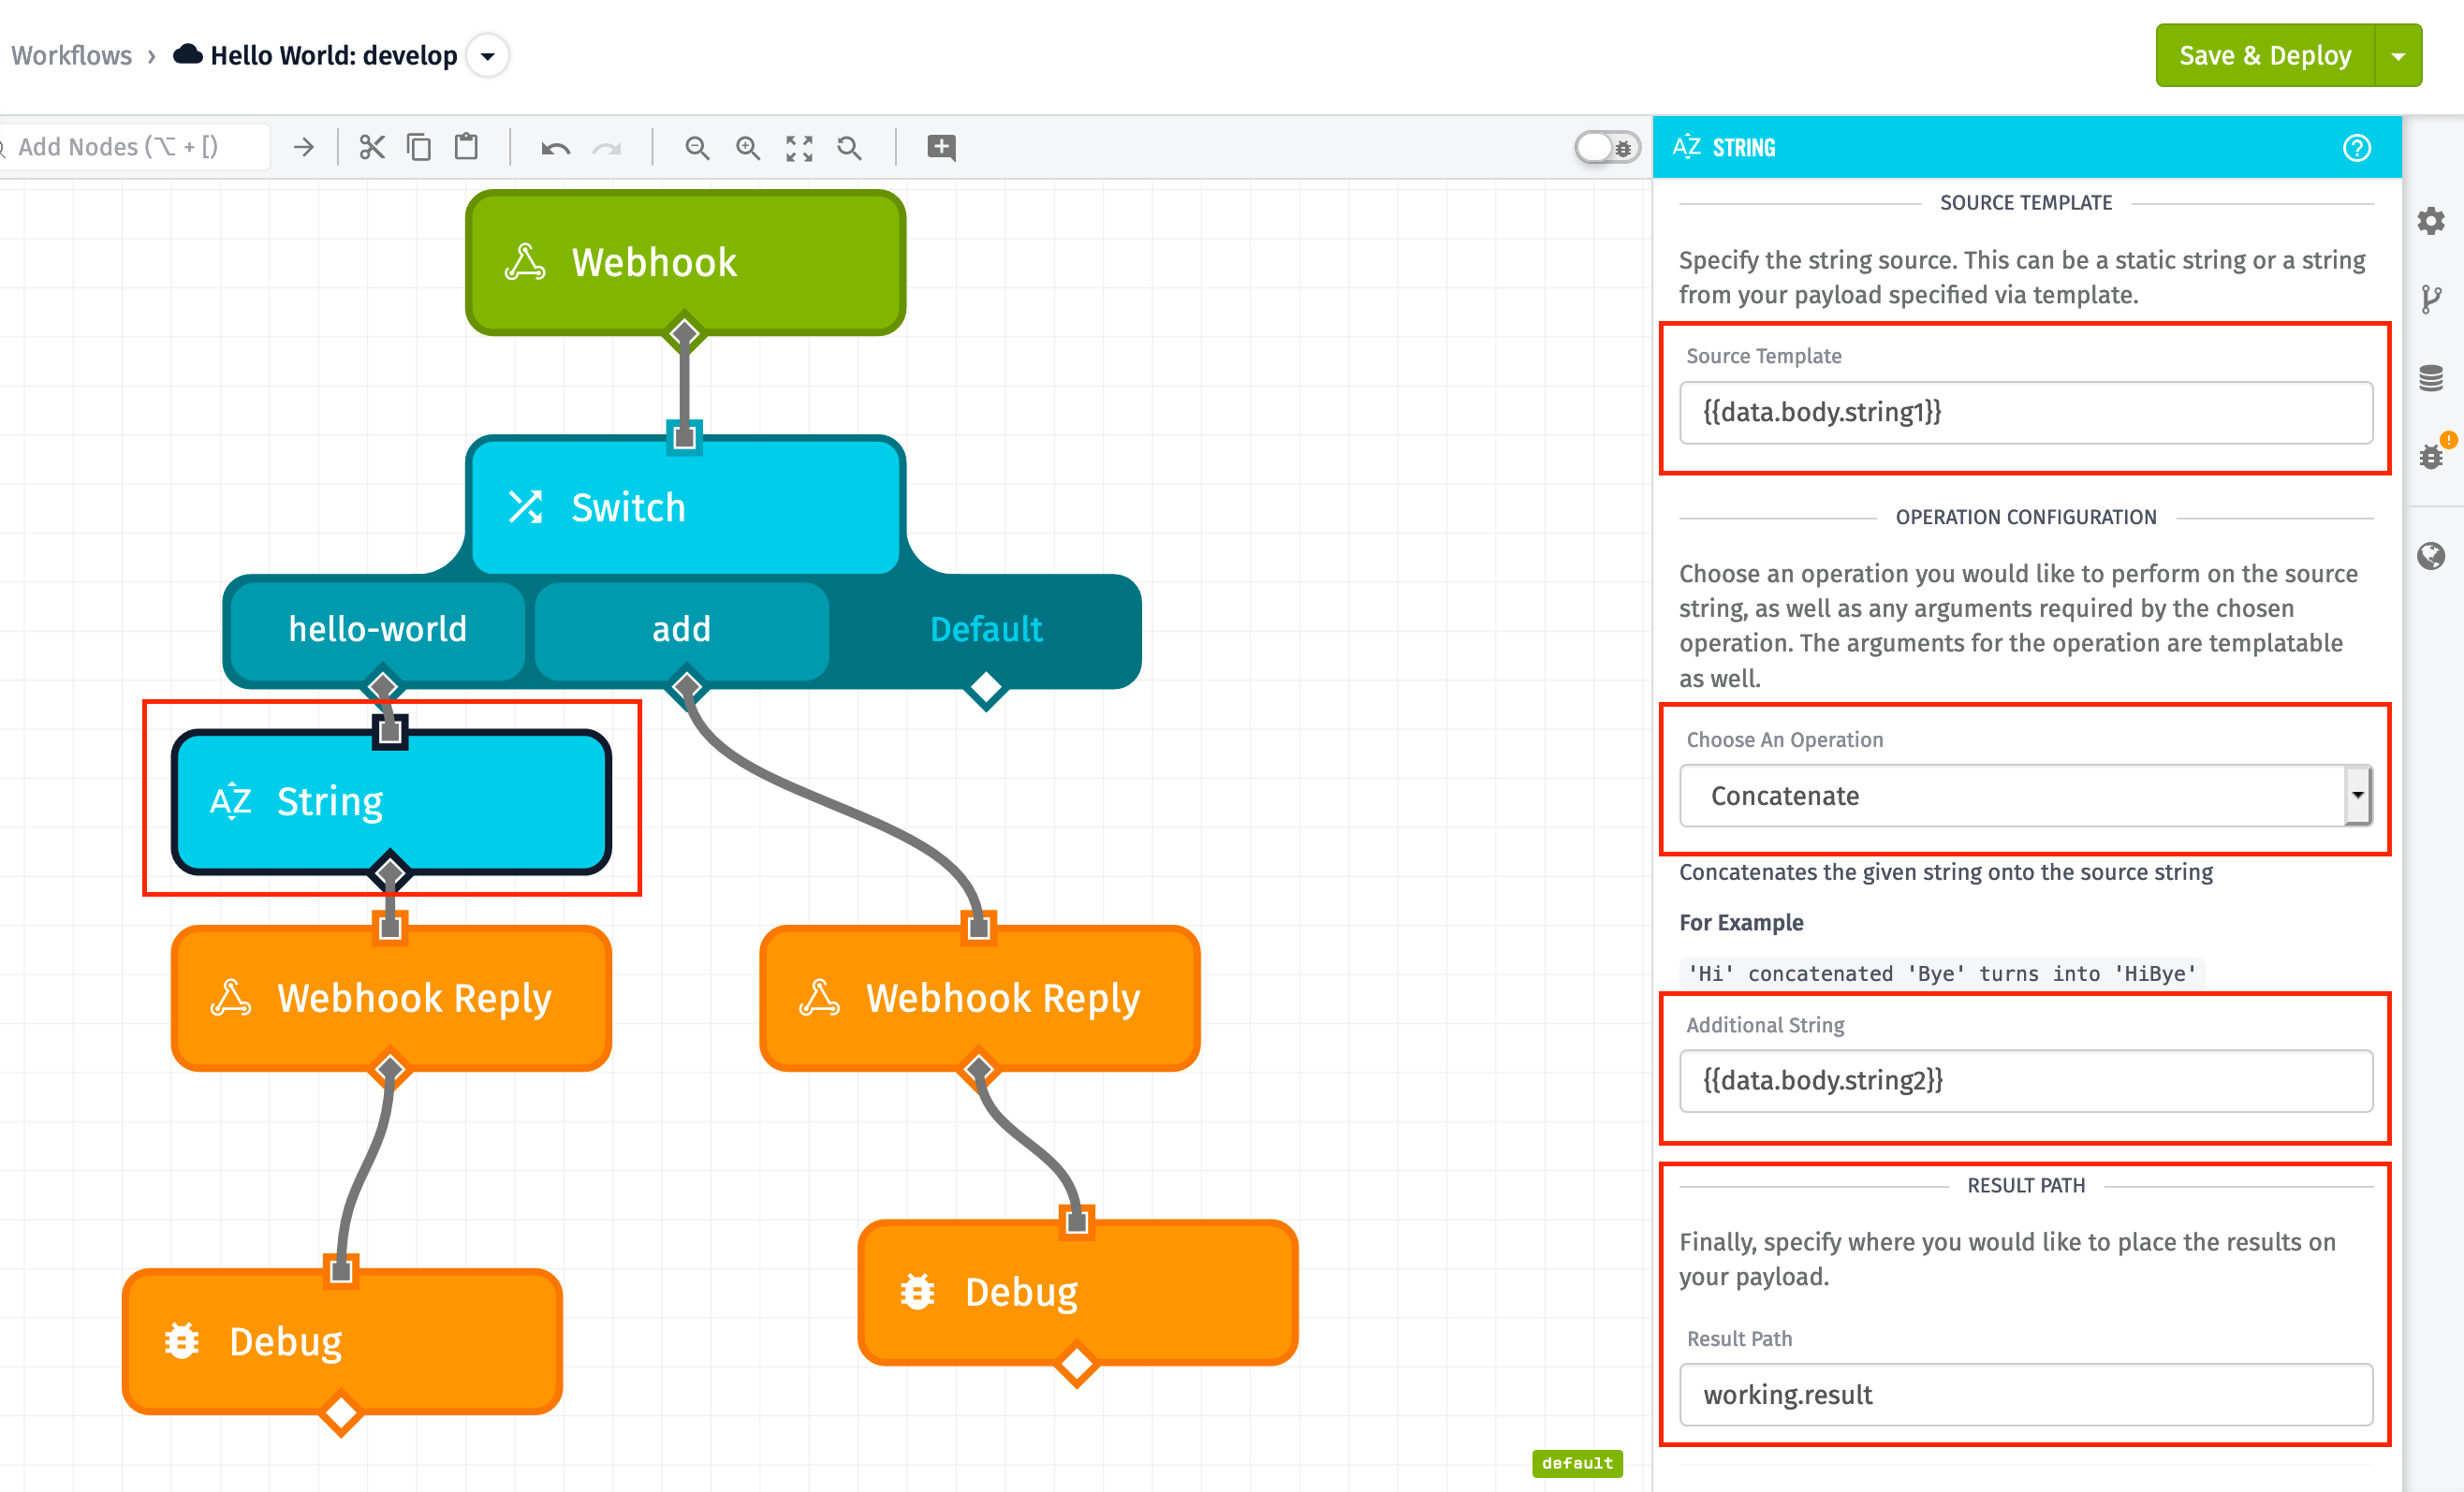
To solve this, let's use the String Node to concatenate string1 and string2:
Notice a couple of things:
- In our String Node configuration, we used
{{data.body.string1}}and{{data.body.string2}}to use the Lab input. - We placed the result of the operation at
working.result.
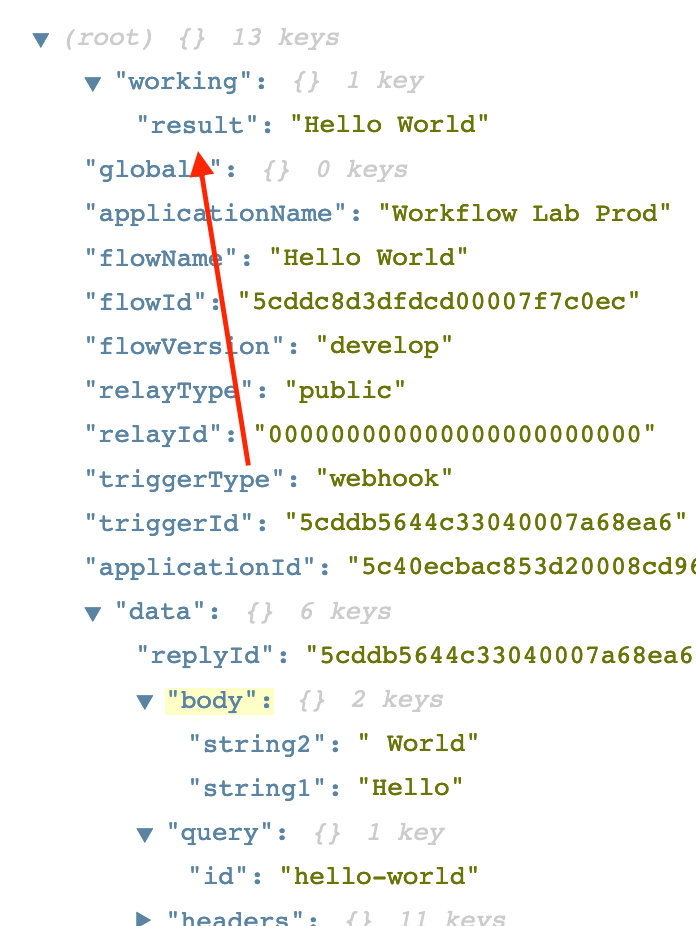
If you rerun the test, you should see working.result with our answer:
The Webhook Reply Node is how we return our results back to the Lab as output:
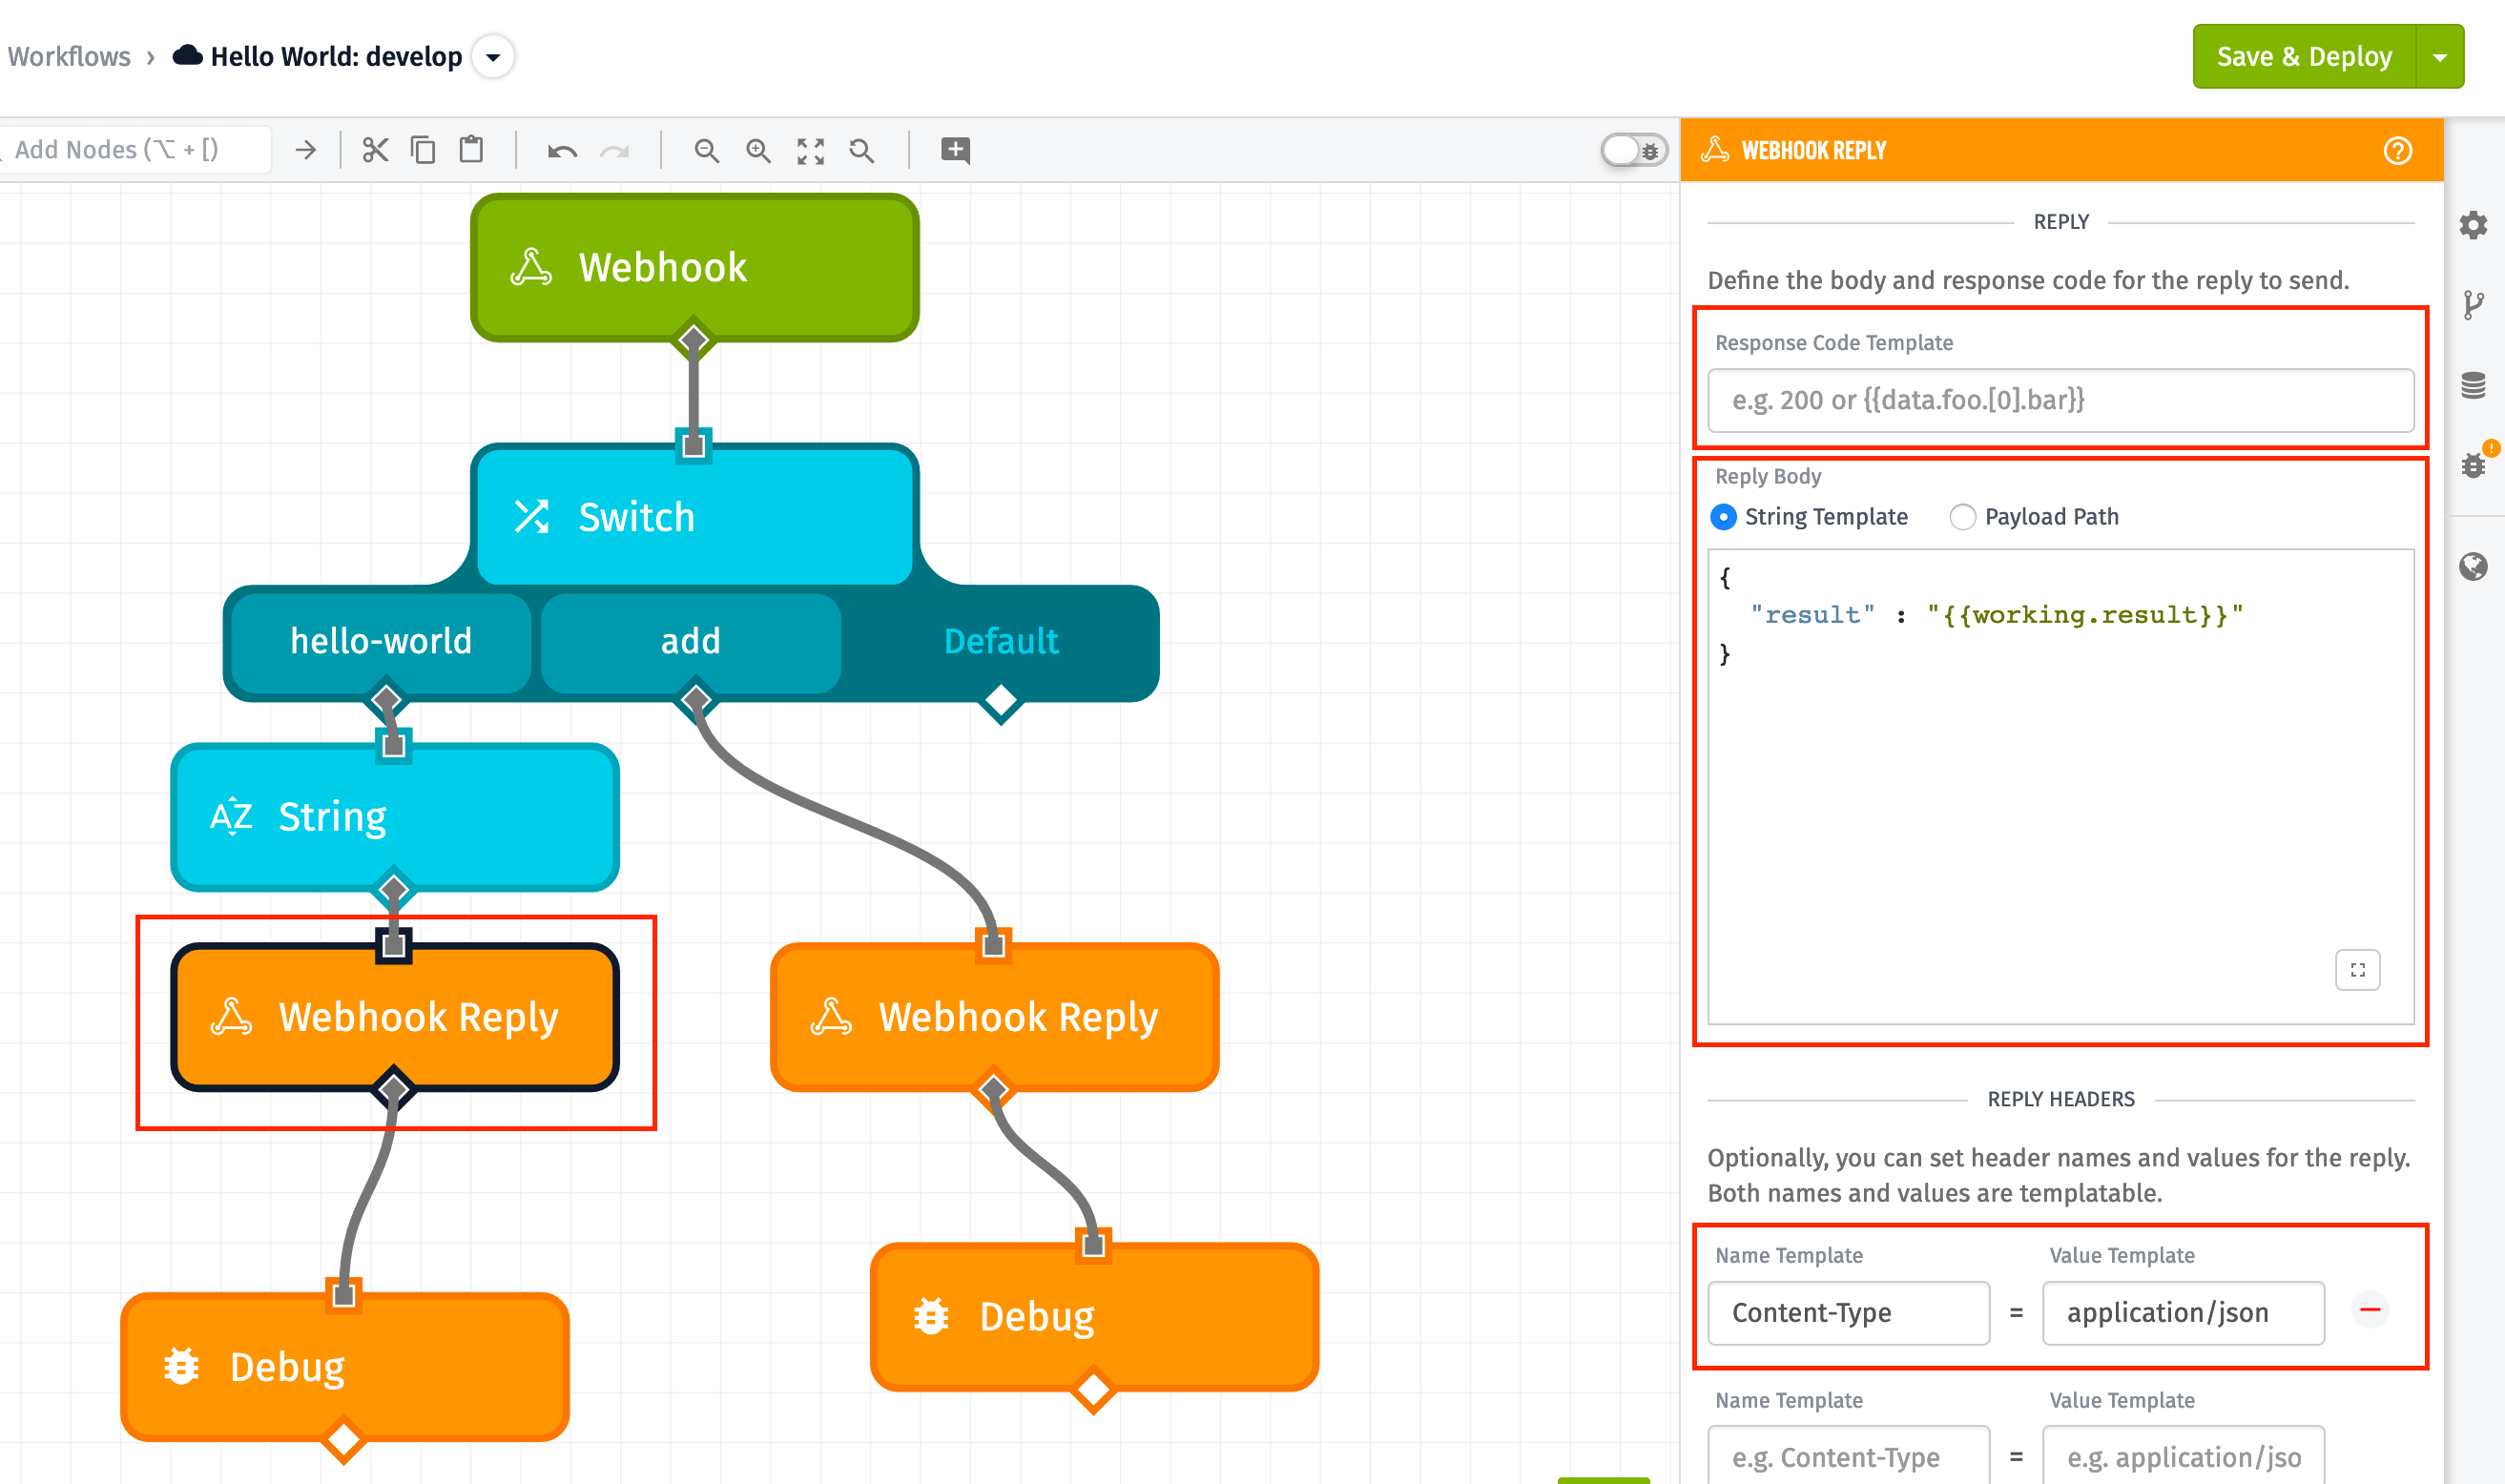
Notice a couple of things:
- In this node, you can configure the Response Code. This is important for some tests in the Lab.
- We are building the result object in the body of the response:
{
  "result" : "{{working.result}}"
}
Since we placed the result at working.result, this body should return the Lab its expected output.
- We are setting the
Content-Typeof the request to beapplication/json. This is how the Lab knows to interpret your result as JSON (no other format is accepted).
If all went well, your test should pass:
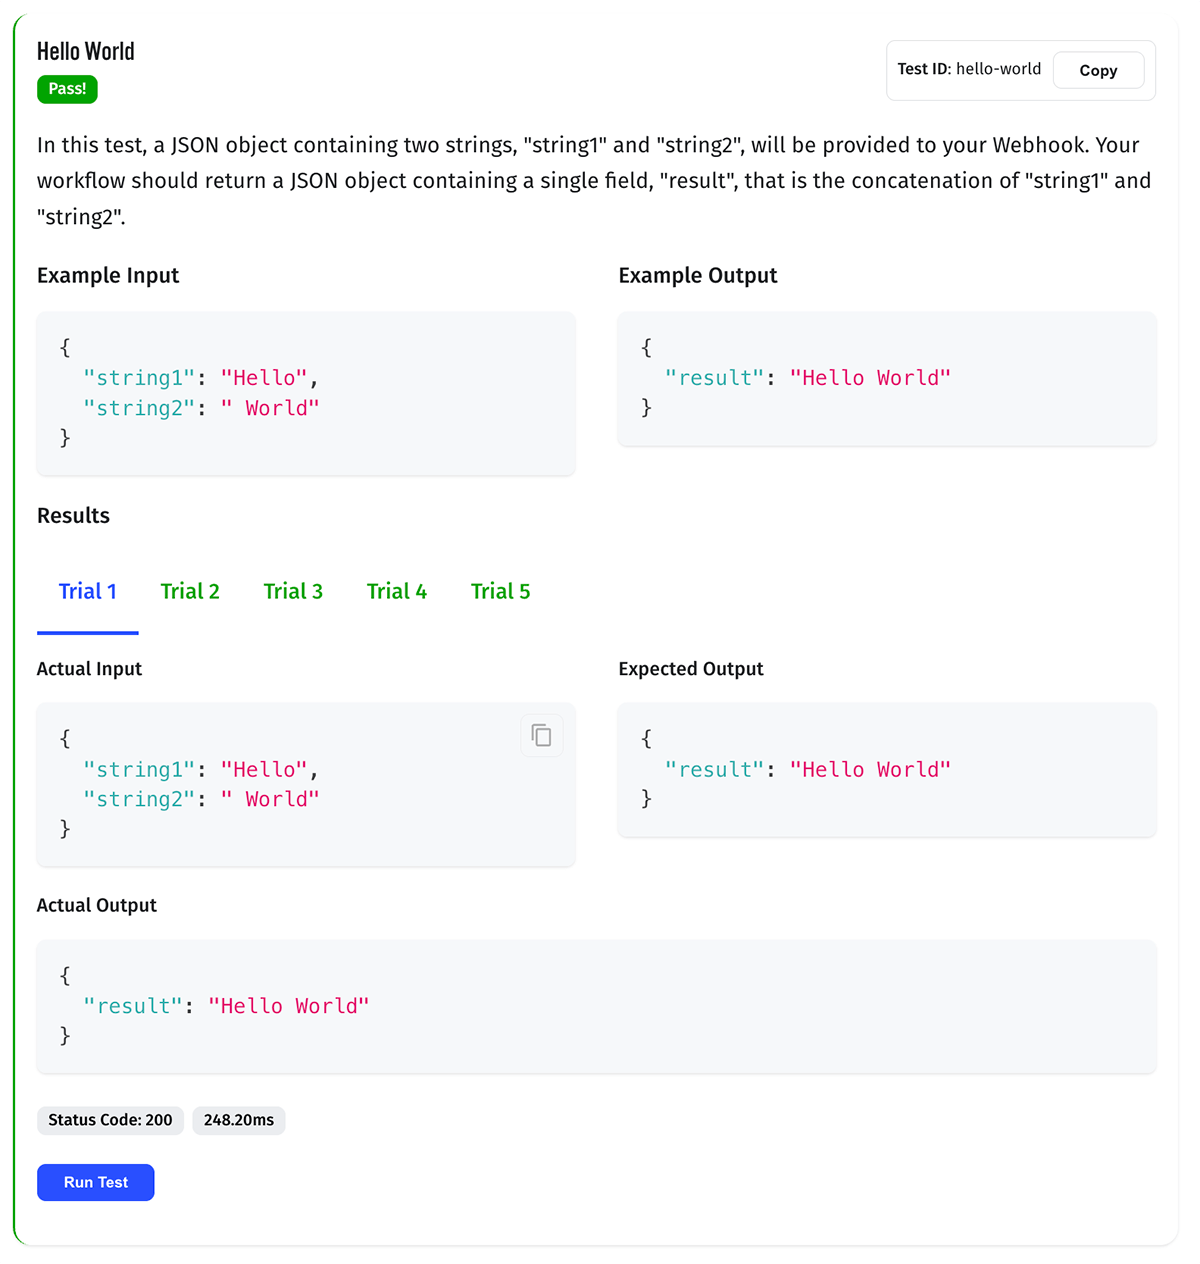
Notice the test trials: you can see the expected input/output and received output for each trial. In this case, it's all the same. But, in the Lab, each of these will be different.
Congratulations! You have successfully completed the Workflow Lab Hello World test. You are now fully equipped for your mission to complete the Losant Workflow Lab.
Next Step: Complete the second Hello World Suite test.
Troubleshooting
In case you have trouble completing a test in the Workflow Lab, solutions to each test are available on GitHub. If the test solutions do not address your concern, feel free to post a question in the Workflow Lab section of the Losant Forums. If your Actual Output for a test looks unfamiliar, be sure to check that you are using the correct webhook and Test Workflow.
Was this page helpful?
Still looking for help? You can also search the Losant Forums or submit your question there.