Experience Endpoints
An Experience Endpoint is a combination of an HTTP method and a route that, when invoked by an HTTP request, can fire an Experience Workflow or directly respond with an Experience Page. Fired workflows can also generate and issue a response to the request.
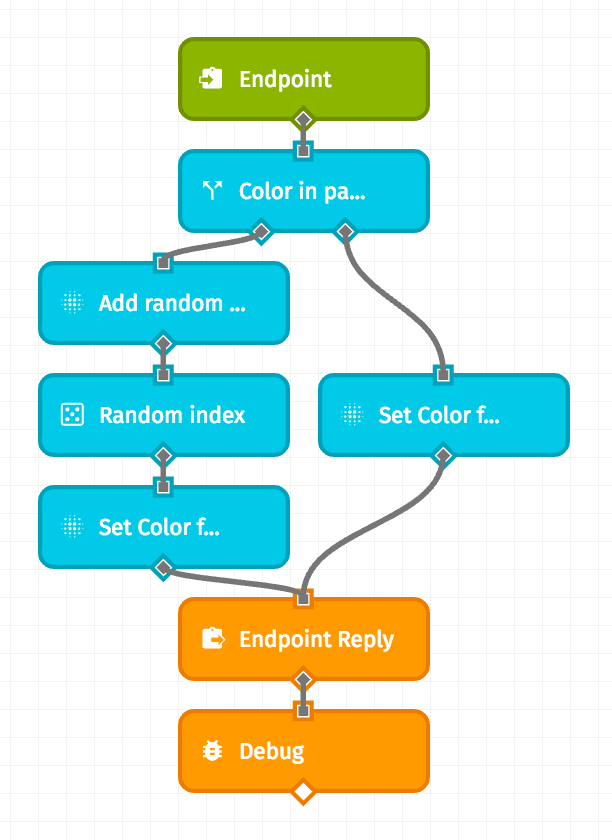
Every endpoint can be powered by a Losant Experience Workflow built by you. The workflow is initiated by an Endpoint Trigger configured to match your endpoint's method and route. From there, you can use any nodes within the workflow editor to parse your user's request, issue a response using an Endpoint Reply Node, and take auxiliary actions (such as sending data to a third party or issuing alerts via email or SMS).
Viewing Experience Endpoints
Endpoints are versioned resources, so you must first choose one of your Experience Versions. (You may reach your application's "develop" version by clicking the "Edit" link in the sub-navigation.) After doing so, a list of your Experience Endpoints is accessible in two places:
- In the left column tree view is a list of the selected version's endpoints. This list is both filterable and sortable using the tools at the top of the column. Please note that if you have more than five endpoints, only the first five (based on the selected sort criteria) will be displayed in this column.
- By clicking the "Endpoints" directory within the tree view (or "View All" if you have more than five endpoints), you may also view a table of all the version's endpoints.

Select an endpoint in the left column or within the table to view its configuration, make edits, or view workflows and pages associated with the endpoint.
Adding an Experience Endpoint
If you are viewing the "develop" version of your application experience, there are three ways you can add a new experience endpoint:
- From the version's overview page, click "Create Endpoint" at the top of the page
- From the full "Endpoints" list, click the "Add" button in the top right corner of the table
- From anywhere within the experience version, click the "+" icon alongside "Endpoints" in the tree view
Endpoint Wizard
After clicking “Create Endpoint” at the top of the page, you will be presented with the Endpoint wizard.
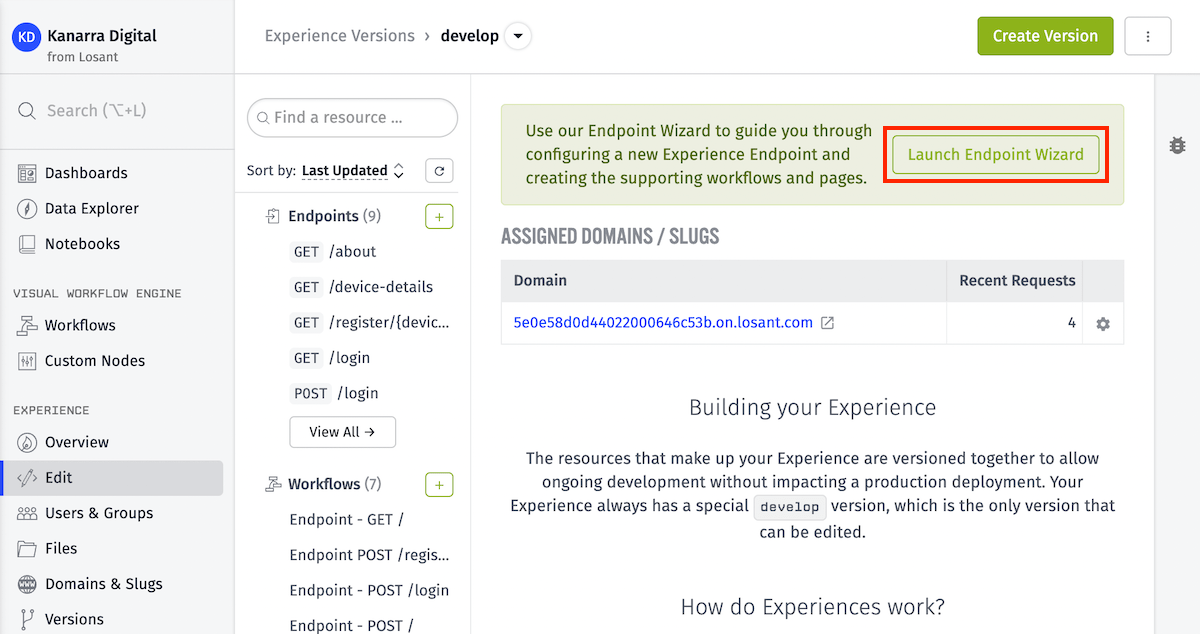
This will display a wizard that allows you to create and configure your new endpoint - its method and route, authorization requirements, as well as any new pages or workflows necessary to utilize it - based on how you wish to utilize the endpoint.
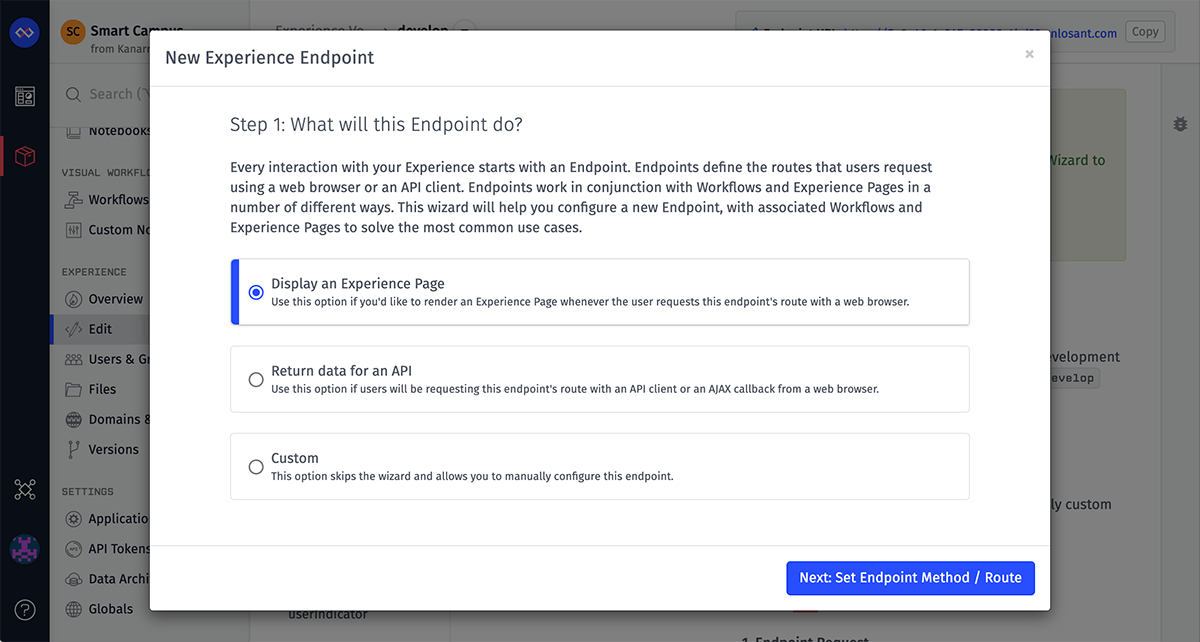
The wizard begins by asking you what sort of endpoint you would like to create:
- Display an Experience Page: The endpoint's purpose is to display an Experience Page
- Return data for an API: The endpoint will be used only to receive and/or return raw data
- Custom: Skip the wizard and configure the endpoint from scratch
Endpoint Configuration
If you skip the endpoint wizard, or if you return to an endpoint later to edit it, you'll be taken to a form where all the endpoint's properties can be defined. Configuring an endpoint takes a few required fields, each of which has its own unique properties.
Method
This is the HTTP method the request should match. It is possible to have one route handle multiple HTTP methods, but each method must be configured as a separate endpoint. Currently, we support these methods:
- GET requests are typically used for retrieving existing resources. A GET request should be repeatable without changing the state of your application and should return the same response body across requests, assuming the underlying data does not change between requests.
- POST requests allow for a payload to be sent with the request body. Though POST requests are typically used for creating new resources, they can also be used for complex data queries that require more configuration than can be conveyed in route parameters.
- PUT requests also allow for a payload body; these requests are typically used to overwrite an existing resource.
- PATCH requests also allow for a payload body; these requests are typically used to merge changes into an existing resource.
- DELETE requests should only be used to delete resources from your application.
- OPTIONS requests are typically sent by web browsers prior to making a cross-origin request. If you are allowing access from any origin through the experience version configuration, it should not be necessary to set up any OPTIONS endpoints. However, you may still create your own OPTIONS routes, and any requests matching those routes will override the default settings handled by Losant.

Route
The route is the URL path, or the part after your Experience's domain. If your Experience's domain is https://my-custom-slug.onlosant.com, the route is the part that comes after the .com. It always starts with a slash / and may contain a series of static and parameter segments separated by more slashes.
There are a number of rules to consider when building your routes:
- A single route may only be used once per method. However, a route of
/my-routecan be set up with a GET method for one endpoint and a POST method for another endpoint, and both are valid. - Routes are matched by order of specificity. The more specific a route, the earlier in the process it is checked when a request comes in. The first route that matches the path in the HTTP request will be invoked. Losant takes care of ordering the routes by specificity for you, based on the rules outlined here.
- Routes can contain string literals, path parameters and optional parameters. For example, given the route
/devices/{deviceId}/{attribute?}...devicesis a string literal, which is a static route parameter. String literals always take priority over the other parts of a route, meaning/users/dannywill match before/users/{name}if "danny" is included in thenamespot.{deviceId}is a required path parameter. If a request is made to/devices/without a{deviceId}after the trailing slash, the request will fail (unless you have also specified a/devicesroute matching that method).{attribute?}is an optional path parameter; a request to/devices/123and/devices/123/tempwill both succeed and will both invoke the same endpoint, but the latter will include{"attribute": "temp"}as part of the payload passed to your workflow.
- Routes must not conflict with each other. The most common example of routes conflicting is with the use of path parameters at the same priority level; for example, a route of
/{deviceId}and/{userId}will conflict because, behind the scenes, the router does not know if the value in that part of the path is a device ID or a user ID. For this reason, it is a good idea to start your routes with a descriptive string literal, such as/devices/{deviceId}and/users/{userId}. If you attempt to create a route that conflicts with another route, you will be alerted of the error. - Routes can contain wildcards. Wildcards must be used with care, as they will match any path that comes after the
*A typical use case for a wildcard is if you want to handle your own CORS requests by issuing a custom reply to allOPTIONSmethod requests. In that case, you would configure a route of/{var*}, wherevaris available on the payload with the value of whatever the user entered after the first slash (/) in their custom Experience Domain.
Access Control
Endpoint access – the ability of a specific user to invoke an endpoint with an HTTP request – can be configured a few different ways ...
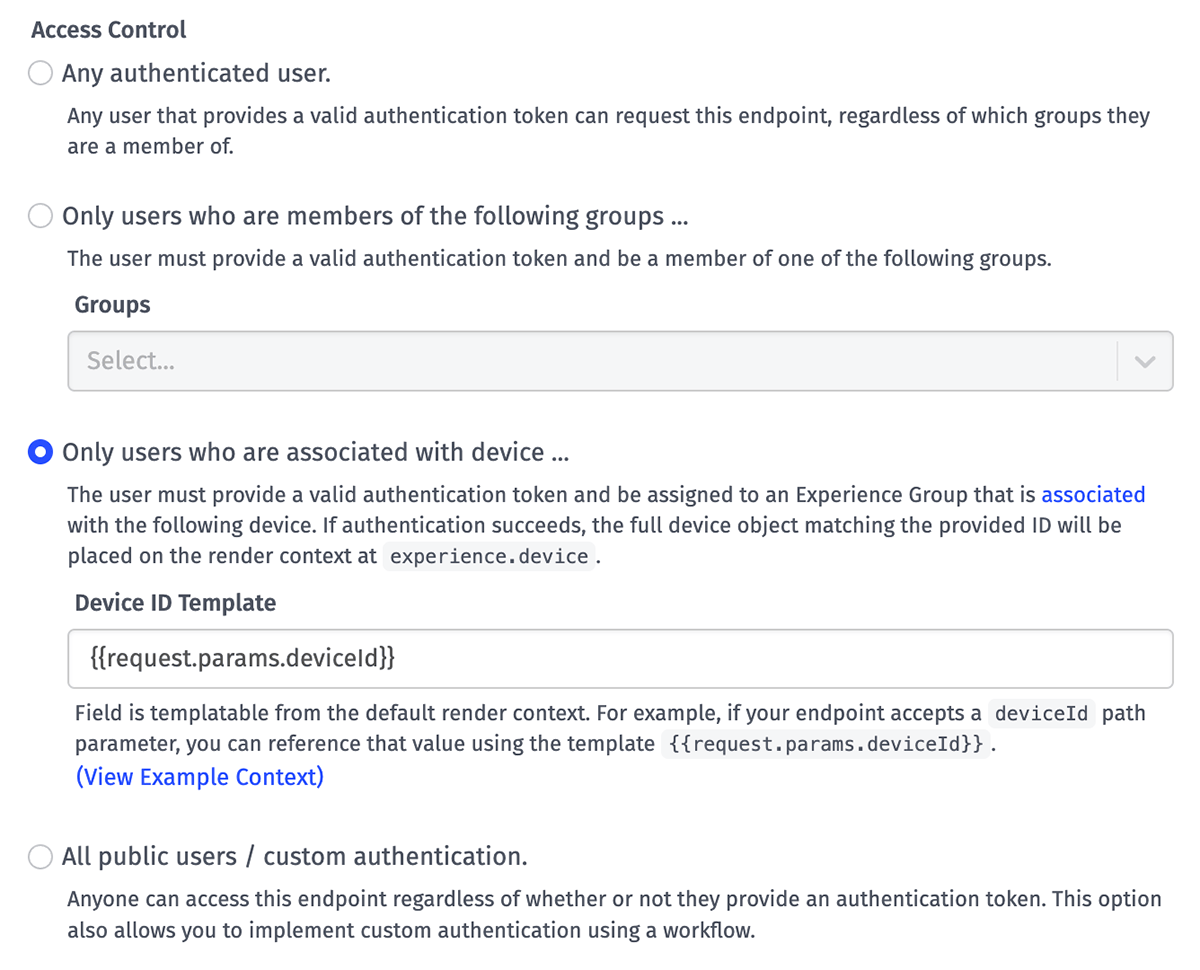
- Any authenticated user endpoints can be invoked by any of your Experience Users when they are signed in. Their authentication token must be included in the request.
- Only users who are members of the following groups ... limits access to signed-in users who are a member of any one of the specified Experience Groups or its ancestors (parents). This is useful for building routes that have special privileges - such as resource editing permissions or Experience administration - that you do not want to provide to your normal population of users.
- When selected, you must provide at least one Group to check the user's membership against.
- The request is treated as unauthorized if the user is not authenticated, or if the user making the request is not a member of one of the provided groups or its ancestors.
- Only users who are associated with device ... allows for authorizing endpoint access based on whether the user making the request is associated with a device.
- When selected, you must provide a Device ID Template that should resolve to a device ID. In almost all cases, the device ID is provided through a path parameter or a query parameter in the user's request. For example, given an endpoint with a route of
/devices/{deviceId}, device association to the user making the request can be checked by providing a Device ID Template of{{request.params.deviceId}}. - When authorization succeeds, the device object for the provided ID is placed on the Endpoint Trigger payload, and the static reply render context, at the path of
experience.device. - The request is treated as unauthorized if the user is not authenticated; if the Device ID Template does not render to a valid ID; or if the user is not associated with the resolved device ID.
- When selected, you must provide a Device ID Template that should resolve to a device ID. In almost all cases, the device ID is provided through a path parameter or a query parameter in the user's request. For example, given an endpoint with a route of
- All public users / custom authentication means that anybody - regardless of whether they have an Experience User account within your application or if they are currently signed in to their account - can access the endpoint. Public endpoints can be used to allow the retrieval of nonsensitive data; they are also essential to allowing users to sign in to your Experience, as the authentication endpoint must be available to non-signed-in users. Developers should also select this option if they are implementing custom endpoint authorization outside of the access control tools provided by Losant.
Reply Types
Endpoints can be configured to handle requests one of several different ways, and the behavior can be defined differently for users who are authorized to make the request versus those who are not.
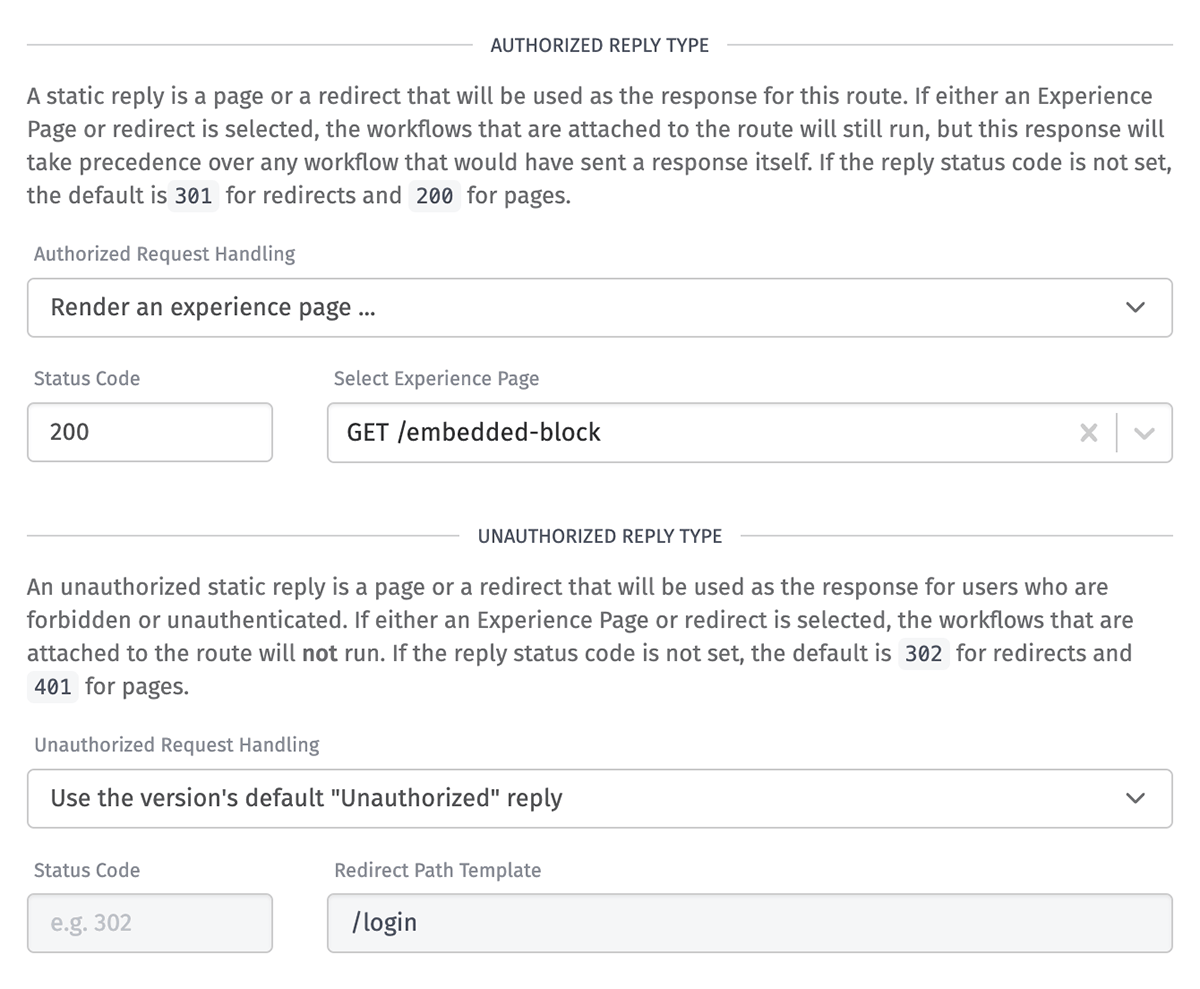
Authorized Reply Types
There are three options for handling requests to authenticated endpoints made by authorized users - or, similarly, for public endpoint requests made by any user ...
- Redirect the user to a URL ...: Requests to the endpoint are re-routed as GET requests to a different path. When selected, you must provide ...
- Status Code: This must be a valid HTTP redirection status code (a number between 300 and 399, inclusive). If not provided, the default is
301(Moved Permanently). - Redirect Path Template: This must be a URL (most commonly a relative path such as
/home) for where to send the unauthorized user. This field supports string templates that resolve against the static reply render context.
- Status Code: This must be a valid HTTP redirection status code (a number between 300 and 399, inclusive). If not provided, the default is
- Render an experience page ...: Choose one of your Experience Pages to render - such as, for example, a public-facing "Terms of Service" page.
- Status Code: This must be a valid HTTP status code. If not provided, the default is
200(OK). - Select Experience Page: Choose the Experience Page to render for the user. This field is required.
- Status Code: This must be a valid HTTP status code. If not provided, the default is
- Use an Endpoint Reply Node in a workflow to reply: When selected, the request will remain open until a workflow execution invokes an Endpoint Reply Node in response to a unique Endpoint Trigger payload generated for the request.
Note: Workflows with Endpoint Triggers pointing to this endpoint will still run anytime an authorized request hits the endpoint, regardless of the selected reply type. If any of those workflows respond with an Endpoint Reply Node, the static reply takes priority over the workflow response.
Static Reply Render Context
The following is an example of the context data that you can access in your redirect template or experience page. It is slightly different than the payload passed when rendering in a workflow.
{
  application: {
    id, // ID of the application
    name // name of the application
  },
  experience: {
    authInfo: { // information on the user's auth token, if applicable
      expiresAt, // date object for when the auth token expires
      extraData, // additional data encoded in the auth token, if applicable
      issuedAt // date object for when the auth token was issued
    },
    device: { ... }, // object containing info on the device matching the request's device authorization, if applicable
    endpoint: { ... }, // object containing info on the endpoint config
    user: { ... }, // object containing info on the user who made the request, if applicable
    version // name of the experience version for this request
  },
  globals: { ... }, // key/value mapping of any global variables from the application / version
  request: {
    cookies: { ... }, // key/value mapping of cookie names as keys and their values
    headers: { ... }, // key/value mapping of header names as keys and their values
    method, // request method (e.g. get, put, post, patch, delete, options)
    params: { ... }, // key/value mapping of endpoint path params as keys and their values
    path, // the actual request path
    query: { ... } // key/value mapping of query params included in the request as keys and their values
  }
  time // date object for the time of the request
}
Unauthorized Reply Types
For requests to authenticated endpoints made by unauthorized users, the options are similar to Authorized Reply Types ...
- Redirect the user to a URL ...: This behavior is the same as described above, however the default status code is
302(Found). - Render an experience page ...: This is also similar, however the default status code is
401(Unauthorized) for unauthenticated users and403(Forbidden) for users who lack the required group membership to access the endpoint. - Use the version's default "Unauthorized" reply: Since requests to authenticated endpoints by unauthorized users do not invoke Endpoint Triggers targeting that endpoint, selecting this option instead allows the request to fall through to the experience version's default Unauthorized Reply behavior.
Other Properties
There are a couple additional properties to set on each endpoint:

- Enabled: Whether this endpoint should accept HTTP requests and issue responses. If the endpoint is not enabled, Losant will skip this entry and will match against the next-best matching route, if applicable.
- Description: A simple description of the endpoint. This is for internal use only; it will never be visible to Experience Users.
- Tags: Tags are optional key/value pairs where extra meta information about the endpoint can be stored. These tags will be accessible in the payload of workflows triggered by the endpoint.
404 Routes
If a user makes a request to your Experience Domain or Slug, and that request does not match the configuration of any route, the response will fall back to the experience version's default Not Found Reply behavior.
To instead reply with a custom 404 response for certain scenarios, you may employ wildcards, which serve as a non-specific "catch-all" route that will match any request of the same method, but will only do so after attempting to match all other routes of the same method.
For example, if you are serving both a JSON API and a traditional HTML web application out of the same experience, and all of your API routes are prefixed with /api, you would not want to return the default 404 HTML page configured in your version settings for requests against the API that failed to resolve. By creating a GET /api/{*any} route, you could catch unresolved API GET requests and provide a JSON response through a workflow.
Usage
From an endpoint's detail page, it is possible to view requests to the endpoint broken down by hour or by day, as well as aggregations of responses by status code.
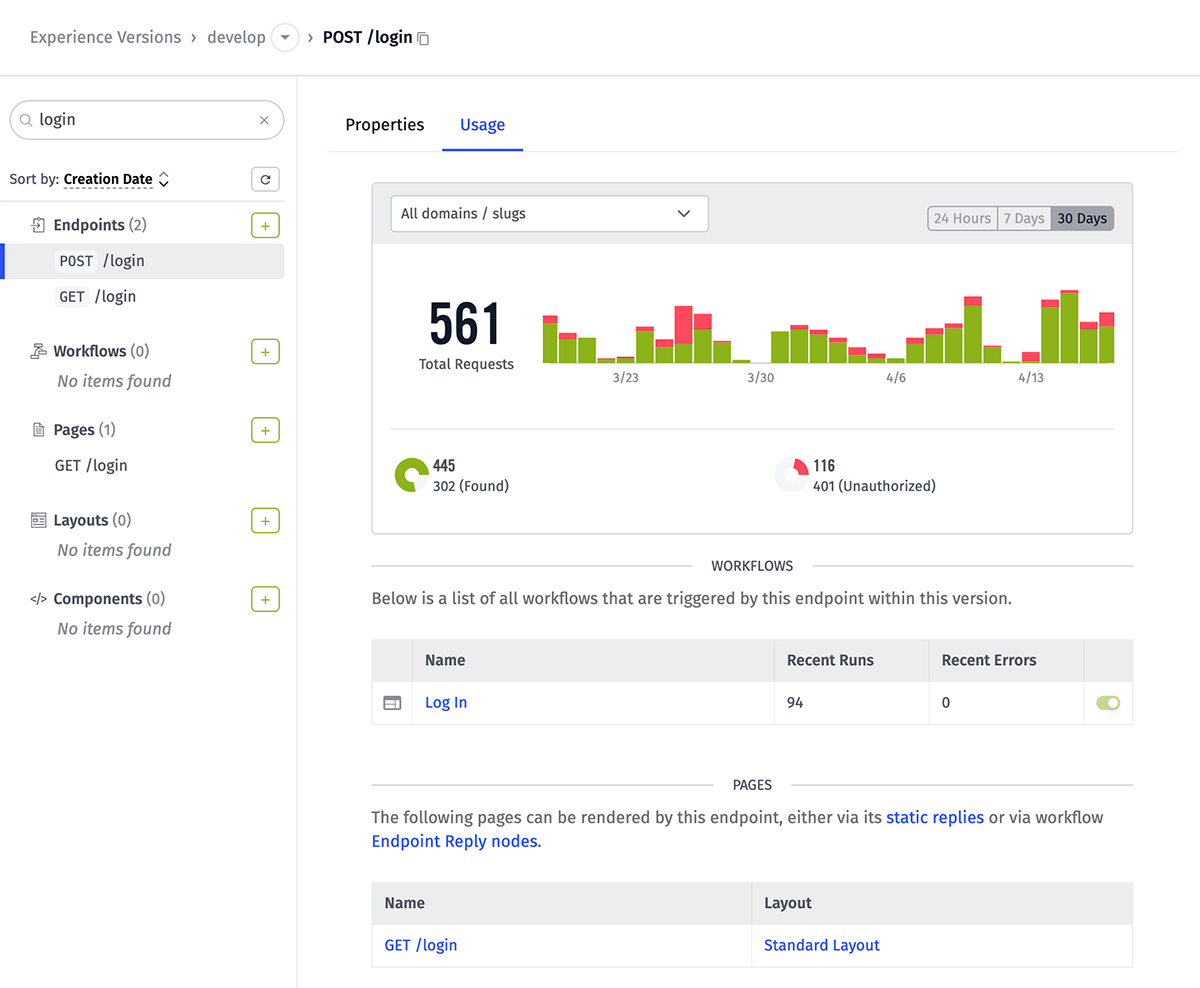
The page also includes lists of resources that are related to the endpoint:
- Workflows that are triggered by requests to this endpoint via an Endpoint Trigger.
- Pages that could potentially be returned by requests to this endpoint. This includes:
- Static replies, either of the authorized or unauthorized type.
- Endpoint Reply Nodes that respond to the request with a specific Page (those referenced by a payload value are not included here).
Making Endpoint Requests
Using your endpoints is as simple as issuing HTTP requests. When a request is sent to your Experience Domain or Slug ...
- Losant looks up the experience version that is tied to the request.
- The request is compared against all endpoints within the experience version and resolves to the first match only.
- Given the authorization token included in the request, Losant determines if the user making the request has access to the endpoint.
If the user has access ...
- If the endpoint has an authorized static reply configured, that static reply will be issued immediately.
- Any workflows matching the version will fire any Endpoint Trigger that match the HTTP method and route.
- If a static reply was not configured for the endpoint, the first Endpoint Reply Node that fired from the workflows will reply to the request. All subsequent replies are ignored.
- If no static reply exists, and no workflows fire an Endpoint Reply Node, the request will fail with a generic error.
If the user does not have access ...
- The endpoint will issue its unauthorized static reply if one has been configured - otherwise, a standard "Unauthorized" response will be issued. In either case, no workflows will fire as a result of the request.
Passing Authorization Tokens
Once you retrieve an authorization token for an Experience User, that token can be appended to any subsequent HTTP requests that require authorization one of three different ways:
- A query parameter added to the URL (e.g.
https://my-custom-slug.onlosant.com/my-user?authorization=[my-token]) - An Authorization HTTP header with the value
Bearer [my-token] - A Cookie HTTP header in the format of
authorization=[my-token](you can set a cookie in the user's browser when they authenticate)
Testing Endpoints
One of the more popular tools for issuing HTTP requests is curl. If you are familiar with curl, chances are you already know how to build requests and test your endpoints.
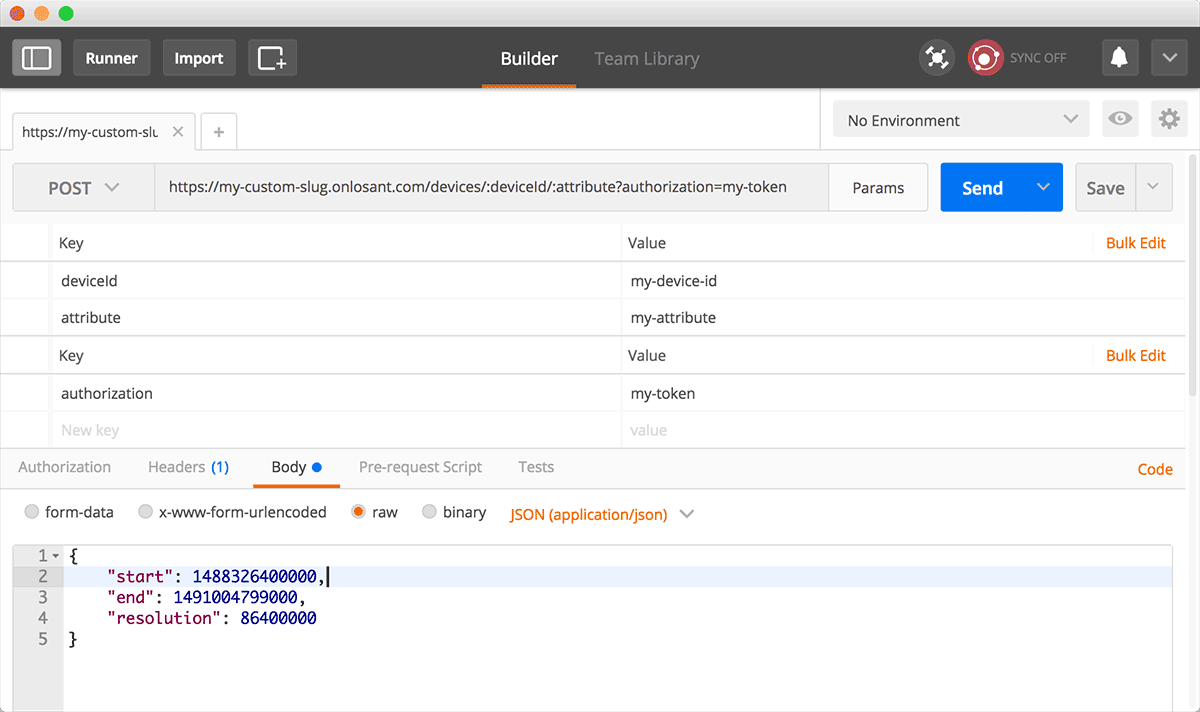
If a command line interface isn't your thing, one of the better (and free) HTTP request builders is Postman. The application includes a GUI for building requests for any HTTP method, sending payload bodies, setting route parameters, defining headers, and everything else you need to test your endpoints.
Experience Workflow Nodes
There are a number of nodes built specifically for working with your Experience Users. Using these nodes, you can ...
- Create, get, update or delete a user
- Check the authentication credentials of a user
- Generate a token for a user of your choosing (if, for example, you are building your own system of authentication)
- Verify a user is a member of an experience group
Endpoint Request Statistics
On the Experience Overview screen, you may view aggregated statistics about requests to your application's experience endpoints and response codes issued for those requests. Similar to workflow metrics, data is available for the last 24 hours; the last 7 days; and the last 30 days.
Request volume is broken down hourly (for the last 24 hours) or daily and categorized as either successful responses (2xx and 3xx response codes) or as failure responses (4xx and 5xx response codes). Data on specific response codes, aggregated across the entire selected time period, is also available.
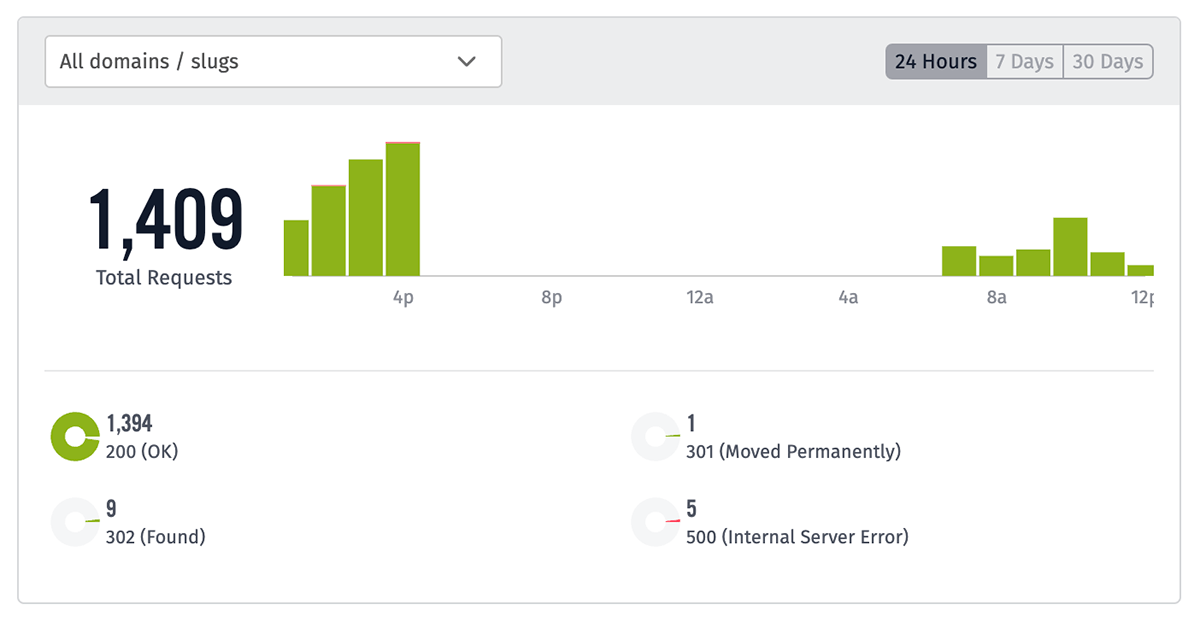
By default, data is provided for requests against all Experience Domains and Slugs, but you may filter the statistics to just a single domain at a time.
Endpoint request statistics are calculated approximately every 15 minutes; therefore, it may take up to 15 minutes for request activity to appear in the graphs.
Endpoint Request Throttling
Losant allows for up to 50 endpoint requests per second per experience version, with a burst of up to 500. Any throttled requests will immediately return a 429 Too Many Requests response to the requests that fall outside of the throttle limit.
Deleting Endpoints
An endpoint can be deleted by clicking the "Delete" icon next to any endpoint on the list page, or by clicking the "Delete" button in the footer of an endpoint's edit page.
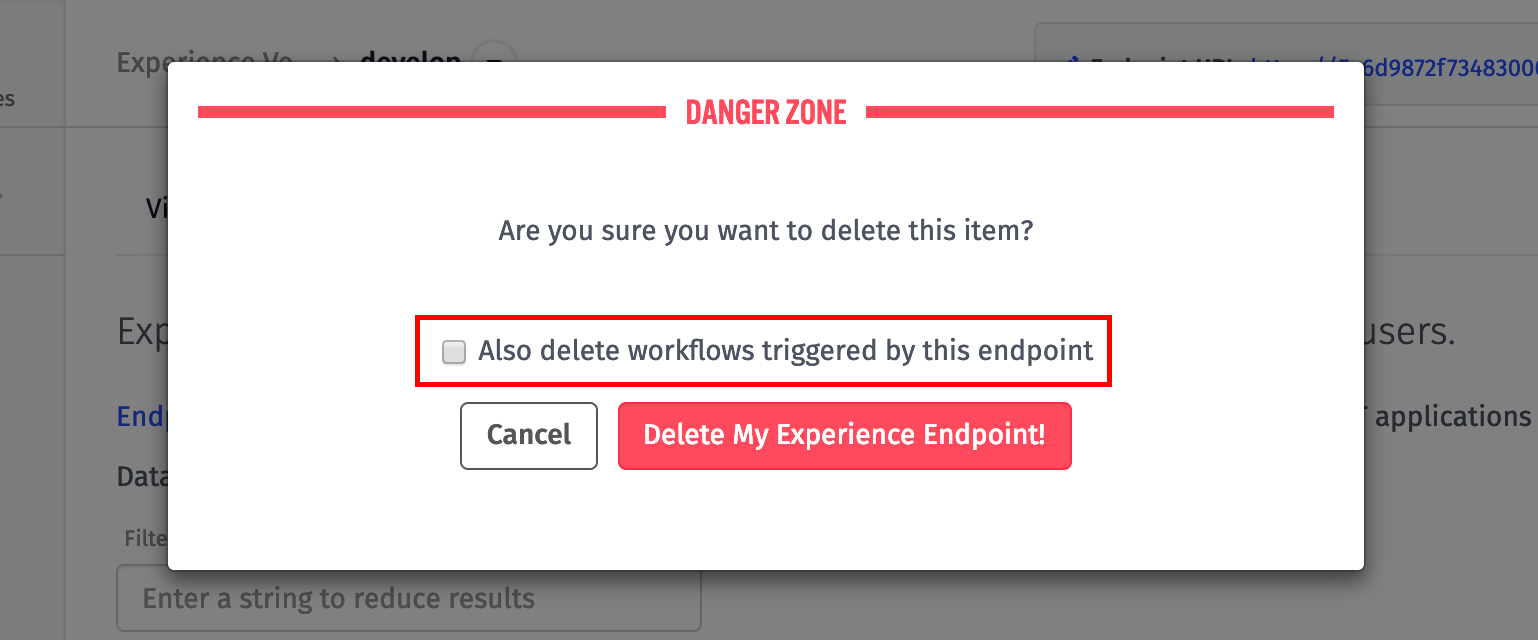
When deleting an endpoint, you also have the option of deleting any experience workflows triggered by that endpoint. Note that this action deletes any experience workflow with an Endpoint Trigger matching this endpoint. If you wish to save your workflows and change out their triggers, or if the workflows are triggered by multiple conditions and you wish to retain them, you should leave this option unchecked.
Was this page helpful?
Still looking for help? You can also search the Losant Forums or submit your question there.