How To Use Google BigQuery as Warm Storage With Losant
IoT devices generate a significant amount of data at scale, and where to store that data for the long term is a decision you will need to make soon after product launch. At Losant, we typically think about storage options as falling into one of three categories:
- Hot storage databases are optimized for performance, so data can be instantly queried and displayed on dashboards or custom user interfaces. This performance, though, comes at a cost. One way to manage that cost is to impose data retention limits, which means that data will only be available in the hot storage database for a certain amount of time.
- Warm storage (often referred to as data lakes or data warehouses) is optimized for scale and permanence. This means that these databases can store an infinite amount of data and typically provide some kind of generic query support to explore that data. These databases, however, are not optimized for IoT data and usually don’t offer the powerful aggregations required for time-series queries.
- Cold storage is optimized for cost. Data is usually saved in the form of static files — not in a database. For more information, check out this guide in our blog.
In this guide, we will set up a Google BigQuery dataset and table and then set up a Losant Workflow to send data to our Google BigQuery data warehouse.
Requirements
For this guide, you will nee a Google Cloud Platform (GCP) account.
Step One: Set Up Google Service Account
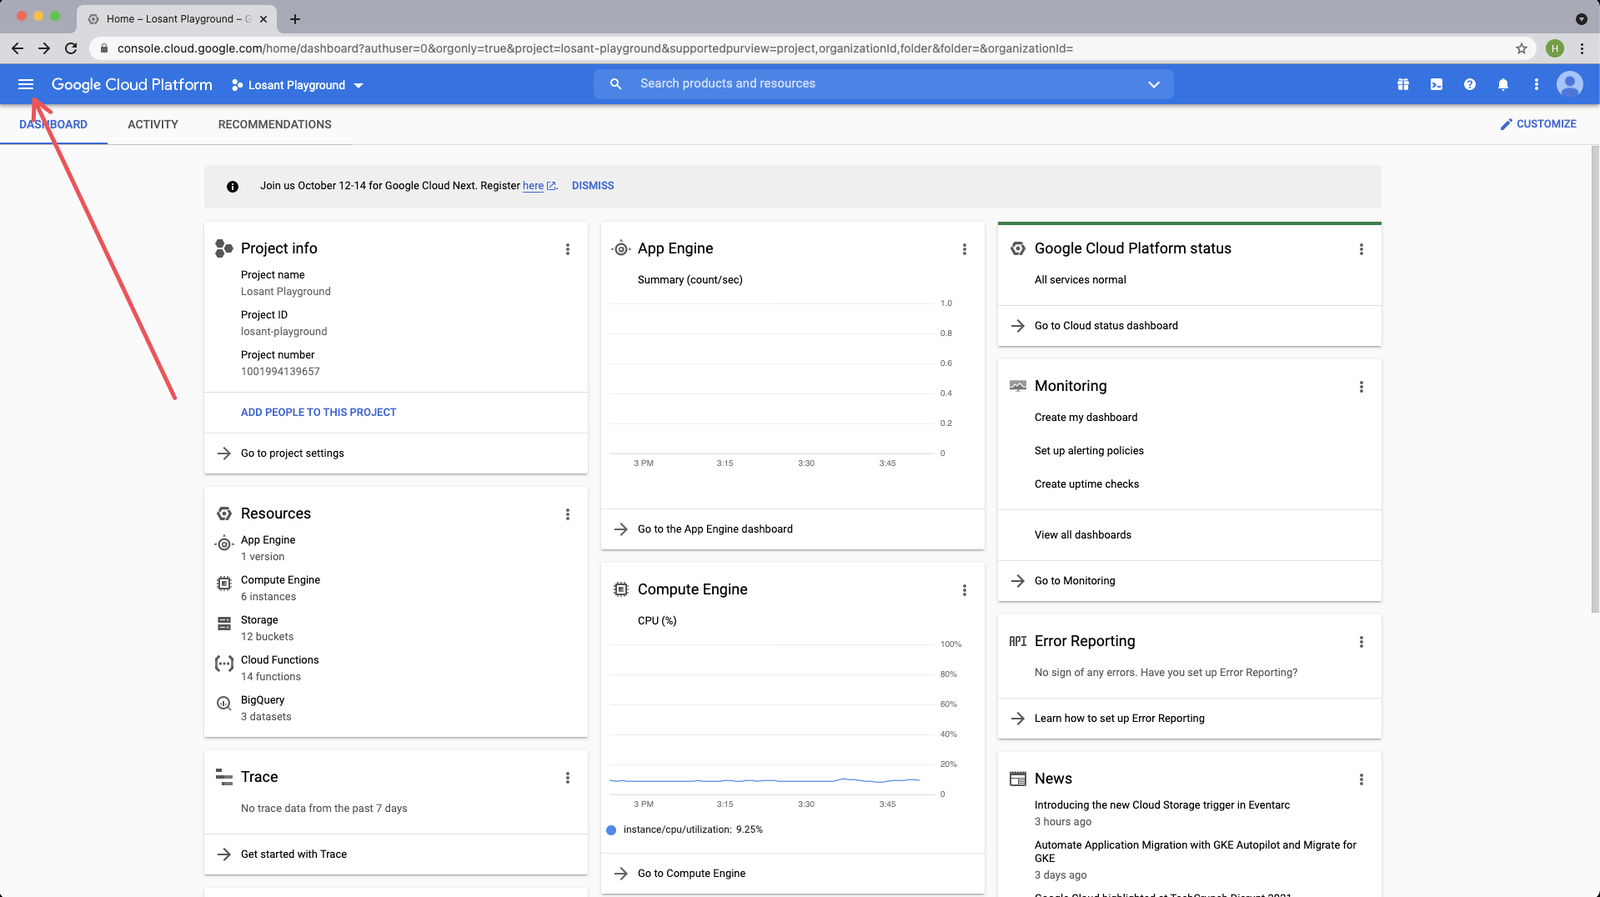
Once you have selected the project that you would like to work in, from the Google Cloud Platform (GCP) dashboard page, click the menu icon in the top left.
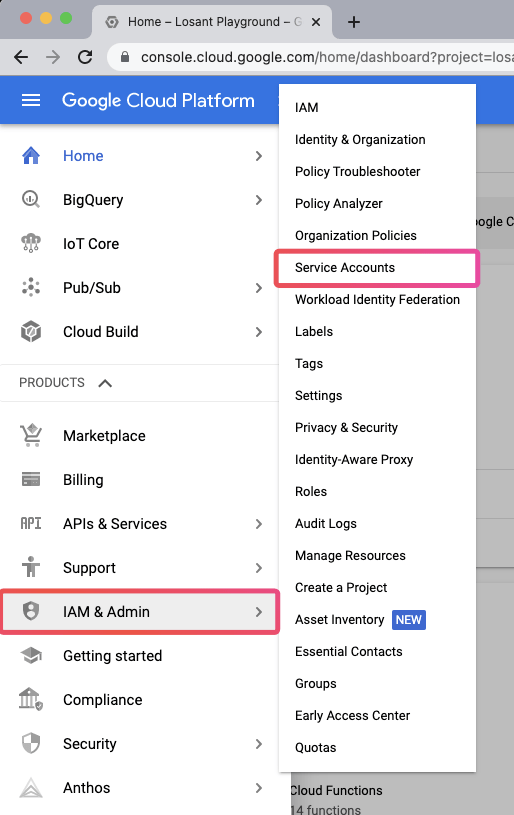
Then click “IAM & Admin” and then “Service Accounts”:
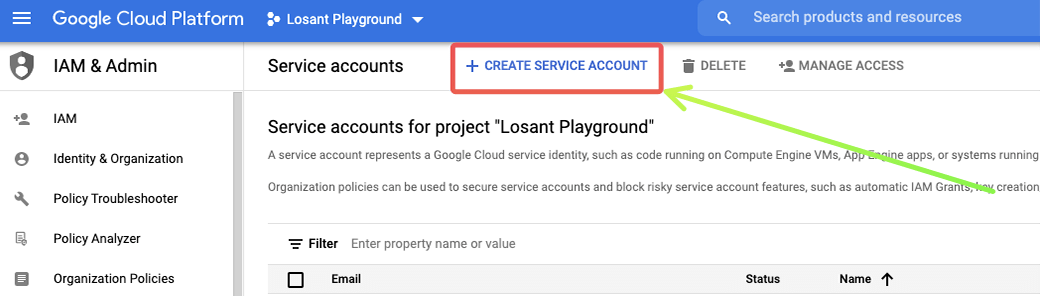
Then in the Service Accounts dashboard, in the top left, click “Create Service Account”.
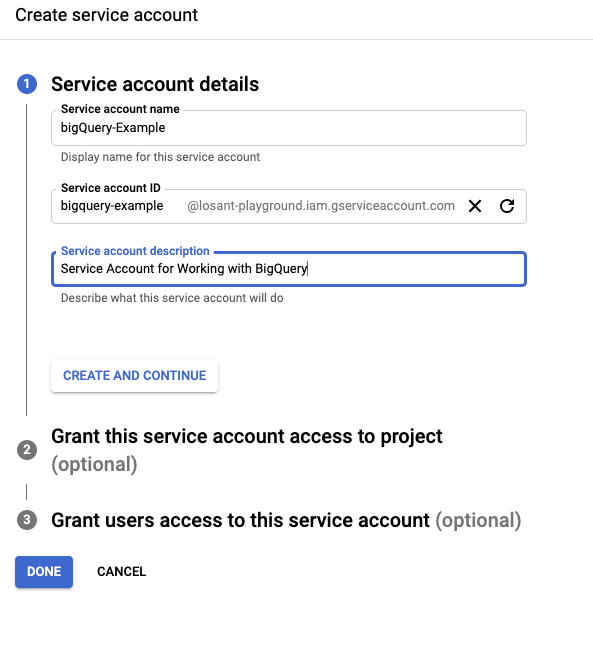
Next, we can give our service account a name, ID, and description. Then, click “Create and Continue”.
For this example, we need to grant two roles to our service account:
- BigQuery Data Editor: Allows us to read and write to datasets.
- BigQuery Job User: Gives us the ability to create “jobs” to query the dataset.
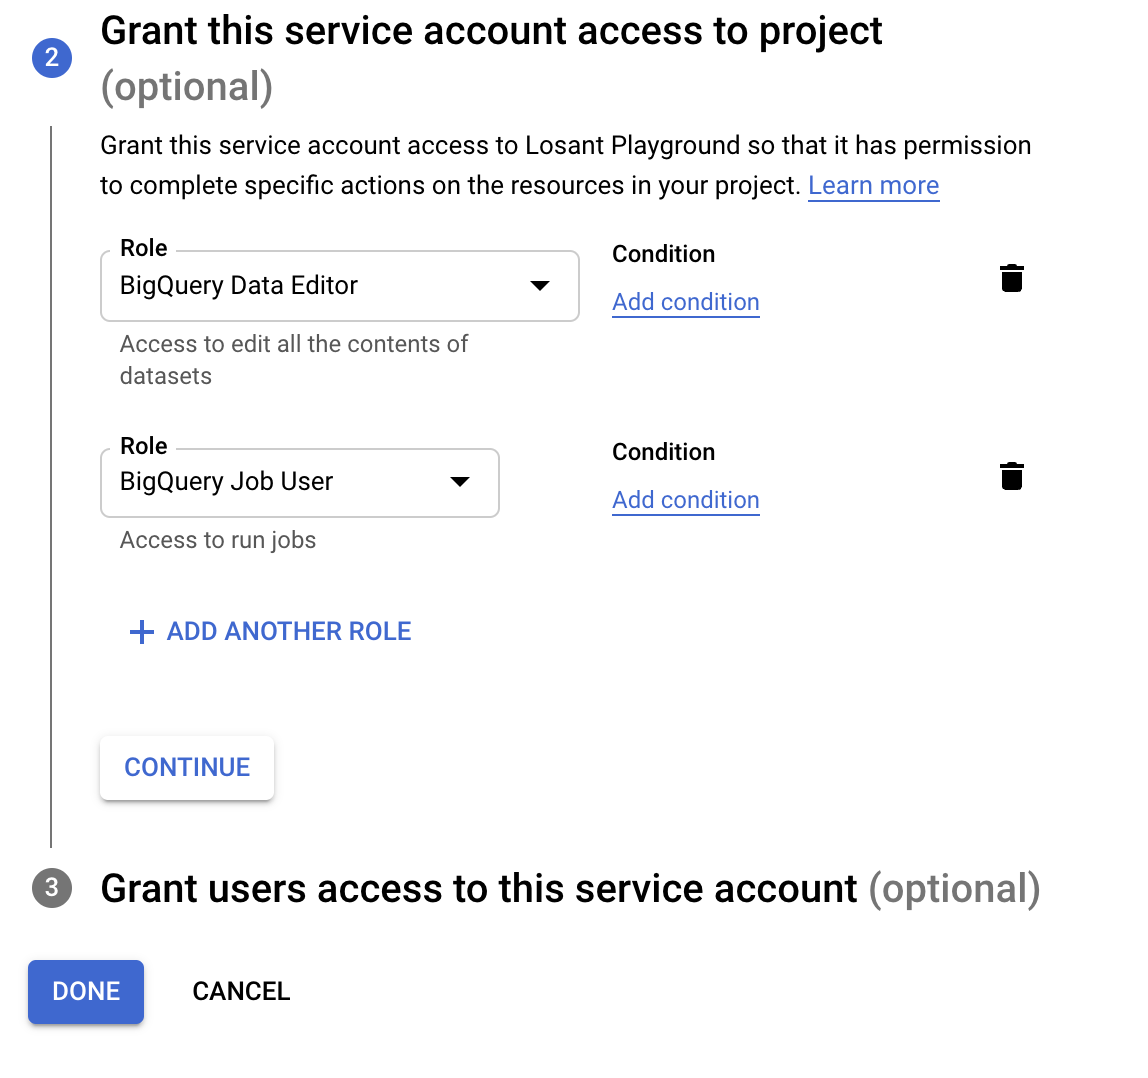
Here, you can either click “Continue” or “Done”. “Continue” will allow you to grant other users in your project access to this service account (an optional step). “Done” will skip the optional 3rd step and move into getting a key from Google for this service account.
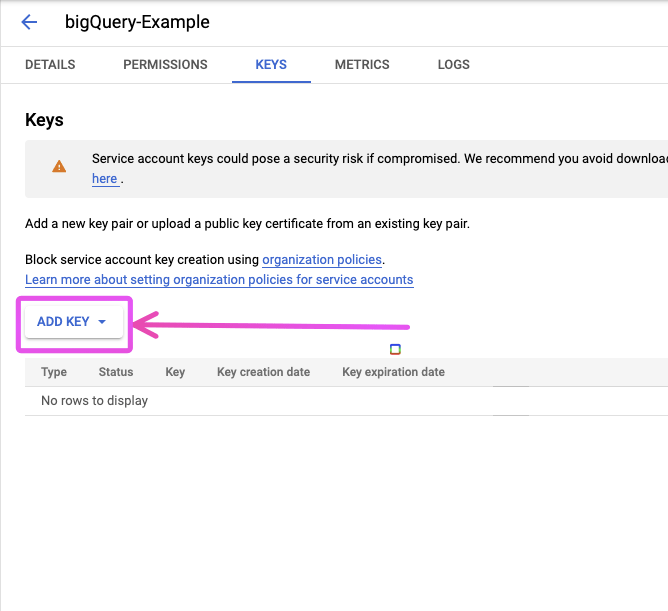
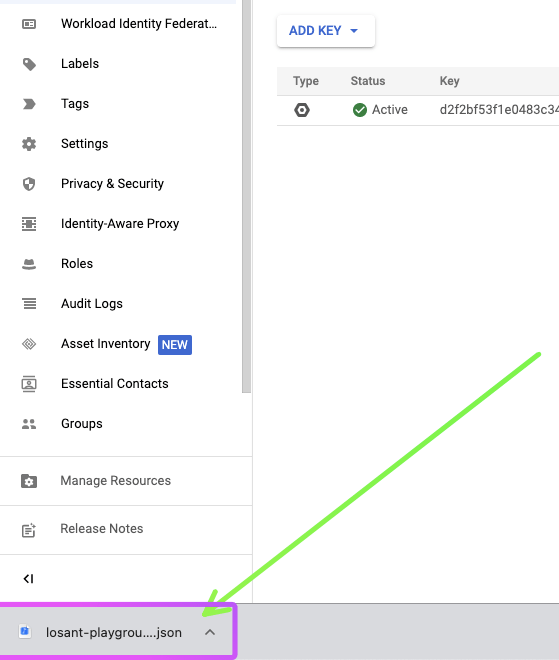
Click “Keys”:

Then “Add Key”:
Then “Create new Key”:

Leave the default option of “JSON”.
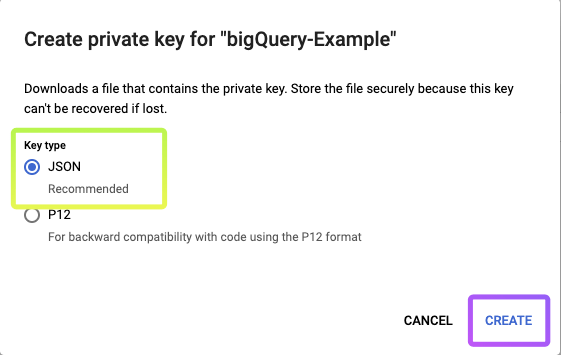
Once you click “Create”, a JSON file will be downloaded. Keep this somewhere safe because this JSON information is what you will use to send queries from Losant to GCP BigQuery.
Step Two: Creating a GCP BigQuery Dataset and Table
Now that we’ve created a service account that will be able to read and write data to GCP BigQuery, let’s get our BigQuery dataset and table set up.
In the left navigation menu, under the “Big Data” section, go to BigQuery:

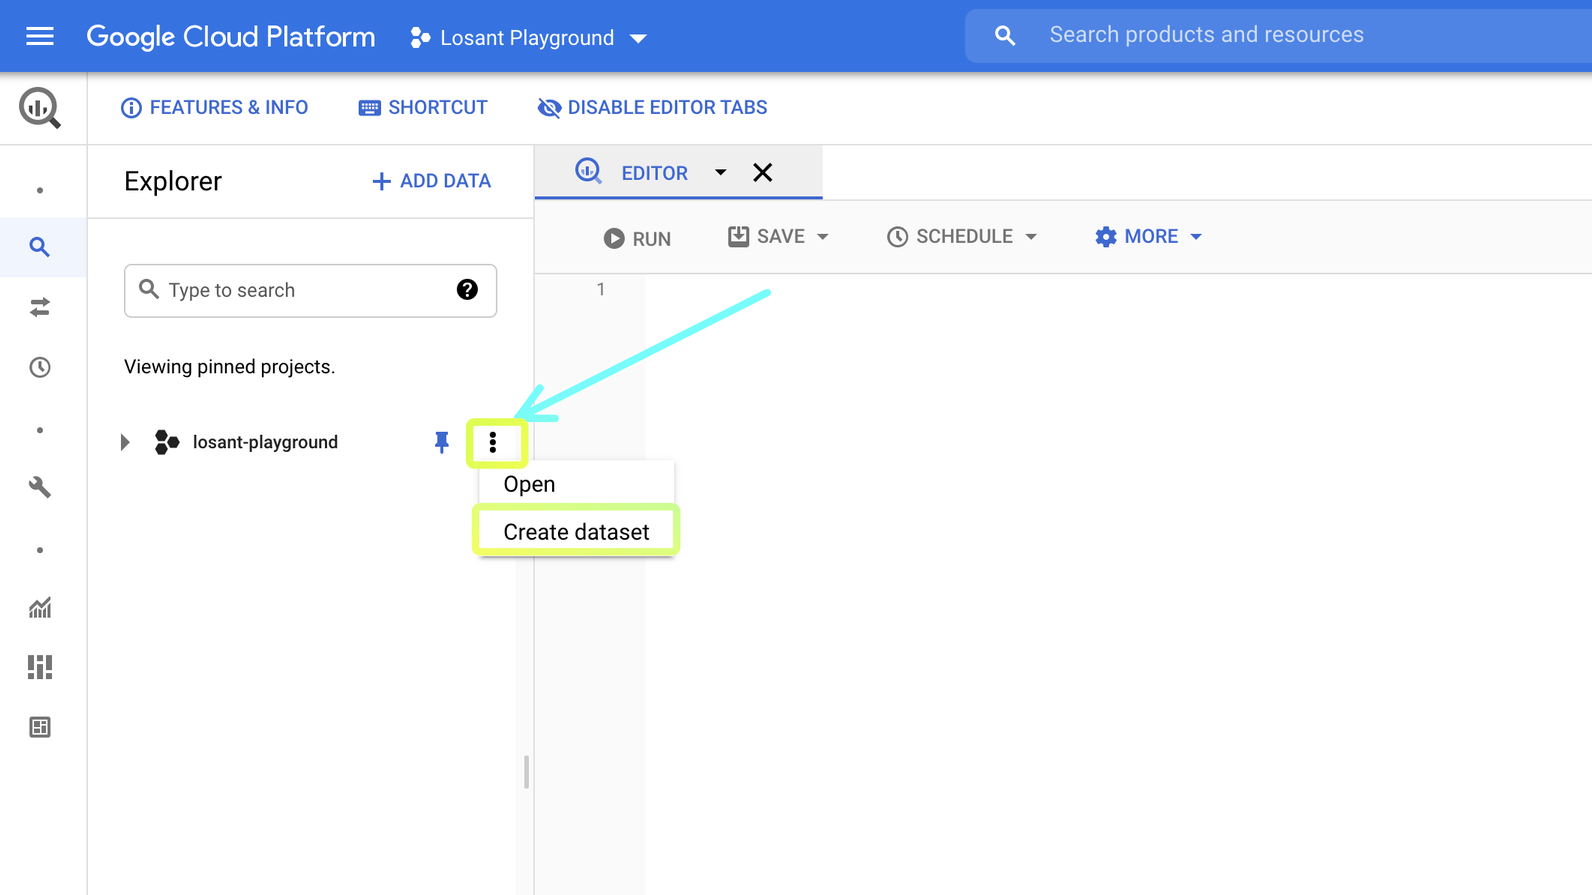
Then, on the BigQuery dashboard, click the three dots next to your project name, and click “Create dataset”:
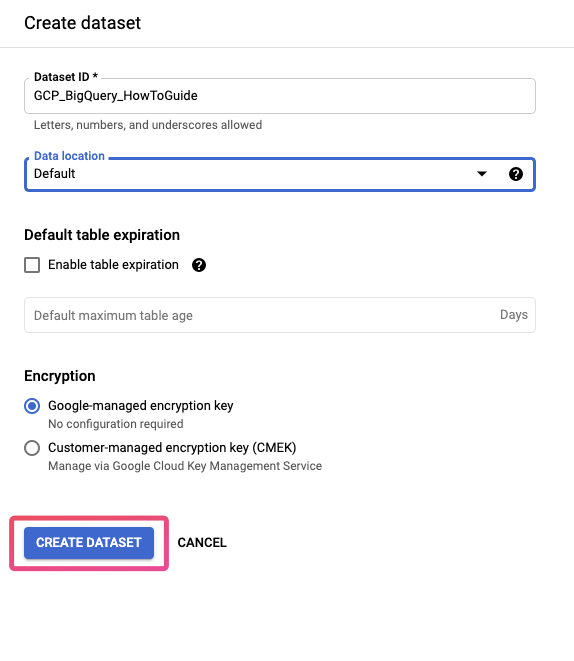
Here’s where we’ll create our dataset. Give your dataset an ID, and then click “Create Dataset”:
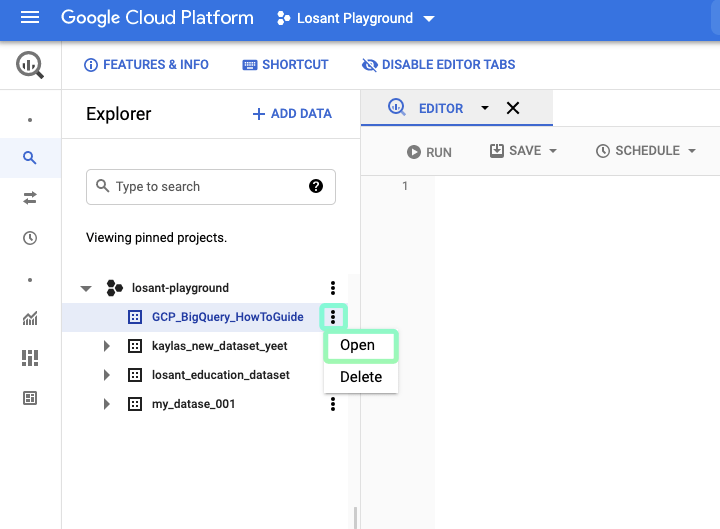
Now, if you open the dropdown for your project in the project list on the left side, you can see your dataset. Next, let’s create a table for our example data.
Click the 3 dots next to your dataset, and click “Open”:
Then, in the project tab that was opened for us, click “Create Table”:

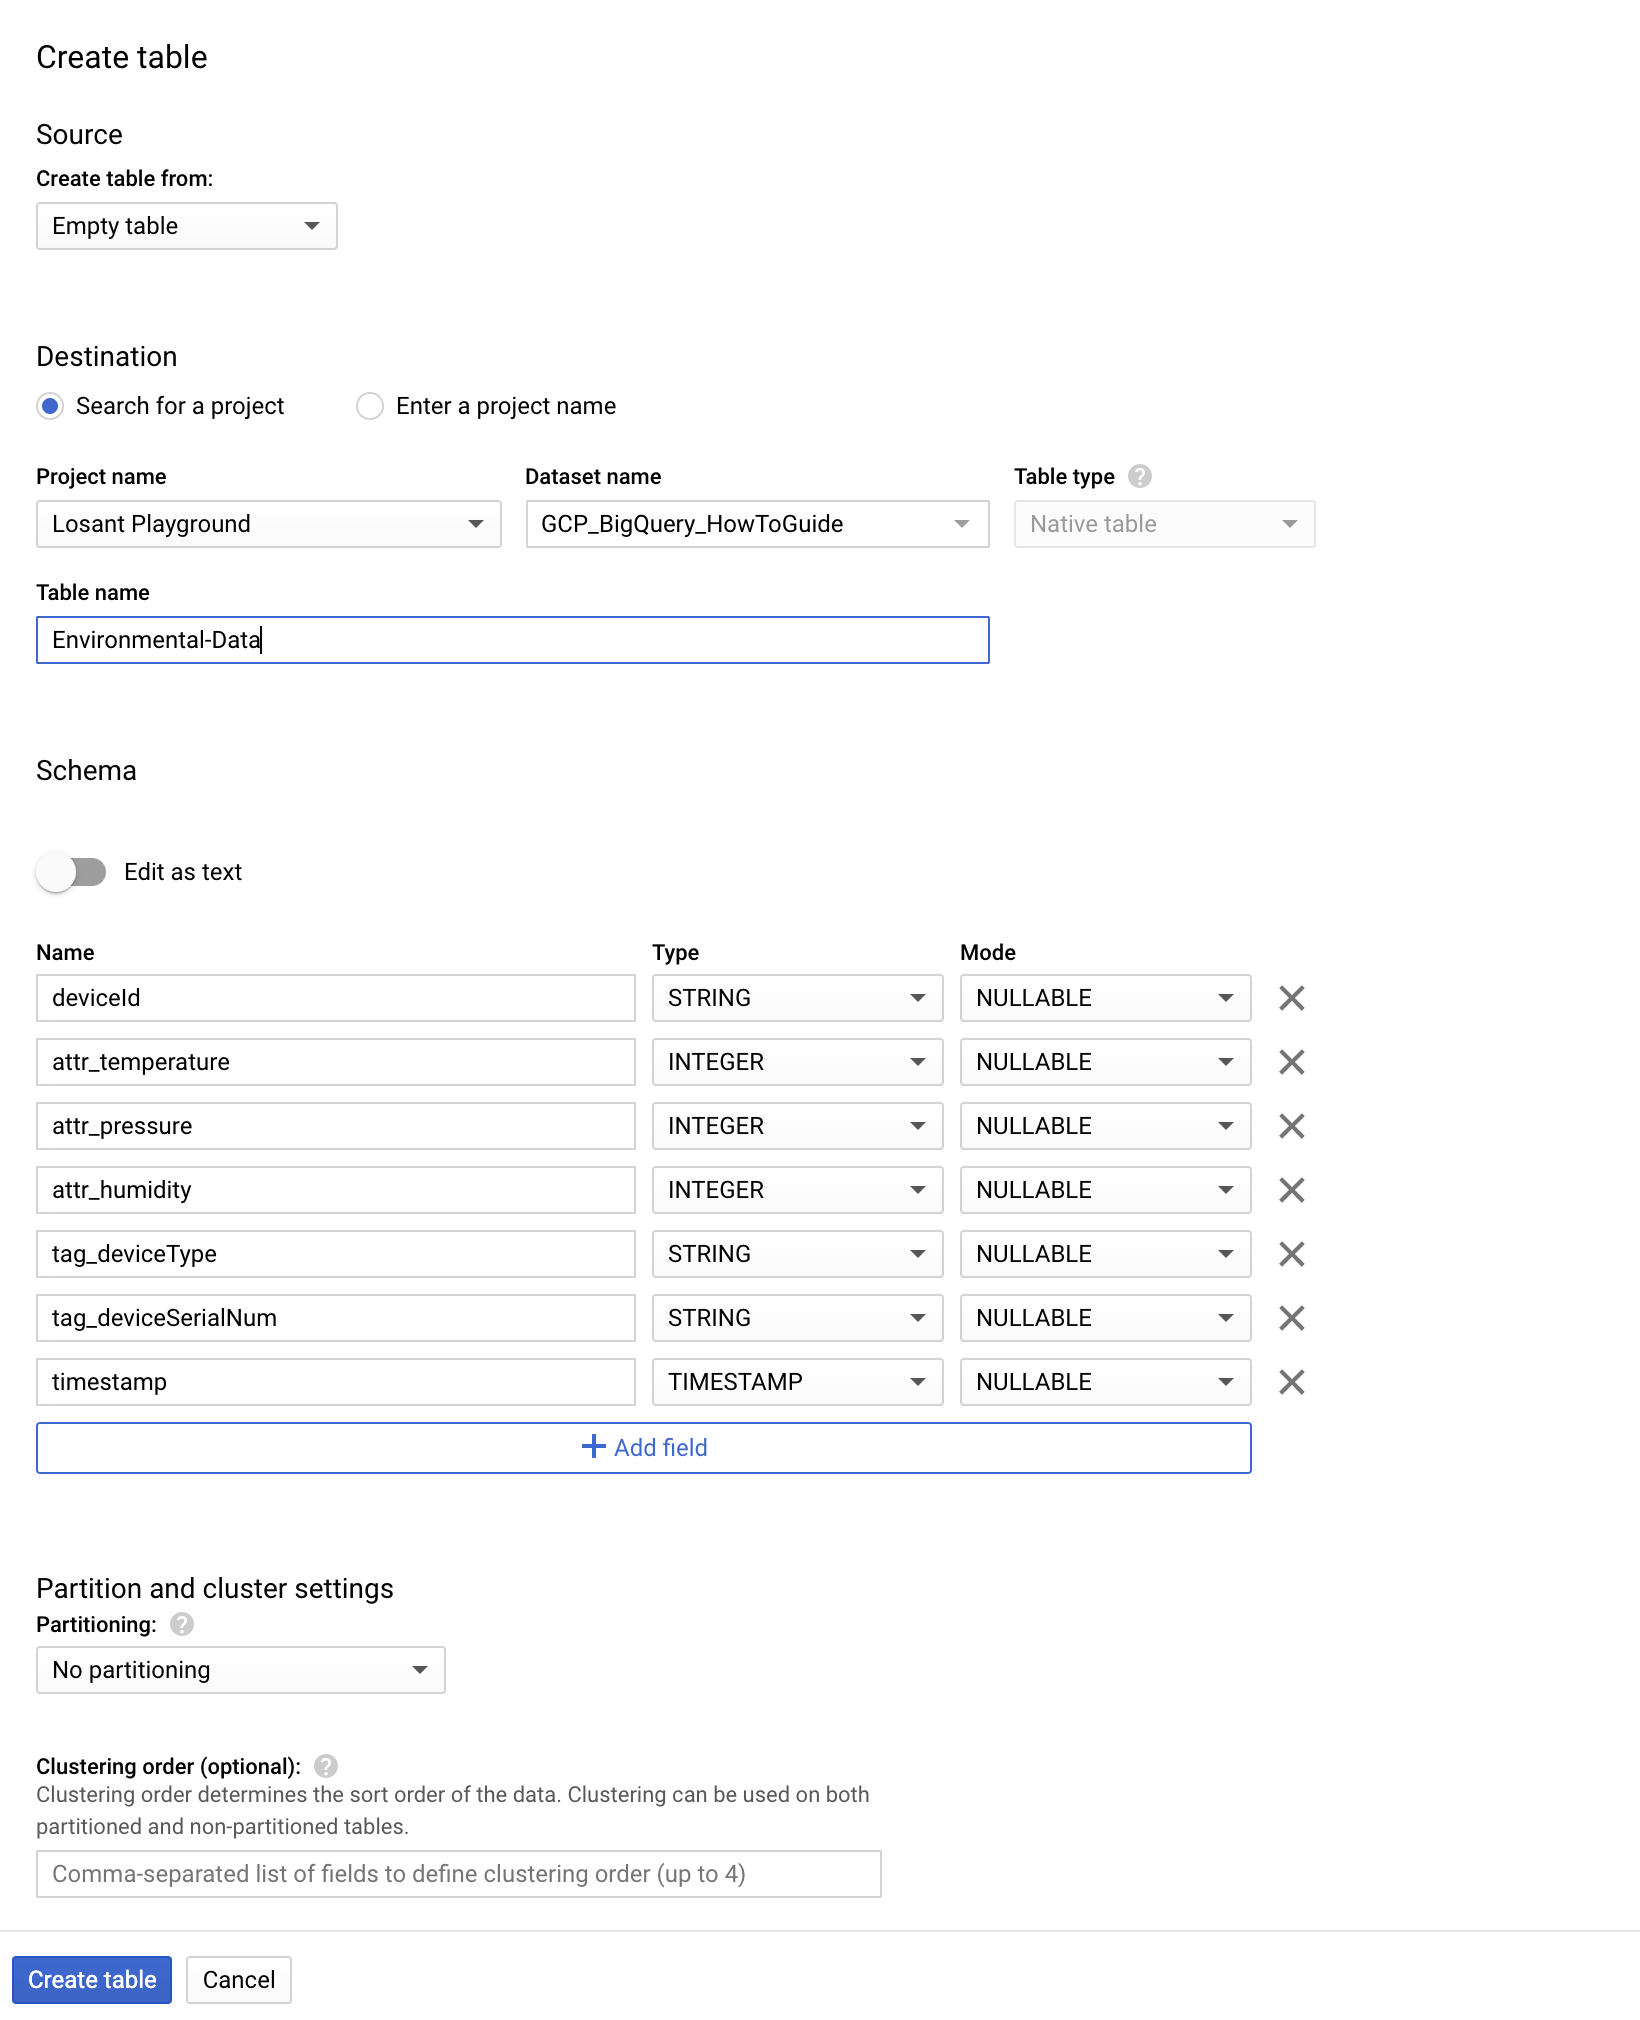
For this example, we’ll be generating simulated environmental data. So, we’ll name our table “Environmental-Data”. The schema that we create is very important moving forward. We want to, in a way, “begin with the end in mind” with our schema. So, we’ll create a schema that includes a Device ID field, a timestamp field, and some device tags. This schema allows for multiple different query options down the road.
To make this schema, click “Add Field” to create a new field for your schema. Here, we prefix device attributes with attr_ and device tags with tag_. The temperature, humidity, and pressure that we’ll be sending will be whole integers, but in a production scenario, it will be important to align your field Types to the type of the data that will be going into this table.
The timestamp field is an absolute point in time with microsecond precision, independent of any time zone or convention such as Daylight Savings Time. BigQuery does support multiple dates & times, but in this case (as you will see) we will be sending a timestamp with the format YYYY-MM-DDTHH:mm:ss.SSSZ.
Finally, click “Create table”:
Now that we’ve got everything ready on the GCP side to ingest data, let’s start sending data to it from Losant.
Step Three: Sending Data to GCP BigQuery from Losant
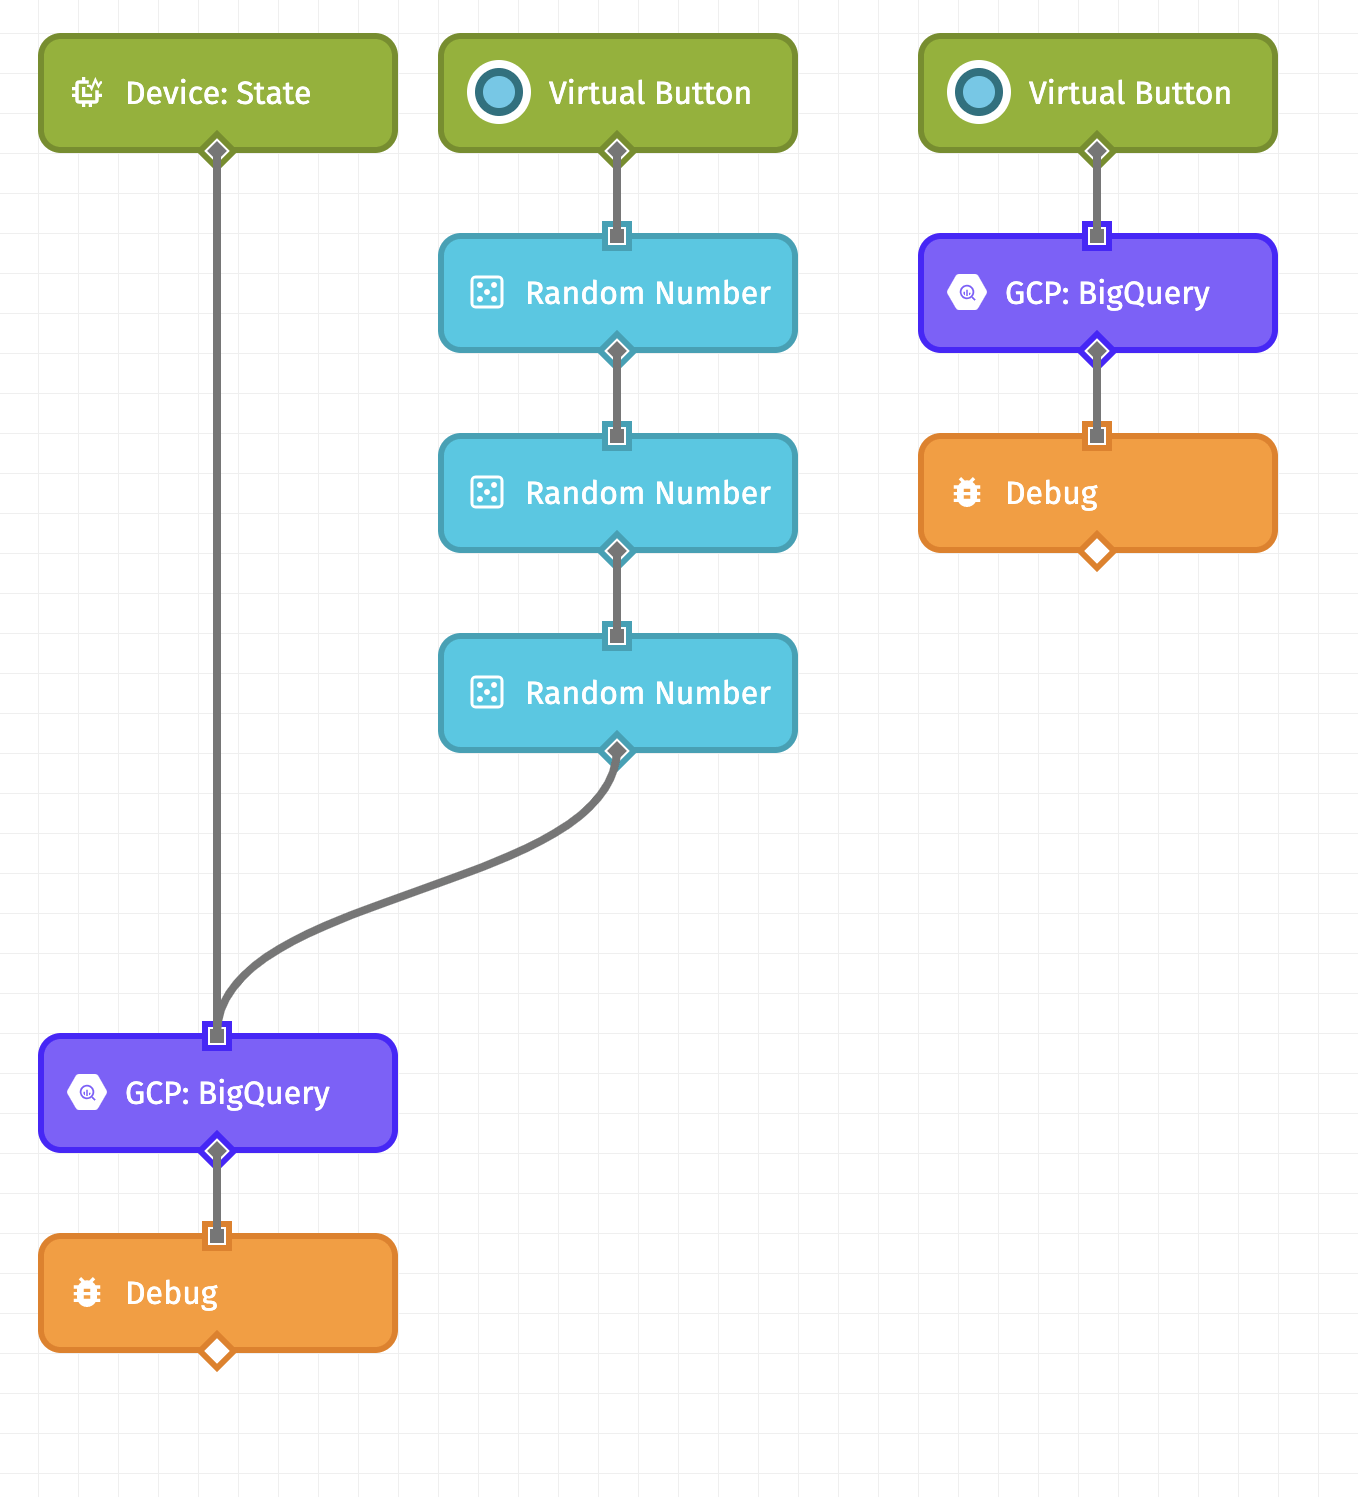
Let’s start by creating the following workflow (download it here):
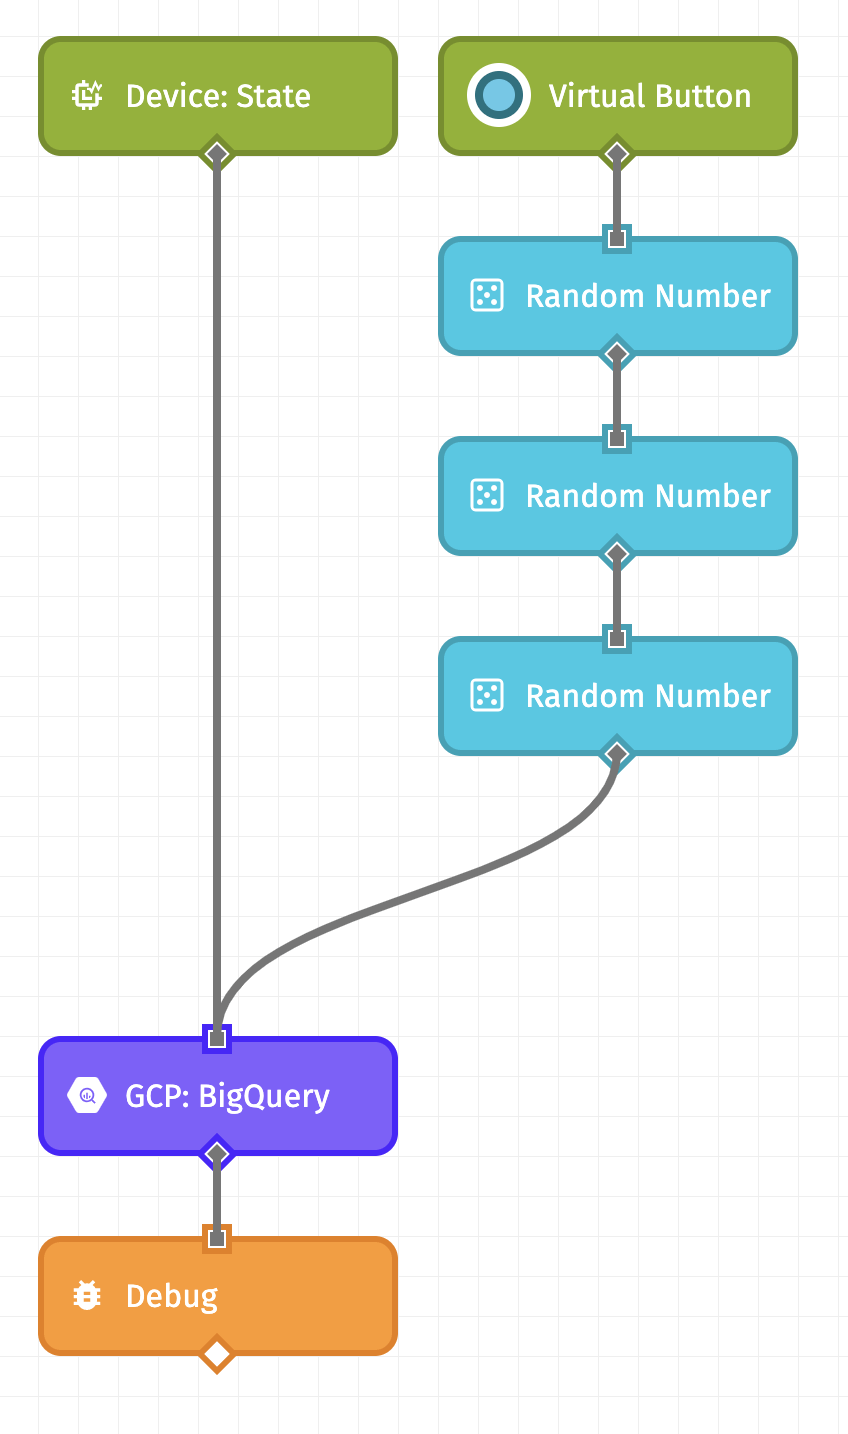
On the left, we are using a Device: State Trigger so that this workflow will execute every time a device reports its state to Losant. When using this trigger, we give you some things by default on the payload, namely the ID of the device that reported its state, as well as its tags. Therefore, in our BigQuery request configuration (which we’ll talk about shortly), we can reference these values directly.
On the right, though, we are using a Virtual Button Trigger and a few Random Number Nodes. The right side of this workflow is useful for testing since we can manually trigger this workflow when we need to.
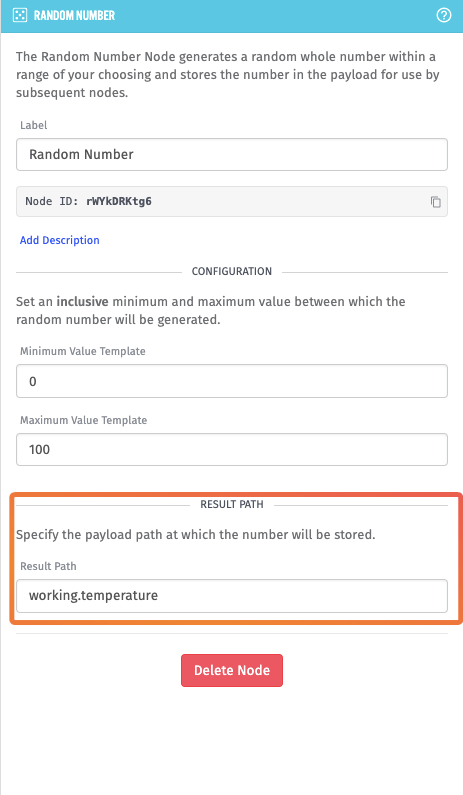
Each Random Number Node is generating a number between 0 and 100, and placing the result on the payload at working.<environmental attribute>. For example, the first Random Number Node is generating temperature:
The GCP: BigQuery Node is the node in this workflow that sends the data we receive or generate to our dataset and table. So, let’s walk through the configuration of this node.
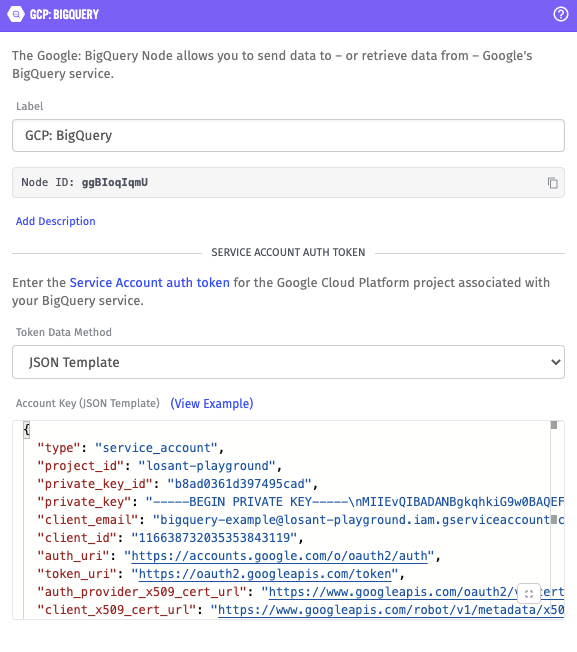
First, we need to input our service account key that was downloaded in Step One. To do that, open the JSON file that was downloaded in a text editor (like Notepad, Notepad++, or Visual Studio Code), copy the content, and paste it in the “Account Key (JSON Template)” field. My key looks like:
{
  "type": "service_account",
  "project_id": "losant-playground",
  "private_key_id": "***Redacted***",
  "private_key": "***Redacted***",
  "client_email": "***Redacted***",
  "client_id": "***Redacted***",
  "auth_uri": "https://accounts.google.com/o/oauth2/auth",
  "token_uri": "https://oauth2.googleapis.com/token",
  "auth_provider_x509_cert_url": "https://www.googleapis.com/oauth2/v1/certs",
  "client_x509_cert_url": "https://www.googleapis.com/robot/v1/metadata/x509/bigquery-example%40losant-playground.iam.gserviceaccount.com"
}
And pasted into the node configuration:
To insert data into our BigQuery Table, we’ll select the Tabledata: Insert All resource action. This resource action requires the ID of both our dataset and our table that we created in GCP. You can find these values in BigQuery as the names you see on the left panel:
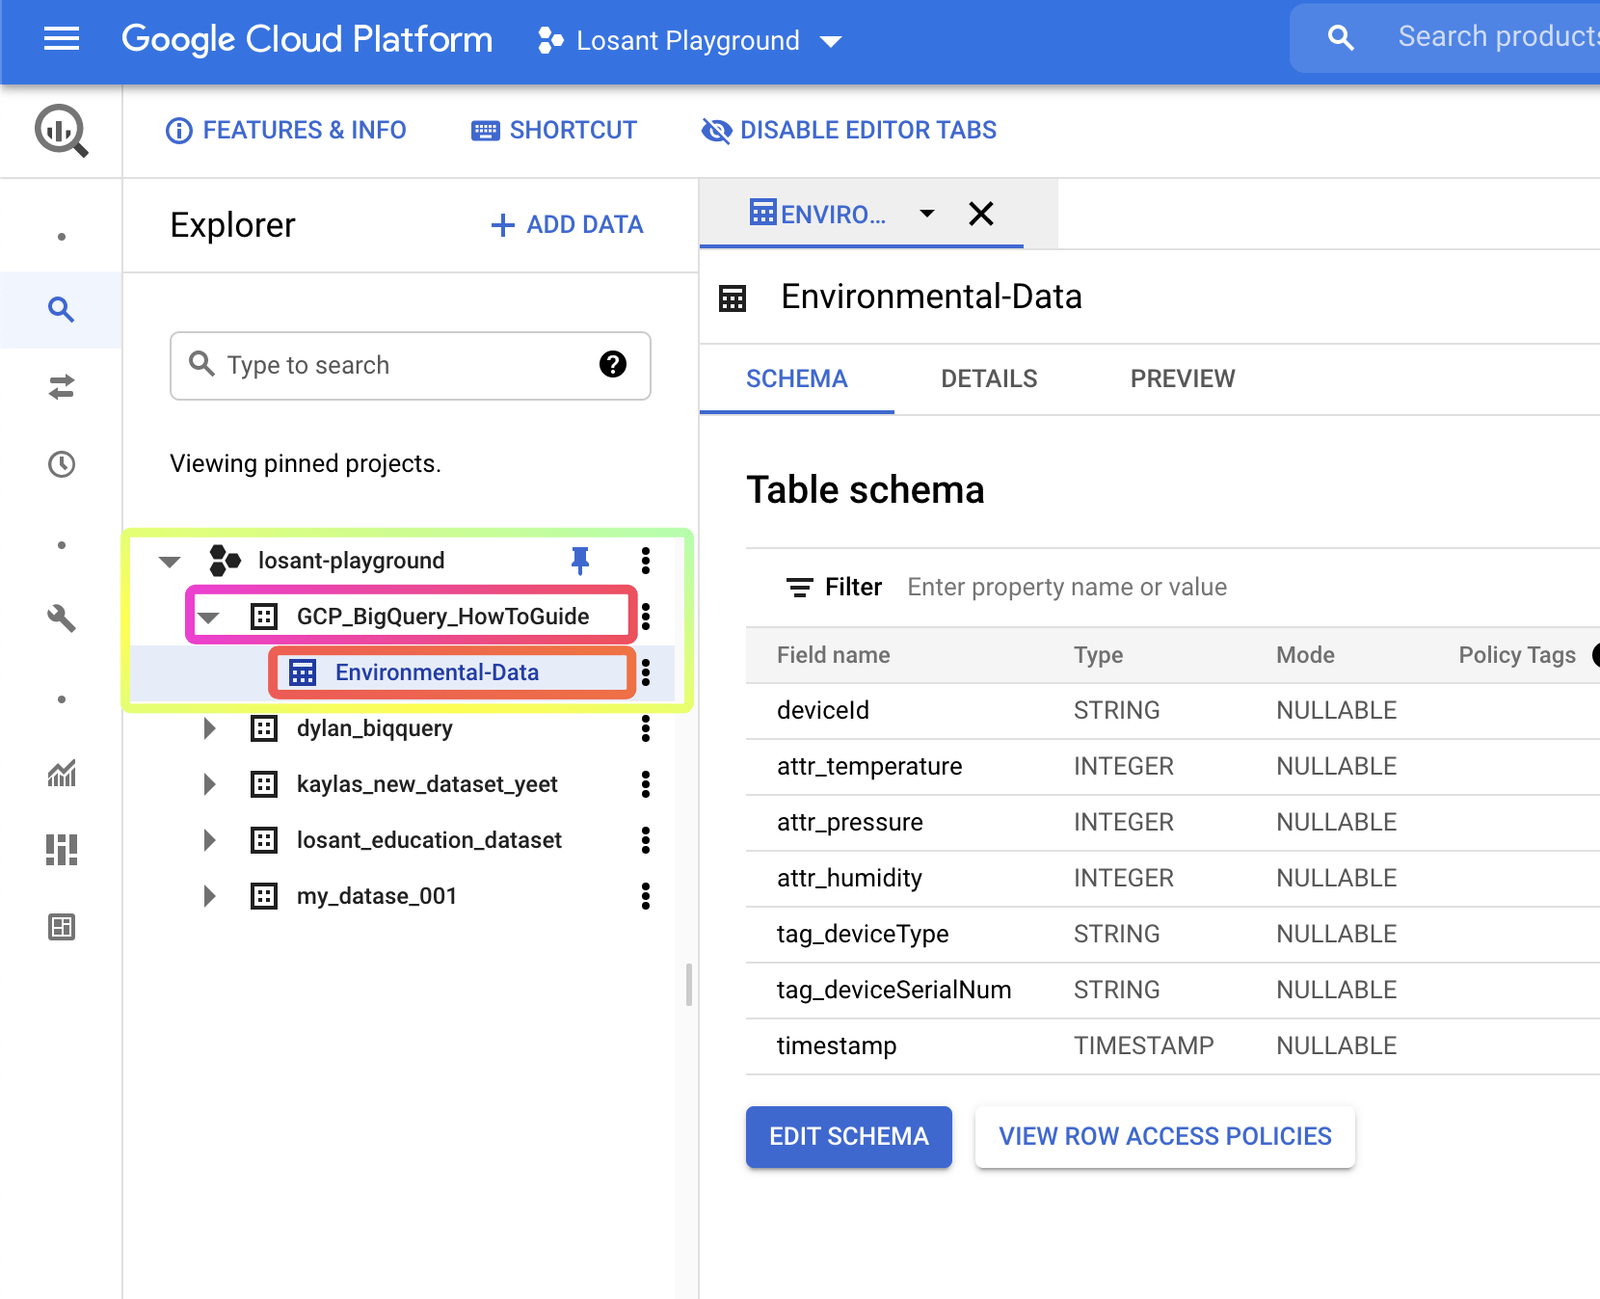
Here, you’ll just input the name of the dataset and table that you create. In this example, my dataset name is GCP_BigQuery_HowToGuide and my table name is Environmental-Data.

We can now work on our Table Data JSON Template. Here’s what we’ll be sending:
{
  "rows": [
    {
      "json": {
        "deviceId": "{{defaultTo deviceId 'myDeviceId'}}",
        "attr_temperature": {{defaultTo data.temperature working.temperature}},
        "attr_pressure": {{defaultTo data.pressure working.pressure}},
        "attr_humidity": {{defaultTo data.humidity working.humidity}},
        "tag_deviceType": "{{defaultTo device.tags.type.[0] 'test-deviceType'}}",
        "tag_deviceSerialNum": "{{defaultTo device.tags.serial.[0] '1234567890'}}",
        "timestamp": "{{formatDate time 'YYYY-MM-DDTHH:mm:ss.SSSZ'}}"
      }
    }
  ]
}
You can read more about the structure of this request in the Google Documentation. Here we are inserting a row (you have the option to insert multiple rows at a time), where the json field matches our schema.
We are making use of the defaultTo helper to fill in the deviceId and tag values, which we'll need when we trigger this workflow using our testing Virtual Button. We are also making use of the formatDate helper to format the time value on the payload to the format that Google expects for the timestamp field.
The last bit of our node configuration will look like:
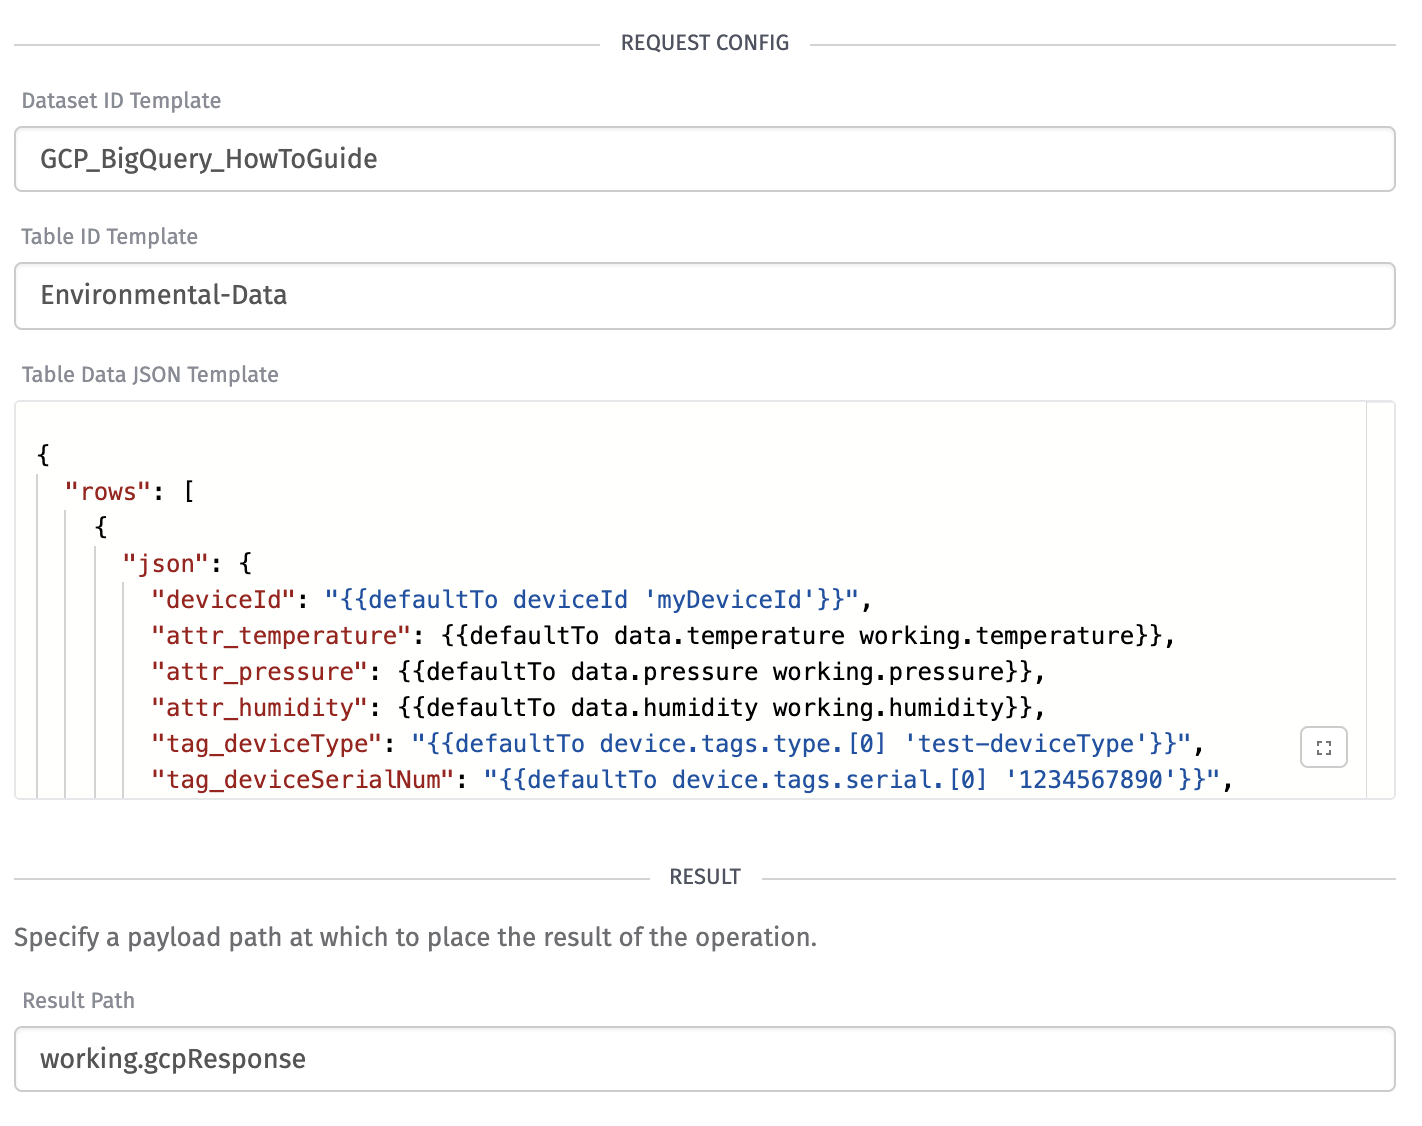
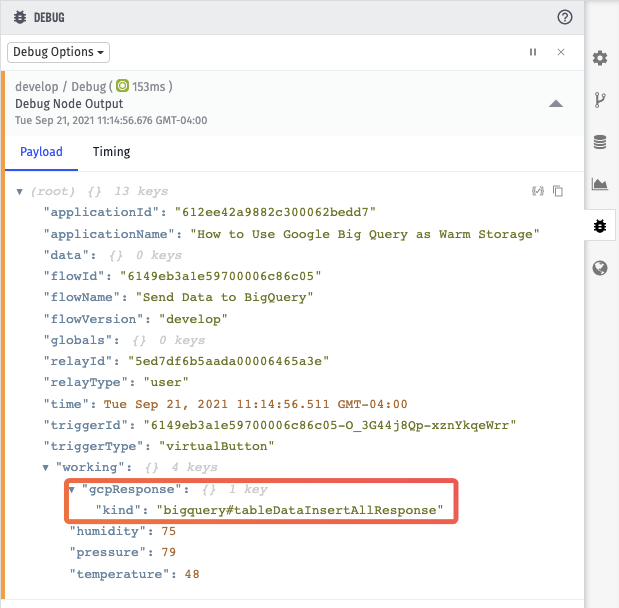
We’re putting the response from GCP on the payload at the path working.gcpResponse. Now, after clicking “Save and Deploy”, you can click the Virtual Button trigger, which should result in a debug message that is similar to the following:
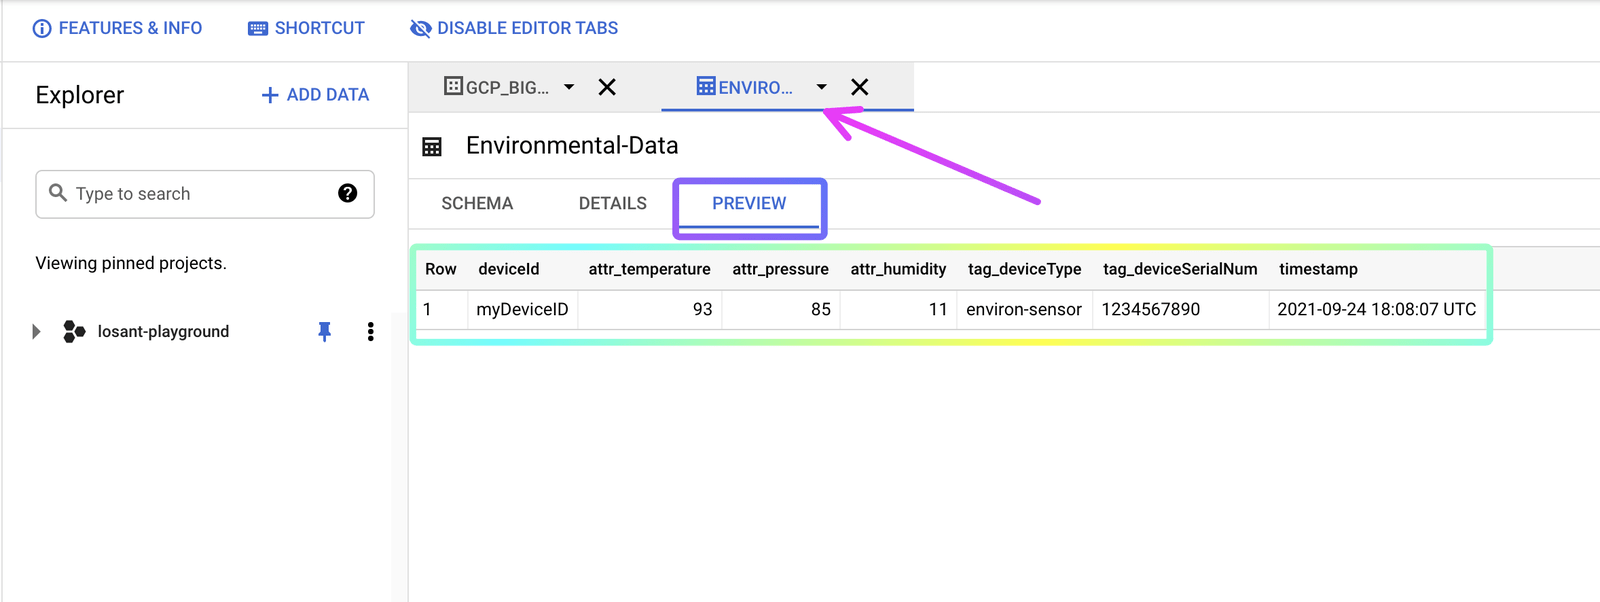
Then, return to GCP and refresh the page. Go to the Table tab and select the Preview option. You should see the data that was sent via the workflow:
Step Four: Query Data
While it may be infrequent that you query data out of BigQuery, one of the reasons you may find yourself wanting data out of BigQuery is to query data by attribute value.
In the same workflow we created at the beginning of Step Three, copy and paste the BigQuery node you have, add a Virtual Button Trigger, and a Debug Node so that your workflow looks like this (which are also included in the downloadable flow):
We copy and paste the BigQuery Node so that we can maintain the same configuration. But, we are going to change the Resource & Action of this node to Jobs: Query, and our new Request Configuration will look like:
{
  "maxResults": 10,
  "query": "SELECT * FROM [losant-playground:GCP_BigQuery_HowToGuide.Environmental-Data] WHERE attr_temperature > 90"
}
So, the BigQuery Node configuration will look like:
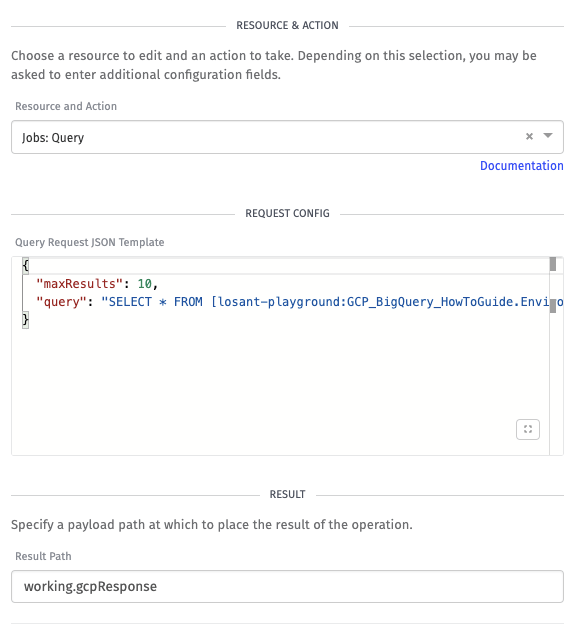
This request configuration contains two items:
maxResultsis the maximum number of times the query will return.queryis the SQL query that queries our data. Refer to Google’s documentation for other available options for this configuration.
In this example, we’re querying all rows where the temperature is greater than 90 degrees. When we press the Virtual Button, our result should look something like:
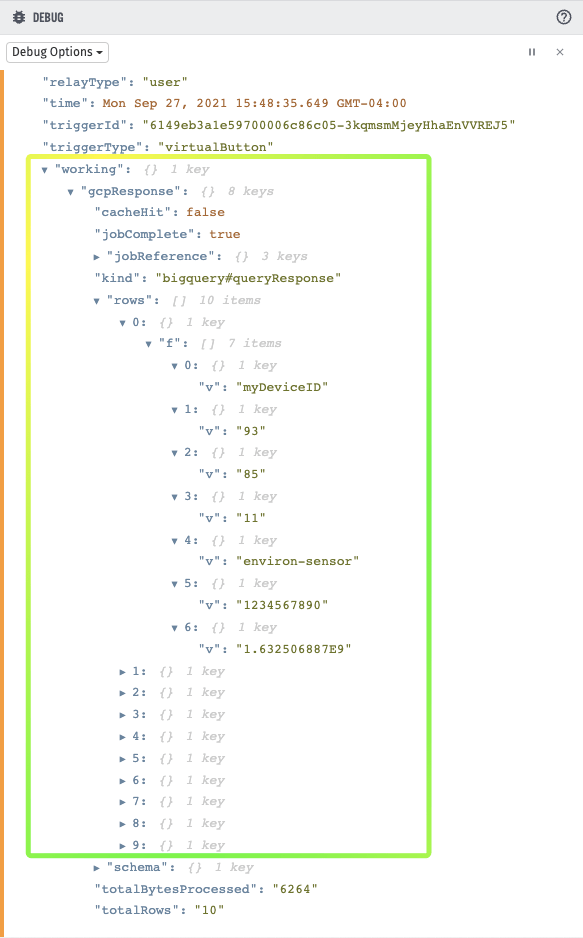
We get an array of objects that contain the values for our queried data.
The data shown above is the raw data that you get back from the BigQuery query. While this data is very operable in its current form, we highly recommend using Array or Object Nodes to parse the data. BigQuery does also include the schema object in the response, so you can also verify that your data matches the schema.
Step 5: Using your Data in BigQuery
Now that you have your data going from Losant to Google BigQuery, not only are you now permanently storing your data in warm storage, but you also get the benefit of BigQuery plugging right into some of Google’s key features. For example, BigQuery ML enables you to create and execute machine learning models using the data you already have in BigQuery.
Lastly, another feature that BigQuery supports is large exports of data. Massive data exports make it easier for those doing offline analytics to organize and clean data before running models or other algorithms on that data. Sanitizing or cleaning data offline can save time and money by not having to spin up and dedicate cloud resources for these processes.
Resources
Was this page helpful?
Still looking for help? You can also search the Losant Forums or submit your question there.