Device Registration
In Part 1 and Part 2 of this walkthrough, we successfully built a custom API for our lōm mobile application that allows users to register and log in. In this tutorial, we’ll create a new API endpoint that allows devices to perform on-demand registration.
Pairing a device to the user’s account is one of the more complicated steps when initially setting up a consumer product. There are many different ways to accomplish this. The lōm product uses an access point mechanism where the user’s mobile phone is connected to an access point on the physical device itself. The registration flow is described below:
- The lōm device exposes an access point.
- The lōm mobile app connects the user’s phone to the access point.
- The lōm mobile app connects the device to the user’s WiFi.
- The lōm mobile app sends the user’s token to the device.
- The device requests a registration endpoint using the user’s token.
- The registration endpoint creates the device and access key pair.
- The device connects directly to Losant’s MQTT broker.
- The lōm mobile app connects the user’s mobile device back to their WiFi.
This guide details steps 5 and 6, which create an Experience Endpoint for registration. The other steps are specific to the actual hardware used and are outside the scope of this guide.
Step One: Create the POST /devices Endpoint
The first step is to create the POST /devices endpoint that your device can use to register itself:
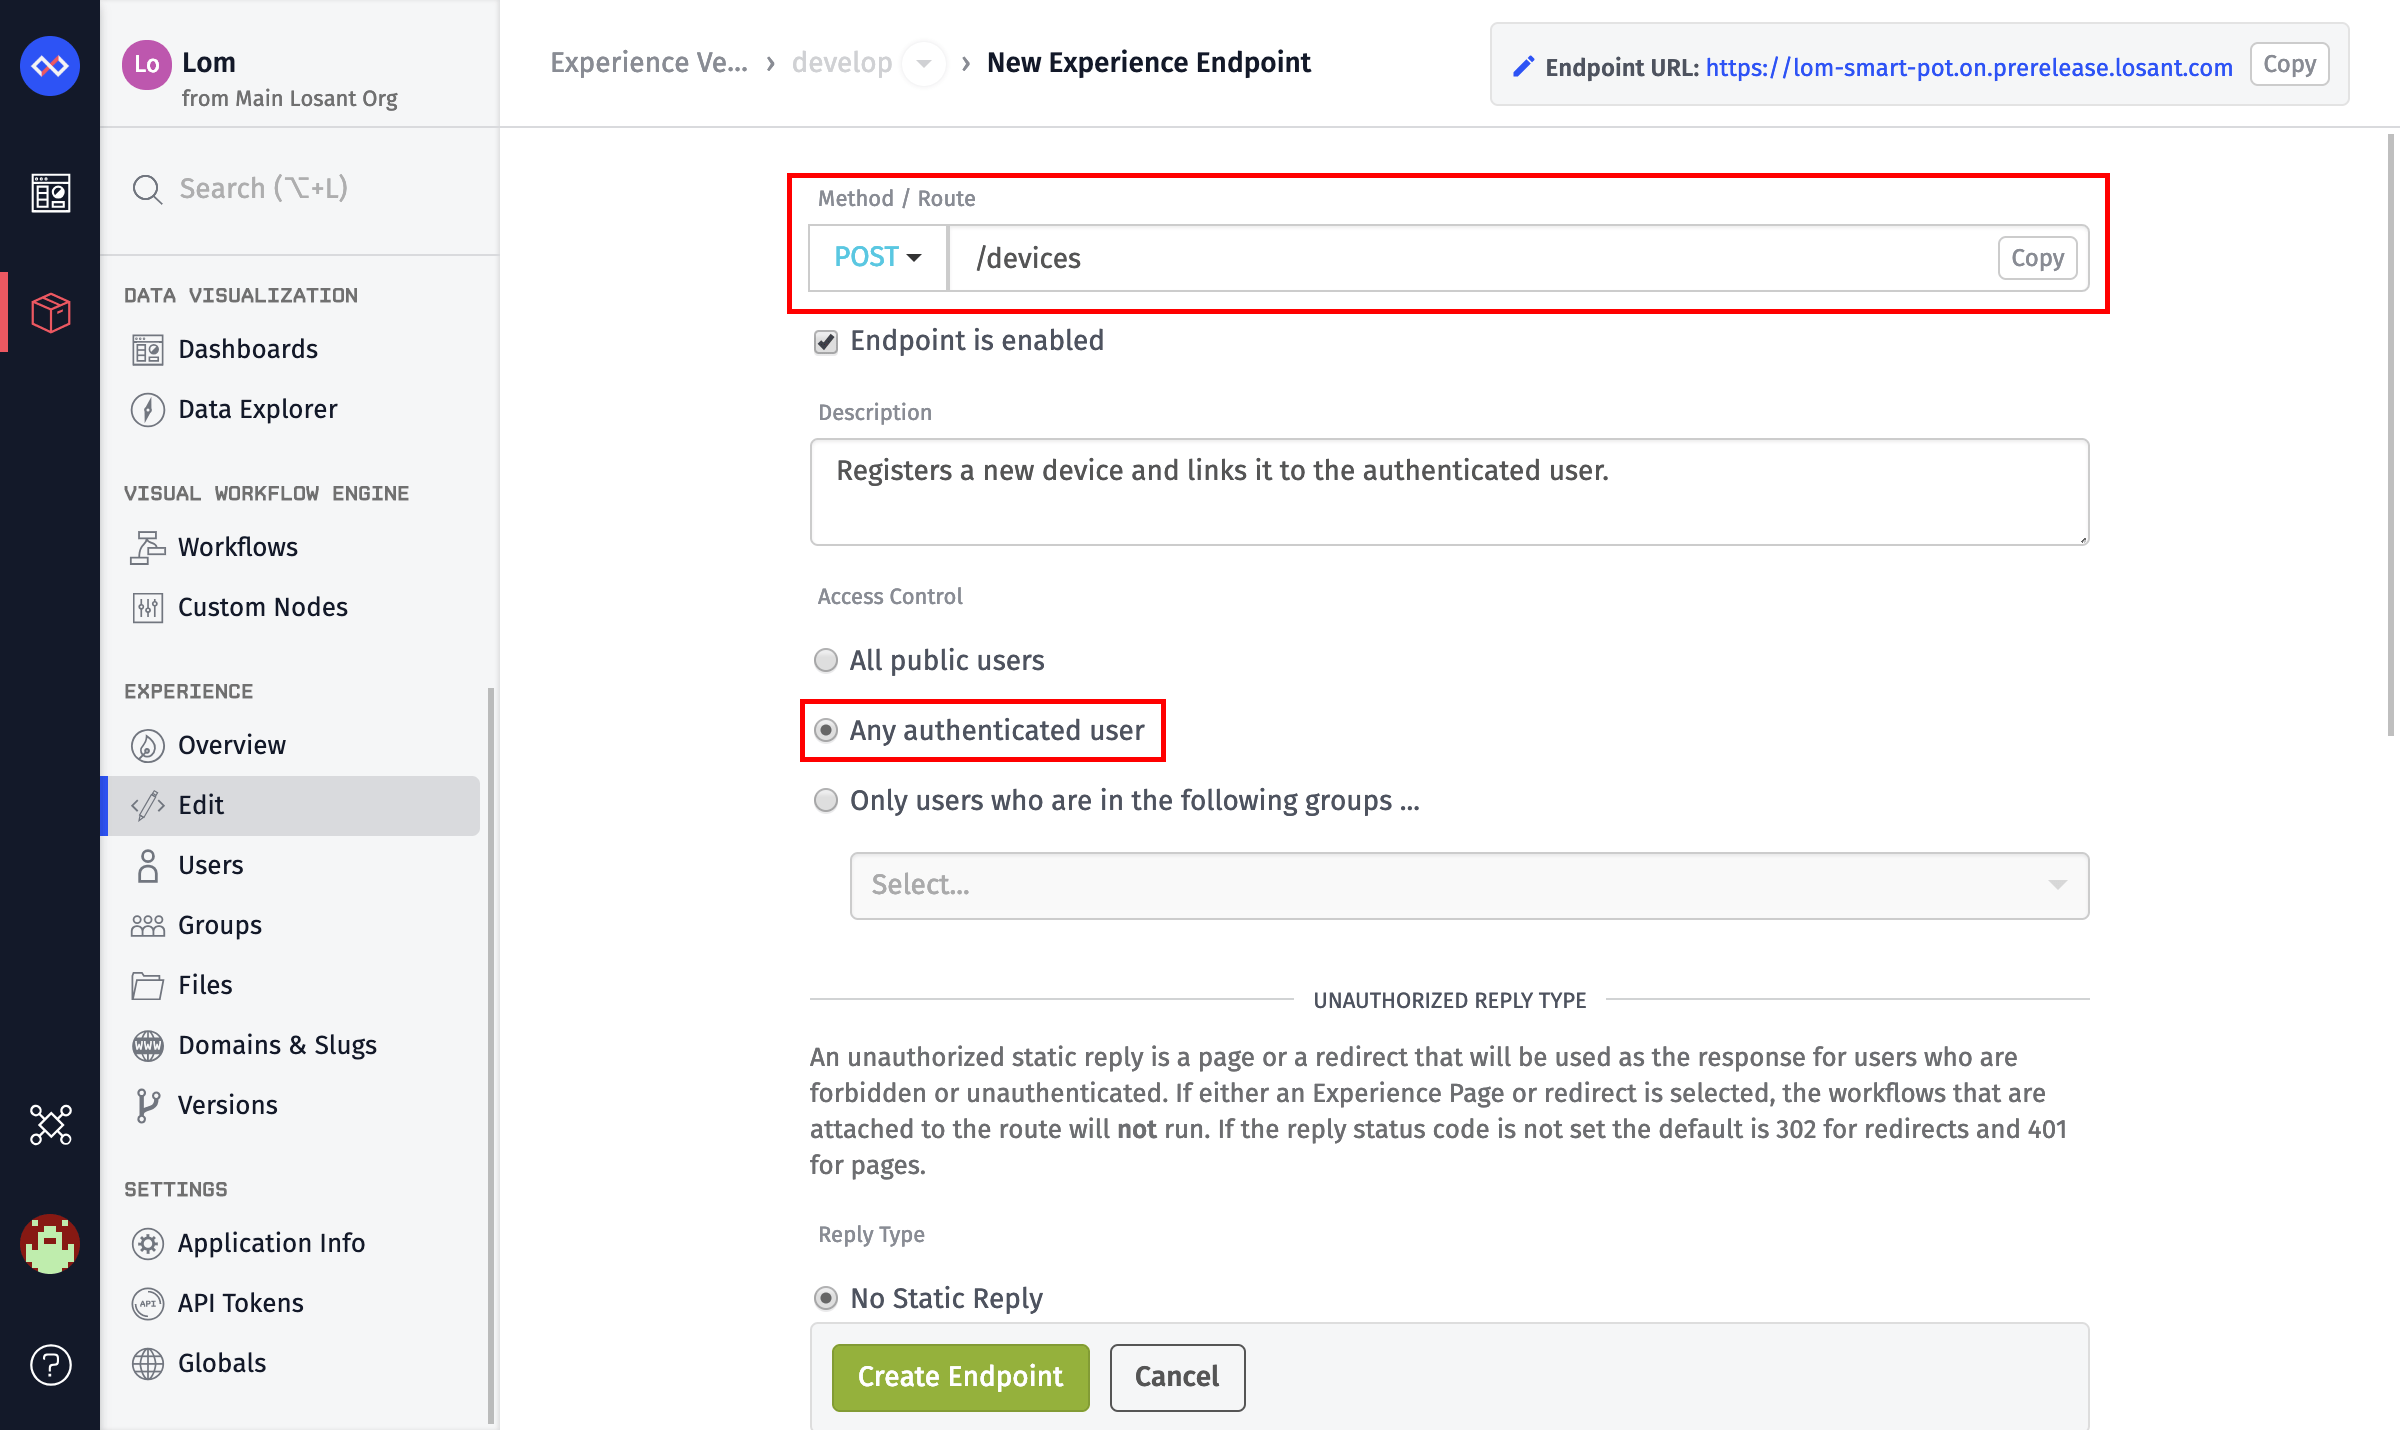
- Set the
MethodtoPOST. - Set the
Routeto/devices. - Add a
Description. - Set the
Access ControltoAny authenticated user.
Unlike the /users and /auth endpoints, this endpoint requires a valid user token. The lōm app does not require the use of user groups, so any authenticated user is allowed to request this endpoint. User groups allow you to granularly define access to specific endpoints for subsets of your Experience Users.
Step Two: Create a Workflow Triggered by the Endpoint
The next step is to create a workflow that is triggered by this endpoint. This workflow does several things:
- Validates that the manufacturer ID sent by the device is valid.
- Creates a new device within Losant.
- Links the device to the user using device tags.
- Creates an access key pair for the newly created device.
This endpoint requires two fields in its body:
- A custom name provided by the user
- A manufacturer ID
This ID can be anything as long as it is unique for each device. A MAC address or a Bluetooth ID work well, but it can be any identifier you want. The endpoint then replies with the new device ID, an access key, and an access secret.
POST /devicesBody:
{
  "deviceName": "custom-device-name",
  "manufacturerId": "000000"
}
Response:
{
  "deviceId": "new-device-id",
  "accessKey": "device-access-key",
  "accessSecret": "device-access-secret"
}
Like all endpoint workflows, start by adding an Endpoint trigger to the canvas.
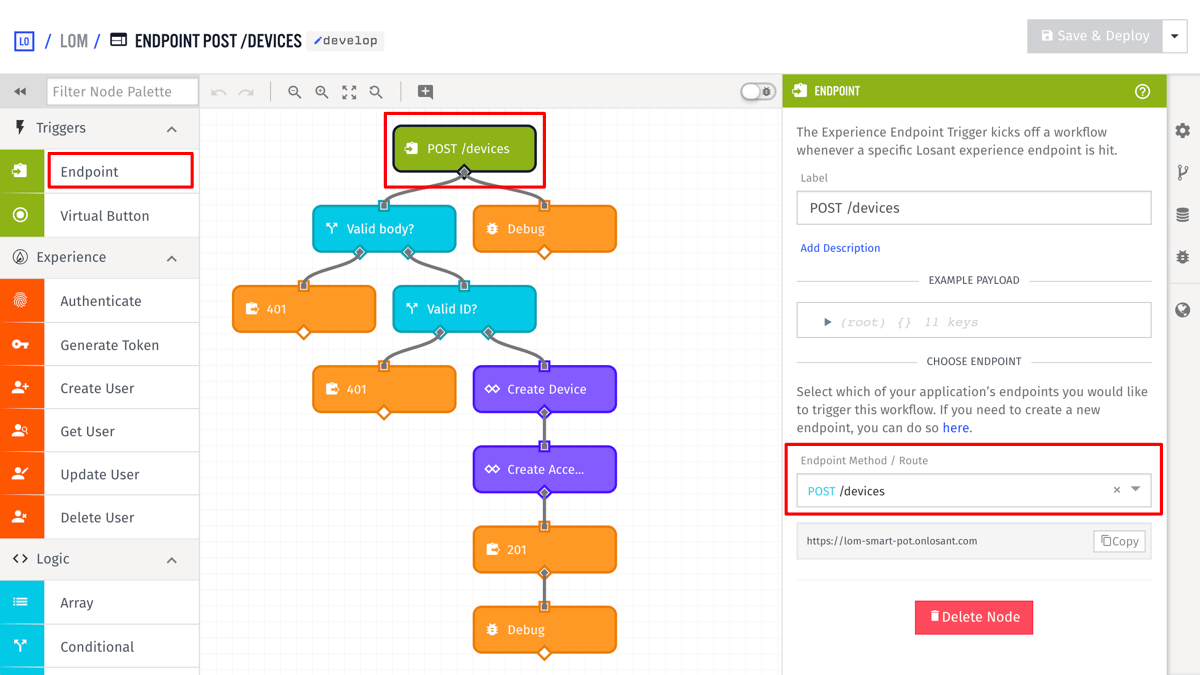
The only required configuration option is to set the Endpoint Method / Route to POST /devices. This workflow triggers whenever the POST /devices endpoint is requested.
Step Three: Add Validation
The next step is to add some validation to ensure the client provides the manufacturer ID and the custom device name. Add a Conditional node and an Endpoint Reply node to the canvas.
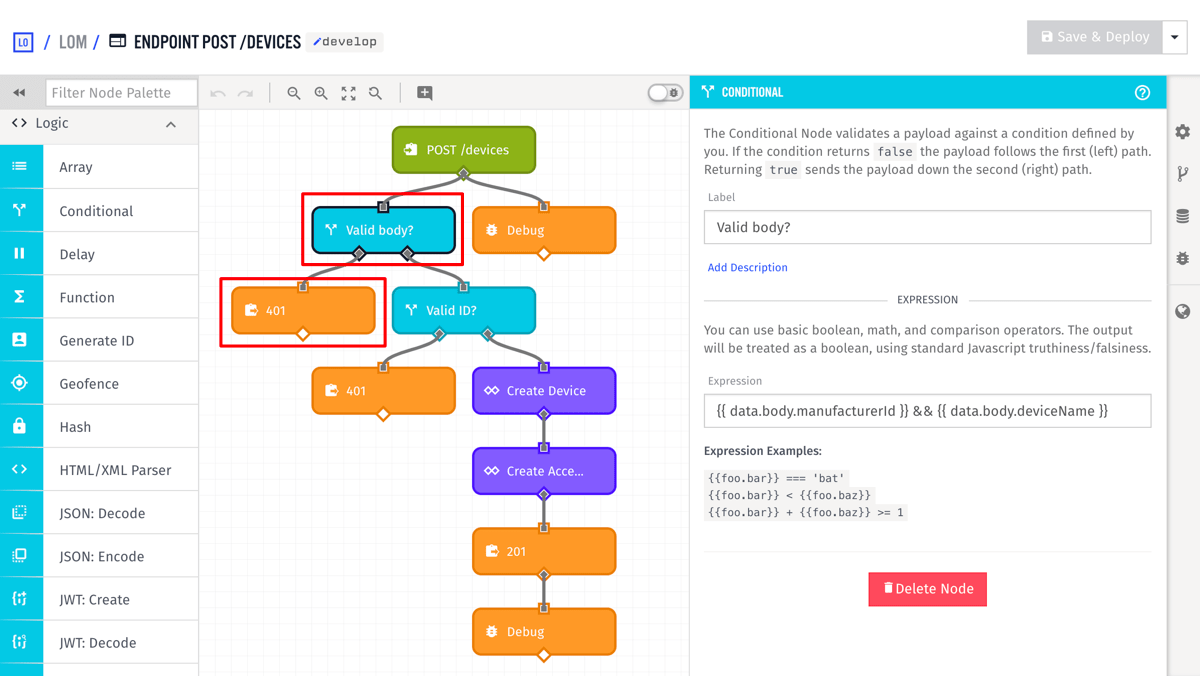
- Set the
Expressionon the Conditional Node to{{ data.body.manufacturerId }} && {{ data.body.deviceName }}. This verifies that both “manufacturerId” and “deviceName” are present on the POST body. - Set the
Response Code Templateto400on the Endpoint Reply node. 400 is the HTTP status code forBad Request. - Set the
Response Body Templateon the Endpoint Reply node to{ "error": "manufacturerId and deviceName are required." }.
Now if a client makes a request against the lōm API to register a device and does not provide all required fields, the API will respond with a 400 (Bad Request).
Step Four: Check Manufacturer ID
The next step is to check that the manufacturer ID that was supplied is valid.
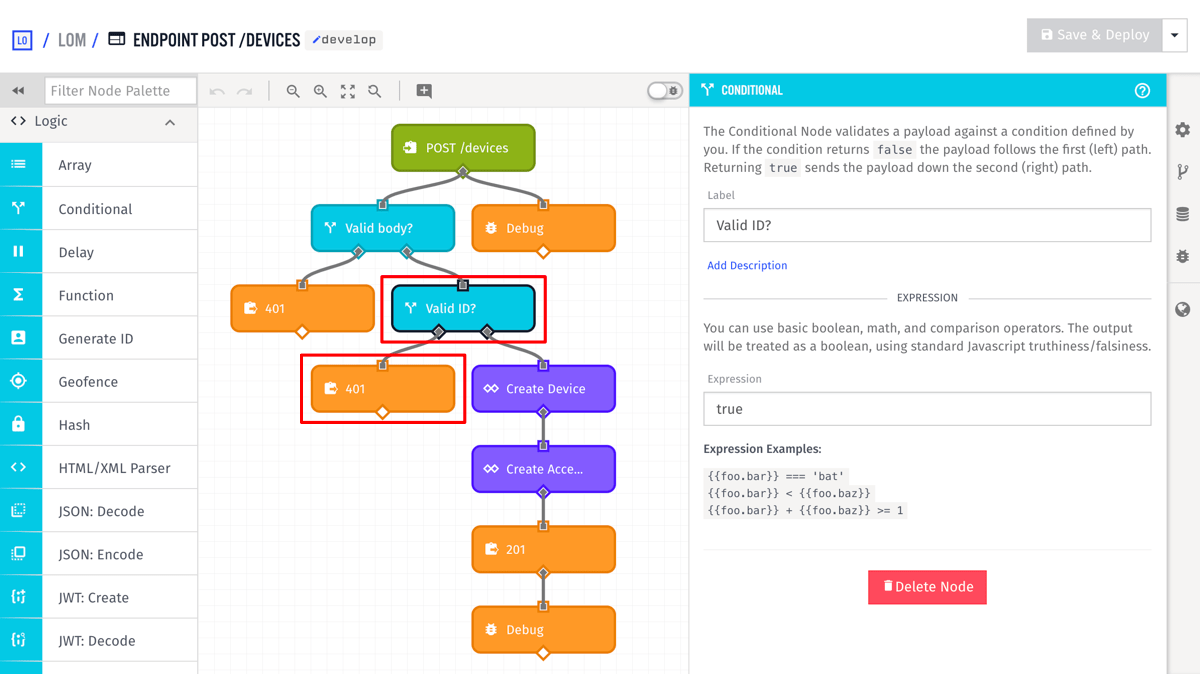
Since this check is so specific to each use-case, this workflow simply adds a representative conditional node that always returns true. In practice, this is the place you’d query some collection of valid IDs. What represents a valid ID is up to you. If the ID is invalid, the API returns a 400 (Bad Request) back to the user.
Step Five: Create a New Device
The next step is to use the Losant API node to create a new device.
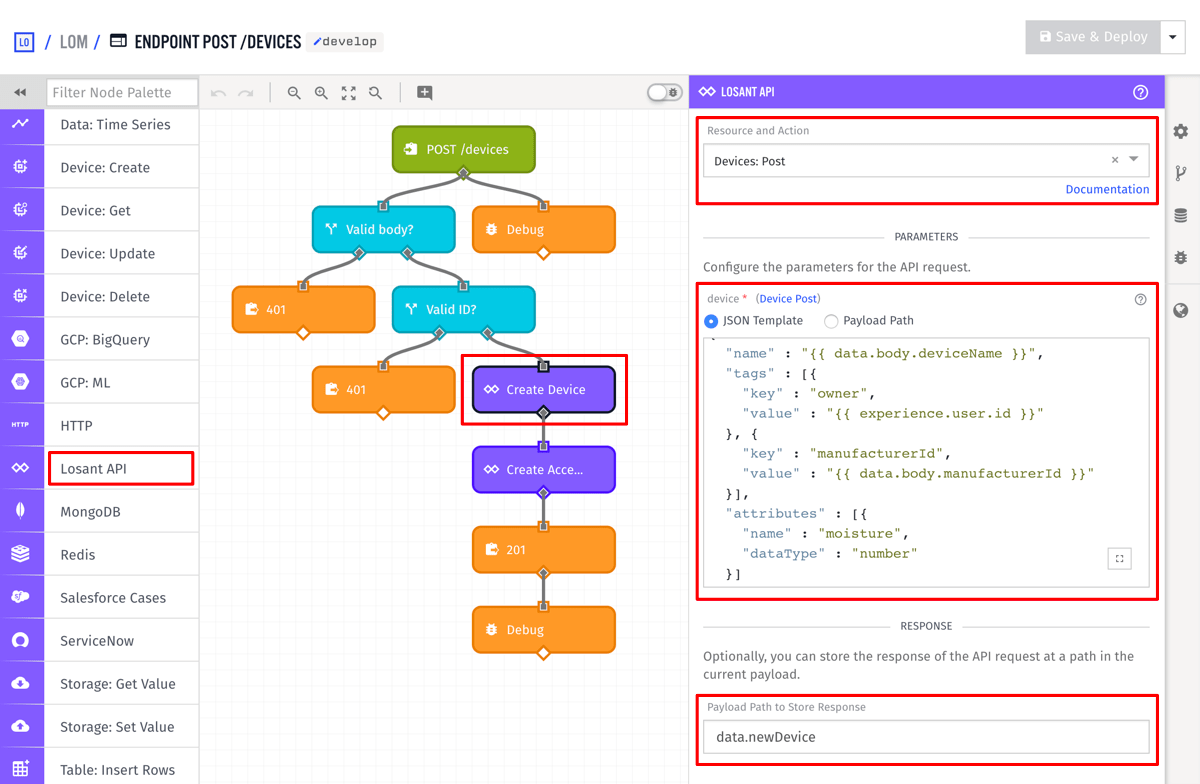
The Losant API node allows you to manage all resources within your Losant application. In this case, we’re using it to create a new Losant device.
- Set the
Resource and ActiontoDevices: POST.
Note: This Devices: POST is not your devices endpoint. This calls the devices endpoint for Losant’s API.
- Set the
deviceto the following:
{
  "name": "{{ data.body.deviceName }}",
  "tags": [
    {
      "key": "owner",
      "value": "{{ experience.user.id }}"
    },
    {
      "key": "manufacturerId",
      "value": "{{ data.body.manufacturerId }}"
    }
  ],
  "attributes": [
    {
      "name": "moisture",
      "dataType": "number"
    }
  ]
}
This object is what Losant expects when creating a new Device. The name field is set to {{ data.body.deviceName }}, which is what was passed into this endpoint as part of the POST body.
Device tags are used to organize devices and provide a way to easily query them from the Losant API. In this example, we’re setting two tags: “owner” and “manufacturerId.” By setting the “owner” tag, we can query the Losant API for all devices owned by this user, which we’ll see in part 4 of this walkthrough. Losant automatically adds the Experience User to the payload on every authenticated request, which is why the current user ID can be obtained at experience.user.id.
The “manufacturerId” tag is not used in this guide, but but it can be used to map the device back to the underlying ID at a later time.
Attributes describe what kind of data this device reports. For lōm, each device reports its moisture as a number.
Set the Payload Path to Store Response to data.newDevice. This puts the result of this Losant API request back onto the payload at this location. The result is the newly created device object.
Step Six: Create an Access Key
Now that we have a device, we can use another Losant API node to create an access key for it.
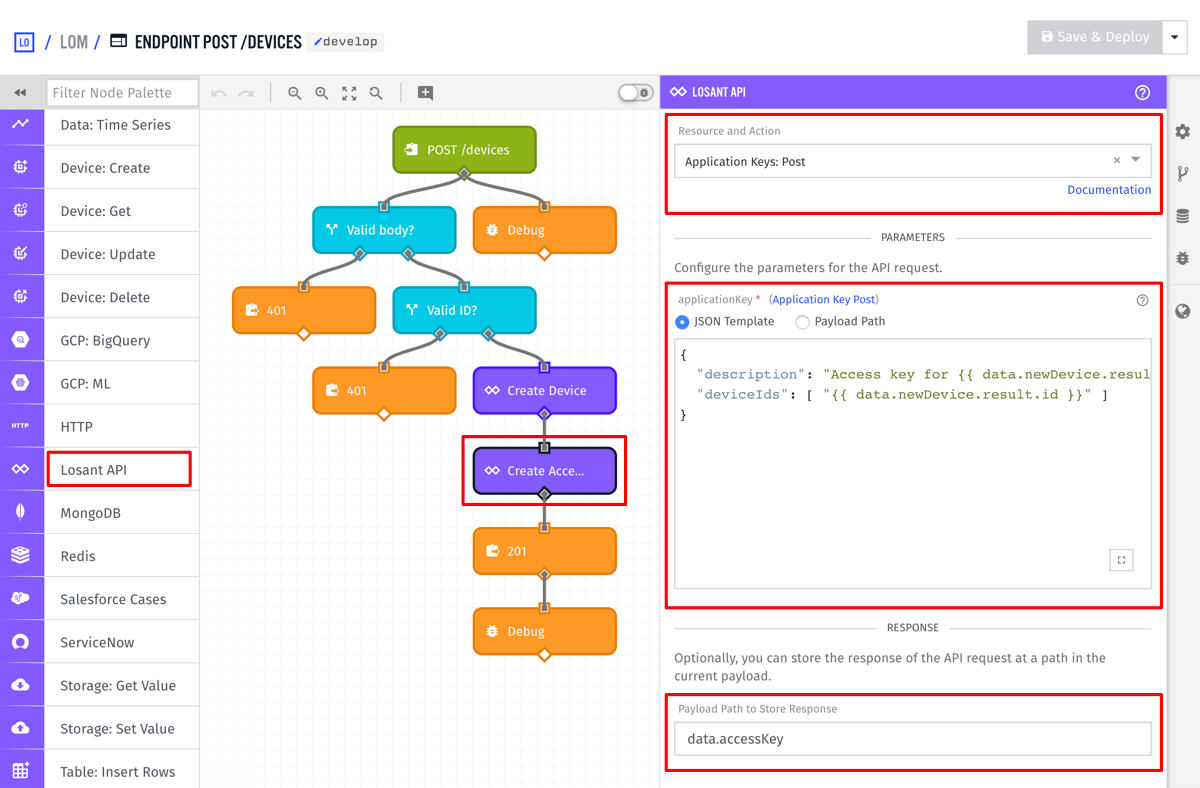
Access Keys allow devices to authenticate against the Losant MQTT broker or REST interface to report state or receive commands.
- Set the
Resource and ActiontoApplication Keys: POST, which creates a new access key within your Losant application. - Set the
applicationKeyto the following:
{
  "description": "Access key for {{ data.newDevice.result.id }}",
  "deviceIds": ["{{ data.newDevice.result.id }}"]
}
This creates an access key that’s only valid for the device we created in the previous node.
- Set the
Payload Path to Store Responsetodata.accessKey, which puts the result of this Losant API request back onto the payload. This includes the access key and secret that we need to send back in the endpoint reply.
Step Seven: Reply to the Request
The final step is to reply to the request with the newly created device ID, the access key, and the access secret.
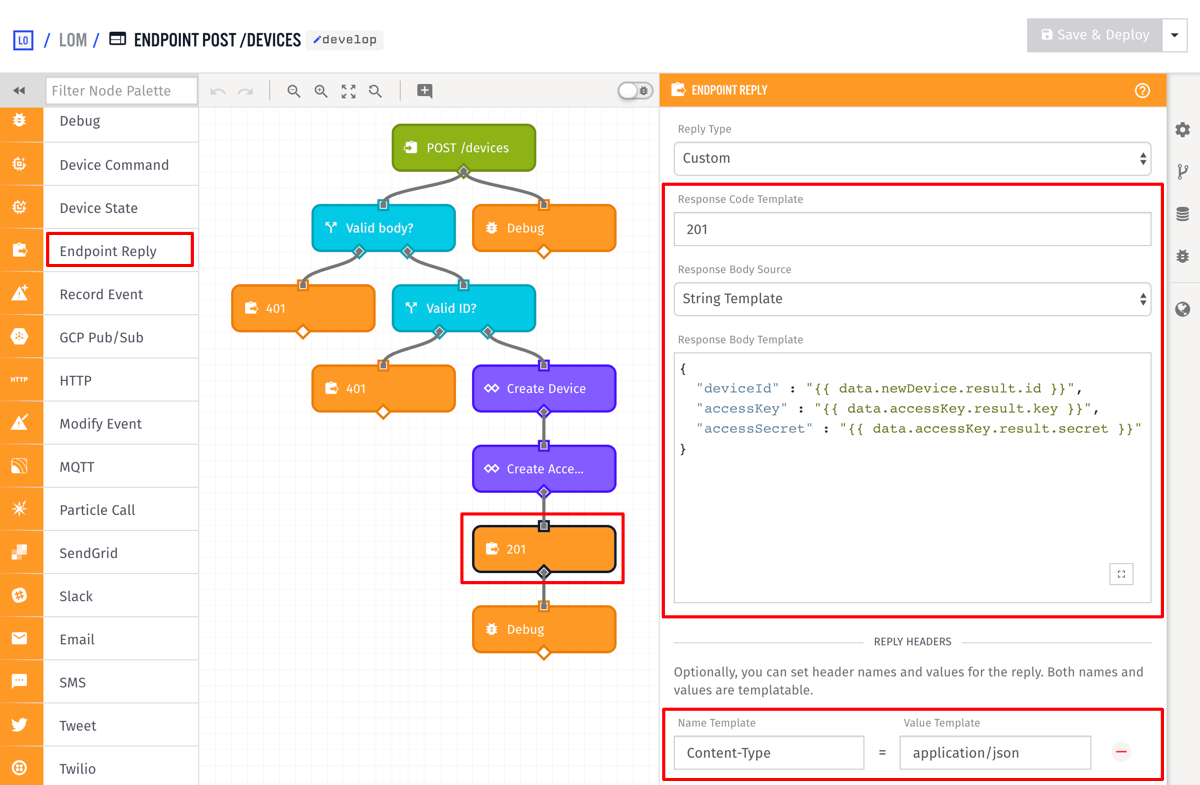
- Set the
Response Code Templateto201, which is the HTTP status code forCreated. - Set the
Response Body Templateto the following:
{
  "deviceId": "{{ data.newDevice.result.id }}",
  "accessKey": "{{ data.accessKey.result.key }}",
  "accessSecret": "{{ data.accessKey.result.secret }}"
}- Add a
Content-Typeheader and set the value toapplication/json.
We can now test this endpoint and see that it successfully creates a device and access key.
curl -H "Content-Type: application/json" \
  -H "Authorization: Bearer USER_TOKEN" \
  -X POST \
  -d '{"deviceName":"My Awesome Plant","manufacturerId":"000000"}' \
  https://example.onlosant.com/devices
{
"deviceId": "new-device-id",
"accessKey": "new-access-key",
"accessSecret": "new-access-secret"
}With this information, the lōm device can now form a secure connection to the Losant MQTT broker and begin publishing its sensor data.
If you navigate to your Losant application’s device list, you’ll also see the new device with the attributes and tags properly configured.
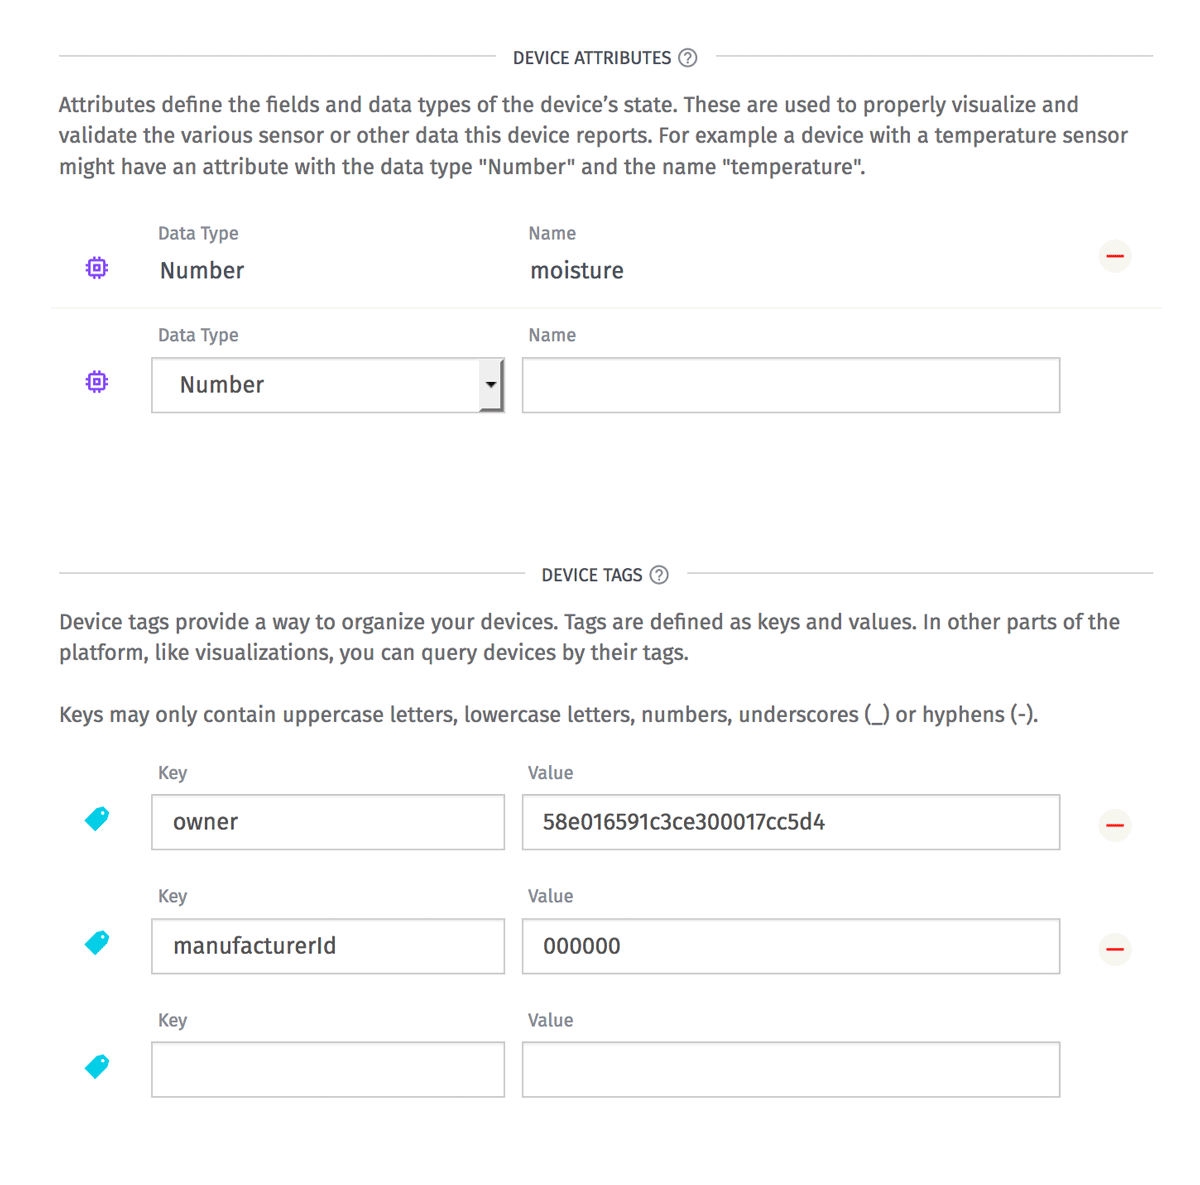
This concludes part 3 of the Experiences walkthrough. At this point the lōm app now has all of the API endpoints required to sign up users, log in, and register new devices. In Part 4: Viewing Device Data, we’ll cover how to access device data in order to display it back to the user.
Was this page helpful?
Still looking for help? You can also search the Losant Forums or submit your question there.
